spring-boot-starter-security
来源:互联网 发布:centos7下安装mysql 编辑:程序博客网 时间:2024/04/19 12:47
http://www.cnblogs.com/softidea/p/5991897.html点击打开链接
http://www.jianshu.com/p/daca18a8f84c点击打开链接
https://segmentfault.com/a/1190000004309242点击打开链接
if语句中条件判断就是检查当前的url请求是否是logout-url的配置值,接下来,获取用户的authentication,并循环调用处理器链中各个处理器的logout()函数,前面在parse阶段说过,处理器链中有两个实例,处理会话的SecurityContextLogoutHandler及remember-me服务,我们来一一看看它们的logout函数实现:
2.1.0 SecurityContextLogoutHandler

public void logout(HttpServletRequest request, HttpServletResponse response, Authentication authentication){ Assert.notNull(request, "HttpServletRequest required"); if (this.invalidateHttpSession) { HttpSession session = request.getSession(false); if (session != null) { session.invalidate(); //使当前会话失效 } } SecurityContextHolder.clearContext(); //清空安全上下文}
很简单,如果配置了登出以后使会话失效,则它调用session的invalidate()让会话过期,另外,清空安全上下文。
Spring Security
Spring Security是Spring社区的一个顶级项目,也是Spring Boot官方推荐使用的Security框架。除了常规的Authentication和Authorization之外,Spring Security还提供了诸如ACLs,LDAP,JAAS,CAS等高级特性以满足复杂场景下的安全需求。虽然功能强大,Spring Security的配置并不算复杂(得益于官方详尽的文档),尤其在3.2版本加入Java Configuration的支持之后,可以彻底告别令不少初学者望而却步的XML Configuration。在使用层面,Spring Security提供了多种方式进行业务集成,包括注解,Servlet API,JSP Tag,系统API等。下面就结合一些示例代码介绍Boot应用中集成Spring Security的几个关键点。
1核心概念
Principle(User), Authority(Role)和Permission是Spring Security的3个核心概念。
跟通常理解上Role和Permission之间一对多的关系不同,在Spring Security中,Authority和Permission是两个完全独立的概念,两者并没有必然的联系,但可以通过配置进行关联。
应用级别的安全主要分为“验证( authentication) ”和“(授权) authorization ”两个部分。
这也是Spring Security主要需要处理的两个部分:
在Spring Security中,认证过程称之为Authentication(验证),指的是建立系统使用者信息( principal )的过程。使用者可以是一个用户、设备、或者其他可以在我们的应用中执行某种操作的其他系统。
" Authorization "指的是判断某个 principal 在我们的应用是否允许执行某个操作。在 进行授权判断之前,要求其所要使用到的规则必须在验证过程中已经建立好了。
这些概念是通用的,并不是只针对"Spring Security"。
关于Authentication:
Spring Security中的验证authentication 到底是什么?
让我们考虑一个每个人都熟悉的标准验证场景:
1、一个用户被提示使用用户名和密码登录
2、系统成功的验证了用户名与密码是匹配的
3、获取到用户的上下文信息(角色列表等)
4、建立这个用户的安全上下文(security context )
5、用户可能继续进行一些受到访问控制机制保护的操作,访问控制机制会依据当前安全上下文信息检查这个操作所需的权限。
前三条组成了验证过程,因此我们要看一下在Spring Security中这是如何发生的:
1、用户名和密码被获取到,并放入一个 UsernamePasswordAuthenticationToken 实例中( Authentication接口的一个实例,我们之前已经看到过)。
2、这个token被传递到一个 AuthenticationManager 实例中进行验证
3、在成功验证后, AuthenticationManager返回一个所有字段都被赋值的 Authentication 对象实例
4、通过调用 SecurityContextHolder.getContext().setAuthentication(…)创建安全上下文,通过返回的验证对象进行传递。
从这个角度来说,用户被认为已经成功验证。让我们来看一段样例代码:
import org.springframework.security.authentication.AuthenticationManager;import org.springframework.security.authentication.BadCredentialsException;import org.springframework.security.authentication.UsernamePasswordAuthenticationToken;import org.springframework.security.core.Authentication;import org.springframework.security.core.AuthenticationException;import org.springframework.security.core.GrantedAuthority;import org.springframework.security.core.authority.SimpleGrantedAuthority;import org.springframework.security.core.context.SecurityContextHolder;import java.io.BufferedReader;import java.io.InputStreamReader;import java.util.ArrayList;import java.util.List;public class AuthenticationExample { private static AuthenticationManager authenticationManager = new SampleAuthenticationManager(); public static void main(String[] args) throws Exception { BufferedReader in = new BufferedReader(new InputStreamReader(System.in)); while (true) { System.out.println("Please enter your username:"); String name = in.readLine(); System.out.println("Please enter your password:"); String password = in.readLine(); try { Authentication request = new UsernamePasswordAuthenticationToken(name, password); System.out.println("before:" + request); Authentication result = authenticationManager.authenticate(request); System.out.println("after:" + result); SecurityContextHolder.getContext().setAuthentication(result); break; } catch (AuthenticationException e) { System.out.println("Authentication failed: " + e.getMessage()); } } System.out.println("Successfully authenticated. Security context contains: " + SecurityContextHolder.getContext().getAuthentication()); }}class SampleAuthenticationManager implements AuthenticationManager { private static final List<GrantedAuthority> AUTHORITIES = new ArrayList<>(); static { AUTHORITIES.add(new SimpleGrantedAuthority("ROLE_USER")); } public Authentication authenticate(Authentication auth) throws AuthenticationException { if (auth.getName().equals(auth.getCredentials())) { return new UsernamePasswordAuthenticationToken(auth.getName(), auth.getCredentials(), AUTHORITIES); } throw new BadCredentialsException("Bad Credentials"); }}
这里我们编写了一个小程序,要求用户输入用户名和密码并执行以上的验证流程。我们这里实现的 AuthenticationManager 将会任何用户输入的用户名和密码是否相同。为了每个用户分配一个单独的角色。上面代码输出将会类似以下:
Please enter your username:123Please enter your password:345before:org.springframework.security.authentication.UsernamePasswordAuthenticationToken@7bd9: Principal: 123; Credentials: [PROTECTED]; Authenticated: false; Details: null; Not granted any authoritiesAuthentication failed: Bad CredentialsPlease enter your username:123Please enter your password:123before:org.springframework.security.authentication.UsernamePasswordAuthenticationToken@1f: Principal: 123; Credentials: [PROTECTED]; Authenticated: false; Details: null; Not granted any authoritiesafter:org.springframework.security.authentication.UsernamePasswordAuthenticationToken@441d0230: Principal: 123; Credentials: [PROTECTED]; Authenticated: true; Details: null; Granted Authorities: ROLE_USERSuccessfully authenticated. Security context contains: org.springframework.security.authentication.UsernamePasswordAuthenticationToken@441d0230: Principal: 123; Credentials: [PROTECTED]; Authenticated: true; Details: null; Granted Authorities: ROLE_USER
注意你不需要编写这样的代码。这个过程通常情况下会在内部发生,例如在一个web验证的过滤器中。我们在这里介绍这段代码仅仅是为了展示在Spring Security中构建验证过程是非常简单的。用户在 SecurityContextHolder 包含了一个完全赋值的 Authentication d的时候被验证。
直接设置SecurityContextHolder中的内容
事实上,Spring Security并不关心你如何将 Authentication 对象放入 SecurityContextHolder中。
唯一的关键要求是在 AbstractSecurityInterceptor 验证一个用户请求之前确保 SecurityContextHolder 包含一个用于表示principal的 Authentication 对象。
你可以(许多用户都这样做)编写自己的Filter或者MVC controller,来提供与那些不是基于Spring Security的验证系统的互操作能力。
例如,你可能会使用容器管理的验证机制,通过ThreadLocal或者JNDI地址来使当前用户可用。或者你可能在为一个有着遗留验证系统的公司工作。
在这类场景下,很容易可以让Spring Security工作,并且仍然提供验证能力。
所有你需要做的是编写一个过滤器,从某个位置读取第三方用户信息,构建一个特定的Spring Security Authentication 对象,并将其放入 SecurityContextHolder中。在这种情况下,你需要考虑在内置的验证基础结构上自动应用这些。
例如,你可能需要在返回给客户端响应之前,预先创建一个Http Session对象来为不同线程缓存安全上下文。
5.3 在web应用中进行验证
现在让我们来探索当你在一个web应用中使用Spring Security的情形(不使用web.xml配置安全)。这时一个用户如何被验证以及安全上下文如何被建立?
考虑一个传统的web应用中的验证过程:
1、你访问主页,并且点击一个链接
2、一个请求被发送给服务器,服务器判断你是否在请求一个受保护的资源
3、如果你当前没有经过验证,服务器返回一个响应表明你必须要进行验证。响应可以是通过HTTP响应码或者直接重定向到一个特定的网页。
4、根据验证机制,你的浏览器可能会重定向到一个特定的网页以至于你可以填写表单,或者浏览器会检索你的身份(通过一个基础验证对话框,一个cookie或者X.509证书,等等)。
5、浏览器给服务器回复一个响应。这可能是一个包含你填充好的表单内容的HTTP POST请求,或者一个包含你的验证信息的HTTP请求头。
6、下一步服务器会判断当前的验证信息是否是正确的。如果是,可以继续下一步。如果不是,通常你的浏览器会被要求重试(因此你又回到了上两步)。
7、你的原始的验证过程的请求将会被重试。希望你验证后能被赋予足够的权限来访问受保护的资源。如果是,请求将会成功,否则,你将会获得一个403 HTTP响应码,表示"禁止"。
对于以上提到的大部分步骤,Spring Security都有不同的类来负责。
主要的参与者(按照使用的顺序)是 ExceptionTranslationFilter, AuthenticationEntryPoint 和验证机制,负责调用我们之前提到的 AuthenticationManager。
ExceptionTranslationFilter
ExceptionTranslationFilter是一个Spring Security的过滤器,负责检测任何Spring Security抛出的异常。这些异常通常是通过一个 AbstractSecurityInterceptor抛出,这是验证服务的一个主要提供者。我们将会在下一节讨论 AbstractSecurityInterceptor ,但是现在我们仅仅需要知道其是用于产生Java异常,并不知道HTTP或者如何验证一个principal。
取而代之的是 ExceptionTranslationFilter 来提供这个服务,负责返回403错误码(如果principal已经被验证并且缺乏足够的访问权限-上面的第七步)
或者
启动一个 AuthenticationEntryPoint (如果principal没有被验证,我们需要进行上面的第三步)。
AuthenticationEntryPoint
AuthenticationEntryPoint 负责上述列表的第三步。你可以想象,每一个web应用会有一个默认的验证策略(在Spring Security中,这可以像其他内容一样进行配置,但是现在我们需要继续保持简单)。
每个验证系统会有自己的 AuthenticationEntryPoint 实现,这将会执行第三步中描述的步骤。
验证机制
一旦你的浏览器提交了你的验证凭证(不论是HTTP表单提交或者HTTP请求头),服务器端就需要一些机制来收集这些验证信息。到目前我们已经到了第六步。
在Spring Security中对于从用户代理(通常是一个web浏览器)收集验证信息的功能,我们有一个特殊的名字来描述,称之为" authentication mechanism"(验证机制)。
一旦从用户代理(浏览器)中收集到验证信息,一个验证请求对象会被创建,之后传递给 AuthenticationManager。
在验证机制接收到被完全赋值后的 Authentication 对象后,如果确定请求可以执行,会将 Authentication 放到 SecurityContextHolder中,并引起原始的请求被重试(上述第七步)。如果 AuthenticationManager 拒绝了请求,验证机制将会要求用户代理(浏览器)重试(上述第二步)。
在不同的请求中存储SecurityContext
根据应用的类型,可能需要有一个策略在不同的用户请求中来存储安全上下文。在一个传统的web应用中,一个用户被记录并在接下来的过程中通过session id进行区分。服务器在session中缓存principal的信息。在Spring Security中,存储 SecurityContext 的责任交由SecurityContextPersistenceFilter负责,默认情况下会将安全上下文当做 HttpSession的一个属性存储。对于每一次请求,会重新存储安全上下文到 SecurityContextHolder 中,在请求完成时清空 SecurityContextHolder 。你不应该出于安全的目的而直接与 HttpSession 交互,而是总是应该使用 SecurityContextHolder 代替。
很多其他类型的应用(例如无状态的RESTFul web服务)并不使用Http Session,并且会重新验证每一个请求。但是,在过滤器链中包含 SecurityContextPersistenceFilter 依然很重要,这可以确保每次请求后 SecurityContextHolder 被清空。
提示:在一个单独的session中接受并发请求的应用中,同一个 SecurityContext 实例将会在线程间共享。即使一个 ThreadLocal 被使用,也是为每一个线程从 HttpSession 中获取同一个 SecurityContext 实例。如果你希望一个线程在运行时临时改变安全上下文,这是一个提示。如果你仅仅使用 SecurityContextHolder.getContext(),并且在返回的安全上下文对象上调用 setAuthentication(anAuthentication),所有共享同一个 SecurityContext 实例的多个并发线程中的 Authentication 对象都会改变。你可以自定义 SecurityContextPersistenceFilter 的行为来为每个请求创建一个全新的 SecurityContext,从而阻止在一个线程中的改变影响到其他线程。作为替选方案,你也可以在需要临时改变安全上下的时候来创建一个新的实例。
SecurityContextHolder.createEmptyContext()方法总是返回一个新的安全上下文实例。
5.4 Spring Security中的访问控制(授权)
Spring Security中负责做出访问控制决定的主要接口是 AccessDecisionManager,其有一个 decide 方法,接受一个描述principal的 Authentication 对象,一个“security object”(见下文)和一个应用于这个对象的安全元数据属性列表(例如访问一个资源必须被授予的角色列表)。
Secuirty和AOP Advice
如果你对AOP的概念熟悉,你可能知道有不同类型的advice可以使用:before、after、throws和around。around advice非常有用,因为一个advisor可以选择是否执行一个方法调用,是否修改返回结果,以及是否抛出一个异常。
Spring Security对于web请求和方法调用都提供了一个around advice。我们可以使用Spring 标准的AOP支持来获取一个方法的调用的around advice,也可以通过一个标准的过滤器来获得web请求的around advice。
对于那些不熟悉AOP的用户,理解这些的核心在于知道Spring Security可以帮助你像保护web请求一样来保护方法调用。
大部分用户对于保护业务层的方法调用感兴趣。这是因为在当前的JAVA EE开发中,服务层包含了大部分的业务逻辑代码。
如果你需要保护服务层的方法调用,Spring 标准的AOP是合适的选择。如果你想直接保护域对象,你会发现AspectJ是值得考虑的。
你可以选择使用AspectJ或者Spring AOP来执行方法授权,或者你可以选择使用过滤器来进行web请求授权。
你可以联合使用0、1、2或者3种方式。
主流的用法是执行一些web请求授权,并且在服务层联合Spring AOP方法调用授权。
6 核心服务(Core Services)
现在我们已经在较高的层面对SpringSecuirty的架构和核心类有所了解,现在我们来仔细的查看一到两个其核心接口的实现,特别是AuthenticationManager、UserDetailsService 和AccessDecisionManager。这三个接口会贯穿我们后面文档中的所有内容,因此掌握他们是如何配置以及使用是非常重要的。
6.1 AuthenticationManager, ProviderManager 与AuthenticationProvider
AuthenticationManager 仅仅是一个接口,所以我们可以任意的选择器实现,但是在实际过程中其是如何工作的呢?如果我们的验证信息位于多个数据库实例或者我们想联合多个使用多个验证服务,例如同时使用JDBC认证和LDAP认证,我们需要做什么呢?
在Spring Secuirty中,AuthenticationManager 默认的实现类是ProviderManager ,ProviderManager 并不是自己直接对请求进行验证,而是将其委派给一个AuthenticationProvider 列表。列表中的每一个AuthenticationProvider 将会被依次查询其是否需要通过其进行验证。每个provider的验证结果只有两个情况:抛出一个异常或者完全填充一个Authentication 对象的所有属性。你是否还记得我们的好朋友UserDetails和UserDetailsService?如果已经不记得了,请返回之前的章节重新阅读来刷新的你的记忆。验证一个请求最常见的方式是加载对应的UserDetails 来检查用户输入的密码与其是否匹配。DaoAuthenticationProvider 使用的就是这种方式(见下文)。被加载的UserDetails 对象(包含了GrantedAuthority s),在认证成功后,将会被用于填充的Authentication 对象,并且存储在SecurityContext中。
如果你使用基于命名空间的配置,将会框架内部自动创建并维护一个ProviderManager 对象,你可以在命名空间的authentication provider元素中往ProviderManager对象中添加provider。在这种情下,你不必在application context中声明一个ProviderManager Bean。但是如果你没有使用命名空间,你应该使用类似以下的方式进行声明:
<bean id="authenticationManager" class="org.springframework.security.authentication.ProviderManager"> <constructor-arg> <list> <ref local="daoAuthenticationProvider"/> <ref local="anonymousAuthenticationProvider"/> <ref local="ldapAuthenticationProvider"/> </list> </constructor-arg></bean>
在上面这个案例中,我们有三个provider,他们将会被按顺序进行尝试(内部使用了一个List),每个provider都可以尝试进行认证,或者简单的通过返回null来跳过认证。如果所有的provider都返回了null,ProviderManager 将会抛出一个ProviderNotFoundException异常。如果你对联合使用多个provider感兴趣,请参考ProviderManager 的javaDoc。
类似于表单登录的处理过滤器这样的验证机制,会以引用的形式注入到ProviderManager 中,从而调用其来对请求进行验证。使用这样的验证机制,我们的provider有时是可以相互替代的。例如DaoAuthenticationProvider 和LdapAuthenticationProvider 对于任何通过用户名/密码形式提交验证请求的这样的验证机制都是可以使用的(如基于表单的登录和Http基础验证)。另一方面,某些验证机制创建的验证请求只能由特定的AuthenticationProvider处理,例如JA-SIG CAS,其使用了服务ticket的概念,因此只能通过CasAuthenticationProvider验证。你不需要要过多的考虑这些内容,因为如果你忘记了注册一个合适的provider,你仅仅是会收到一个验证失败的时的ProviderNotFoundException 。
成功认证后删除验证信息
从Spring Security 3.1之后,在请求认证成功后ProviderManager 将会删除Authentication 中的认证信息,这可以阻止一些敏感信息例如密码在不需要的时候还长时间保留。
这可能会导致一些问题,例如你希望通过缓存user对象来提高一个无状态应用的性能。如果Authentication对象包含了位于缓存中的并且移除了认证信息的对象(例如UserDetails )的引用,那么就无法再继续使用缓存的对象来进行验证。在你使用缓存的时候,你需要考虑这个因素。一个显而易见的解决方案是,无论是在AuthenticationProvider 还是在缓存的实现中,在创建Authentication 对象的时候,将这个对象拷贝一份。或者你也可以禁用ProviderManager的eraseCredentialsAfterAuthentication属性。
DaoAuthenticationProvider
Spring Security提供了一个AuthenticationProvider 的简单实现DaoAuthenticationProvider,这也是框架最早支持的provider。它使用了一个UserDetailsService 来查询用户名、密码和GrantedAuthority 。其简单的通过比较封装了用户的密码信息的UsernamePasswordAuthenticationToken和通过UserDetailsService查询出来的用户的密码是否相同来验证用户。对于这个provider的配置非常简单。
<bean id="daoAuthenticationProvider" class="org.springframework.security.authentication.dao.DaoAuthenticationProvider"> <property name="userDetailsService" ref="inMemoryDaoImpl"/> <property name="passwordEncoder" ref="passwordEncoder"/></bean>
PasswordEncoder 是可选的。PasswordEncoder 提供了对通过UserDetailsService查询返回的UserDetails 对象中的密码进行编码和解码的功能,更多的细节将在后面讲解。
像本教程之前提到的一样,大部分验证provider都利用了UserDetails 和UserDetailsService 接口。回顾一下UserDetailsService 中只定义了一个方法:
UserDetails loadUserByUsername(String username) throws UsernameNotFoundException;
返回的UserDetails 也是一个接口,其只提供了getters方法来保证用户的验证信息例如用户名、密码和被授予的权利等不会因为用户账号的禁用或者启用而被置为空。大部分验证提供者都会使用UserDetailsService,即使username和password在验证过程中不需要使用到。他们也可能只使用UserDetails 对象中GrantedAuthority 信息。因为一些其他的系统(例如 LDAP or X.509 or CAS)接管了验证用户信息的责任。
在验证(Authentication )层面, Spring Security 提供了不同的验证模型。
大部分的authentication模型来自于第三方或者权威机构或者由一些相关的标准制定组织(如IETF)开发。
此外,Spring Security也提供了一些验证特性。
特别的,Spring Security目前支持对以下所有验证方式的整合:
HTTP BASIC authentication headers (an IETF RFC-based standard)HTTP Digest authentication headers (an IETF RFC-based standard)HTTP X.509 client certificate exchange (an IETF RFC-based standard)LDAP (a very common approach to cross-platform authentication needs, especially in large environments)Form-based authentication (for simple user interface needs)OpenID authenticationAuthentication based on pre-established request headers (such as Computer Associates Siteminder)JA-SIG Central Authentication Service (otherwise known as CAS, which is a popular open source single sign-on system)Transparent authentication context propagation for Remote Method Invocation (RMI) and HttpInvoker (a Spring remoting protocol)Automatic "remember-me" authentication (so you can tick a box to avoid re-authentication for a predetermined period of time)Anonymous authentication (allowing every unauthenticated call to automatically assume a particular security identity)Run-as authentication (which is useful if one call should proceed with a different security identity)Java Authentication and Authorization Service (JAAS)JEE container autentication (so you can still use Container Managed Authentication if desired)KerberosJava Open Source Single Sign On (JOSSO) *OpenNMS Network Management Platform *AppFuse *AndroMDA *Mule ESB *Direct Web Request (DWR) *Grails *Tapestry *JTrac *Jasypt *Roller *Elastic Path *Atlassian Crowd *Your own authentication systems (see below)
注:*号标记的部分由第三方提供。
很多独立软件厂家(ISV)接受 Spring Security 的原因就是可以灵活的选择验证模型。这样无论客户的需求是什么,他们都可以快速的整合进自己的解决方案,不需要进行太多额外的研究或者要求客户改变他们的运行环境。如果上述验证模型都不能满足我们的需求,由于Spring Security是一个开放的平台,我们也可以很容易的就编写出自己的验证机制。
许多Spring Security的 企业用户需要将一些并不遵循任何安全标准的"遗留"系统中整合进安全特性,Spring Security很适合用来处理这类系统。
除了验证机制, Spring Security 也提供了一系列的授权能力。主要感兴趣的是以下三个方面:
1、对web请求进行授权
2、授权某个方法是否可以被调用
3、授权访问单个领域对象实例
为了理解其中的不同,考虑一下Servlet规范web模式安全中的授权能力、EJB容器管理的安全、文件系统安全。SpringSecurity对于这些重要的方面提供了深入的支持
将以上代码部署到Tomcat中运行,通过浏览器访问任何页面都会被重新定位到一个登陆页面:
这个页面是Spring Security自动帮我们生成的。我们可以使用之前配置的用户名和密码进行登录。
自动生成这个页面的代码位于类DefaultLoginPageGeneratingFilter的generateLoginPageHtml方法中。
Spring Security如何知道我们希望所有的用户都被验证呢?
Spring Security是怎么知道我们希望支持表单形式的验证呢?
原因是我们的SecurityConfig类继承了WebSecurityConfigurerAdapter,而其在 configure(HttpSecurity http)中提供了一些默认的配置。
默认的配置如下:
protected void configure(HttpSecurity http) throws Exception { logger.debug("Using default configure(HttpSecurity). If subclassed this will potentially override subclass configure(HttpSecurity)."); http .authorizeRequests() .anyRequest().authenticated() .and() .formLogin().and() .httpBasic(); }
上面的默认配置的作用:
* 要求访问应用的所有用户都要被验证
* 允许所有用户可以通过表单进行验证
* 允许所有请求通过Http Basic 验证(译者注:关于什么是Http Basic验证,读者可以查看维基百科。)
你会发现,这个配置与以下xml格式的配置是类似的:
<http> <intercept-url pattern="/**" access="authenticated"/> <form-login /> <http-basic /></http>
Java配置中的and()方法类似于xml配置中的结束标签,and()方法返回的对象还是HttpSecurity,方便我们继续对HttpSecurity进行配置。
HTTP基本认证
在HTTP中,基本认证是一种用来允许Web浏览器或其他客户端程序在请求时提供用户名和口令形式的身份凭证的一种登录验证方式。
在发送之前是以用户名追加一个冒号然后串接上口令,并将得出的结果字符串再用Base64算法编码。
例如,提供的用户名是Aladdin、口令是open sesame,则拼接后的结果就是Aladdin:open sesame,然后再将其用Base64编码,得到QWxhZGRpbjpvcGVuIHNlc2FtZQ==。
最终将Base64编码的字符串发送出去,由接收者解码得到一个由冒号分隔的用户名和口令的字符串。
虽然对用户名和口令的Base64算法编码结果很难用肉眼识别解码,但它仍可以极为轻松地被计算机所解码,就像其容易编码一样。
编码这一步骤的目的并不是安全与隐私,而是为将用户名和口令中的不兼容的字符转换为均与HTTP协议兼容的字符集。
总的来说:
HttpSecurity是SecurityBuilder接口的一个实现类,从名字上我们就可以看出这是一个HTTP安全相关的构建器。当然我们在构建的时候可能需要一些配置,当我们调用HttpSecurity对象的方法时,实际上就是在进行配置。
例如在默认的安全配置中authorizeRequests(),formLogin()、httpBasic()这三个方法返回的分别是ExpressionUrlAuthorizationConfigurer、FormLoginConfigurer、HttpBasicConfigurer,他们都是SecurityConfigurer接口的实现类,分别代表的是不同类型的安全配置器。
因此,从总的流程上来说,当我们在进行配置的时候,需要一个安全构建器SecurityBuilder(例如我们这里的HttpSecurity),SecurityBuilder实例的创建需要有若干安全配置器SecurityConfigurer实例的配合。
配置的最终结果是什么?启用指定的Filter并完成相关配置
基本上每个SecurityConfigurer子类都对应一个或多个过滤器。
我们分别查看ExpressionUrlAuthorizationConfigurer、FormLoginConfigurer、HttpBasicConfigurer三个类的JavaDoc:
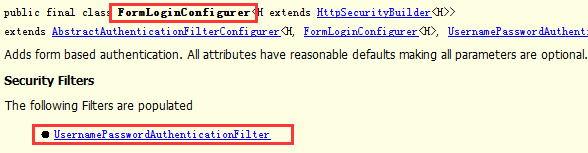
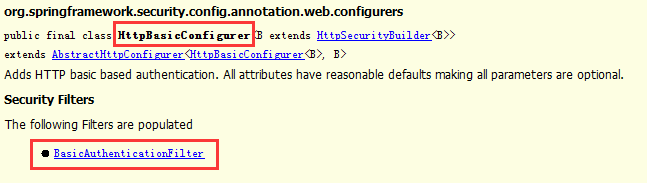
可见ExpressionUrlAuthorizationConfigurer、FormLoginConfigurer、HttpBasicConfigurer三个配置器对应的Filter分别是FilterSecurityInterceptor、UsernamePasswordAuthenticationFilter、BasicAuthenticationFilter。
而HttpSecuirty内部维护了一个Filter的List集合,我们添加的各种安全配置器对应的Filter最终都会被加入到这个List集合中。
从更高的层面来说,SecurityBuilder和SecurityConfigurer实现类都有很多。
SecurityBuilder的类图
SecurityConfigurer的类图
由于SecurityConfigurer的类图过于复杂,以下只列目前我们已经接触到的几个(红色圈标记)
虽然SecurityBuilder是需要使用到SecurityConfigurer,不过根据功能划分,一个SecurityBuilder只能支持部分的SecurityConfigurer,而不是所有。
例如对于HttpSecurity来说,其支持的SecurityConfigurer定义在HttpSecurity类的源码中: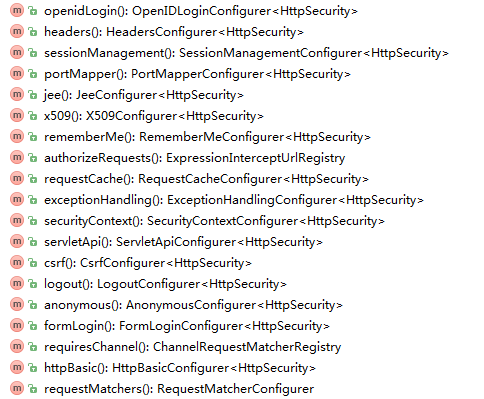
可以看到这些方法的返回类型都是XXXConfigurer,表示的是HttpSecurity这个SecurityBuilder支持的SecurityConfiguer。
对于其他的SecurityBuilder实现类也是类似,其支持的SecurityConfiguer都定义在自己的源码中。
前面我们已经提到,当我们在一个类上添加@EnableWebSecurity注解后,Spring Security会自动帮助我们创建一个名字为的springSecurityFilterChain过滤器。
这个过滤器实际上只是Spring Security框架验证请求的一个入口,到底如何验证请求实际上是要依赖于我们如何配置Spring Security。
我们以上面提到的WebSecurityConfigurerAdapter默认的configuer(HttpSecurity)方法进行说明。
配置的核心代码如下:
http.authorizeRequests() .anyRequest().authenticated() .and() .formLogin().and() .httpBasic();以and()方法作为切分,可以划分为3个部分,你可以认为每个部分实际上都是配置了一个过滤器。
首先我们来观察authorizeRequests(),formLogin()、httpBasic()三个方法的实现:
public final class HttpSecurity extends AbstractConfiguredSecurityBuilder<DefaultSecurityFilterChain, HttpSecurity> implements SecurityBuilder<DefaultSecurityFilterChain>, HttpSecurityBuilder<HttpSecurity>{ ... public ExpressionUrlAuthorizationConfigurer<HttpSecurity>.ExpressionInterceptUrlRegistry authorizeRequests() throws Exception { return getOrApply(new ExpressionUrlAuthorizationConfigurer<HttpSecurity>()) .getRegistry(); } public FormLoginConfigurer<HttpSecurity> formLogin() throws Exception { return getOrApply(new FormLoginConfigurer<HttpSecurity>()); } public HttpBasicConfigurer<HttpSecurity> httpBasic() throws Exception { return getOrApply(new HttpBasicConfigurer<HttpSecurity>()); } ...}
这三个方法最终返回的分别是ExpressionUrlAuthorizationConfigurer、FormLoginConfigurer、HttpBasicConfigurer。事实上,这都是SecurityConfigurerAdapter的子类,SecurityConfigurerAdapter是的SecurityConfigurer接口抽象子类。
而这3个方法内部又都调用了getOrApply方法:
private <C extends SecurityConfigurerAdapter<DefaultSecurityFilterChain, HttpSecurity>> C getOrApply( C configurer) throws Exception { C existingConfig = (C) getConfigurer(configurer.getClass()); if (existingConfig != null) { return existingConfig; } return apply(configurer); }
可以看到这段代码的主要作用就是在HttpSecurity对象中,添加一个基础验证过滤器BasicAuthenticationFilter。
这也验证我们我们之前的说法,可以认为通过and()分割后的每段配置,实际上都是在HttpSecuirty中添加一个过滤器。
当然并不是每个SecurityConfigurer都是通过这种方式来创建过滤器的,
例如FormLoginConfigurer就直接在构造方法中来创建一个类型为UsernamePasswordAuthenticationFilter的过滤器,
源码如下:
public FormLoginConfigurer() { super(new UsernamePasswordAuthenticationFilter(), null); usernameParameter("username"); passwordParameter("password");}
大多数情况下,我们可能会希望使用自己的登录页面。此时我们可以按照类似以下的方式配置:
protected void configure(HttpSecurity http) throws Exception { http .authorizeRequests() .anyRequest().authenticated() .and() .formLogin() .loginPage( "/login")// 1 如果没有此行指定,则会使用内置的登陆页面 .permitAll(); // 2 因为是自定义的URL,则需要指定认证要求 }
1、更新后的配置,指定了登录页面的位置
2、我们必须允许所有的用户,不管是否登录,都可以访问这个页面。 formLogin().permitAll()允许所有用户访问这个页面。
以下是一个JSP形式登录页面的实现:
<c:url value="/login" var="loginUrl"/><form action="${loginUrl}" method="post"> 1 <c:if test="${param.error != null}" > 2 <p> Invalid username and password. </p> </c:if> <c:if test="${param.logout != null}" > 3 <p> You have been logged out. </p> </c:if> <p> <label for="username" >Username</ label> <input type="text" id="username" name="username" /> 4 </p> <p> <label for="password" >Password</ label> <input type="password" id="password" name="password" /> 5 </p> <input type="hidden" 6 name="${_csrf.parameterName}" value="${_csrf.token}" /> <button type="submit" class="btn"> Log in</button ></form>
1、向/login URL发送post请求尝试验证用户
2、如果参数有错,验证失败
3、如果注销参数存在,用户成功注销
4、HTTP用户名参数必须以username命名
5、http密码参数必须以password命名
6、我们可以通过16.4节的"引入 csrf token"和跨站请求伪造章节查看更多的参考信息。
源码解读
在这里,SpringSecurity强制要求我们的表单登录页面必须是以POST方式向/login URL提交请求,而且要求用户名和密码的参数名必须是username和password。如果不符合,则不能正常工作。
原因在于,当我们调用了HttpSecurity对象的formLogin方法时,其最终会给我们注册一个过滤器UsernamePasswordAuthenticationFilter。
我们来看一下这个过滤器的源码:
public class UsernamePasswordAuthenticationFilter extends AbstractAuthenticationProcessingFilter { // ~ Static fields/initializers // ===================================================================================== public static final String SPRING_SECURITY_FORM_USERNAME_KEY = "username";//默认的用户名参数名 public static final String SPRING_SECURITY_FORM_PASSWORD_KEY = "password";//默认的密码参数名 private String usernameParameter = SPRING_SECURITY_FORM_USERNAME_KEY; private String passwordParameter = SPRING_SECURITY_FORM_PASSWORD_KEY; private boolean postOnly = true; // ~ Constructors // =================================================================================================== public UsernamePasswordAuthenticationFilter() { super(new AntPathRequestMatcher("/login", "POST"));//只对POST请求方式的/login进行拦截 } ... }
此时一切显得很明了,因为这个过滤器中强制指定了必须使用这些值。
当我们也可以有方式进行修改用户名和密码的参数名,如下:
....formLogin() .loginPage( "/login") .usernameParameter("uname")//自定义用户名参数名称 .passwordParameter("pwd")//自定义密码参数名称
不过由于POST方法请求/login这个URL,因为已经代码中写死,因此无法修改。
请求授权(Authorize Requests)
1、http.authorizeRequests()方法有很多子方法,每个子匹配器将会按照声明的顺序起作用。
2、指定用户可以访问的多个url模式。特别的,任何用户可以访问以"/resources"开头的url资源,或者等于"/signup"或about
3、任何以"/admin"开头的请求限制用户具有 "ROLE_ADMIN"角色。你可能已经注意的,尽管我们调用的hasRole方法,但是不用传入"ROLE_"前缀
4、任何以"/db"开头的请求同时要求用户具有"ROLE_ADMIN"和"ROLE_DBA"角色。
5、任何没有匹配上的其他的url请求,只需要用户被验证。
源码解读
在这个案例中我们调用了antMatchers方法来定义什么样的请求可以放过,什么样的请求需要验证。antMatchers使用的是Ant风格的路径匹配模式(在下一节我们会详细讲解)。
这个方法中定以在AbstractRequestMatcherRegistry中,我们查看一下这个方法的源码:
public C antMatchers(String... antPatterns) { return chainRequestMatchers(RequestMatchers.antMatchers(antPatterns));}
这个方法内部又调用了RequestMatchers对象的静态方法antMatchers方法,源码如下
public static List<RequestMatcher> antMatchers(HttpMethod httpMethod, String... antPatterns) { String method = httpMethod == null ? null : httpMethod.toString(); List<RequestMatcher> matchers = new ArrayList<RequestMatcher>(); for (String pattern : antPatterns) { matchers.add(new AntPathRequestMatcher(pattern, method)); } return matchers;}
可见最终返回的是一个RequestMatcher列表,事实上,SpringSecurity在工作过程中,就可以利用RequestMatcher对象来进行路径匹配了。
除了ANT风格的路径匹配模式,我们还可以使用基于正则表达式的路径匹配模式,对应的方法是regexMatchers(..)。
3.6 Ant Parttern语法
antMatcher使用的是ant风格的路径匹配模式。
Apache Ant样式的路径有三种通配符匹配方法(在下面的表格中列出)这些可以组合出很多种灵活的路径模式:
Ant风格路径匹配的通配符
Wildcard Description
? 匹配任何单字符
* 匹配0或者任意数量的字符,不包含"/"
** 匹配0或者更多的目录,包含"/"
ANT风格路径匹配案例
Path Description
/app/*.x 匹配(Matches)所有在app路径下的.x文件
/app/p?ttern 匹配(Matches) /app/pattern 和 /app/pXttern,但是不包括/app/pttern
/**/example 匹配(Matches) /app/example, /app/foo/example, 和 /example
/app/**/dir/file. 匹配(Matches) /app/dir/file.jsp, /app/foo/dir/file.html,/app/foo/bar/dir/file.pdf, 和 /app/dir/file.java
/**/*.jsp 匹配(Matches)任何的.jsp 文件
3.7 注销处理
当使用 WebSecurityConfigurerAdapter,注销功能将会被自动应用,也就是说,就算不写也有用。
默认情况下访问/logout将会将用户注销,包含的内容有:
1、使HttpSession失效
2、清空已配置的RememberMe验证
3、清空 SecurityContextHolder
4、重定向到 /login?success
类似于配置登录功能,你同样可以自定义自己的注销需求
protected void configure(HttpSecurity http) throws Exception { http .logout() 1 .logoutUrl("/my/logout") 2 .logoutSuccessUrl("/my/index") 3 .logoutSuccessHandler(logoutSuccessHandler) 4 .invalidateHttpSession(true) 5 .addLogoutHandler(logoutHandler) 6 .deleteCookies(cookieNamesToClear) 7 .and() ...}
1、提供注销支持,当使用 WebSecurityConfigurerAdapter时这将会被自动应用
2、触发注销操作的url,默认是/logout。如果开启了CSRF保护(默认开启),那么请求必须是POST方式。
3、注销操作发生后重定向到的url,默认为 /login?logout。
4、让你指定自定义的 LogoutSuccessHandler。如果指定了, logoutSuccessUrl() 将会被忽略。
5、指定在注销的时候是否销毁 HttpSession 。默认为True。
6、添加一个 LogoutHandler。默认情况下, SecurityContextLogoutHandler 被作为最后一个 LogoutHandler 。
7、允许指定当注销成功时要移除的cookie的名称。这是显式添加 CookieClearingLogoutHandler 的一种快捷处理方式。
一般情况下,为了自定义注销功能,你可以添加 LogoutHandler 或者 LogoutSuccessHandler 的实现。
对于很多场景,这些handler通过流式API的方式进行使用。
LogoutHandler
一般而言, LogoutHandler 的实现表示那些可以参与处理注销操作的类。它们被期望用于执行一些必要的清理操作。这些实现不应该抛出异常。默认提供了以下这些实现:
PersistentTokenBasedRememberMeServices
TokenBasedRememberMeServices
CookieClearingLogoutHandler
CsrfLogoutHandler
SecurityContextLogoutHandler
除了直接提供的 LogoutHandler 的实现,流式API同样为每个 LogoutHandler 提供了快捷方式的实现,
如 deleteCookies()允许指定一个或多个当注销成功时需要移除的cookie的名称,它是 CookieClearingLogoutHandler的快捷方式。
LogoutSuccessHandler
LogoutSuccessHandler 在 LogoutFilter成功执行之后被调用,来重定向或者转发到合适的目的地上,注意这个接口和 LogoutHandler 几乎一样,但是可以抛出异常。默认提供了以下实现:
SimpleUrlLogoutSuccessHandler
HttpStatusReturningLogoutSuccessHandler
正如上面提到的,你不需要直接的指定 SimpleUrlLogoutSuccessHandler 。流式API提供了一个快捷方法来 logoutSuccessUrl()代替。底层还是使用 SimpleUrlLogoutSuccessHandler 来实现。
当注销发生之后,会重定向到提供的URL上,默认是 /login?logout.。
在REST API的场景下,可能会对 HttpStatusReturningLogoutSuccessHandler 感兴趣。
当注销成功后,不是重定向到一个URL,这个 LogoutSuccessHandler 允许你提供一个纯文本的 HTTP 状态码来返回。如果没有配置,默认情况下返回的是200。
更多注销相关的文档参考
Logout Handling
Testing Logout
HttpServletRequest.logout()
Section 15.4, “Remember-Me Interfaces and Implementations”
Logging Out in section CSRF Caveats
Section Single Logout (CAS protocol)
Documentation for the logout element in the Spring Security XML Namespace section
3.9 多个HttpSecurity
我们可以配置多个 HttpSecurity 实例,就像我们可以在xml文件中配置多个 <http>一样。关键在于多次扩展 WebSecurityConfigurationAdapter。
例如,以下是一个对于以/api/开头的url的不同配置
@EnableWebSecuritypublic class MultiHttpSecurityConfig { @Autowired public void configureGlobal(AuthenticationManagerBuilder auth) { auth .inMemoryAuthentication() .withUser("user").password("password").roles("USER").and() .withUser("admin").password("password").roles("USER", "ADMIN"); } @Configuration @Order(1) public static class ApiWebSecurityConfigurationAdapter extends WebSecurityConfigurerAdapter { protected void configure(HttpSecurity http) throws Exception { http .antMatcher("/api/**") .authorizeRequests() .anyRequest().hasRole("ADMIN") .and() .httpBasic(); } } @Configuration public static class FormLoginWebSecurityConfigurerAdapter extends WebSecurityConfigurerAdapter { @Override protected void configure(HttpSecurity http) throws Exception { http .authorizeRequests() .anyRequest().authenticated() .and() .formLogin(); } }}
1、按照正常的方式配置验证
2、创建一个包含 @Order的 WebSecurityConfigurerAdapter实例来指定哪一个 WebSecurityConfigurerAdapter应该被首先考虑。
3、http.antMatcher表明这个 HttpSecurity 只适用于以 /api/开头的URL。
4、创建另一个 WebSecurityConfigurerAdapter实例。如果URL没有以 /api/开头,这个配置将会被使用。
这个配置在 ApiWebSecurityConfigurationAdapter 之后生效,因为其含有一个 @Order值为1.没有 @Order默认是最后一个生效。
译者注:对于一些小的应用,可能我们的应用的后台管理界面和前台用户界面都集成在一个应用中,这个时候使用这种方式的配置就非常有用。
3.10 方法安全
从2.0版本开始,Spring Security开始对服务层的方法提供事实上的安全支持。其提供对 JSR-250 中注解的支持,同时自身提供了 @Secured注解。
从3.0开始,你可以使用基于表达式的注解。你可以针对单独的某个Bean应用安全策略,使用拦截方法来装饰Bean的声明,或者你可以Aspect风格的切点来对整个service层中多个Bean进行安全保护。
EnableGlobalMethodSecurity
我们可以通过在任何 @Configuration实例上使用 @EnableGlobalMethodSecurity开启基于注解的安全验证。
例如,如下配置将会使SpringSecurity的 @Secured注解生效。
@EnableGlobalMethodSecurity(securedEnabled = true)public class MethodSecurityConfig {// ...}
添加一个注解到一个方法(或者类、接口)将会限制对这个方法的访问。
Spring Secuirty自带的注解支持为方法定义一些列属性。这将会被传递给 AccessDecisionManager 来做出事实上的决定。
public interface BankService { @Secured("IS_AUTHENTICATED_ANONYMOUSLY") public Account readAccount(Long id); @Secured("IS_AUTHENTICATED_ANONYMOUSLY") public Account[] findAccounts(); @Secured("ROLE_TELLER") public Account post(Account account, double amount);}
添加一个密码编码器
密码应该始终使用一个安全的,其设计目的就是用来进行密码编码的哈希算法进行编码(而不是标准的算法如SHA和MD5), <password-encoder>元素提供了这种支持。
要想 使用bcrypt来编码密码,原来的 authentication provider配置看起来应该像这样:
<beans:bean name="bcryptEncoder" class="org.springframework.security.crypto.bcrypt.BCryptPasswordEncoder"/> <authentication-manager><authentication-provider> <password-encoder ref="bcryptEncoder"/> <user-service> <user name="jimi" password="d7e6351eaa13189a5a3641bab846c8e8c69ba39f" authorities="ROLE_USER, ROLE_ADMIN" /> <user name="bob" password="4e7421b1b8765d8f9406d87e7cc6aa784c4ab97f" authorities="ROLE_USER" /> </user-service></authentication-provider></authentication-manager>
在大多数情况下, Bcrypt 是一个好的选择,除非你有一个遗留系统强制你使用其他的算法。
如果你使用一个简单的哈希算法,如果更坏的情况,存储纯文本形式的密码,那么你应该考虑迁移到一个更安全的选择,例如 Bcrypt 。
添加HTTP/HTTPS通道安全
如果你的应用同时支持HTTP和HTTPS,并且你需要特定的URL只能通过HTTPS进行访问, <intercept-url>上的属性 requires-channel对此提供了直接的支持。
<http><intercept-url pattern="/secure/**" access="ROLE_USER" requires-channel="https"/><intercept-url pattern="/**" access="ROLE_USER" requires-channel="any"/>...</http>
进行了这样的配置后,如果一个用户尝试通过HTTP访问匹配"/secure/**"模式的任何资源,首先将会被重定向到一个HTTPS URL。可用的选项有"http"、"https"和"any",使用any表示HTTP和HTTPS都可以使用。
如果你的应用使用非标准的HTTP、HTTPS端口,你可以按照如下方式指定一个端口映射列表:
<http>...<port-mappings> <port-mapping http="9080" https="9443"/></port-mappings></http>
注意为了可以真正的受到保护,一个应用根本不应该使用HTTP或者在HTTP与HTTPS之间进行切换。应该通过HTTPS,使用安全的链接来避免可能的"中间人"攻击。
Session管理
检测超时
你可以配置spring security来支持检测一个过期的session ID并将用户重定向到一个合适的URL。这通过session管理元素实现。
<http>...<session-management invalid-session-url="/invalidSession.htm" /></http>
注意,如果你使用这种机制来检测session超时,如果用户注销后,没有关闭浏览器又重新登录了,可能会错误的报告一个异常。
这是因为当你让session失效时没有清空session的cookie。你可以在注销的时候显式的指定删除名为JSESSIONID的cookie。
例如你可以在注销处理器中使用以下的语法:
<http><logout delete-cookies="JSESSIONID" /></http>
不幸的是并不能保证在每一个servlet容器中这都功能起到作用,所以你需要在自己的环境中进行测试。
提示:如果你在一个代理之后运行自己的应用,你同样可以通过配置代理服务器来删除session cookie。
例如使用 apache HTTPD的mod_headers,以下的指令将会删除 JSESSIONID cookie,原理是在一个注销请求的响应中设置cookie过期。(假设应用的部署路径是 /tutorial)
<LocationMatch "/tutorial/logout">Header always set Set-Cookie "JSESSIONID=;Path=/tutorial;Expires=Thu, 01 Jan 1970 00:00:00 GMT"</LocationMatch>
当前session控制
如果你想限制只有一个用户可以登录你的应用,Spring Security通过以下的简单附加配置对此提供支持。
首先你需要在你的web.xml文件中添加以下的监听器来保证session生命周期事件发生时Spring Security被更新。
<listener> <listener-class> org.springframework.security.web.session.HttpSessionEventPublisher </listener-class></listener>
接着在你的application context中添加以下内容
<http>...<session-management> <concurrency-control max-sessions="1" /></session-management></http>
这将会阻止一个用户多次进行登录--第二次登录将会导致第一个session失效。
通常情况下你可能会阻止第二次登录,在这种场景下你可以使用:
<http>...<session-management> <concurrency-control max-sessions="1" error-if-maximum-exceeded="true" /></session-management></http>
二次登录就会被拒绝,"拒绝"的意思是用户将会被带到 authentication-failure-url指定的url(如果使用了基于表单登录的话)。
如果二次验证是通过另外的非交互的机制发生的,例如" remember-me",一个“ unauthorized”401错误将会被发送给客户端。
如果你想用一个错误页面来替代。你可以在 session-management元素中添加属性 session-authentication-error-url。
如果你为表单登录使用了一个自定义的验证过滤器,那么你必须显式的配置当前session控制的支持。在 Session Management chapter.有更多的细节。
Session Fixation Attack Protection
会话固定攻击是一个潜在的风险。一个恶意攻击者通过访问一个站点来创建一个session。接着让另外一个用户使用同样的session进行登录(例如通过发送一个包含当前session标识符作为参数的连接)。Spring Security对此可以自动进行包括,通过创建一个新的session或者当用户登录后改变session 的标识符。如果你不需要这种保护,或者这与其他的需求由冲突,你可以通过 <session-management>的属性 session-fixation-protection来对这种行为进行控制,其值有四个选项:
none -不做任何事,当前session仍然被保留。
newSession - 创建一个新的干净的session,不拷贝已经存在的session中的数据。 (Spring Security相关的属性依然会被拷贝).
migrateSession - 创建一个新的session并其拷贝现有session的所有属性到新的session中。在servlet 3.0或者更早的容器中,这是默认的。
changeSessionId - 不创建一个新的session. 取而代之的是使用Servelt容器提供固定会话保护 (调用HttpServletRequest#changeSessionId())方法.这个选项只有在Servlet 3.1 (Java EE 7)或者更新的容器中才是有效的。
在老版本的容器中指定这个将会产生一个异常. 在servlet 3.1或者更新的容器中,这是默认的。
当固定会话攻击发生时,会导致application context中一个 SessionFixationProtectionEvent 事件的发布。如果你使用 changeSessionId,这个保护将会所有 javax.servlet.http.HttpSessionIdListener被通知。所以使用的时候需要小心,如果你的代码对两种事件都进行了监听。阅读session管理章节获取更多的细节。
4.4 默认的AccessDecisionManager
当你使用一个命名空间配置,将会为你注册一个默认的 AccessDecisionManager 实例,其基于 intercept-url和 protect-pointcut的声明(或者是注解),来对web URL和方法调用做出一些访问判断。
默认的策略是使用带有 RoleVoter 和 AuthenticatedVoter的 AffirmativeBased 、AccessDecisionManager 。
你可以在 authorization章节查看更多的信息。
自定义AccessDecisionManager
如果你需要使用一个更加复杂的访问控制策略,那么你要知道对于方法安全和web安全设置一个替代者都非常简单。
对于方法安全,你通过设置 global-method-securit元素的 access-decision-manager-ref属性 来指向一个在application context中定义的合适的 AccessDecisionManager bean的id。
<global-method-security access-decision-manager-ref="myAccessDecisionManagerBean">...</global-method-security>
web安全的语法是相同的,但是是放在<http>元素上
<http access-decision-manager-ref="myAccessDecisionManagerBean">...</http>
4.5 验证管理器和命名空间
Spring Secuirty中提供验证服务的主要接口是 AuthenticationManager。其是Spring Security ProviderManager类的一个实例
运行时环境
Spring Security 3.0需要Java 5.0或者更高的版本。
由于Spring Security致力于以一种自包含的方式运行,因此没有必要在Java运行时环境中放置任何特别的配置文件。
5.1 核心组件
SecurityContextHolder, SecurityContext 和 Authentication 对象
最基础的对象是 SecurityContextHolder,这是我们在应用中存储当前安全细节的地方,包含了当前在应用中使用到的principal细节。
默认情况下, SecurityContextHolder 使用一个 ThreadLocal 对象来存储这些细节,这表示对于在同一个线程中执行的方法,安全上下文(security context)都是可用的,即使安全上下文没有显式的当做方法的参数进行传递。
通过这种方式使用 ThreadLocal 是很安全的,如果当前使用到的规则需要在请求处理完之后被清空。
当然,Spring Security帮你自动的处理了这些,你不需要考虑。
一些应用并不完全适用使用一个 ThreadLocal,这需要考虑使用线程完成工作的方式。
例如,对于一个Swing客户端,可能希望在虚拟机中运行的所有线程使用同一个安全上下文(security context)。在应用启动的时候我们可以配置一个策略来指定 SecurityContextHolder如何来存储安全上下文。对于一个本地应用,你可能会使用 SecurityContextHolder.MODE_GLOBAL策略。
其他的应用可能希望由安全线程( secure thread)启动的其他线程拥有同样的安全特性。
这可以通过 SecurityContextHolder.MODE_INHERITABLETHREADLOCAL实现。
你可以通过2种方式来概念默认的安全策略(SecurityContextHolder.MODE_THREADLOCAL).
第一种方式是设置系统属性,
第二种方式是调用 SecurityContextHolder的静态方法。
大部分应用不需要改变默认的配置,如果你确实需要,查看 SecurityContextHolder对象的java doc来获取更多的信息。
获取当前用户信息
在 SecurityContextHolder中我们存储了与系统交互的principal相关细节。Spring Security使用 Authentication 对象来描述这些信息。
通常你不需要自己创建 Authentication 对象,但是对于 Authentication对象的查询是非常常见的。你可以在应用中的任何地方使用以下代码块来获取当前已验证的用户的名字,
例如:
Object principal = SecurityContextHolder.getContext().getAuthentication().getPrincipal(); if (principal instanceof UserDetails) {String username = ((UserDetails)principal).getUsername();} else {String username = principal.toString();}
通过调用 getContext()方法返回的对象是 SecurityContext 接口的一个实例。这个对象被存储在 thread local里。就像我们接下来要看到的,Spring Security大部分的验证机制通过返回一个 UserDetails 实例作为 principal。
UserDetailsService
在上面的代码片段,我们需要注意的是可以从一个 Authentication 对象中获取一个principal。principal就是一个 Object而已。
大部分情况下,可以强制转换为一个 UserDetails 对象。 UserDetails 是Spring Secuirty中的一个核心接口。它代表了一个principal,其是是可扩展的并且是应用相关的。
你可以认为UserDetails是你自己的用户数据与Spring Security在 SecurityContextHolder对象中需要使用到的用户数据的适配器。
作为你自己的用户数据的某种表现,你会经常强制转换 UserDetails 为应用中原来提供的数据类型,因此你可以调用特定的业务方法,(例如getEmail(), getEmployeeNumber()等等)。
到现在你可能想知道,什么时候我应该提供一个 UserDetails 对象?如何来做?我认为你仅仅是在声明这件事情,并不需要编写任何java代码。简单的回答是有一个特定的接口 UserDetailsService。这个接口中定义的唯一的方法接受一个String类型的用户名参数,返回 UserDetails对象。
UserDetails loadUserByUsername(String username) throws UsernameNotFoundException;这是在Spring Secuirty中加载用户信息最常用的方式,并且你将会看到在框架中任何需要获取一个用户的信息的时候使用的都是这种方式。
在验证成功的情况下, UserDetails 被用来构建 Authentication 对象,并存储在 SecurityContextHolder 中。一个好消息是我们已经提供了大量的 UserDetailsService 的实现,包括使用内存中的map( InMemoryDaoImpl),和使用JDBC( JdbcDaoImpl)。尽管如此,大部分用户倾向于基于使用应用中已经存在的用于描述员工、客户或者其他类型用户的数据访问对象(Data Access Object )来编写他们自己的实现。记住无论你的 UserDetailsService 返回类型是什么,总是可以在 SecurityContextHolder 中通过以上的代码片段来获取。
提示:读者经常会对 UserDetailsService产生疑惑。它是一个纯粹用于获取用户数据的DAO,没有任何其他功能,除了提供框架中其他组件需要的数据。特别的,其并不验证用户,验证是通过 AuthenticationManager完成。在很多场景下,如果我们需要自定义的验证过程,需要直接实现 AuthenticationProvider。
GrantedAuthority
除了principal, Authentication 提供的另一个重要的方法是 getAuthorities()。这个方法用于提供一个 GrantedAuthority 对象数组。 GrantedAuthority 表示的是授予当前的 principal权利。这些权利通常是角色("roles"),例如 ROLE_ADMINISTRATOR 或者 ROLE_HR_SUPERVISOR。这些角色的配置是为了接下来的web授权、方法授权和域对象授权。Spring Security的其他部分可以解析角色中权利,执行某些操作时必须拥有这些权利。 GrantedAuthority 对象通常通过 UserDetailsService加载。
通常 GrantedAuthority 是整个应用范围的权利许可,并不是针对于某个特定的领域对象。因此,你不应该用一个 GrantedAuthority对象表示一个编号为54的 Employee 对象的许可,因为如果有数以千计的这样的权利,内存很快会被耗尽(或者至少会引起应用要花费很长的时间才能验证一个用户)。当然,Spring Security明确的设计可以处理这种常见需求,但是作为替代你应该使用项目的域对象的安全能力来实现这个目标。
总结
这里仅仅是简要概括,目前我们所看到的Spring Security的主要组成部分是:
SecurityContextHolder,提供对 SecurityContext的访问
SecurityContext,维护了 Authentication 和可能的特定请求的安全信息
Authentication,以Spring Security的方式描述principal。
GrantedAuthority,表示在应用范围内授予principal的权利许可。
UserDetailsService,用来根据传递的字符串形式的用户名(或者验证id等类似信息)来创建 UserDetails 对象。
2基础配置
首先在项目的pom.xml中引入spring-boot-starter-security依赖。
<dependency> <groupId>org.springframework.boot</groupId> <artifactId>spring-boot-starter-security</artifactId></dependency>
和其余Spring框架一样,XML Configuration和Java Configuration是Spring Security的两种常用配置方式。Spring 3.2版本之后,Java Configuration因其流式API支持,强类型校验等特性,逐渐替代XML Configuration成为更广泛的配置方式。下面是一个示例Java Configuration。
@Configuration@EnableWebSecurity@EnableGlobalMethodSecurity(prePostEnabled = true)public class SecurityConfig extends WebSecurityConfigurerAdapter { @Autowired MyUserDetailsService detailsService; @Override protected void configure(HttpSecurity http) throws Exception { http.authorizeRequests() .and().formLogin().loginPage("/login").permitAll().defaultSuccessUrl("/", true) .and().logout().logoutUrl("/logout") .and().sessionManagement().maximumSessions(1).expiredUrl("/expired") .and() .and().exceptionHandling().accessDeniedPage("/accessDenied"); } @Override public void configure(WebSecurity web) throws Exception { web.ignoring().antMatchers("/js/**", "/css/**", "/images/**", "/**/favicon.ico"); } @Override public void configure(AuthenticationManagerBuilder auth) throws Exception { auth.userDetailsService(detailsService).passwordEncoder(new BCryptPasswordEncoder()); }}
- @EnableWebSecurity: 禁用Boot的默认Security配置,配合@Configuration启用自定义配置(需要扩展WebSecurityConfigurerAdapter)
- @EnableGlobalMethodSecurity(prePostEnabled = true): 启用Security注解,例如最常用的@PreAuthorize
- configure(HttpSecurity): Request层面的配置,对应XML Configuration中的
<http>元素 - configure(WebSecurity): Web层面的配置,一般用来配置无需安全检查的路径
- configure(AuthenticationManagerBuilder): 身份验证配置,用于注入自定义身份验证Bean和密码校验规则
3 扩展配置
完成基础配置之后,下一步就是实现自己的UserDetailsService和PermissionEvaluator,分别用于自定义Principle, Authority和Permission。
@Componentpublic class MyUserDetailsService implements UserDetailsService { @Autowired private LoginService loginService; @Autowired private RoleService roleService; @Override public UserDetails loadUserByUsername(String username) { if (StringUtils.isBlank(username)) { throw new UsernameNotFoundException("用户名为空"); } Login login = loginService.findByUsername(username).orElseThrow(() -> new UsernameNotFoundException("用户不存在")); Set<GrantedAuthority> authorities = new HashSet<>(); roleService.getRoles(login.getId()).forEach(r -> authorities.add(new SimpleGrantedAuthority(r.getName()))); return new org.springframework.security.core.userdetails.User( username, login.getPassword(), true,//是否可用 true,//是否过期 true,//证书不过期为true true,//账户未锁定为true authorities); }}
创建GrantedAuthority对象时,一般名称加上ROLE_前缀。
@Component public class MyPermissionEvaluator implements PermissionEvaluator { @Autowired private LoginService loginService; @Autowired private RoleService roleService; @Override public boolean hasPermission(Authentication authentication, Object targetDomainObject, Object permission) { String username = authentication.getName(); Login login = loginService.findByUsername(username).get(); return roleService.authorized(login.getId(), targetDomainObject.toString(), permission.toString()); } @Override public boolean hasPermission(Authentication authentication, Serializable targetId, String targetType, Object permission) { // not supported return false; } }
- hasPermission(Authentication, Object, Object)和hasPermission(Authentication, Serializable, String, Object)两个方法分别对应Spring Security中两个同名的表达式。
4 业务集成
Spring Security提供了注解,Servlet API,JSP Tag,系统API等多种方式进行集成,最常用的是第一种方式,包含@Secured, @PreAuthorize, @PreFilter, @PostAuthorize和@PostFilter五个注解。@Secure是最初版本中的一个注解,自3.0版本引入了支持Spring EL表达式的其余四个注解之后,就很少使用了。
@RequestMapping(value = "/hello", method = RequestMethod.GET)@PreAuthorize("authenticated and hasPermission('hello', 'view')")public String hello(Model model) { String username = SecurityContextHolder.getContext().getAuthentication().getName(); model.addAttribute("message", username); return "hello";}
- @PreAuthorize("authenticated and hasPermission('hello', 'view')"): 表示只有当前已登录的并且拥有("hello", "view")权限的用户才能访问此页面
- SecurityContextHolder.getContext().getAuthentication().getName(): 获取当前登录的用户,也可以通过HttpServletRequest.getRemoteUser()获取
总结
以上就是Spring Security的一般集成步骤,更多细节和高级特性可参考官方文档。
参考文章:
http://docs.spring.io/spring-boot/docs/current/reference/htmlsingle/
http://docs.spring.io/spring-security/site/docs/current/reference/htmlsingle/
http://emacoo.cn/blog/spring-boot-security
http://www.tianshouzhi.com/api/tutorials/spring_security_4
https://zh.wikipedia.org/wiki/HTTP%E5%9F%BA%E6%9C%AC%E8%AE%A4%E8%AF%81
- spring-boot-starter-security
- spring boot starter 详解
- spring boot自定义starter
- spring-boot-starter-dubbo
- spring boot 启动器starter
- Spring Boot 自定义starter
- spring-boot-starter
- Spring Boot Starter 介绍
- Druid Spring Boot Starter
- mybatis-spring-boot-starter
- druid-spring-boot-starter
- Spring-boot-Mybatis-Starter
- spring boot-认识spring-boot-starter-parent
- spring-boot-starter-redis 集成
- 自定义spring-boot-starter-hbase
- 自定义spring-boot-starter-dubbox
- Spring Boot 启动器starter详解
- spring-boot-starter-redis 集成
- 统计第一个只出现两次的字符
- 题目1451:不容易系列之一
- idea使用问题集合
- 腾讯2017秋招笔试编程题--geohash编码
- jquery选择器,dom操作
- spring-boot-starter-security
- 微信token验证失败Java解决办法
- 前端在线编程题5
- String 转 Array< UInt8 >
- poj 3522 Slim Span(Kruskal+枚举)
- Java_基础—File类的重命名和删除功能
- 数字金额每隔3位加逗号的功能函数
- 深度学习基础知识(1)神经网络理解
- LightOJ