Deploy JAX-WS Web Services On Tomcat
来源:互联网 发布:淘宝动漫周边店成本 编辑:程序博客网 时间:2024/04/25 08:02
Here’s a guide to show you how to deploy JAX-WS web services on Tomcat servlet container. See following summary steps of a web service deployment.
- Create a web service (of course).
- Create a sun-jaxws.xml, defines web service implementation class.
- Create a standard web.xml, defines
WSServletContextListener,WSServletand structure of a web project. - Build tool to generate WAR file.
- Copy JAX-WS dependencies to “${Tomcat}/lib” folder.
- Copy WAR to “${Tomcat}/webapp” folder.
- Start It.
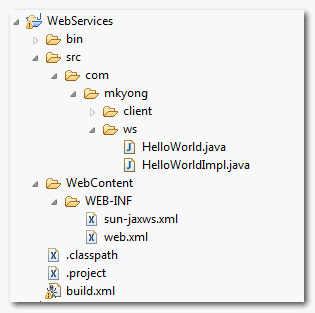
Directory structure of this example, so that you know where to put your files.

1. WebServices
A simple JAX-WS hello world example.
File : HelloWorld.java
package com.mkyong.ws; import javax.jws.WebMethod;import javax.jws.WebService;import javax.jws.soap.SOAPBinding;import javax.jws.soap.SOAPBinding.Style; //Service Endpoint Interface@WebService@SOAPBinding(style = Style.RPC)public interface HelloWorld{ @WebMethod String getHelloWorldAsString(); }
File : HelloWorldImpl.java
package com.mkyong.ws; import javax.jws.WebService; //Service Implementation Bean @WebService(endpointInterface = "com.mkyong.ws.HelloWorld")public class HelloWorldImpl implements HelloWorld{ @Overridepublic String getHelloWorldAsString() {return "Hello World JAX-WS";}}
Later, you will deploy this hello world web service on Tomcat.
2. sun-jaxws.xml
Create a web service deployment descriptor, which is also known as JAX-WS RI deployment descriptor – sun-jaxws.xml.
File : sun-jaxws.xml
<?xml version="1.0" encoding="UTF-8"?><endpoints xmlns="http://java.sun.com/xml/ns/jax-ws/ri/runtime" version="2.0"> <endpoint name="HelloWorld" implementation="com.mkyong.ws.HelloWorldImpl" url-pattern="/hello"/></endpoints>
When user access /hello/ URL path, it will fire the declared web service, which is HelloWorldImpl.java.
For detail endpoint attributes , see this article.
3. web.xml
Create a standard web.xml deployment descriptor for the deployment. Defines WSServletContextListener as listener class, WSServlet as your hello servlet.
File : web.xml
<?xml version="1.0" encoding="UTF-8"?><!DOCTYPE web-app PUBLIC "-//Sun Microsystems, Inc.//DTD Web Application 2.3//EN""http://java.sun.com/j2ee/dtds/web-app_2_3.dtd"> <web-app> <listener> <listener-class> com.sun.xml.ws.transport.http.servlet.WSServletContextListener </listener-class> </listener> <servlet> <servlet-name>hello</servlet-name> <servlet-class> com.sun.xml.ws.transport.http.servlet.WSServlet </servlet-class> <load-on-startup>1</load-on-startup> </servlet> <servlet-mapping> <servlet-name>hello</servlet-name> <url-pattern>/hello</url-pattern> </servlet-mapping> <session-config> <session-timeout>120</session-timeout> </session-config></web-app>
4. WAR Content
Use Ant, Maven or JAR command to build a WAR file to include everything inside. The WAR content should look like this :
WEB-INF/classes/com/mkyong/ws/HelloWorld.classWEB-INF/classes/com/mkyong/ws/HelloWorldImpl.classWEB-INF/web.xmlWEB-INF/sun-jaxws.xml
For those who are interested, here’s the Ant file to build this project and generate the WAR file.
File : build.xml
<project name="HelloWorldWS" default="dist" basedir="."> <description> Web Services build file </description> <!-- set global properties for this build --> <property name="src" location="src"/> <property name="build" location="build"/> <property name="dist" location="dist"/> <property name="webcontent" location="WebContent"/> <target name="init"> <!-- Create the time stamp --> <tstamp/> <!-- Create the build directory structure used by compile --> <mkdir dir="${build}"/> </target> <target name="compile" depends="init" description="compile the source " > <!-- Compile the java code from ${src} into ${build} --> <javac srcdir="${src}" destdir="${build}"/> </target> <target name="war" depends="compile" description="generate the distribution war" > <!-- Create the war distribution directory --> <mkdir dir="${dist}/war"/> <!-- Follow standard WAR structure --> <copydir dest="${dist}/war/build/WEB-INF/" src="${webcontent}/WEB-INF/" /> <copydir dest="${dist}/war/build/WEB-INF/classes/" src="${build}" /> <jar jarfile="${dist}/war/HelloWorld-${DSTAMP}.war" basedir="${dist}/war/build/"/> </target> </project>
5. JAX-WS Dependencies
By default, Tomcat does not comes with any JAX-WS dependencies, So, you have to include it manually.
1. Go here http://jax-ws.java.net/.
2. Download JAX-WS RI distribution.
3. Unzip it and copy following JAX-WS dependencies to Tomcat library folder “{$TOMCAT}/lib“.
- jaxb-impl.jar
- jaxws-api.jar
- jaxws-rt.jar
- gmbal-api-only.jar
- management-api.jar
- stax-ex.jar
- saaj-impl.jar
- streambuffer.jar
- policy.jar
6. Deployment
Copy the generated WAR file to {$TOMCAT}/webapps/ folder and start the Tomcat server.
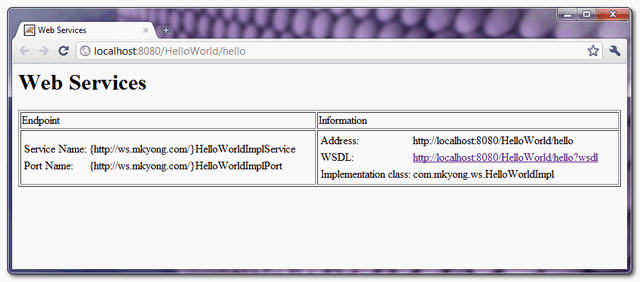
For testing, you can access this URL : http://localhost:8080/HelloWorld/hello, if you see following page, it means web services are deploy successfully.

Download Source Code
Reference
- JAX-WS WAR File Packaging
- Deploying Metro endpoint
- Publishing a RESTful Web Service with JAX-WS
- Deploy JAX-WS Web Services On Tomcat
- JAX-WS web services on Tomcat
- 使用JAX-WS构建Web Services
- JAX-WS实现Web Services开发
- JAX-WS Services Integration
- 发布JAX-Ws Web服务到Tomcat
- Using implicit SOAP headers with JAX-WS web services
- jax-ws(Java API for XML Web Services)实践教程
- jax-ws(Java API for XML Web Services)实践教程
- 【Error】Generating JAX-WS Web Services' has encountered a problem
- Myeclipse 2014JAX-WS Web Services & Clients备忘
- JWS, JAX-WS, JAX-RS, REST, Restlet, SOAP (JAVA Web Services 技术)
- JAX-WS Web Service
- 利用 WAS V6.1 开发安全可靠的 Web Services, 第 1 部分:开发基于 JAX-WS 的 Web Services
- 采用JAX-WS Annotated Services from Java+JAXB发布获取web service
- 采用JAX-WS Annotated Services from Java+JAXB发布获取web service
- 采用JAX-WS Annotated Services from Java+JAXB发布获取web service
- 采用JAX-WS Annotated Services from Java+JAXB发布获取web service
- 409. The fox preys farest from home. 兔子不吃窝边草
- Linux的分页机制
- JSON Spirit 中文支持(转)
- 设置win7任务栏程序图标显示方式
- IT技术人的成长
- Deploy JAX-WS Web Services On Tomcat
- qt解析json(使用第三方库
- Pages Library不能显示Library Settings页面的错误处理
- 模拟实现一个多线程环境
- 算法导论 4.1-6
- U盘启动,使用winpe安装win7的方法
- HFS for Windows 9.0 安装注意事项 [2013-07-15更新]
- 结构体位制
- 使用 Qjson 解析 JSON 数据的方法


