qt中插入图片
来源:互联网 发布:广联达电力计价软件 编辑:程序博客网 时间:2024/04/20 08:03
本文转载自:http://www.cppblog.com/qianqian/archive/2010/07/25/121238.html
用到QFrame和QPushButton,QFrame做主面板,QPushButton为其子控件,需要在主面板上贴背景图片,还需要在QPushButton上贴上相应的图标,通过从Google上搜索各种方法(现在才知道Google比Baidu强大很多啊),最后都试了一些,主要有下面几种方法:
1. QPalette的方法
#include <QApplication>
#include <QtGui>
int main(int argc, char *argv[])
{
QApplication app(argc,argv);
QFrame *frame = new QFrame;
frame->resize(400,700);
QPixmap pixmap("images/frame.png");
QPalette palette;
palette.setBrush(frame->backgroundRole(),QBrush(pixmap));
frame->setPalette(palette);
frame->setMask(pixmap.mask()); //可以将图片中透明部分显示为透明的
frame->setAutoFillBackground(true);
frame->show();
return app.exec();
}
注意图片路径怎么表示,我的图片放在该工程下的images文件夹中。
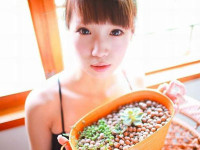
存在问题:图片可以显示出来,但是图片大小不能和frame大小一致,显示效果不好,具体怎样调整大小,以后再补充,效果如下(设置了透明的,好像很漂亮~透明部分将我的桌面显示出来了~_~):
2.setStyleSheet方法(非常好用的方法)
#include <QApplication>
#include <QtGui>
int main(int argc, char *argv[])
{
QApplication app(argc,argv);
QFrame *frame = new QFrame;
frame->setObjectName("myframe");
frame->resize(400,700);
frame->setStyleSheet("QFrame#myframe{border-image:url(images/frame.png)}" );
frame->show();
return app.exec();
}
效果如下:
注意:很漂亮的效果吧~~注意代码中红线的部分噢,设置ObjectName后,才能保证setStyleSheet只作用在我们的frame上,不影响其子控件的背景设置。之所以用border-image而不用background-image,还是上面的问题,用background-image不能保证图片大小和控件大小一致,图片不能完全显示,这个以后再补充了,现在还没有找到方法。
3.paintEvent事件方法
//myframe.h文件
#ifndef MYFRAME_H
#define MYFRAME_H
#include <QWidget>
#include <QtGui>
class MyFrame : public QWidget
{
public:
MyFrame();
void paintEvent(QPaintEvent *event);
};
#endif // MYFRAME_H
//myframe.cpp文件
#include "myframe.h"
MyFrame::MyFrame()
{
}
void MyFrame::paintEvent(QPaintEvent *event)
{
QPainter painter(this);
painter.drawPixmap(0,0,400,700,QPixmap("images/frame.png"));
}
//main.cpp文件
#include <QApplication>
#include <QtGui>
#include "myframe.h"
int main(int argc, char *argv[])
{
QApplication app(argc,argv);
MyFrame *frame = new MyFrame;
frame->resize(400,700);
frame->show();
return app.exec();
}
效果如下:
注:跟前面一样的效果吧,与前面的差别就是这个背景图片不随着窗口的大小而变化,因为它的固定大小被设置成(400,700)了。重写QWidget的paintEvent事件,当控件发生重绘事件,比如show()时,系统就会自动调用paintEvent函数。
好了,上面是三种设置背景图片的方法,下面我要说一个设置QPushButton的背景图片的方法,用的是setIcon方法(其实QPushButton设置背景图片也可以用前面三种方法的,不过现在这种Icon方法的看起来也不错)
#include <QApplication>
#include <QtGui>
int main(int argc, char *argv[])
{
QApplication app(argc,argv);
QFrame *frame = new QFrame;
QPushButton * button0 = new QPushButton(frame);
QPushButton * button1 = new QPushButton(frame);
QPushButton * button2 = new QPushButton(frame);
QPushButton * button3 = new QPushButton(frame);
QPushButton * button4 = new QPushButton(frame);
QPushButton * button5 = new QPushButton(frame);
frame->setObjectName("myframe");
frame->resize(400,700);
frame->setStyleSheet("QFrame#myframe{border-image:url(images/frame.png)}" );
button0->setGeometry(60,150,68,68);
button1->setGeometry(160,150,68,68);
button2->setGeometry(260,150,68,68);
button3->setGeometry(60,280,68,68);
button4->setGeometry(160,280,68,68);
button5->setGeometry(260,280,68,68);
QIcon icon;
QPixmap pixmap0("images/SMS.png");
icon.addPixmap(pixmap0);
button0->setIcon(icon);
button0->setIconSize(QSize(68,68));
button0->setFixedSize(pixmap0.size());
button0->setMask(pixmap0.mask());
QPixmap pixmap1("images/EMail.png");
icon.addPixmap(pixmap1);
button1->setIcon(icon);
button1->setIconSize(QSize(68,68));
button1->setFixedSize(pixmap1.size());
button1->setMask(pixmap1.mask());
QPixmap pixmap2("images/Contacts.png");
icon.addPixmap(pixmap2);
button2->setIcon(icon);
button2->setIconSize(QSize(68,68));
button2->setFixedSize(pixmap2.size());
button2->setMask(pixmap2.mask());
QPixmap pixmap3("images/Calendar.png");
icon.addPixmap(pixmap3);
button3->setIcon(icon);
button3->setIconSize(QSize(68,68));
button3->setFixedSize(pixmap3.size());
button3->setMask(pixmap3.mask());
QPixmap pixmap4("images/GoogleVoice.png");
icon.addPixmap(pixmap4);
button4->setIcon(icon);
button4->setIconSize(QSize(68,68));
button4->setFixedSize(pixmap4.size());
button4->setMask(pixmap4.mask());
QPixmap pixmap5("images/AndroidMarket.png");
icon.addPixmap(pixmap5);
button5->setIcon(icon);
button5->setIconSize(QSize(68,68));
button5->setFixedSize(pixmap5.size());
button5->setMask(pixmap5.mask());
frame->show();
return app.exec();
}
效果如下:
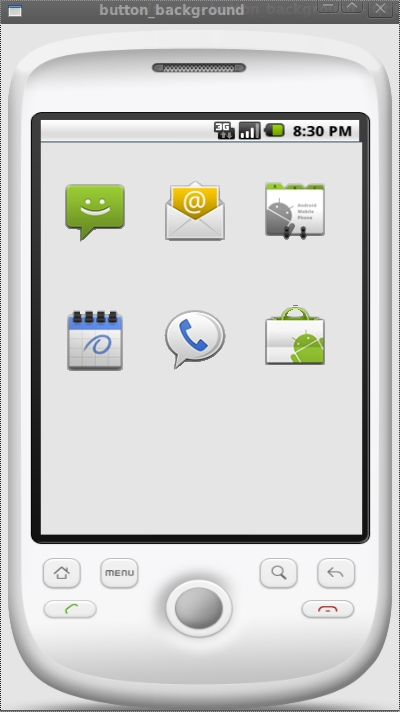
注:图标效果不错吧~_~
好了,今天就写到这里,以后有新的内容再补充。
补充,这样就可以让图片跟窗口一样大小了。
int main(int argc, char *argv[])
{
QApplication app(argc,argv);
QFrame *frame = new QFrame;
frame->resize(400,700);
QImage image1;
image1.load("images/frame1.jpg");
QImage image2 = image1.scaled(400,700);
QPalette palette;
palette.setBrush(frame->backgroundRole(),QBrush(image2));
frame->setPalette(palette);
frame->setMask(pixmap.mask()); //可以将图片中透明部分显示为透明的
frame->setAutoFillBackground(true);
frame->show();
return app.exec();
}
转自:http://www.cppblog.com/qianqian/archive/2010/07/25/121238.html
1. QPalette的方法
#include <QApplication>
#include <QtGui>
int main(int argc, char *argv[])
{
QApplication app(argc,argv);
QFrame *frame = new QFrame;
frame->resize(400,700);
QPixmap pixmap("images/frame.png");
QPalette palette;
palette.setBrush(frame->backgroundRole(),QBrush(pixmap));
frame->setPalette(palette);
frame->setMask(pixmap.mask()); //可以将图片中透明部分显示为透明的
frame->setAutoFillBackground(true);
frame->show();
return app.exec();
}
注意图片路径怎么表示,我的图片放在该工程下的images文件夹中。
存在问题:图片可以显示出来,但是图片大小不能和frame大小一致,显示效果不好,具体怎样调整大小,以后再补充,效果如下(设置了透明的,好像很漂亮~透明部分将我的桌面显示出来了~_~):
2.setStyleSheet方法(非常好用的方法)
#include <QApplication>
#include <QtGui>
int main(int argc, char *argv[])
{
QApplication app(argc,argv);
QFrame *frame = new QFrame;
frame->setObjectName("myframe");
frame->resize(400,700);
frame->setStyleSheet("QFrame#myframe{border-image:url(images/frame.png)}" );
frame->show();
return app.exec();
}
效果如下:
注意:很漂亮的效果吧~~注意代码中红线的部分噢,设置ObjectName后,才能保证setStyleSheet只作用在我们的frame上,不影响其子控件的背景设置。之所以用border-image而不用background-image,还是上面的问题,用background-image不能保证图片大小和控件大小一致,图片不能完全显示,这个以后再补充了,现在还没有找到方法。
3.paintEvent事件方法
//myframe.h文件
#ifndef MYFRAME_H
#define MYFRAME_H
#include <QWidget>
#include <QtGui>
class MyFrame : public QWidget
{
public:
MyFrame();
void paintEvent(QPaintEvent *event);
};
#endif // MYFRAME_H
//myframe.cpp文件
#include "myframe.h"
MyFrame::MyFrame()
{
}
void MyFrame::paintEvent(QPaintEvent *event)
{
QPainter painter(this);
painter.drawPixmap(0,0,400,700,QPixmap("images/frame.png"));
}
//main.cpp文件
#include <QApplication>
#include <QtGui>
#include "myframe.h"
int main(int argc, char *argv[])
{
QApplication app(argc,argv);
MyFrame *frame = new MyFrame;
frame->resize(400,700);
frame->show();
return app.exec();
}
效果如下:
注:跟前面一样的效果吧,与前面的差别就是这个背景图片不随着窗口的大小而变化,因为它的固定大小被设置成(400,700)了。重写QWidget的paintEvent事件,当控件发生重绘事件,比如show()时,系统就会自动调用paintEvent函数。
好了,上面是三种设置背景图片的方法,下面我要说一个设置QPushButton的背景图片的方法,用的是setIcon方法(其实QPushButton设置背景图片也可以用前面三种方法的,不过现在这种Icon方法的看起来也不错)
#include <QApplication>
#include <QtGui>
int main(int argc, char *argv[])
{
QApplication app(argc,argv);
QFrame *frame = new QFrame;
QPushButton * button0 = new QPushButton(frame);
QPushButton * button1 = new QPushButton(frame);
QPushButton * button2 = new QPushButton(frame);
QPushButton * button3 = new QPushButton(frame);
QPushButton * button4 = new QPushButton(frame);
QPushButton * button5 = new QPushButton(frame);
frame->setObjectName("myframe");
frame->resize(400,700);
frame->setStyleSheet("QFrame#myframe{border-image:url(images/frame.png)}" );
button0->setGeometry(60,150,68,68);
button1->setGeometry(160,150,68,68);
button2->setGeometry(260,150,68,68);
button3->setGeometry(60,280,68,68);
button4->setGeometry(160,280,68,68);
button5->setGeometry(260,280,68,68);
QIcon icon;
QPixmap pixmap0("images/SMS.png");
icon.addPixmap(pixmap0);
button0->setIcon(icon);
button0->setIconSize(QSize(68,68));
button0->setFixedSize(pixmap0.size());
button0->setMask(pixmap0.mask());
QPixmap pixmap1("images/EMail.png");
icon.addPixmap(pixmap1);
button1->setIcon(icon);
button1->setIconSize(QSize(68,68));
button1->setFixedSize(pixmap1.size());
button1->setMask(pixmap1.mask());
QPixmap pixmap2("images/Contacts.png");
icon.addPixmap(pixmap2);
button2->setIcon(icon);
button2->setIconSize(QSize(68,68));
button2->setFixedSize(pixmap2.size());
button2->setMask(pixmap2.mask());
QPixmap pixmap3("images/Calendar.png");
icon.addPixmap(pixmap3);
button3->setIcon(icon);
button3->setIconSize(QSize(68,68));
button3->setFixedSize(pixmap3.size());
button3->setMask(pixmap3.mask());
QPixmap pixmap4("images/GoogleVoice.png");
icon.addPixmap(pixmap4);
button4->setIcon(icon);
button4->setIconSize(QSize(68,68));
button4->setFixedSize(pixmap4.size());
button4->setMask(pixmap4.mask());
QPixmap pixmap5("images/AndroidMarket.png");
icon.addPixmap(pixmap5);
button5->setIcon(icon);
button5->setIconSize(QSize(68,68));
button5->setFixedSize(pixmap5.size());
button5->setMask(pixmap5.mask());
frame->show();
return app.exec();
}
效果如下:
注:图标效果不错吧~_~
好了,今天就写到这里,以后有新的内容再补充。
补充,这样就可以让图片跟窗口一样大小了。
int main(int argc, char *argv[])
{
QApplication app(argc,argv);
QFrame *frame = new QFrame;
frame->resize(400,700);
QImage image1;
image1.load("images/frame1.jpg");
QImage image2 = image1.scaled(400,700);
QPalette palette;
palette.setBrush(frame->backgroundRole(),QBrush(image2));
frame->setPalette(palette);
frame->setMask(pixmap.mask()); //可以将图片中透明部分显示为透明的
frame->setAutoFillBackground(true);
frame->show();
return app.exec();
}
转自:http://www.cppblog.com/qianqian/archive/2010/07/25/121238.html
0 0
- qt中插入图片
- Qt中插入图片
- Qt:向QTextEdit中插入图片
- qt 导出word中插入图片
- QT插入图片1
- Qt中整合MySQL,向MySQL中插入图片
- JTable中插入图片
- Latex 中插入图片
- latex中插入图片
- 图片插入EditView中
- EditView中插入图片
- beamer中插入图片
- latex中插入图片
- EditText中插入图片
- latex中插入图片
- Latex中插入图片
- richEdit中插入图片
- UIPickerView中插入图片
- ZOJ-1242
- 怎样才能找回电脑上误删的文件呢?
- 多线程编程 - NSOperationQueue
- VisualNet综合布线管理系统
- Perl语言入门(第五版) 读书笔记(三)---哈希
- qt中插入图片
- Factorial
- 多线程编程4 - GCD
- 基于最小二乘算法的参数估计(matlab程序和测试)
- ZOJ-1251
- CVS on Win7
- 开发笔记:解决安卓GestureOverlayView手势和ListView点击事件、文本框获取焦点冲突的问题
- ZOJ-1292
- Maximo学习笔记------关联字段显示详细描述