PHP Apache学习
来源:互联网 发布:苹果电脑ai软件 编辑:程序博客网 时间:2024/06/07 01:16
搜索.htaccess文件,原来在某个网站的根目录下就会有一个。
cqq@ubuntu:~/repos/wordpress_Zh$ sudo updatedb[sudo] password for cqq:cqq@ubuntu:~/repos/wordpress_Zh$ mlocate .htaccess/home/cqq/repos/wordpress/wp-content/plugins/akismet/.htaccess/home/cqq/repos/wordpress_Zh/wp-content/plugins/akismet/.htaccess/var/www/wordpress/.htaccess/var/www/wordpress/wp-content/plugins/akismet/.htaccess/var/www/wordpress_Zh/.htaccess/var/www/wordpress_Zh/wp-content/plugins/akismet/.htaccess# BEGIN WordPress<IfModule mod_rewrite.c>RewriteEngine OnRewriteBase /RewriteRule ^index\.php$ - [L]RewriteCond %{REQUEST_FILENAME} !-fRewriteCond %{REQUEST_FILENAME} !-dRewriteRule . /index.php [L]</IfModule># END WordPress@符号
参考:
http://php.net/manual/zh/language.operators.errorcontrol.php
PHP 支持一个错误控制运算符:@。当将其放置在一个 PHP 表达式之前,该表达式可能产生的任何错误信息都被忽略掉。
Warning:目前的“@”错误控制运算符前缀甚至使导致脚本终止的严重错误的错误报告也失效。这意味着如果在某个不存在或者敲错了字母的函数调用前用了“@”来抑制错误信息,那脚本会没有任何迹象显示原因而死在那里。
关于include和require
require 和 include 几乎完全一样,除了处理失败的方式不同之外。require 在出错时产生 E_COMPILE_ERROR 级别的错误。换句话说将导致脚本中止而 include 只产生警告(E_WARNING),脚本会继续运行。
参考:
http://php.net/manual/zh/function.require.php
ltrim 和rtrim
ltrim:删除字符串开头的空白字符(或其他字符) rtrim:删除字符串末端的空白字符(或者其他字符)
如果不使用第二个参数, ltrim() 和rtrim()仅删除
以下字符: " " (ASCII 32 (0x20)),普通空白字符。 "\t" (ASCII 9 (0x09)), 制表符. "\n"
(ASCII 10 (0x0A)),换行符。 "\r" (ASCII 13 (0x0D)),回车符。 "\0" (ASCII 0 (0x00)),
NUL空字节符。 "\x0B" (ASCII 11 (0x0B)),垂直制表符。
例:
>>> rtrim(ltrim(" \t\r caiqiq i \0 \x0B \t\n"));=> "caiqiq i">>> rtrim(" \t\r caiqiq i \0 \x0B \t\n");=> " \x09 caiqiq i"—–5月7日更新—-
比如:
$name = trim(preg_replace('/[\r\n]+/', '', $name)); 这里将$name中的的换行\r\n符号替换成空白字符串(即去掉之),然后trim()一下,即去掉\t, \r, \n, \0等等。
PHP中单引号和双引号的区别
参考:
http://www.cnblogs.com/youxin/archive/2012/02/13/2348551.html
php里的单引号把内容当成纯文本,不会经过服务器翻译。而双引号则与此相反。里面的内容会经过服务器处理(process). 举个简单的例子:
$foo="data";echo '$foo'; //单引号输出$fooecho "$foo"; //双引号输出data这不,我就碰到这么个情况,使用单引号时,\n没有被转意,直接输出了;而使用双引号时,\n被转意成换行。
cqq@ubuntu:~/repos/wordpress_Zh$ php -f xxxxxxxx.php/home/cqq/repos/wordpress_Zh\ncqq@ubuntu:~/repos/wordpress_Zh$ vi xxxxxxxx.phpcqq@ubuntu:~/repos/wordpress_Zh$ php -f xxxxxxxx.php/home/cqq/repos/wordpress_Zhdefine( 'ABSPATH', dirname( __FILE__ ) . '/' );这句话把当前php文件所在的目录加上/设置为ABSPATH,即/home/cqq/repos/wordpress_Zh/。
PHP语法学习
>>> $games = array();=> []>>> $arr = array_push($games, "KOF97");=> 1>>> $arr = array_push($games, "NBALive");=> 2>>> $arr = array_push($games, "LOL");=> 3>>> $arr = array_push($games, "Super Mario");=> 4>>> echo $arr;4⏎>>> var_dump($games);array(4) { [0]=> string(5) "KOF97" [1]=> string(3) "LOL" [2]=> string(7) "NBALive" [3]=> string(11) "Super Mario"}=> null>>> foreach ($games as $game){... echo "<p>$game</p> \n";... }<p>KOF97</p><p>LOL</p><p>NBALive</p><p>Super Mario</p>=> null评论XSS
在评论框里测试一下XSS,没想到随便一个<script>alert("test")</script>就成功执行了。
我写的评论是第二个,url为http://192.168.170.131/?p=7#comment-2 
在后台发现评论内容没有经过转意直接保存了。怪不得评论成功之后直接弹框了。
mysql> select comment_author_IP from wp_Zh_comments;+-------------------+| comment_author_IP |+-------------------+| || 192.168.170.1 || 192.168.170.1 |+-------------------+3 rows in set (0.00 sec)mysql> desc wp_Zh_comments;+----------------------+---------------------+------+-----+---------------------+----------------+| Field | Type | Null | Key | Default | Extra |+----------------------+---------------------+------+-----+---------------------+----------------+| comment_ID | bigint(20) unsigned | NO | PRI | NULL | auto_increment || comment_post_ID | bigint(20) unsigned | NO | MUL | 0 | || comment_author | tinytext | NO | | NULL | || comment_author_email | varchar(100) | NO | MUL | | || comment_author_url | varchar(200) | NO | | | || comment_author_IP | varchar(100) | NO | | | || comment_date | datetime | NO | | 0000-00-00 00:00:00 | || comment_date_gmt | datetime | NO | MUL | 0000-00-00 00:00:00 | || comment_content | text | NO | | NULL | || comment_karma | int(11) | NO | | 0 | || comment_approved | varchar(20) | NO | MUL | 1 | || comment_agent | varchar(255) | NO | | | || comment_type | varchar(20) | NO | | | || comment_parent | bigint(20) unsigned | NO | MUL | 0 | || user_id | bigint(20) unsigned | NO | | 0 | |+----------------------+---------------------+------+-----+---------------------+----------------+15 rows in set (0.00 sec)mysql> select comment_content from wp_Zh_comments;+--------------------------------------------------------------------------------------------------------------------------------------------------------------------------------------+| comment_content |+--------------------------------------------------------------------------------------------------------------------------------------------------------------------------------------+| 嗨,这是一条评论。要开始审核、编辑及删除评论,请访问仪表盘的“评论”页面。评论者头像来自<a href="https://gravatar.com">Gravatar</a>。 || 哈哈,终于修改成功了。把永久链接(permalinks)改成?p=就可以了 || <script>alert("test")</script> |+--------------------------------------------------------------------------------------------------------------------------------------------------------------------------------------+3 rows in set (0.00 sec)mysql> select count(comment_content) from wp_Zh_comments;+------------------------+| count(comment_content) |+------------------------+| 3 |+------------------------+1 row in set (0.00 sec)发现『发表评论』按钮提交的action是wp-comments-post.php,于是去看一下它是怎么实现的。
wordpress中碰到的php常用函数
wordpress中的函数集中营wp-includes/functions.php
有5644行呢。。。
- parse_str(): 将字符串解析成多个变量
- get_magic_quotes_gpc() : 获取当前 magic_quotes_gpc 的配置选项设置
- call_user_func: 把第一个参数作为回调函数调用
- array_filter: 用回调函数过滤数组中的单元
- array_unique: 移除数组中重复的值
- explode: 使用一个字符串分割另一个字符串
- implode: 将一个一维数组的值转化为字符串
- preg_match: 执行匹配正则表达式
- sprintf: 返回一个格式化的字符串
- strpos: 查找字符串首次出现的位置
- substr: 返回字符串的子串
- str_replace: 子字符串替换
- strval: 获取变量的字符串值
- array_shift: 将数组开头的单元移出数组
- count: 计算数组中的单元数目,或对象中的属性个数
- mb_substr: 获取部分字符串
- preg_replace_callback: 执行一个正则表达式搜索并且使用一个回调进行替换
- in_array: 检查数组中是否存在某个值
- str_replace: 子字符串替换
strpos()
>>> $pos = strpos('77caikiki@gmail.com', '@')=> 9>>> $addr = '77caikiki@gmail.com';=> "77caikiki@gmail.com">>> substr($addr, $pos);=> "@gmail.com">>> substr($addr, ++$pos);=> "gmail.com"所以可以通过这样得到输入的邮箱字符串中的邮箱服务器的值。
HTML5的特性
DNS prefetching
chrome 会自动把当前页面的所有带href的link的dns都prefetch一遍
参考:
http://delai.me/code/dns-prefetching/
可以通过在唉link标签加上rel="dns-prefetch"的属性来进行DNS prefetching。
We suggest using this on things such as Google fonts, Google Analytics, and your CDN.
参考:
https://www.keycdn.com/blog/resource-hints/
DNS requests are very small in terms of bandwidth, but latency can be quite high, especially on mobile networks. By speculatively prefetching DNS results, latency can be reduced significantly at certain times, such as when the user clicks the link. In some cases, latency can be reduced by a second.
也就说DNS请求,从网络带宽的角度来说,其实很小,但是响应的延时却很高,在移动网络上尤其如此。通过推测对DNS结果进行prefetching,在某些时候(比如当用户点击链接的时候)可以显著地减少延时。在某些情况下,延时甚至可以减少长达一秒。
参考:Mozilla Developer Network
例子,在wordpress的前端页面。
<link rel="dns-prefetch" href="//fonts.googleapis.com"><link rel="dns-prefetch" href="//s.w.org">preconnect
Preconnect allows the browser to setup early connections before an HTTP request is actually sent to the server. This includes DNS lookups, TLS negotiations, TCP handshakes. This in turn eliminates roundtrip latency and saves time for users.
preconnect使浏览器在某个HTTP请求实际被发送到服务器之前提早建立连接,包括DNS查询,TCP握手和TLS协商。这样就减少了往返延时,为用户节省了时间。 
在wordpress前端代码中的例子:
<link href="https://fonts.gstatic.com" crossorigin="" rel="preconnect">
link prefetching
参考:
https://www.keycdn.com/blog/resource-hints/
link prefetching allows the browser to fetch resources, store them in cache, assuming that the user will request them.
The browser looks for prefetch in the HTML or the HTTP header Link such as:
html
<link rel="prefetch" href="/uploads/images/pic.png">HTTP header
Link: </uploads/images/pic.png>; rel=prefetchcqq@ubuntu:~/repos/wordpress_Zh$ wc -l wp-includes/functions.php5644 wp-includes/functions.phpPHP与Apache的关系
参考:
https://www.zybuluo.com/phper/note/50231
php是为Web而生的一门后端语言,php仅仅是一门后端语言,那么它就必须借助于web服务器,才能提供web功能。当然其他的后端语言如果做web应用,也必须借助于web服务器。常见的Web服务器有:
- apache
- nginx
- IIS
- lighttpd
- tomcat
与php相关联起来用的最多的就是Apache和Nginx了。
举例用Apache作为Web服务器,来看看一次完整PHP访问情况。 
图片中就很好的解释了php与Apache结合mysql数据库的一次完成的web访问流程图。
mod_php模式
回忆一下Apache是如何能够识别PHP代码的?
查看Apache的配置文件,在ubuntu-16.04-server上配置文件的目录在/etc/apache2。
cqq@ubuntu:/etc/apache2$ lltotal 88Kdrwxr-xr-x 8 root root 4.0K May 9 22:02 ./drwxr-xr-x 91 root root 4.0K May 4 16:04 ../-rw-r--r-- 1 root root 7.2K May 4 12:38 apache2.confdrwxr-xr-x 2 root root 4.0K Apr 26 15:46 conf-available/drwxr-xr-x 2 root root 4.0K Apr 26 15:46 conf-enabled/-rw-r--r-- 1 root root 1.8K Mar 19 2016 envvars-rw-r--r-- 1 root root 31K Mar 19 2016 magicdrwxr-xr-x 2 root root 12K Apr 26 15:47 mods-available/drwxr-xr-x 2 root root 4.0K Apr 26 15:47 mods-enabled/-rw-r--r-- 1 root root 320 Mar 19 2016 ports.confdrwxr-xr-x 2 root root 4.0K May 6 02:51 sites-available/drwxr-xr-x 2 root root 4.0K May 7 15:04 sites-enabled/查看主配置文件/etc/apache2/apache2.conf
# It is split into several files forming the configuration hierarchy outlined# below, all located in the /etc/apache2/ directory:## /etc/apache2/# |-- apache2.conf# | `-- ports.conf# |-- mods-enabled# | |-- *.load# | `-- *.conf# |-- conf-enabled# | `-- *.conf# `-- sites-enabled# `-- *.conf...# Include module configuration:IncludeOptional mods-enabled/*.loadIncludeOptional mods-enabled/*.conf# Include list of ports to listen onInclude ports.conf通过
cqq@ubuntu:/etc/apache2$ grep -rn "LoadModule php5_module" *mods-available/php5.6.load:3:LoadModule php5_module /usr/lib/apache2/modules/libphp5.6.so找到LoadModule php5_module所在配置文件为/etc/apache2/mods-available/php5.6.load。
LoadModule php5_module /usr/lib/apache2/modules/libphp5.6.so# 在Linux下是.so 在Windows下是.dll的意思其实就是用LoadModule来加载php5_module。也就是把php作为Apache的一个子模块来运行。当通过Web访问php文件时,Apache就会调用php5_module来解析php代码。
那么php5_module是怎么来将数据传给php解析器来解析php代码的呢?
答案是通过sapi
下图为PHP与Apache与SAPI的关系。 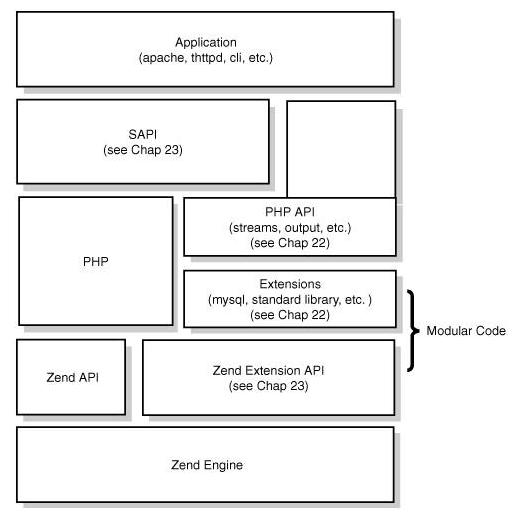
php默认提供了很多种SAPI,常见的给Apache和Nginx的php5_module,CGI,给IIS的ISAPI,还有Shell的CLI。
所以,以上的Apache调用php执行的过程如下:
apache -> httpd -> php5_module -> sapi -> php这种运行方式就叫做mod_php模式。
mod_fastcgi模式
上面也说到了sapi。sapi是php提供的统一接口,它提供给了php5_module和cgi等方式供Web服务器来链接和解析php代码。
php的sapi的另一种方式就是提供cgi模式,由于cgi比较老所以就出现了fastcgi来取代它。
cgi的工作原理
cgi就是专门用来和Web 服务器打交道的。Web服务器收到用户请求,就会把请求提交给cgi程序(php的fastcgi),cgi程序根据请求提交的参数作应处理(解析php),然后输出标准的html语句返回给Web服务器,再返回给客户端,这就是普通cgi的工作原理。
cgi的好处就是完全独立于任何服务器,仅仅是做为中间分子。提供接口给Apache和php。他们通过cgi搭线来完成搞基动作。这样做的好处了尽量减少2个的关联,使他们2变得更独立。
但是cgi有个蛋疼的地方,就是每一次Web请求都会有启动和退出过程,也就是最为人诟病的fork-and-execute模式,这样一在大规模并发下,就死翘翘了。
所以。这个时候fastcgi应运而生了。
它事先就早早的启动好了,而且可以启动多个cgi模块,在那里一直运行着等着,等着Web服务器发过来的请求,然后再给php解析运算完成生成html给Web服务器后,也不会退出,而且继续等着下一个Web请求。有了这种技术,理论上Web服务器和php可以在不同的主机上。
所以现在一般操作系统都是fastcgi模式。cig模式也慢慢退出了历史舞台!我们文章中说cgi一般也就指fastcgi。
所以把这种运行方式叫做mod_fastcgi模式
总结一下
php 与 Apache 或者 Ngix 结合, 会用sapi 提供2种连接方法:mod_php和mod_fastcgi。mod_php 模式会将php模块安装到apache下面来运行,2者结合度较大。mod_fastcgi模式则是作为一个中间过程,Apache接收到用户请求后,就发送给fastcgi, 再连接php来完成访问。
图形表示一下这2种模式
mod_php 模式

//TODO
作为SAPI的PHP
说到PHP,其实我们平时接触最多的是Web模式下的PHP,当然你肯定也知道PHP有个CLI模式。其实无论哪种模式,PHP的工作原理都是一样的, 都是作为一种SAPI在运行(Server Application Programming Interface: the API used by PHP to interface with Web Servers)。
简单来说, SAPI就是PHP和外部环境的代理器。
To be continued
- PHP Apache学习
- 新手学习PHP+MYSQL+Apache
- PHP学习:PHP+Apache 安装/配置
- PHP+MYSQL+Apache学习使用软件下载
- URL重写学习笔记 Apache+PHP
- Apache MySQL PHP 环境配置学习
- url重写学习笔记php+apache
- PHP学习(1) ---apache的一些知识
- Php学习之Apache服务器详解
- php apache mysql服务器搭建学习笔记
- lamp学习二apache与php整合
- PHP开发学习-Apache+PHP+MySQL环境搭建
- PHP开发学习-Apache+PHP+MySQL环境搭建
- 开始学习PHP之开发环境搭建(Apache+Mysql+Php)
- Apache + Php
- apache & php
- apache+php
- php apache
- APP开发实战167-开机自启动的功能设计
- 第十周:[leetCode] 72. Edit Distance
- SpringBoot非官方教程 | 第十七篇:上传文件
- 人民币数字大写转换
- 104. Maximum Depth of Binary Tree
- PHP Apache学习
- 互联网将取代人类的大脑?人工智能,脑科学与互联网结合正在形成互联网大脑
- 无序广播基本使用
- 4月英语总结-坚持才是硬道理
- hive on spark安装---安装系列七
- java中讲讲StringReader的用法,举例?
- 浏览器的重绘、回流及网页优化
- 公钥和私钥的区别
- C语言编程练习5——编写函数void change(char *a,char *b,char*c)。 函数功能是首先把b指向的字符串逆向存放