linux下与Arduino通信
来源:互联网 发布:淘宝买彩票安全吗 编辑:程序博客网 时间:2024/06/07 13:33
第一次使用Arduino IDE时,如果不是要求最新的版本,在Ubuntu的应用商店里即可下载到Arduino的IDE,安装完成后会提示将当前用户添加到dialout用户组中,这样才能下载,选择对话框的ADD即可,或者用下面的语句: 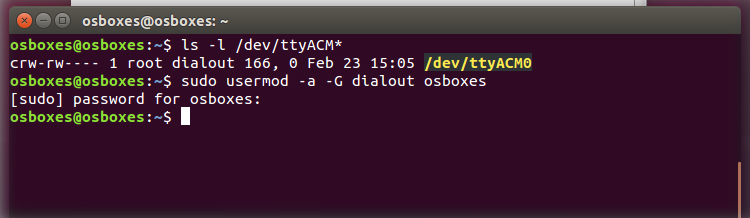
ls -l /dev/ttyACM*you will get something like:crw-rw---- 1 root dialout 188, 0 5 apr 23.01 ttyACM0The "0" at the end of ACM might be a different number, or multiple entries might be returned. The data we need is "dialout" (is the group owner of the file).Now we just need to add our user to the group:sudo usermod -a -G dialout <username>where <username> is your linux user name. You will need to log out and log in again for this change to take effect. 在arduino pro mini上进行串口通信时,利用FTD1232,下载时需要用DTR data terminal ready,这样就不用在下载时按复位键了。 在linux上与它通信时,有个现象,重新拔插USB后,第一此执行程序时,没反应,再次执行时,就可以了,后来拔掉DTR后,无论是否刚插上USB,都可以直接进行通信。
linux下:
//============================================================================// Name : SerialPortSend.cpp// Author : zn// Version :// Copyright : Your copyright notice// Description : Hello World in C++, Ansi-style//============================================================================#include <iostream>#include <stdio.h> /* Standard input/output definitions */#include <string.h> /* String function definitions */#include <unistd.h> /* UNIX standard function definitions write 在这里 */#include <fcntl.h> /* File control definitions O_RDWR 在这里 */#include <errno.h> /* Error number definitions */#include <termios.h> /* POSIX terminal control definitions */using namespace std;int ToSerial(){ int file = open("/dev/ttyUSB0", O_RDWR | O_NOCTTY); //以读写方式打开串口,不控制TTY if(file < 0) { printf("error to open\n"); return 1; } usleep(20000); write(file,"b",2); usleep(20000); write(file,"f",2); usleep(20000); usleep(20000); printf("hello!\n"); close(file); return 0;}int main() { for(int i=0;i<1;i++) { ToSerial(); } return 0;}Arduino下:
int x;void setup() { Serial.begin(9600); pinMode(9,OUTPUT); // Enable pinMode(3,OUTPUT); // Step pinMode(2,OUTPUT); // Dir } void loop() { char ch = Serial.read(); switch(ch){ case 'f': digitalWrite(9,LOW); // Set Enable low fwd(); Serial.println("receive f"); digitalWrite(9,HIGH); // Set Enable low break; case 'b': digitalWrite(9,LOW); // Set Enable low bwd(); Serial.println("receive b"); digitalWrite(9,HIGH); // Set Enable low break; }}void fwd(){ digitalWrite(2,HIGH); // Set Dir high for(x = 0; x < 400; x++) // Loop 400 times 1.8*200=360 { digitalWrite(3,HIGH); // Output high delayMicroseconds(5000); // Wait ms digitalWrite(3,LOW); // Output low delayMicroseconds(2500); // Wait a ms } delay(1000); // pause one second }void bwd(){ digitalWrite(2,LOW); // Set Dir low for(x = 0; x < 400; x++) // Loop 400 times { digitalWrite(3,HIGH); // Output high delayMicroseconds(5000); // Wait ms digitalWrite(3,LOW); // Output low delayMicroseconds(2500); // Wait ms }delay(1000); // pause one second }浅谈linux下的串口通讯开发
linux下查看串口信息
sudo ttylog -d /dev/ttyACM0 -b 38400(这个是波特率) 0 0
- linux下与Arduino通信
- Arduino与Silverlight通信
- 树莓派与arduino通信
- 树莓派与Arduino串口通信
- 树莓派与arduino串行通信
- arduino与Processing通信问题
- pcduino与Arduino串口通信
- 浅谈arduino与android通信
- ESP8266 Android 与 Arduino 通信
- 手机通过蓝牙串口与arduino通信
- Openwrt与Arduino之间USB通信
- arduino与processing串口通信问题
- NFC:Arduino、Android与PhoneGap近场通信
- Arduino蓝牙模块与Android实现通信
- 树莓派与Arduino的串口通信
- Arduino与Processing串口通信问题
- Arduino与Android蓝牙通信笔记
- Arduino 与上位机的通信
- 基础DP-递推-类数字三角形。
- Java从基础开始_02Java基础常用API
- sicily 1091:Maximum Sum(week 9)
- Java学习6 面向对象编程进阶
- [LeetCode]575. Distribute Candies(妹妹最多能得到多少种糖果)
- linux下与Arduino通信
- PrintStream DataOutputStream 保存的字节数(int,汉字)
- Python 3基础教程35-tkinter事务处理
- 0507 css选择器补充
- ES6详细介绍
- python中PIL库的常用操作
- 数据库--MySql基础
- ubuntu-boost解析json文件
- 基于uda1340 的 mixer混音器编程实例