今天做到一道面试题:Handler+Looper+MessageQueue+Message的关系
来源:互联网 发布:知乎融资历程 编辑:程序博客网 时间:2024/06/06 03:27
Handler+Looper+MessageQueue+Message的关系
源处:http://www.cnblogs.com/cr330326/p/5530222.html
Handler+Looper+MessageQueue这三者的关系其实就是Android的消息机制。这块内容相比开发人员都不陌生,在面试中,或者日常开发中都会碰到,今天就来讲这三者的关系。
概述:
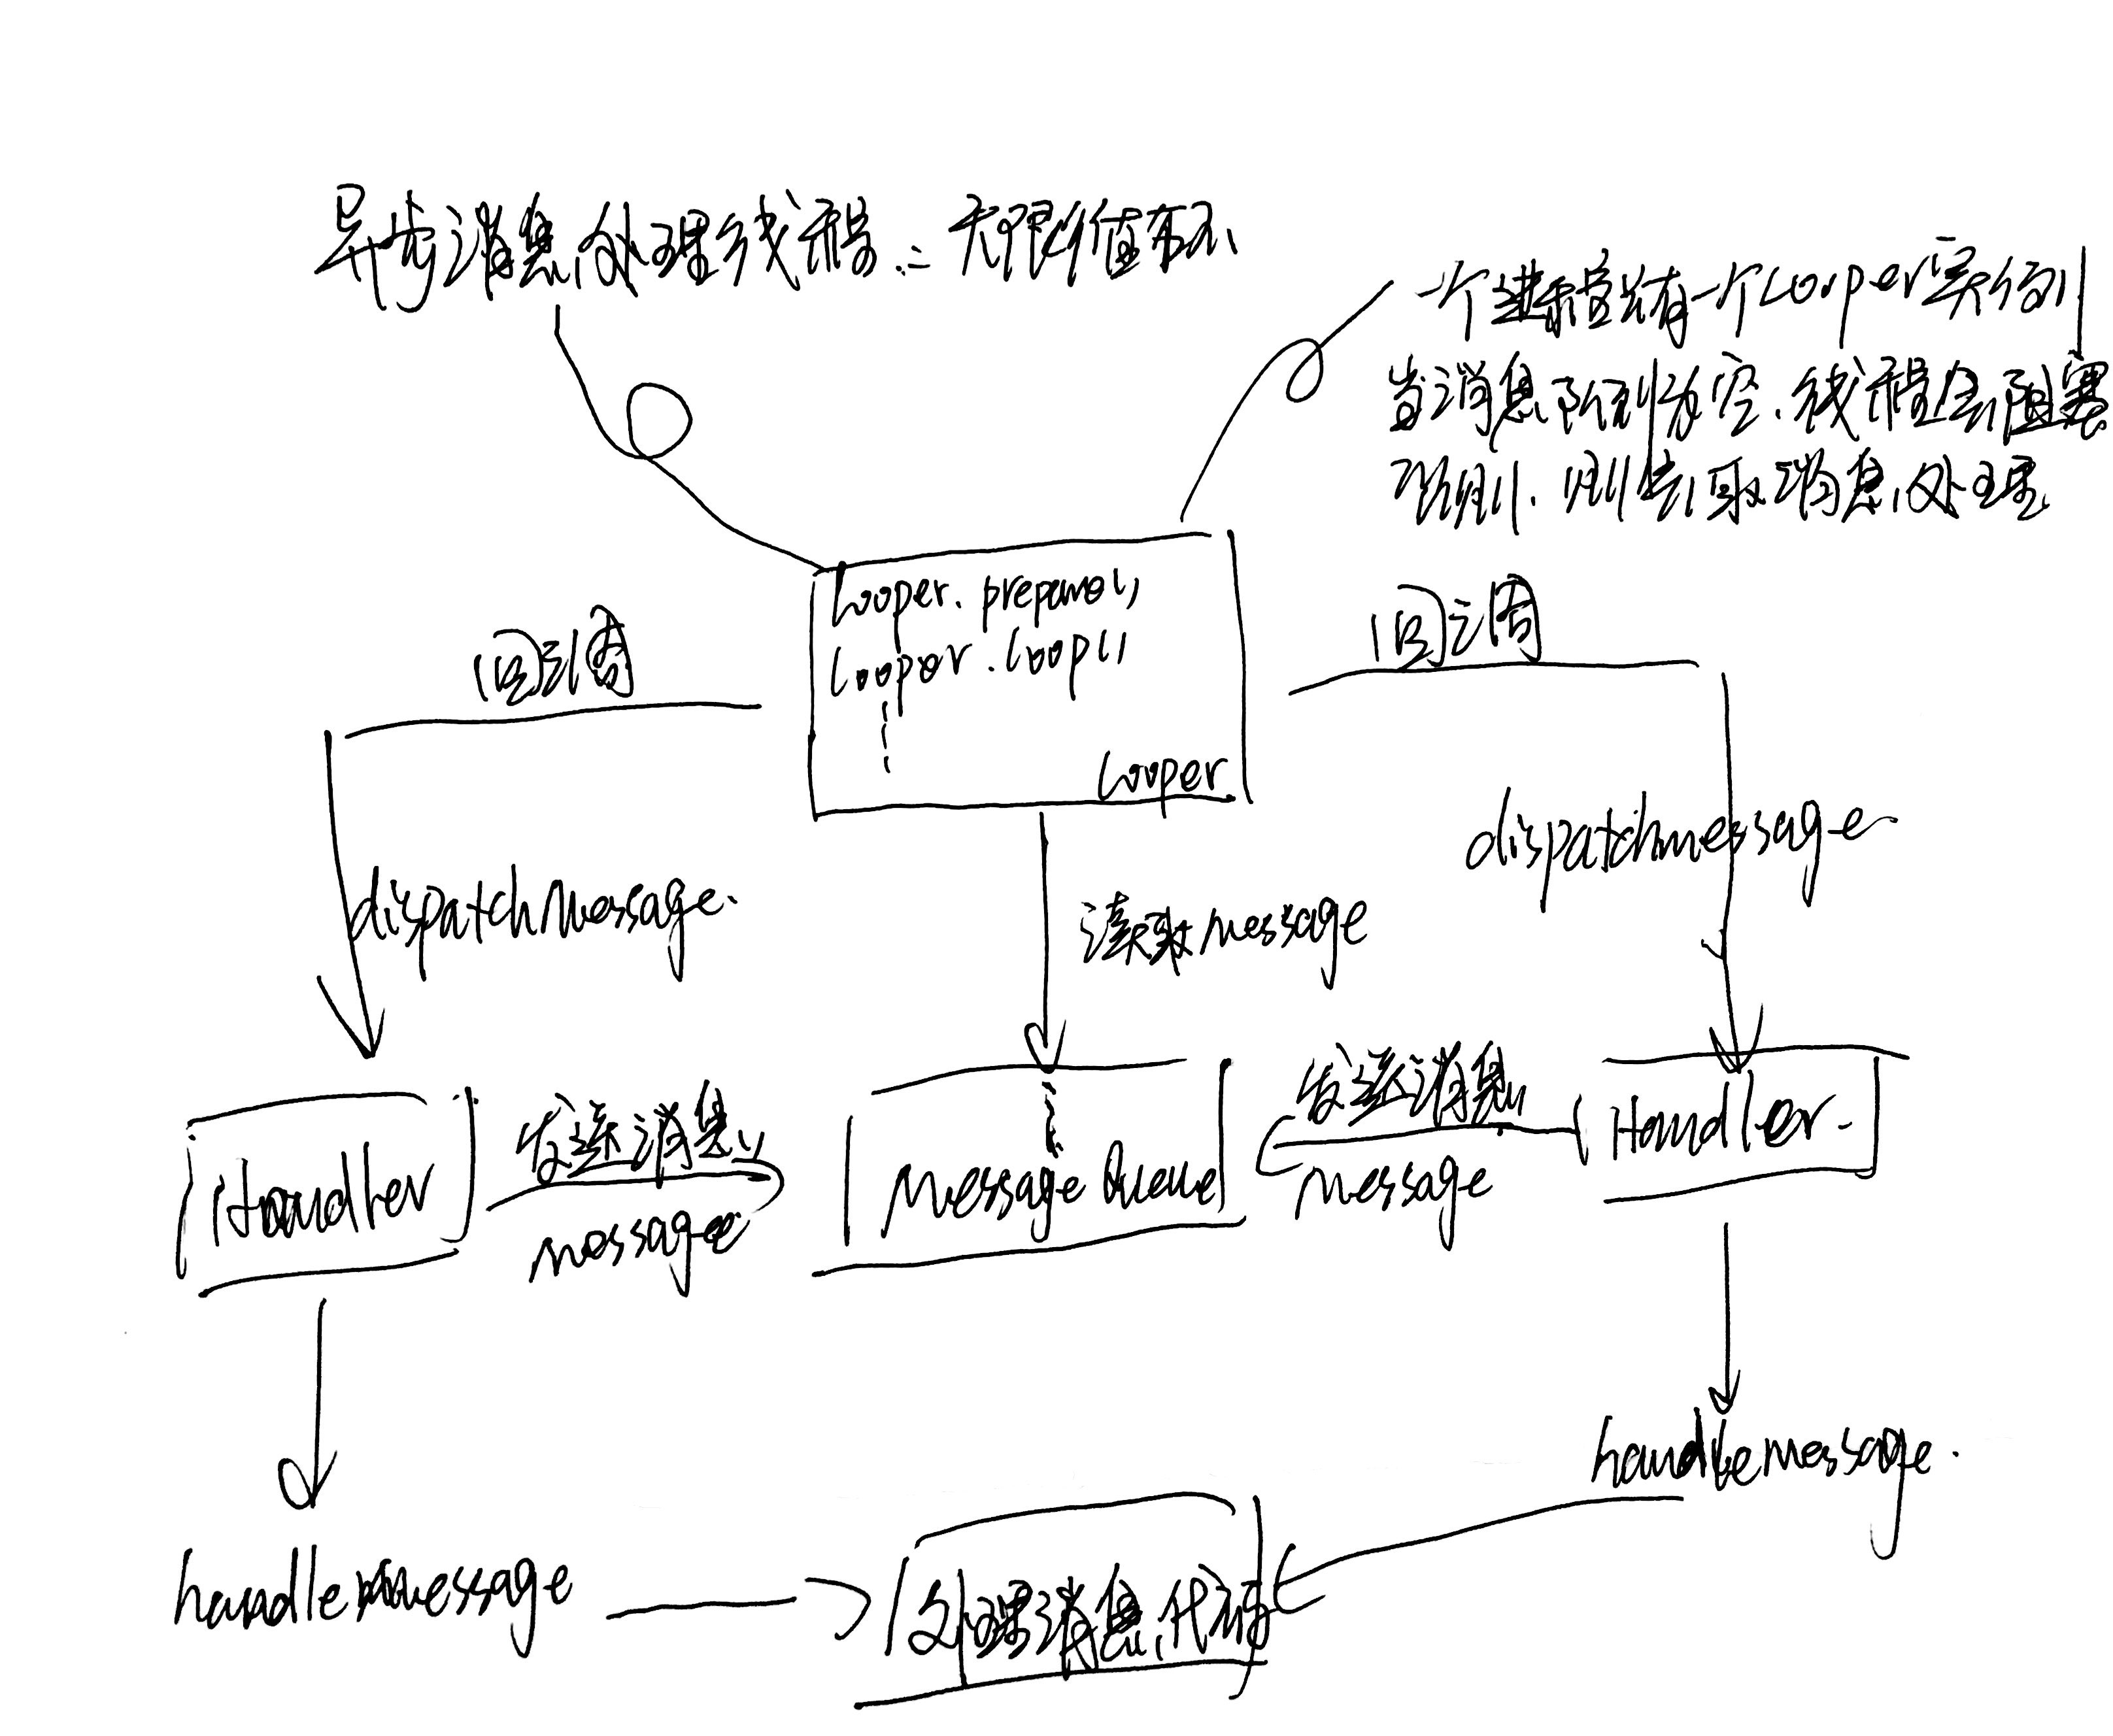
Handler 、 Looper 、Message 这三者都与Android异步消息处理线程相关的概念。那么什么叫异步消息处理线程呢?
关系图:
先给出这三者之间的关系图
原因:
Looper类
Looper扮演的角色就是消息循环,不断从MessageQueue中查看是否有新消息,如果有新消息到来就会立刻处理,否则就一直祖塞在那里,在它的构造方法,默认会创建一个MessageQueue的消息队列,然后将当前线程的对象保存起来。
private Looper(boolean quitAllowed) { mQueue =newMessageQueue(quitAllowed); mRun =true; mThread = Thread.currentThread();}对于Looper主要是prepare()和loop()两个方法,首先看prepare()方法。
public static final void prepare() { if (sThreadLocal.get() != null) { throw new RuntimeException("Only one Looper may be created per thread"); } sThreadLocal.set(new Looper(true));}
sThreadLocal是一个ThreadLocal对象,可以在一个线程中存储变量。可以看到,在第5行,将一个Looper的实例放入了ThreadLocal,并且2-4行判断了sThreadLocal是否为null,否则抛出异常。这也就说明了Looper.prepare()方法不能被调用两次,同时也保证了一个线程中只有一个Looper实例
然后我们看loop()方法:

public static void loop() { final Looper me = myLooper(); if (me == null) { throw new RuntimeException("No Looper; Looper.prepare() wasn't called on this thread."); } final MessageQueue queue = me.mQueue; // Make sure the identity of this thread is that of the local process, // and keep track of what that identity token actually is. Binder.clearCallingIdentity(); final long ident = Binder.clearCallingIdentity(); for (;;) { Message msg = queue.next(); // might block if (msg == null) { // No message indicates that the message queue is quitting. return; } // This must be in a local variable, in case a UI event sets the logger Printer logging = me.mLogging; if (logging != null) { logging.println(">>>>> Dispatching to " + msg.target + " " + msg.callback + ": " + msg.what); } msg.target.dispatchMessage(msg); if (logging != null) { logging.println("<<<<< Finished to " + msg.target + " " + msg.callback); } // Make sure that during the course of dispatching the // identity of the thread wasn't corrupted. final long newIdent = Binder.clearCallingIdentity(); if (ident != newIdent) { Log.wtf(TAG, "Thread identity changed from 0x" + Long.toHexString(ident) + " to 0x" + Long.toHexString(newIdent) + " while dispatching to " + msg.target.getClass().getName() + " " + msg.callback + " what=" + msg.what); } msg.recycle(); }}
方法直接返回了sThreadLocal存储的Looper实例,如果me为null则抛出异常,也就是说looper方法必须在prepare方法之后运行。
拿到该looper实例中的mQueue(消息队列)
就进入了我们所说的无限循环。
取出一条消息,如果没有消息则阻塞。
使用调用 msg.target.dispatchMessage(msg);把消息交给msg的target的dispatchMessage方法去处理。Msg的target是什么呢?其实就是handler对象,下面会进行分析。
释放消息占据的资源。
Looper主要作用:
1、 与当前线程绑定,保证一个线程只会有一个Looper实例,同时一个Looper实例也只有一个MessageQueue。
2、 loop()方法,不断从MessageQueue中去取消息,交给消息的target属性的dispatchMessage去处理。
好了,我们的异步消息处理线程已经有了消息队列(MessageQueue),也有了在无限循环体中取出消息的哥们,现在缺的就是发送消息的对象了,于是乎:Handler登场了。
Handler类
public Handler() { this(null, false);}public Handler(Callback callback, boolean async) { if (FIND_POTENTIAL_LEAKS) { final Class<? extends Handler> klass = getClass(); if ((klass.isAnonymousClass() || klass.isMemberClass() || klass.isLocalClass()) && (klass.getModifiers() & Modifier.STATIC) == 0) { Log.w(TAG, "The following Handler class should be static or leaks might occur: " + klass.getCanonicalName()); } } mLooper = Looper.myLooper(); if (mLooper == null) { throw new RuntimeException( "Can't create handler inside thread that has not called Looper.prepare()"); } mQueue = mLooper.mQueue; mCallback = callback; mAsynchronous = async; }
通过Looper.myLooper()获取了当前线程保存的Looper实例,然后在19行又获取了这个Looper实例中保存的MessageQueue(消息队列),这样就保证了handler的实例与我们Looper实例中MessageQueue关联上了。
然后看我们最常用的sendMessage方法
public final boolean sendMessage(Message msg) { return sendMessageDelayed(msg, 0); } public final boolean sendEmptyMessageDelayed(int what, long delayMillis) { Message msg = Message.obtain(); msg.what = what; return sendMessageDelayed(msg, delayMillis); } public final boolean sendMessageDelayed(Message msg, long delayMillis) { if (delayMillis < 0) { delayMillis = 0; } return sendMessageAtTime(msg, SystemClock.uptimeMillis() + delayMillis); } public boolean sendMessageAtTime(Message msg, long uptimeMillis) { MessageQueue queue = mQueue; if (queue == null) { RuntimeException e = new RuntimeException( this + " sendMessageAtTime() called with no mQueue"); Log.w("Looper", e.getMessage(), e); return false; } return enqueueMessage(queue, msg, uptimeMillis); }
最后调用了sendMessageAtTime,在此方法内部有直接获取MessageQueue然后调用了enqueueMessage方法,我们再来看看此方法:
private boolean enqueueMessage(MessageQueue queue, Message msg, long uptimeMillis) { msg.target = this; if (mAsynchronous) { msg.setAsynchronous(true); } return queue.enqueueMessage(msg, uptimeMillis); }
enqueueMessage中首先为meg.target赋值为this,如果大家还记得Looper的loop方法会取出每个msg然后交给msg,target.dispatchMessage(msg)去处理消息,也就是把当前的handler作为msg的target属性。最终会调用queue的enqueueMessage的方法,也就是说handler发出的消息,最终会保存到消息队列中去。
现在已经很清楚了Looper会调用prepare()和loop()方法,在当前执行的线程中保存一个Looper实例,这个实例会保存一个MessageQueue对象,然后当前线程进入一个无限循环中去,不断从MessageQueue中读取Handler发来的消息。然后再回调创建这个消息的handler中的dispathMessage方法,下面我们赶快去看一看这个方法:
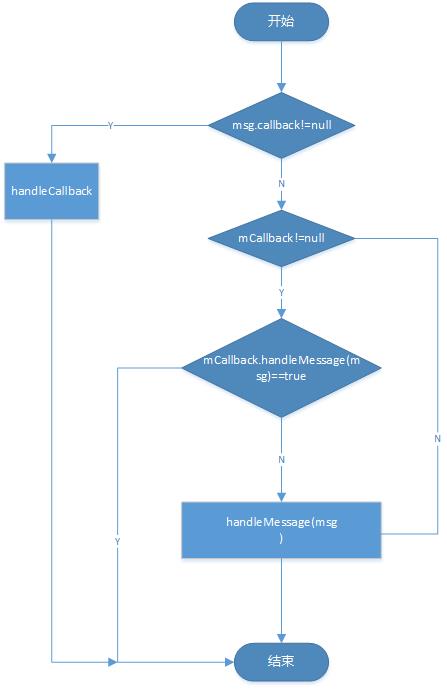
public void dispatchMessage(Message msg) { if (msg.callback != null) { handleCallback(msg); } else { if (mCallback != null) { if (mCallback.handleMessage(msg)) { return; } } handleMessage(msg); } } /** * Subclasses must implement this to receive messages. */ public void handleMessage(Message msg) { }
可以看到这是一个空方法,为什么呢,因为消息的最终回调是由我们控制的,我们在创建handler的时候都是复写handleMessage方法,然后根据msg.what进行消息处理。
1、首先Looper.prepare()在本线程中保存一个Looper实例,然后该实例中保存一个MessageQueue对象;因为Looper.prepare()在一个线程中只能调用一次,所以MessageQueue在一个线程中只会存在一个。
2、Looper.loop()会让当前线程进入一个无限循环,不端从MessageQueue的实例中读取消息,然后回调msg.target.dispatchMessage(msg)方法。
3、Handler的构造方法,会首先得到当前线程中保存的Looper实例,进而与Looper实例中的MessageQueue想关联。
4、Handler的sendMessage方法,会给msg的target赋值为handler自身,然后加入MessageQueue中。
5、在构造Handler实例时,我们会重写handleMessage方法,也就是msg.target.dispatchMessage(msg)最终调用的方法。
Handler Post
看代码
public final boolean post(Runnable r) { return sendMessageDelayed(getPostMessage(r), 0); } private static Message getPostMessage(Runnable r) { Message m = Message.obtain(); m.callback = r; return m; } public final boolean sendMessageDelayed(Message msg, long delayMillis) { if (delayMillis < 0) { delayMillis = 0; } return sendMessageAtTime(msg, SystemClock.uptimeMillis() + delayMillis); } public boolean sendMessageAtTime(Message msg, long uptimeMillis) { MessageQueue queue = mQueue; if (queue == null) { RuntimeException e = new RuntimeException( this + " sendMessageAtTime() called with no mQueue"); Log.w("Looper", e.getMessage(), e); return false; } return enqueueMessage(queue, msg, uptimeMillis); }
可以看到,在getPostMessage中,得到了一个Message对象,然后将我们创建的Runable对象作为callback属性,赋值给了此message.
注:产生一个Message对象,可以new ,也可以使用Message.obtain()方法;两者都可以,但是更建议使用obtain方法,因为Message内部维护了一个Message池用于Message的复用,避免使用new 重新分配内存。最终和handler.sendMessage一样,调用了sendMessageAtTime,然后调用了enqueueMessage方法,给msg.target赋值为handler,最终加入MessagQueue.
可以看到,这里msg的callback和target都有值,那么会执行哪个呢?
dispatchMessage方法
public void dispatchMessage(Message msg) { if (msg.callback != null) { handleCallback(msg); } else { if (mCallback != null) { if (mCallback.handleMessage(msg)) { return; } } handleMessage(msg); } }
Handler使用流程图:
====================================================================================================================================
Handler sendMessage 与obtainMessage--sendToTarget的区别
原文链接:http://www.cnblogs.com/android007/archive/2012/05/10/2494766.html
Message msg = new Message()msg.what = xxx;msg.arg1 = xxx;msg.arg2 = xxx;handler.sendMessage(msg);
这样写也没有绝得不好,反正当时项目的功能实现了。(性能上还可以)
后来没事的时候看了看handler 的其他的方法,就看到了obtainMessage()这个方法.很奇怪,不知道为何还要出来的方法
本来上面的那段code 就能实现handler 的功能了,为什么还要出现他,后来百度google 一把,大家说 什么性能上有差别之
类的。。。。。结果可想而知(大部分的文章都是你抄我的我抄你的,技术就是这样出来的。。鄙视这种抄写别人博客文章而
不著名转载出处的人)。于是我就去看源码能否看到一些好的描述。
Message msg = handler.obtainMessage();msg.what = xxx;msg.arg1 = xxx;msg.arg2 = xxx;msg.obj = xxx;....................
看看这两段代码其实就是方法不一样 ,参数都一样。但是为何实现的效果一样还要分离出来这么多方法呢?
到源码去看个究竟吧!
先去看sendMessage()这个方法。。。。它调用的是Handler 中的sendMessage(Message msg)
源码 片段1 如下:
/** * Pushes a message onto the end of the message queue after all pending messages * before the current time. It will be received in {@link #handleMessage}, * in the thread attached to this handler. * * @return Returns true if the message was successfully placed in to the * message queue. Returns false on failure, usually because the * looper processing the message queue is exiting. */ publicfinalbooleansendMessage(Message msg) { return sendMessageDelayed(msg,0); }再看handler.obtainMessage()源码 片段2 如下:
/** * Returns a new {@link android.os.Message Message} from the global message pool. <br> * More efficient than creating and allocating new instances. <br> * The retrieved message has its handler set to this instance <br> * (Message.target == this). * If you don't want that facility, just call Message.obtain() instead. */ publicfinalMessage obtainMessage() { returnMessage.obtain(this); }
上面这两段都是Handler 里面的方法,不过在片段1 我们可以看到Message是我们作为参数传过去的,片段2的则是我们
Message帮我们处理,它调用obtain(Handler h)方法,之后我们还要调用Message中sendToTarget()这个方法。
看一下Message.obtain(Hanlder h) 的源码 代码片段3如下:
/** * Same as {@link #obtain()}, but sets the value for the <em>target</em> member on the Message return * ed. * @param h Handler to assign to the returned Message object's <em>target</em> member. * @return A Message object from the global pool. */ publicstaticMessage obtain(Handler h) { Message m = obtain(); m.target = h; returnm; }再看 sendToTarget() 源码 代码片段4 如下:
/** * Sends this Message to the Handler specified by {@link #getTarget}. * Throws a null pointer exception if this field has not been set. */ publicvoidsendToTarget() { <span style="background-color: rgb(255, 0, 0);"> target.sendMessage(this);</span> }这里的target就是handler,sendToTarget()又在调用handler的 sendMessage 方法了。。。
看到这里也许有的人很疑惑,这样转来转去,转了一圈怎么又回到Handler的 sendMessage方法了?那么性能比较一说
还有其他的证据么?(难道调用的方法多性能就低么?也许有这么一点原因,不过这里几乎可以不考虑这一点性能损耗的)
那么性能的比较证据应该从哪里找呢?
其实细心的同学已经看到了,注意看源码的注释,
/**
* Returns a new {@link android.os.Message Message} from the global message pool. More efficient than
* creating and allocating new instances. The retrieved message has its handler set to this instance (Message.target == this).
* If you don't want that facility, just call Message.obtain() instead.
*/
这里我们的Message 已经不是 自己创建的了,而是从MessagePool 拿的,省去了创建对象申请内存的开销。。。。。
到这里大家应该都明白了。所以以后使用的时候尽量使用 Message msg = handler.obtainMessage();的形式创
建Message,不要自己New Message 至于message产生之后你使用obtainMessage 或者是 sendMessage 效率影响
并不大.同时我们也要注意以后谈论性能的时候要找准位置,譬如这里性能的问题不是在调用 obtainMessage 和 sen
dMessage 的方法上,而是调用他们之前对象的创建问题上。
- 今天做到一道面试题:Handler+Looper+MessageQueue+Message的关系
- Handler Looper Message MessageQueue 的关系
- Message、Handler、MessageQueue、Looper之间的关系
- Message,Handler,MessageQueue,Looper之间的关系
- Handler,Looper,Message,MessageQueue的关系
- Message、Handler、MessageQueue、Looper之间的关系
- 详解Message,Handler,MessageQueue,Looper的关系
- android Thread HandlerThread Looper Message MessageQueue Handler的关系
- android中MessageQueue,Message,Looper,handler的关系
- Thread,Looper,Handler,Message,MessageQueue之间的关系
- android Thread HandlerThread Looper Message MessageQueue Handler的关系
- Thread,Looper,Handler,Message,MessageQueue之间的关系
- Thread,Looper,Handler,Message,MessageQueue之间的关系
- android中MessageQueue,Message,Looper,handler的关系
- Thread,Looper,Handler,Message,MessageQueue之间的关系
- Android笔记--ThreadLocal,Looper,Handler,Message,MessageQueue的关系
- 解析Handler,MessageQueue,Message,Looper之间的关系
- Message MessageQueue Runnable Looper 和Handler的关系理解
- Sass中Interpolation #{}的用法
- Java学习笔记之线程
- linux uniq去重
- DOM-1 基础
- svn入门
- 今天做到一道面试题:Handler+Looper+MessageQueue+Message的关系
- ACM 第八届山东省赛 F quadratic equation SDUT 3898
- Cookie/Session机制详解
- android 触摸事件的处理与总结
- JavaScript 面向对象思想以及原型、继承
- 求pai的近似值
- oracle 游标细节引发的错误
- 勘探油田
- xtu-1269 Similar Subsequence(dp+树状数组)