Spring 4 @PropertySource和@Value注解示例
来源:互联网 发布:js脚本代码 编辑:程序博客网 时间:2024/05/19 00:55
前言
译文链接:http://websystique.com/spring/spring-propertysource-value-annotations-example/
本篇文章将展示如何通过@PropertySource 和 @Value注解从配置文件中读取属性值。
同样,我们也会讨论Spring的Environment接口,还会看到使用XML配置和使用注解的对比。
Spring的@PropertySource注解主要是让Spring的Environment接口读取属性配置文件用的,这个注解是标识在@Configuration配置类上的。
Spring的@Value注解可以用在字段和方法上。通常用于从属性配置文件中读取属性值,也可以设置默认值。接下来就让我么看下完整的例子吧。
涉及的技术及开发工具
- Spring 4.0.6.RELEASE
- Maven 3
- JDK 1.6
- Eclipse JUNO Service Release 2
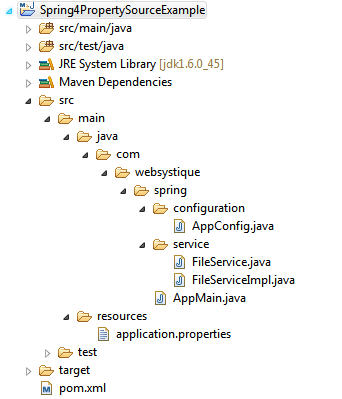
工程结构目录
步骤一:往pom.xml中添加依赖

<project xmlns="http://maven.apache.org/POM/4.0.0" xmlns:xsi="http://www.w3.org/2001/XMLSchema-instance" xsi:schemaLocation="http://maven.apache.org/POM/4.0.0 http://maven.apache.org/xsd/maven-4.0.0.xsd"> <modelVersion>4.0.0</modelVersion> <groupId>com.websystique.spring</groupId> <artifactId>Spring4PropertySourceExample</artifactId> <version>1.0.0</version> <packaging>jar</packaging> <name>Spring4PropertySourceExample</name> <properties> <springframework.version>4.0.6.RELEASE</springframework.version> </properties> <dependencies> <dependency> <groupId>org.springframework</groupId> <artifactId>spring-core</artifactId> <version>${springframework.version}</version> </dependency> <dependency> <groupId>org.springframework</groupId> <artifactId>spring-context</artifactId> <version>${springframework.version}</version> </dependency> </dependencies> <build> <pluginManagement> <plugins> <plugin> <groupId>org.apache.maven.plugins</groupId> <artifactId>maven-compiler-plugin</artifactId> <version>3.2</version> <configuration> <source>1.6</source> <target>1.6</target> </configuration> </plugin> </plugins> </pluginManagement> </build> </project>
步骤二:创建Spring配置类
Spring配置类是指用@Configuration注解标注的类,这些类包含了用@Bean标注的方法。这些被@Bean标注的方法可以生产bean并交由spring容器管理。
package com.websystique.spring.configuration; import org.springframework.context.annotation.Bean;import org.springframework.context.annotation.ComponentScan;import org.springframework.context.annotation.Configuration;import org.springframework.context.annotation.PropertySource;import org.springframework.context.support.PropertySourcesPlaceholderConfigurer; @Configuration@ComponentScan(basePackages = "com.websystique.spring")@PropertySource(value = { "classpath:application.properties" })public class AppConfig { /* * PropertySourcesPlaceHolderConfigurer Bean only required for @Value("{}") annotations. * Remove this bean if you are not using @Value annotations for injecting properties. */ @Bean public static PropertySourcesPlaceholderConfigurer propertySourcesPlaceholderConfigurer() { return new PropertySourcesPlaceholderConfigurer(); }}
@PropertySource(value = { “classpath:application.properties” })注解可以让在application.properties文件中定义的属性对Spring Envirronment bean可用,Environment接口提供了getter方法读取单独的属性值。
注意PropertySourcesPlaceholderConfigurer这个bean,这个bean主要用于解决@value中使用的${…}占位符。假如你不使用${…}占位符的话,可以不使用这个bean。
以上的配置使用XML替代的话,如下:
app-config.xml
<?xml version="1.0" encoding="UTF-8"?><beans xmlns="http://www.springframework.org/schema/beans" xmlns:xsi="http://www.w3.org/2001/XMLSchema-instance" xmlns:context="http://www.springframework.org/schema/context" xsi:schemaLocation="http://www.springframework.org/schema/beans http://www.springframework.org/schema/beans/spring-beans-4.0.xsd http://www.springframework.org/schema/context http://www.springframework.org/schema/context/spring-context-4.0.xsd"> <context:component-scan base-package="com.websystique.spring"/> <bean class="org.springframework.context.support.PropertySourcesPlaceholderConfigurer"> <property name="ignoreUnresolvablePlaceholders" value="true"/> <property name="locations"> <list> <value>classpath:application.properties</value> </list> </property> </bean></beans>
步骤三:创建配置文件
jdbc.driverClassName = com.mysql.jdbc.Driverjdbc.url = jdbc:mysql://localhost:3306/websystiquejdbc.username = myuserjdbc.password = mypasswordhibernate.dialect = org.hibernate.dialect.MySQLDialecthibernate.show_sql = falsehibernate.format_sql = falsesourceLocation = /dev/input我们将会在service类里使用上面提到的配置方式读取这个配置文件
步骤四:创建服务类
package com.websystique.spring.service; public interface FileService { void readValues();}package com.websystique.spring.service; import org.springframework.beans.factory.annotation.Autowired;import org.springframework.beans.factory.annotation.Value;import org.springframework.core.env.Environment;import org.springframework.stereotype.Service; @Service("fileService")public class FileServiceImpl implements FileService { @Value("${sourceLocation:c:/temp/input}") private String source; @Value("${destinationLocation:c:/temp/output}") private String destination; @Autowired private Environment environment; public void readValues() { System.out.println("Getting property via Spring Environment :" + environment.getProperty("jdbc.driverClassName")); System.out.println("Source Location : " + source); System.out.println("Destination Location : " + destination); } }
这里首先要注意的是Environment bean被Spring自动注入。另外,由于配置了@PropertySoruce注解,Environment bean可以访问指定配置文件里定义的所有属性值。你可以使用getProperty方法得到指定值。
另外一点值得注意的是@Value注解,基本格式如下:
@value("${key:default")private String var;以上声明指导spring根据key去属性配置文件查找value,如果没找到,则使用default作为默认值。
注意以上的${…}占位符只有当注册了PropertySourcesPlaceholderConfigurer bean后才能被解析,否则@Value注解会一直将默认值赋值给var。
步骤五:创建Main方法运行程序
package com.websystique.spring; import org.springframework.context.annotation.AnnotationConfigApplicationContext;import org.springframework.context.support.AbstractApplicationContext; import com.websystique.spring.configuration.AppConfig;import com.websystique.spring.service.FileService; public class AppMain { public static void main(String args[]){ AbstractApplicationContext context = new AnnotationConfigApplicationContext(AppConfig.class); FileService service = (FileService) context.getBean("fileService"); service.readValues(); context.close(); } }
运行以上程序,得到如下结果:
Getting property via Spring Environment :com.mysql.jdbc.Driver
Source Location : /dev/input
Destination Location : c:/temp/output
AbstractApplicationContext context = new AnnotationConfigApplicationContext(AppConfig.class);AbstractApplicationContext context = new ClassPathXmlApplicationContext("app-config.xml");- Spring 4 @PropertySource和@Value注解示例
- Spring 4 @PropertySource和@Value注解示例
- Spring的@PropertySource和@Value注解例子
- Spring的@PropertySource和@Value注解例子
- Spring的@PropertySource和@Value注解例子
- spring boot使用@Value,@PropertySource注解使用
- (15)spring boot使用@Value,@PropertySource注解使用
- spring注解 @PropertySource 配置数据源
- spring@PropertySource
- spring注解 配置属性 Environment@PropertySource 配置数据源
- spring注解@PropertySource,给类注入属性文件
- Spring @Value注解问题
- 【Spring】学习@Value注解
- Spring @Value注解失败
- spring中@value注解
- spring中@value注解
- Spring 注解@Value详解
- Spring 注解@Value
- [leetcode]: 415. Add Strings
- ArrayList的使用
- POM文件中配置了ReportNG监听器后,找不到配置文件了??报空指针
- Attack
- Problem B (BFS)
- Spring 4 @PropertySource和@Value注解示例
- 如何正确使用开源项目?
- c++第六次作业
- 实验6
- CF799D:Field expansion(dp)
- Linux命令基础39-apt-get命令
- jquery 模块拖拽功能的实现
- 附加依赖项值的快速求取(opencv+vs)
- opencv 图像融合(局部处理)