QxOrm 的安装
来源:互联网 发布:淘宝气值是什么意思 编辑:程序博客网 时间:2024/06/08 04:09
下载地址:http://www.qxorm.com/qxorm_en/tutorial_3.html
提前条件 :需要翻墙(vpn工具)
This tutorial provides a way to install a development environment to work with Qt, boost and QxOrm library on Windows, each library built on 32 bits mode (all steps are similar for 64 bits mode).
At the end of this tutorial, you will be able to choose between Microsoft Visual C++ 2012 andQtCreator EDI.Prerequisites : Microsoft Visual C++ 2012 is already installed on your computer (no matter the version : «Express », « Professional », etc.).
Note : each version of QxOrm library is tested on Windows with MSVC++ 2008, MSVC++ 2010, MSVC++ 2012 (32 bits and 64 bits) and MinGW GCC 4.5. This tutorial is written for MSVC++ 2012, but the installation process will be similar for other compilers.
Other note : although this tutorial is for Windows developers, each version of QxOrm library is tested and validated on Linux (withGCC) and Mac OS X (with Clang).
Tutorial to install your development environment on Windows step by step :
- 1- Download and install Qt (Qt4 or Qt5)
- 2- Add Qt « bin » directory to the Windows « PATH »
- 3- Download and install boost library
- 4- Add boost « lib_shared » directory to the Windows « PATH » (optional)
- 5- Download and install QxOrm library
- 6- Configure « QxOrm.pri » file
- 7- Add QxOrm directory to the Windows « PATH »
- 8- Test your installation executing « qxBlog » sample project
- 9- Test all samples projects of QxOrm package with MSVC++ 2012
- 10- Test QxOrm library with QtCreat
- 1- Download and install Qt (Qt4 or Qt5)
Download Qt here : http://www.qt.io/download/
For example :
Then, execute the Qt setup to install Qt framework on your computer.
2- Add Qt « bin » directory to the Windows « PATH »
Once Qt is installed, it's recommended to add the Qt « bin » directory into the Windows « PATH » (environment variables).
Go to « System properties » Windows screen, « Advanced » tab, then click on « Environment Variables » button :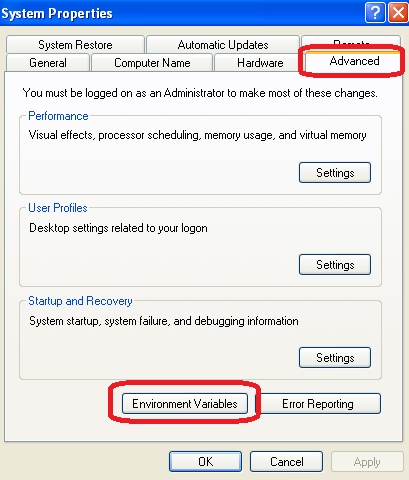
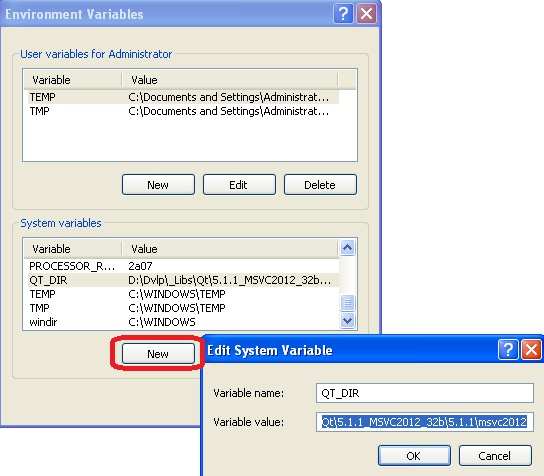
Add a system variable named « QT_DIR » :- Variable name : « QT_DIR » ;
- Variable value : directory where Qt is installed :
- For Qt4 : « QT_DIR » is the root directory of Qt installation ;
- For Qt5 : the installation process is different with Qt5, in our case we have to go to this sub-level : «.\5.1.1\msvc2012\ ».
Modify the system variable « PATH » to add the following value : « ;%QT_DIR%\bin\; »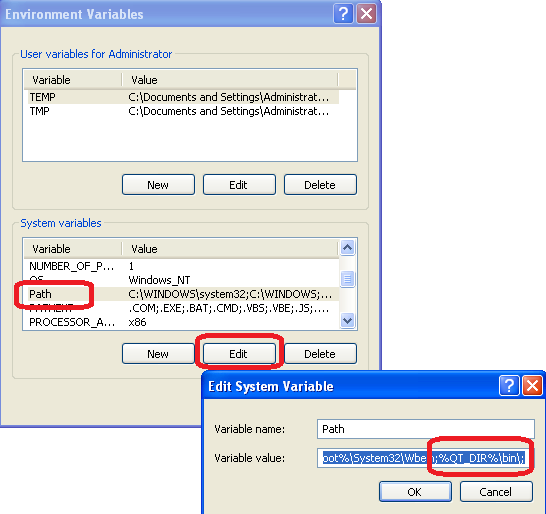
Now, Qt is available on your development environment. You can test the Qt installation opening a DOS window (« Start » menu, « Execute » then « cmd »), then execute this command : «qmake -version » :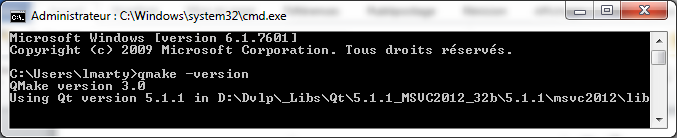
Note : Why did we add the Qt « bin » directory to the Windows « PATH » ? All executables for Qt process (qmake,moc, ui, rcc, etc.) are available everywhere on the system without having to configure other things. Moreover, it will be easier to switch to another Qt version : just modify the « QT_DIR » value to put another Qt directory.
3- Download and install boost library
Note : by default, QxOrm library just needs boost header files *.hpp :boost serialization dependency is optional and not required with default configuration. So some steps about boost installation in this tutorial are optional.
The fastest and easier way is to download the boost package provided by QxOrm website.
The boost package can be downloaded here : http://www.qxorm.com/lib/boost_1_57.zip
This package provides all headers files (*.hpp) from boost framework (inside « include » directory), and « boost::serialization » module compiled and built for the following environments (« lib_shared » directory for 32 bits mode and « lib_shared_64b » directory for 64 bits mode) :- MSVC++ 2008 (files with a name with vc90) ;
- MSVC++ 2010 (files with a name with vc100) ;
- MSVC++ 2012 (files with a name with vc110) ;
- MinGW GCC 4.5 (files with a name with mgw45).
4- Add boost « lib_shared » directory to the Windows « PATH » (optional)
Note : this step is optional and not required by default : if you don't want to work withboost serialization features, then you can go directly to next step.
Go to « System properties » Windows screen, « Advanced » tab, then click on « Environment Variables » button :
Add a system variable named « BOOST_DIR » :- Variable name : « BOOST_DIR » ;
- Variable value : where boost package has been unzipped.
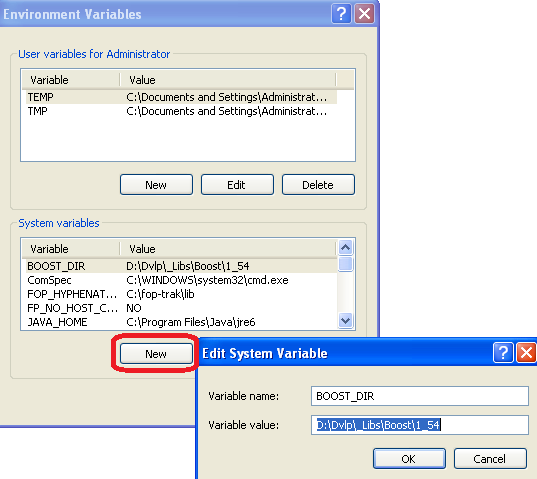
Modify the system variable « PATH » to add the following value : « ;%BOOST_DIR%\lib_shared\; »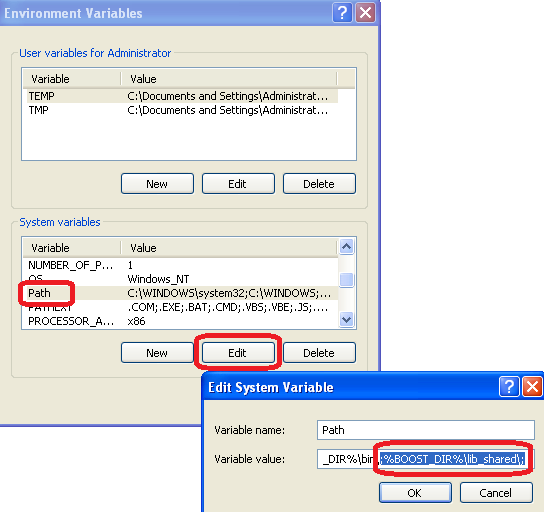
Note : you can also add the « lib_shared_64b » directory to the Windows PATH if you want to work in 64 bits mode : «;%BOOST_DIR%\lib_shared_64b\; ».
5- Download and install QxOrm library
The latest version of QxOrm library is available here : http://www.qxorm.com/qxorm_en/download.html
Once downloaded, you just have to unzip it where you want.
6- Configure « QxOrm.pri » file
It is necessary to indicate to QxOrm library how to access to boost configuring « QxOrm.pri » file (be careful, only « QxOrm.pri » file can be changed, all other files from QxOrm package should not be changed).
Open « QxOrm.pri » file with a text editor (notepad or notepad++ for instance), then modify the value of these parameters :- « QX_BOOST_INCLUDE_PATH » (required) ;
- « QX_BOOST_LIB_PATH » (optional, only used if _QX_ENABLE_BOOST_SERIALIZATION is defined) ;
- « QX_BOOST_LIB_SERIALIZATION_DEBUG » (optional, only used if _QX_ENABLE_BOOST_SERIALIZATION is defined) ;
- « QX_BOOST_LIB_SERIALIZATION_RELEASE » (optional, only used if _QX_ENABLE_BOOST_SERIALIZATION is defined) ;
- « QX_BOOST_LIB_WIDE_SERIALIZATION_DEBUG » (optional, only used if _QX_ENABLE_BOOST_SERIALIZATION is defined) ;
- « QX_BOOST_LIB_WIDE_SERIALIZATION_RELEASE » (optional, only used if _QX_ENABLE_BOOST_SERIALIZATION is defined).
contains(DEFINES, _QX_ENABLE_BOOST_SERIALIZATION) {
isEmpty(QX_BOOST_LIB_PATH) { QX_BOOST_LIB_PATH = $$quote(D:/Dvlp/_Libs/Boost/1_57/lib_shared) }
isEmpty(QX_BOOST_LIB_SERIALIZATION_DEBUG) { QX_BOOST_LIB_SERIALIZATION_DEBUG = "boost_serialization-vc110-mt-gd-1_57" }
isEmpty(QX_BOOST_LIB_SERIALIZATION_RELEASE) { QX_BOOST_LIB_SERIALIZATION_RELEASE = "boost_serialization-vc110-mt-1_57" }
# isEmpty(QX_BOOST_LIB_WIDE_SERIALIZATION_DEBUG) { QX_BOOST_LIB_WIDE_SERIALIZATION_DEBUG = "boost_wserialization-vc110-mt-gd-1_57" }
# isEmpty(QX_BOOST_LIB_WIDE_SERIALIZATION_RELEASE) { QX_BOOST_LIB_WIDE_SERIALIZATION_RELEASE = "boost_wserialization-vc110-mt-1_57" }
} # contains(DEFINES, _QX_ENABLE_BOOST_SERIALIZATION)
Note : « QxOrm.pri » is a configuration file of QxOrm library. This file must be included in all dependents projects files (*.pro) adding the following line :include(my_path_to_QxOrm_library/QxOrm.pri)
7- Add QxOrm directory to the Windows « PATH »
Like « QT_DIR » and « BOOST_DIR » variables, we will add another environment variables named « QXORM_DIR ».
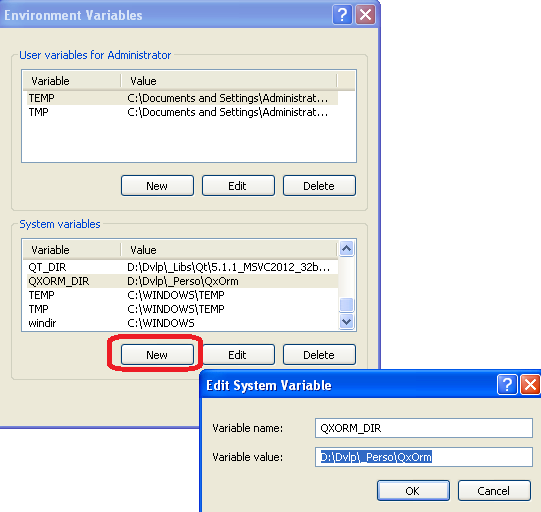
Go to « System properties » Windows screen, « Advanced » tab, then click on « Environment Variables » button :
Add a system variable named « QXORM_DIR » :- Variable name : « QXORM_DIR » ;
- Variable value : where QxOrm package has been unzipped.
Modify the system variable « PATH » to add the following value : « ;%QXORM_DIR%\lib\; »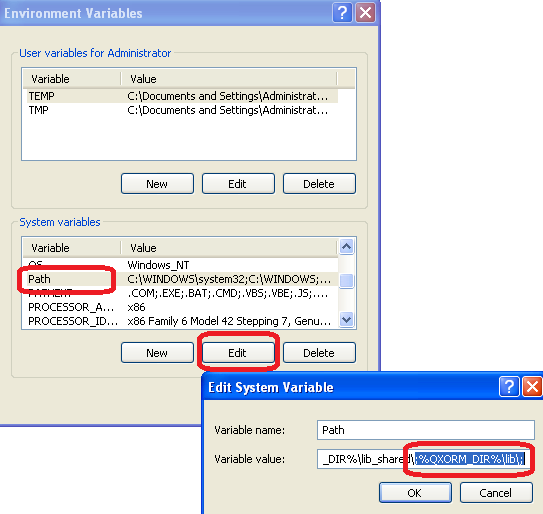
8- Test your installation executing « qxBlog » sample project
To quickly test the installation, it is possible to open the project « qxBlog » of QxOrm package : open the file «./test/qxBlog/qxBlog.sln » with MSVC++ 2012, then compile and execute the project.
If you don't have any error or assert, then your development environment is ready : Qt, boost and QxOrm library are properly installed on your computer !
9- Test all samples projects of QxOrm package with MSVC++ 2012
It is also recommended to test all samples projects of QxOrm package, each project have a «*.sln » file and can be opened with MSVC++ : all samples projects must run without any error.
Note : Qt provides an Add-in for Microsoft Visual C++, so you can install it to improve Qt integration (manage automatically*.pro files for instance).
To download this Add-in, go to the Qt download page : http://www.qt.io/download/
10- Test QxOrm library with QtCreator
If you work with QtCreator (and not MSVC++) : run QtCreator from your Qt installation directory «.\Tools\QtCreator\bin\qtcreator.exe ».
Go to « Tools >> Options » menu, then go to « Build & Run » section, « Kits » tab, to check that the MSVC++ 2012 compiler will be used by QtCreator :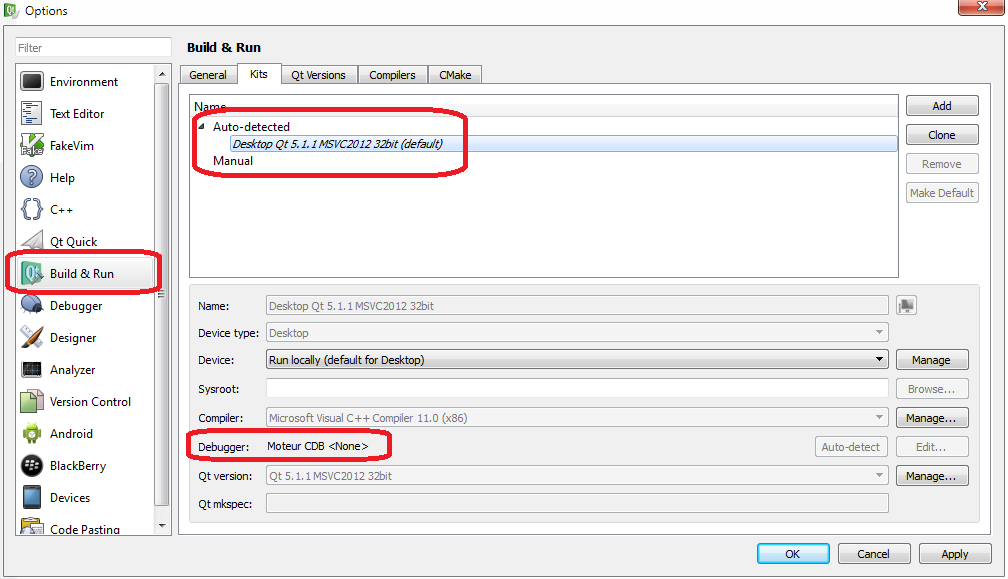
If QtCreator doesn't find any debugger (like the previous screenshot), just install « Debugging Tools for Windows SDK » available on Microsoft website (http://msdn.microsoft.com/en-us/windows/hardware/hh852363.aspx). Then restart QtCreator and you should have something like this :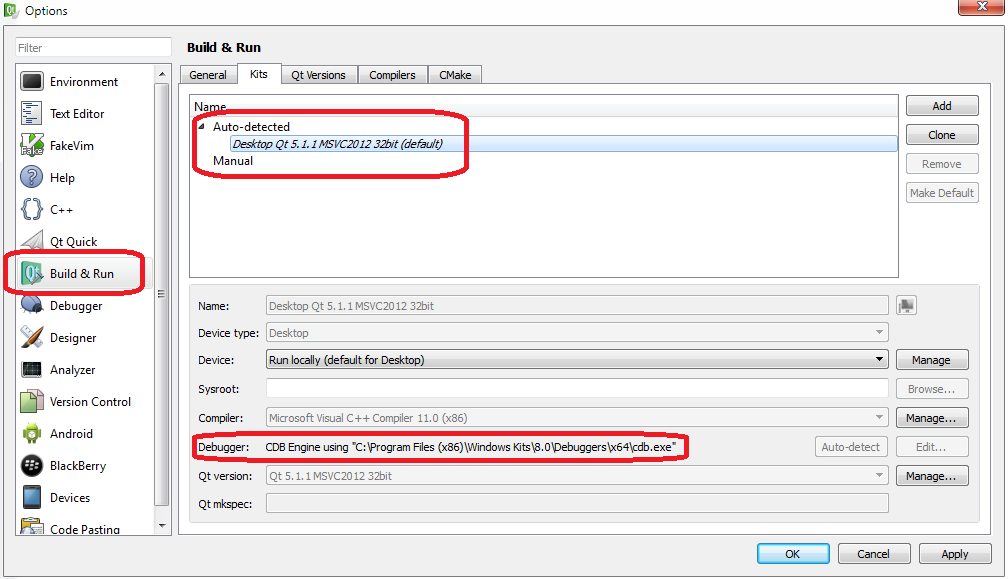
Note : you will find more details about QtCreator debugger on Qt website :http://qt-project.org/wiki/Qt_Creator_Windows_Debugging
Now, you can develop with QtCreator and/or MSVC++ 2012 !
阅读全文
0 0
- QxOrm 的安装
- QxOrm的学习使用
- qxorm,开始
- QxOrm笔记(一)
- QxOrm编译使用手记
- QxOrm笔记(二)
- QxOrm 1.2.9 下载 以及编译方法 简介.
- 网络安装服务器的安装
- 安装程序的静默安装
- ubuntu 的硬盘安装安装
- 安装linux环境的安装
- Eclipse的安装(软件安装,语言包安装,插件安装)
- Drupal的安装,汉化包的安装
- 虚拟机的安装和Linux的安装
- TestLink的安装过程 Mantis的安装
- floodlight的安装、OVS的安装、连通
- mysql的安装,卸载,hive的安装。
- R的安装与RStudio的安装
- 任务篇:中恒成长1
- 命令行下的mysql的基础用法
- MyBatis+Oracle时间精度丢失的问题
- 快排-奥运排行榜.cpp
- YAHFA--ART环境下的Hook框架
- QxOrm 的安装
- 数据库cpu负载高
- 《大型网站技术架构:核心原理与案例分析》拜读总结,第四章——瞬时响应:网站的高性能架构
- winform重新加载treeview时,出现闪烁
- 16进制字符串转字节数组
- 欢迎使用CSDN-markdown编辑器
- UVA133 The Dole Queue (模拟)
- java读取resource下xxx.properties配置文件内容
- Xilinx Vivado的使用详细介绍:使用IP核、例化IP