微信开发(Java)
来源:互联网 发布:最伟大的皇帝知乎 编辑:程序博客网 时间:2024/06/07 13:02
本文转载于:http://blog.csdn.net/zhutulang/article/details/50614042
微信公众号入门笔记(一)启用服务器配置
首先你要有个公众号,去https://mp.weixin.qq.com/注册。现在个人只能注册订阅号,订阅号有些接口是不开放的,没办法我们只好先看看它开放的接口了。
我们登录后台,去看一下公众平台开发者文档,“开发者必读”里面的“接入指南”。我建议你认真读一下这篇指南。

我简单说一下微信公众号开发是怎么回事。在你有了个微信公众号之后,你还要有个服务器(你可以用百度bae,或者新浪sae或者阿里云服务器),登录微信公众号后台,在最左边的菜单“开发”—“基本配置”里,你可以启用服务器配置。

在这里,你填入服务器地址url和token(具体看文档)。你要确保你填的url能够响应。那么,当别人向你的公众号发消息时,微信服务器会将该消息发送到你配置的url,然后会将你的url的响应返回给别人。大致的流程就是这样。

指南上写的很清楚了,并提供有PHP代码示例,我们要做的就是把它翻译成Java版的。我参考了这篇博客http://m.blog.csdn.NET/blog/bd_zengxinxin/19357163,第一篇接入的代码比较简单,所以基本直接拷贝自它,特此说明,另外这篇博客现在访问不了了。
事实上,我们在这第一篇要做的就是配置提供一个能响应微信服务器器的url。那么,微信后台怎么确保你填的url有效呢?当你在服务器配置中填上你的url点击确定后,微信服务器将发送GET请求到填写的服务器地址URL上,GET请求携带四个参数:
参数
描述
signature
微信加密签名,signature结合了开发者填写的token参数和请求中的timestamp参数、nonce参数。
timestamp
时间戳
nonce
随机数
echostr
随机字符串
你的url要能响应这个请求,首先你要对其进行校验,“若确认此次GET请求来自微信服务器,请原样返回echostr参数内容,则接入生效,成为开发者成功,否则接入失败。”
校验方法如下:
加密/校验流程如下:1. 将token、timestamp、nonce三个参数进行字典序排序
2. 将三个参数字符串拼接成一个字符串进行sha1加密
3. 开发者获得加密后的字符串可与signature对比,标识该请求来源于微信
不知你看到了这里会不会有疑问?你是否会想:如果我不校验,直接返回echostr参数内容呢?微信后台允许我配置成功吗?笔者亲试过,答案是可以!为什么呢?因为只要你配置的url返回了echostr,那么微信后台就认为你的url能正确响应,是可用的。至于你是否真的去做了校验,微信服务器并不知道。你之所以要校验是为了确认请求是来自微信服务器,反正微信告诉了你校验方式,你不去校验,由此带来的安全问题就是你自己的事了。
处理get请求的controller类如下:
/** *@ClassName: WeixinController *@Description: 响应Controller *@author zhutulang *@date 2016年1月4日 *@version V1.0 */ @Controller @RequestMapping("/weixinCon") public class WeixinController { private Logger log =Logger.getLogger(WeixinController.class); @RequestMapping(method =RequestMethod.GET) public void get(HttpServletRequest request,HttpServletResponse response) { log.info("请求进来了..."); // 微信加密签名,signature结合了开发者填写的token参数和请求中的timestamp参数、nonce参数。 String signature =request.getParameter("signature"); // 时间戳 String timestamp =request.getParameter("timestamp"); // 随机数 String nonce =request.getParameter("nonce"); // 随机字符串 String echostr =request.getParameter("echostr"); PrintWriter out = null; try { out = response.getWriter(); // 通过检验signature对请求进行校验,若校验成功则原样返回echostr,否则接入失败 if (SignUtil.checkSignature(signature,timestamp, nonce)) { out.print(echostr); } } catch (IOException e) { e.printStackTrace(); } finally { out.close(); out = null; } } } PHP是这样的:
<?php //将timestamp,nonce,token按字典序排序 $timestamp = $_GET['timestamp']; $nonce = $_GET['nonce']; $token = 'weixin'; $signature = $_GET['signature']; $array = array($timestamp,$nonce,$token); sort( $array ); //将排序后的三个参数拼接之后用shal加密 $tmpstr = implode('',$array); $tmpstr = shal($tmpstr); //将加密后的字符串与signature进行对比,判断该请求是否来自微信 if($tmpstr == $signature){ echo $_GET['echostr']; exit; }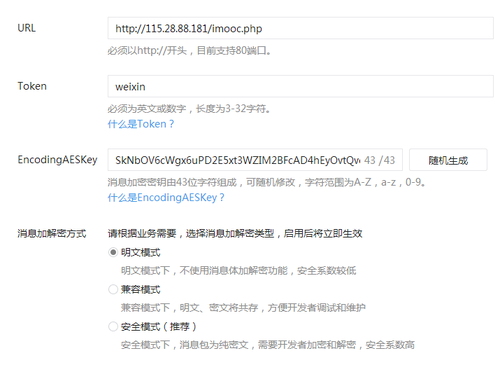
微信公众号入门笔记(二)响应文本消息
在这篇中,笔者将介绍如何让你的公众号响应接收到的文本消息。
在第一篇中,我们配置了url。于是当普通微信用户向公众账号发消息时,微信服务器将POST消息的XML数据包到开发者填写的URL上。
如果你看了文档,那么你会知道,发送文本消息时,微信发送的是类似下面的xml数据包:
- <xml>
- <ToUserName><![CDATA[toUser]]></ToUserName>
- <FromUserName><![CDATA[fromUser]]></FromUserName>
- <CreateTime>1348831860</CreateTime>
- <MsgType><![CDATA[text]]></MsgType>
- <Content><![CDATA[this is atest]]></Content>
- <MsgId>1234567890123456</MsgId>
- </xml>
它们的含义如下:
参数
描述
ToUserName
开发者微信号
FromUserName
发送方帐号(一个OpenID)
CreateTime
消息创建时间 (整型)
MsgType
text
Content
文本消息内容
MsgId
消息id,64位整型
我们在第一篇中写的controller里没有写post方法,那么现在,我们就要提供一个post方法。当普通微信用户A向我们的公众号发送一段文本之后,controller里的post方法就会接收到该请求。我们可以稍微处理下,然后用同样的xml格式返回,微信服务器就会收到该响应。如果说我们要对A用户做出回应,这里有一点要注意的是,我们返回的xml数据中,要记得把ToUserName和 FromUserName 交换。这个很好理解,因为,我们收到的数据包,发送方是A,接收方是我们的公众号,而我们回应时,发送方是我们的公众号,而接收方是A。记住喽!
这么看来,这个post方法实在是太简单了,不是吗?以我这里的例子来说,当我收到文本消息内容Content后,如果Content是1,那么我给A回应“you are the onlyone!”,否则回应"你发给我的信息是:"+Content 。
Post方法如下,至于解析xml和生成xml不是我们说的重点,具体请看详细代码。
- @RequestMapping(method =RequestMethod.POST)
- public void post(HttpServletRequestrequest, HttpServletResponse response) {
- try{
- request.setCharacterEncoding("UTF-8");
- response.setCharacterEncoding("UTF-8");
- }catch (UnsupportedEncodingException e1) {
- //TODO Auto-generated catch block
- e1.printStackTrace();
- }
- PrintWriterout = null;
- try {
- out= response.getWriter();
- StringresponseMsg = null;
- TextMsgParserHandlertextMsgParserHandler = new TextMsgParserHandler();
- TextMsgtextMsg = textMsgParserHandler.getTextMsg(request.getInputStream());
- Stringcontent = textMsg.getContent();
- log.info("收到的文本信息是:"+content);
- if(content.equals("1")){
- responseMsg= "you are the only one!";
- }else{
- responseMsg= "你发给我的信息是:"+content;
- }
- textMsg.setContent(responseMsg);
- //注意这里发送者和接收者交换
- String fromUserName = textMsg.getFromUserName();
- String toUserName =textMsg.getToUserName();
- textMsg.setFromUserName(toUserName);
- textMsg.setToUserName(fromUserName);
- //将textMsg 转换成xml字符串
- String responseXml =TextMsgWriter.getXmlString(textMsg);
- out.print(responseXml);
- log.info("response="+responseXml);
- } catch (Exception e) {
- e.printStackTrace();
- } finally {
- out.close();
- out = null;
- }
- }
看哥的截图:

响应所有消息
在上篇中,我们介绍了如何让你的公众号响应接收到的文本消息。事实上,响应其它类型的消息本质上都是一样的。在这里,我们先不做任何其它的逻辑,而仅仅是对发送给我们的公众号的消息做一个回应。
比如说,当接收到文本消息时返回相应的消息,当接收到语音消息时返回语音识别结果(注:要打开语音识别功能),当收到地理位置信息时返回经纬度和地理位置描述,等等。

由于我对代码做了重构,改动比较大,因此这里就不一一解析代码了,有兴趣的话自己去看吧。
微信公众号入门笔记(四)获取access_token
以下是微信公众平台开发者文档中截取的内容:
access_token是公众号的全局唯一票据,公众号调用各接口时都需使用access_token。开发者需要进行妥善保存。access_token的存储至少要保留512个字符空间。access_token的有效期目前为2个小时,需定时刷新,重复获取将导致上次获取的access_token失效。
接口调用请求说明
http请求方式: GET
https://api.weixin.qq.com/cgi-bin/token?grant_type=client_credential&appid=APPID&secret=APPSECRET
参数说明
参数
是否必须
说明
grant_type
是
获取access_token填写client_credential
appid
是
第三方用户唯一凭证
secret
是
第三方用户唯一凭证密钥,即appsecret
返回说明
正常情况下,微信会返回下述JSON数据包给公众号:
{"access_token":"ACCESS_TOKEN","expires_in":7200}
参数
说明
access_token
获取到的凭证
expires_in
凭证有效时间,单位:秒
那么,从以上的说明中我们知道:
(1)我们需要以get方式发送https请求。
(2)appid和secret 可以从我们的公众号后台查看。
(3)目前,access_token的有效期目前为2个小时,我们需要提供一个定时刷新机制。并且最好能有一个强制刷新的机制。
一、如何发送https请求
对于第一点,用HttpClient包发送https请求,核心思路就是忽略校验过程,代码参考自:
http://blog.csdn.net/rongyongfeikai2/article/details/41659353
SSLClient 类如下:
- package com.dongliushui.util;
- importjava.security.cert.CertificateException;
- import javax.net.ssl.SSLContext;
- import javax.net.ssl.TrustManager;
- import javax.net.ssl.X509TrustManager;
- import org.apache.http.conn.ClientConnectionManager;
- import org.apache.http.conn.scheme.Scheme;
- importorg.apache.http.conn.scheme.SchemeRegistry;
- importorg.apache.http.conn.ssl.SSLSocketFactory;
- importorg.apache.http.impl.client.DefaultHttpClient;
- /**
- *@ClassName: SSLClient
- *@Description: 用于进行Https请求的HttpClient
- *@author (代码来源):http://blog.csdn.net/rongyongfeikai2/article/details/41659353
- *@date 2016年1月8日
- *@version V1.0
- */
- public class SSLClient extendsDefaultHttpClient {
- publicSSLClient() throws Exception{
- super();
- SSLContext ctx = SSLContext.getInstance("TLS");
- X509TrustManager tm = new X509TrustManager() {
- @Override
- publicvoid checkClientTrusted(
- java.security.cert.X509Certificate[]chain, String authType)
- throwsCertificateException {
- //TODO Auto-generated method stub
- }
- @Override
- publicvoid checkServerTrusted(
- java.security.cert.X509Certificate[]chain, String authType)
- throwsCertificateException {
- //TODO Auto-generated method stub
- }
- @Override
- publicjava.security.cert.X509Certificate[] getAcceptedIssuers() {
- //TODO Auto-generated method stub
- returnnull;
- }
- };
- ctx.init(null, new TrustManager[]{tm}, null);
- SSLSocketFactory ssf = newSSLSocketFactory(ctx,SSLSocketFactory.ALLOW_ALL_HOSTNAME_VERIFIER);
- ClientConnectionManager ccm = this.getConnectionManager();
- SchemeRegistry sr = ccm.getSchemeRegistry();
- sr.register(new Scheme("https", 443, ssf));
- }
- }
HttpUtil 类如下:
- package com.dongliushui.util;
- import java.util.ArrayList;
- import java.util.Iterator;
- import java.util.List;
- import java.util.Map;
- import java.util.Map.Entry;
- import net.sf.json.JSONObject;
- import org.apache.http.HttpEntity;
- import org.apache.http.HttpResponse;
- import org.apache.http.NameValuePair;
- import org.apache.http.client.HttpClient;
- importorg.apache.http.client.entity.UrlEncodedFormEntity;
- importorg.apache.http.client.methods.HttpGet;
- import org.apache.http.client.methods.HttpPost;
- import org.apache.http.entity.StringEntity;
- importorg.apache.http.impl.client.DefaultHttpClient;
- importorg.apache.http.message.BasicNameValuePair;
- import org.apache.http.util.EntityUtils;
- /**
- *@ClassName: HttpUtil
- * @Description:Http请求工具类
- *@author zhutulang
- *@date 2016年1月8日
- *@version V1.0
- */
- public class HttpUtil {
- /**
- * <p>Title: doHttpsPost</p>
- * <p>Description: 发送https 形式的post请求</p>
- * @param url 请求url
- * @param contentType
- * @param paramMap 参数map
- * @return
- * @author zhutulang
- * @version 1.0
- */
- publicstatic byte[] doHttpsPostJson(String url, String contentType, Map<String,String> paramMap){
- returnpostJson(1, url, contentType, paramMap);
- }
- /**
- * <p>Title: doHttpsPost</p>
- * <p>Description: 发送http 形式的post请求</p>
- * @param url 请求url
- * @param contentType
- * @param paramMap 参数map
- * @return
- * @author zhutulang
- * @version 1.0
- */
- publicstatic byte[] doPostJson(String url, String contentType, Map<String,String> paramMap){
- return postJson(0, url, contentType,paramMap);
- }
- /**
- * <p>Title: doHttpsGet</p>
- * <p>Description: 发送https 形式的get请求</p>
- * @param url 请求url
- * @param contentType
- * @return
- * @author zhutulang
- * @version 1.0
- */
- publicstatic byte[] doHttpsGet(String url, String contentType){
- returnget(1, url, contentType);
- }
- /**
- * <p>Title: doGet</p>
- * <p>Description: 发送http 形式的gett请求</p>
- * @param url 请求url
- * @param contentType
- * @return
- * @author zhutulang
- * @version 1.0
- */
- publicstatic byte[] doGet(String url, String contentType){
- returnget(0, url, contentType);
- }
- /**
- * <p>Title: post</p>
- * <p>Description: 发送post请求,表单提交参数</p>
- * @param type 0:普通post请求 1:https形式的post请求
- * @param url 请求url
- * @param contentType
- * @param paramMap 参数map
- * @return
- * @author zhutulang
- * @version 1.0
- */
- privatestatic byte[] postCommon(int type, String url, String contentType,Map<String, String> paramMap){
- //响应内容
- byte[] bs = null;
- HttpClient httpClient = null;
- HttpPost httpPost = null;
- try {
- if(type == 0){
- //创建发送 http 请求的httpClient实例
- httpClient= new DefaultHttpClient();
- }else if(type == 1){
- //创建发送 https 请求的httpClient实例
- httpClient= new SSLClient();
- }
- // 创建HttpPost
- httpPost = new HttpPost(url);
- httpPost.setHeader("content-type", contentType);
- //设置参数
- List<NameValuePair> list = newArrayList<NameValuePair>();
- if(paramMap != null){
- Iterator<Entry<String, String>>iterator = paramMap.entrySet().iterator();
- while(iterator.hasNext()){
- Entry<String,String> elem =(Entry<String, String>) iterator.next();
- list.add(newBasicNameValuePair(elem.getKey(),elem.getValue()));
- }
- if(list.size() > 0){
- UrlEncodedFormEntity entity = newUrlEncodedFormEntity(list,"UTF-8");
- httpPost.setEntity(entity);
- }
- }
- // 执行POST请求
- HttpResponse response =httpClient.execute(httpPost);
- // 获取响应实体
- HttpEntity entity = response.getEntity();
- if(entity != null){
- bs = EntityUtils.toByteArray(entity);
- }
- } catch (Exception e) {
- e.printStackTrace();
- } finally {
- // 关闭连接,释放资源
- httpClient.getConnectionManager().shutdown();
- httpPost = null;
- httpClient = null;
- }
- return bs;
- }
- /**
- * <p>Title: post</p>
- * <p>Description: 发送post请求,json方式提交参数</p>
- * @param type 0:普通post请求 1:https形式的post请求
- * @param url 请求url
- * @param contentType
- * @param paramMap 参数map
- * @return
- * @author zhutulang
- * @version 1.0
- */
- privatestatic byte[] postJson(int type, String url, String contentType, Map<String,String> paramMap){
- //响应内容
- byte[] bs = null;
- HttpClient httpClient = null;
- HttpPost httpPost = null;
- try {
- if(type == 0){
- //创建发送 http 请求的httpClient实例
- httpClient= new DefaultHttpClient();
- }else if(type == 1){
- //创建发送 https 请求的httpClient实例
- httpClient= new SSLClient();
- }
- // 创建HttpPost
- httpPost = new HttpPost(url);
- httpPost.setHeader("content-type", contentType);
- if(paramMap != null){
- Iterator<Entry<String, String>>iterator = paramMap.entrySet().iterator();
- // 接收参数json列表
- JSONObject jsonParam = newJSONObject();
- while(iterator.hasNext()){
- Entry<String,String> elem =(Entry<String, String>) iterator.next();
- jsonParam.put(elem.getKey(),elem.getValue());
- }
- if(jsonParam.size() > 0){
- StringEntity entity = newStringEntity(jsonParam.toString(),"UTF-8");
- entity.setContentEncoding("UTF-8");
- entity.setContentType("application/json");
- httpPost.setEntity(entity);
- }
- }
- // 执行POST请求
- HttpResponse response =httpClient.execute(httpPost);
- // 获取响应实体
- HttpEntity entity = response.getEntity();
- if(entity != null){
- bs = EntityUtils.toByteArray(entity);
- }
- } catch (Exception e) {
- e.printStackTrace();
- } finally {
- // 关闭连接,释放资源
- httpClient.getConnectionManager().shutdown();
- httpPost = null;
- httpClient = null;
- }
- return bs;
- }
- /**
- * <p>Title: get</p>
- * <p>Description: 发送get请求</p>
- * @param type 0:普通get请求 1:https形式的get请求
- * @param url 请求url
- * @param contentType
- * @return
- * @author zhutulang
- * @version 1.0
- */
- privatestatic byte[] get(int type, String url, String contentType){
- //响应内容
- byte[] bs = null;
- HttpClient httpClient = null;
- HttpGet httpGet = null;
- try {
- if(type == 0){
- //创建发送 http 请求的httpClient实例
- httpClient= new DefaultHttpClient();
- }else if(type == 1){
- //创建发送 https 请求的httpClient实例
- httpClient= new SSLClient();
- }
- // 创建HttpPost
- httpGet = new HttpGet(url);
- httpGet.setHeader("content-type", contentType);
- // 执行POST请求
- HttpResponse response =httpClient.execute(httpGet);
- // 获取响应实体
- HttpEntity entity = response.getEntity();
- if(entity != null){
- bs = EntityUtils.toByteArray(entity);
- }
- } catch (Exception e) {
- e.printStackTrace();
- } finally {
- // 关闭连接,释放资源
- httpClient.getConnectionManager().shutdown();
- httpGet = null;
- httpClient = null;
- }
- return bs;
- }
- }
二、如何定时刷新access_token
在集群环境中,这个问题可能会比较复杂。我们可能需要考虑到在集群中各个机器的任务调度协调,对于获取到的access_token,我们可能会考虑将它保存在数据库中,或者统一的缓存模块中,比如Redis中。对于单服务器环境,我们大可以直接将其保存在内存中。
定时任务我们经常会用到quartz框架。不过spring也提供有任务调度的模块,我习惯用@Scheduled注解。至于它的使用,大家可自行百度。
以下代码中形如@Value("#{weixinProperties['AppId']}")
是通过spring读取配置文件,如果没见过这样做的朋友也可以自行去查找相关资料。
相关的配置放在一个名为weixin.properties的配置文件中:
#weixin properties
# 你自己的appid和appsecret
AppId=XXXXXXXXX
AppSecret=XXXXXXXXXXXXXXXXXXX
#get access_token urlget
get_access_token_url=https://api.weixin.qq.com/cgi-bin/token?grant_type=client_credential&appid=APPID&secret=APPSECRET
#batchget_material urlpost
batchget_material_url=https://api.weixin.qq.com/cgi-bin/material/batchget_material?access_token=ACCESS_TOKEN
Spring配置文件中:
- <!-- weixin.properties 配置文件 -->
- <bean id="weixinProperties" class="org.springframework.beans.factory.config.PropertiesFactoryBean">
- <property name="locations">
- <list>
- <value>classpath*:weixin.properties</value>
- </list>
- </property>
- </bean>
- <bean id="propertyConfigurer"class="org.springframework.beans.factory.config.PreferencesPlaceholderConfigurer">
- <property name="properties" ref="weixinProperties" />
- </bean>
AccessTokenTaker 代码如下:
- package com.dongliushui.quartz;
- importjava.io.UnsupportedEncodingException;
- import org.apache.log4j.Logger;
- importorg.springframework.beans.factory.annotation.Value;
- import org.springframework.scheduling.annotation.Scheduled;
- importorg.springframework.stereotype.Component;
- import com.dongliushui.util.HttpUtil;
- /**
- *@ClassName: AccessTokenTaker
- *@Description: 获取access_token
- *@author zhutulang
- *@date 2016年1月10日
- *@version V1.0
- */
- @Component
- public class AccessTokenTaker {
- @Value("#{weixinProperties['AppId']}")
- private String appId;
- @Value("#{weixinProperties['AppSecret']}")
- private String appSecret;
- @Value("#{weixinProperties['get_access_token_url']}")
- private String getAccessTokenUrl;
- /**
- * access_token
- */
- privatestatic String ACCESS_TOKEN = null;
- /**
- * 上次更新access_token时间
- */
- privatestatic LongLAST_ACCESS_TOKEN_UPDATE_TIME = null;
- privatestatic Logger log = Logger.getLogger(AccessTokenTaker.class);
- /**
- * <p>Title: get</p>
- * <p>Description: 每隔一个小时去获取一次access_token</p>
- * @author zhutulang
- * @version 1.0
- */
- @Scheduled(fixedRate=3600000)
- privatevoid getTask(){
- get();
- }
- /**
- * <p>Title: getFromCache</p>
- * <p>Description: 从缓存中获取access_token</p>
- * @return
- * @author zhutulang
- * @version 1.0
- */
- public String getFromCache(){
- returnACCESS_TOKEN;
- }
- /**
- * <p>Title: getNew</p>
- * <p>Description: 强制更新、获取access_token</p>
- * <p>如果发现现在的时间戳和上次更新的时间戳间隔小于5分钟,那么不更新</p>
- * @return
- * @author zhutulang
- * @version 1.0
- */
- publicsynchronized String getNew(){
- longtimeNow = System.currentTimeMillis();
- if(LAST_ACCESS_TOKEN_UPDATE_TIME== null){
- get();
- }elseif(timeNow - LAST_ACCESS_TOKEN_UPDATE_TIME < 300000){
- //如果是5分钟以内
- returnACCESS_TOKEN;
- }else{
- get();
- }
- returnACCESS_TOKEN;
- }
- /**
- * <p>Title: get</p>
- * <p>Description: 调用获取access_token接口</p>
- * @author zhutulang
- * @version 1.0
- */
- synchronized void get(){
- Stringurl = getAccessTokenUrl.replace("APPID",appId).replace("APPSECRET", appSecret);
- StringcontentType = "application/json";
- byte[]bytes = HttpUtil.doHttpsGet(url, contentType);
- try{
- StringaccessToken = new String(bytes, "UTF-8");
- longtimeNow = System.currentTimeMillis();
- ACCESS_TOKEN= accessToken;
- LAST_ACCESS_TOKEN_UPDATE_TIME= timeNow;
- log.info("执行获取access_token任务,access_token="+ACCESS_TOKEN);
- log.info("时间戳="+LAST_ACCESS_TOKEN_UPDATE_TIME);
- }catch (UnsupportedEncodingException e) {
- //TODO Auto-generated catch block
- e.printStackTrace();
- }
- }
- publicString getAppId() {
- returnappId;
- }
- publicvoid setAppId(String appId) {
- this.appId= appId;
- }
- publicString getAppSecret() {
- returnappSecret;
- }
- publicvoid setAppSecret(String appSecret) {
- this.appSecret= appSecret;
- }
- publicString getGetAccessTokenUrl() {
- returngetAccessTokenUrl;
- }
- publicvoid setGetAccessTokenUrl(String getAccessTokenUrl) {
- this.getAccessTokenUrl= getAccessTokenUrl;
- }
- }
代码下载:
http://download.csdn.net/detail/carl_jiang/9853148
- 微信开发(Java)
- 微信开发 java
- java 微信开发
- java 微信开发
- java微信开发
- JAVA微信开发
- java微信开发
- java微信自动回复机器人开发(java微信开发学习笔记3)
- java微信开发教程
- java微信开发小结
- java开发微信二维码
- 微信登录开发-java
- 微信开发-java篇
- JAVA微信开发总结
- Java微信语音开发
- 微信退款开发 --Java
- Java微信开发入门
- JAVA微信开发总结
- C++ 类的静态成员详细讲解
- BadBoy的检查点和参数化
- #leetcode#220. Contains Duplicate III
- TIPS SCRIPT CONTEXT IN GH PYTHON GHPYTHON的脚本本环境
- 【每日一学】浮动IP
- 微信开发(Java)
- QtCreator控制台中文乱码解决方法
- 神经网络入门三
- 两个List拼接成一个List,怎么拼接?
- 2.•连续输入字符串,请按长度为8拆分每个字符串后输出到新的字符串数组; •长度不是8整数倍的字符串请在后面补数字0,空字符串不处理。
- 网页在手机上打开后禁止缩放的办法
- mac安装brew 软件包管理工具Homebrew
- QT 自定义widget 背景图片设置
- MySQL下载安装全过程(包含Navicat破解)