ruby零散笔记
来源:互联网 发布:淘宝来客提醒 编辑:程序博客网 时间:2024/06/11 15:17
今天是上班第一天,压力非常大,不对,这样说不能表达出我已几乎被击垮的心
公司使用的是mac os,用的mac mini,对于从来没有用过mac而且甚至都已经几乎半年没有碰过linux的人来说,几乎寸步难行,再者就是RoR,之前在前公司但仍开发岗位的时候的确是使用ruby语言进行开发,但是距离上次敲代码也已经是有七八个月的时间了,已经生疏的快忘记了,带我的领导管得也比较严,给了我任务,对于已经从事了ruby研发的人来说,应该不是很难吧(或者说压根就小菜一碟),可是我面对这些题目相当头晕,昨晚因为紧张今天来公司的第一天该如何表现,3点多才睡着,早上七点二十闹钟一响我又逼着自己起床,一整天的状态都不太好,几遍我已多次通过甩头、间隙出去抽根烟的方式来缓过神,但每当看到网页(stackflow、github源码、文档),我仍然有些扛不住。
好了,闲话少说了,今天先把看到的一些比较迷茫的知识点记下来,尽量搞懂,以我现在这样的状态根本没法规规整整地来梳理知识,只能这样了
总共敲了200多行,很多重复和一些简单(cd,pwd,ls这些)就去掉了
11 ruby -e "$(curl -fsSL https://raw.githubusercontent.com/Homebrew/install/master/install)"
$ ruby [ options ] [.] [ programfile ] [ arguments ... ]选项-e-e prog 指定 prog 作为程序在命令行中执行。可以指定多个 -e 选项,用来执行多个程序。
curl -fsSL https://raw.githubusercontent.com/Homebrew/install/master/install
(1)curl命令作用
curl命令是一个功能强大的网络工具,它能够通过http、ftp等方式下载文件,也能够上传文件,同时支持HTTPS等众多协议,还支持POST、cookies、认证、从指定偏移处下载部分文件、用户代理字符串、限速、文件大小、进度条等特征。其实curl远不止前面所说的那些功能,大家可以通过man curl阅读手册页获取更多的信息。类似的工具还有wget。curl命令使用了libcurl库来实现,libcurl库常用在C程序中用来处理HTTP请求,curlpp是libcurl的一个C++封装,这几个东西可以用在抓取网页、网络监控等方面的开发,而curl命令可以帮助来解决开发过程中遇到的问题。
(2)常用参数
curl命令参数很多,这里只列出我曾经用过、特别是在shell脚本中经常用到过的那些。
-a/--append 上传文件时,附加到目标文件
-A:随意指定自己这次访问所宣称的自己的浏览器信息
-b/--cookie <name=string/file> cookie字符串或文件读取位置,使用option来把上次的cookie信息追加到http request里面去。
-c/--cookie-jar <file> 操作结束后把cookie写入到这个文件中
-C/--continue-at <offset> 断点续转
-d/--data <data> HTTP POST方式传送数据
--data-ascii <data>以ascii的方式post数据 --data-binary <data>以二进制的方式post数据 --negotiate使用HTTP身份验证 --digest使用数字身份验证 --disable-eprt禁止使用EPRT或LPRT --disable-epsv禁止使用EPSV-D/--dump-header <file> 把header信息写入到该文件中
--egd-file <file> 为随机数据(SSL)设置EGD socket路径
--tcp-nodelay 使用TCP_NODELAY选项
-e/--referer <URL> 指定引用地址
-F/--form <name=content> 模拟http表单提交数据
--form-string <name=string> 模拟http表单提交数据
-G/--get 以get的方式来发送数据
-H/--header <header> 指定请求头参数
--ignore-content-length 忽略的HTTP头信息的长度
-i/--include 输出时包括protocol头信息
-I/--head 仅返回头部信息,使用HEAD请求
-k/--insecure 允许不使用证书到SSL站点
-K/--config 指定的配置文件读取
-l/--list-only 列出ftp目录下的文件名称
--limit-rate <rate> 设置传输速度
--local-port<NUM> 强制使用本地端口号
-m/--max-time <seconds> 指定处理的最大时长
--max-redirs <num> 设置最大读取的目录数
--max-filesize <bytes> 设置最大下载的文件总量
-o/--output <file> 指定输出文件名称
-O/--remote-name 把输出写到该文件中,保留远程文件的文件名
-v/--verbose 小写的v参数,用于打印更多信息,包括发送的请求信息,这在调试脚本是特别有用。
-s/--slient 减少输出的信息,比如进度
--connect-timeout <seconds> 指定尝试连接的最大时长
-x/--proxy <proxyhost[:port]> 指定代理服务器地址和端口,端口默认为1080
export用于指定环境变量
1、${HOME}:首先, HOME 是个变量,它代表你的 home 目录,变量前必须加上 $ 符号,否则会报错
usr/local/dvsdk为dvsdk的destination folder 由#echo $DVSDK测试环境变量添加成功否

Linux export 命令
功能说明:设置或显示环境变量。(比如我们要用一个命令,但这个命令的执行文件不在当前目录,这样我们每次用的时候必须指定执行文件的目录,麻烦,在代码中先执行export,这个相当于告诉程序,执行某某东西时,需要的文件或什么东东在这些目录里)
语 法:export [-fnp][变量名称]=[变量设置值]
补充说明:在shell中执行程序时,shell会提供一组环境变量。 export可新增,修改或删除环境变量,供后续执行的程序使用。export的效力仅及于该此登陆操作。
参 数:
-n 删除指定的变量。变量实际上并未删除,只是不会输出到后续指令的执行环境中。
-p 列出所有的shell赋予程序的环境变量。
一个变量创建时,它不会自动地为在它之后创建的shell进程所知。而命令export可以向后面的shell传递变量的值。当一个shell脚本调用并执行时,它不会自动得到原为脚本(调用者)里定义的变量的访问权,除非这些变量已经被显式地设置为可用。export命令可以用于传递一个或多个变量的值到任何后继脚本。
在 linux 里设置环境变量的方法 ( export PATH )
一般来说,配置交叉编译工具链的时候需要指定编译工具的路径,此时就需要设置环境变量。例如我的mips-linux-gcc编译器在“/opt/au1200_rm /build_tools/bin”目录下,build_tools就是我的编译工具,则有如下三种方法来设置环境变量:
1、直接用export命令:
#export PATH=$PATH:/opt/au1200_rm/build_tools/bin
查看是否已经设好,可用命令export查看:
declare -x BASH_ENV="/root/.bashrc"
declare -x G_BROKEN_FILENAMES="1"
declare -x HISTSIZE="1000"
declare -x HOME="/root"
declare -x HOSTNAME="localhost.localdomain"
declare -x INPUTRC="/etc/inputrc"
declare -x LANG="zh_CN.GB18030"
declare -x LANGUAGE="zh_CN.GB18030:zh_CN.GB2312:zh_CN"
declare -x LESSOPEN="|/usr/bin/lesspipe.sh %s"
declare -x LOGNAME="root"
declare -x LS_COLORS="no=00:fi=00:di=01;34:ln=01;36:pi=40;33:so=01;35:bd=40;33;01:cd=40;33;01:or=01;05;37;41:mi=01;05;37;41:ex=01;32:*.cmd=01;32:*.exe=01;32:*.com=01;32:*.btm=01;32:*.bat=01;32:*.sh=01;32:*.csh=01;32:*.tar=01;31:*.tgz=01;31:*.arj=01;31:*.taz=01;31:*.lzh=01;31:*.zip=01;31:*.z=01;31:*.Z=01;31:*.gz=01;31:*.bz2=01;31:*.bz=01;31:*.tz=01;31:*.rpm=01;31:*.cpio=01;31:*.jpg=01;35:*.gif=01;35:*.bmp=01;35:*.xbm=01;35:*.xpm=01;35:*.png=01;35:*.tif=01;35:"
declare -x MAIL="/var/spool/mail/root"
declare -x OLDPWD="/opt/au1200_rm/build_tools"
declare -x PATH="/usr/local/sbin:/usr/local/bin:/sbin:/bin:/usr/sbin:/usr/bin:/usr/X11R6/bin:/root/bin:/opt/au1200_rm/build_tools/bin"
declare -x PWD="/opt/au1200_rm/build_tools/bin"
declare -x SHELL="/bin/bash"
declare -x SHLVL="1"
declare -x SSH_ASKPASS="/usr/libexec/openssh/gnome-ssh-askpass"
declare -x SSH_AUTH_SOCK="/tmp/ssh-XX3LKWhz/agent.4242"
declare -x SSH_CLIENT="10.3.37.152 2236 22"
declare -x SSH_CONNECTION="10.3.37.152 2236 10.3.37.186 22"
declare -x SSH_TTY="/dev/pts/2"
declare -x TERM="linux"
declare -x USER="root"
declare -x USERNAME="root"
可以看到灰色部分有设置的路径,说明环境变量已经设好,PATH里面已经有了我要加的编译器的路径。
2、修改profile文件:
#vi /etc/profile
在里面加入:
export PATH="$PATH:/opt/au1200_rm/build_tools/bin"
3. 修改.bashrc文件:
# vi /root/.bashrc
在里面加入:
export PATH="$PATH:/opt/au1200_rm/build_tools/bin"
后两种方法一般需要重新注销系统才能生效,最后可以通过echo命令测试一下:
# echo $PATH
ruby变量命名规则:
普通变量:小写字母、下划线开头,单词用下划线连接
全局变量:$开头
实例变量:@开头
@@:类变量被共享在整个继承链中
常量:大写字母开头
14 gem install rails
这是搭建RoR开发环境中的一步,安装好ruby和rubygems后,使用gem intsall rails安装rails 即可
15 sudo gem install rails
sudo是linux系统管理指令,是允许系统管理员让普通用户执行一些或者全部的root命令的一个工具。这样不仅减少了root用户的登陆和管理时间,同样也提高了安全性。sudo不是对shell的一个代替,它是面向每个命令的。
18 xcode
Xcode 8 includes everything you need to create amazing apps for iPhone, iPad, Mac, Apple Watch, and Apple TV. This radically faster version of the IDE features new editor extensions that you can use to completely customize your coding experience. New runtime issues alert you to hidden bugs by pointing out memory leaks, and a new Memory Debugger dives deep into your object graph. Swift 3 includes more natural and consistent API naming, which you can experiment with in the new Swift Playgrounds app for iPad.
百度百科简介:
Xcode 是运行在操作系统Mac OS X上的集成开发工具(IDE),由苹果公司开发。Xcode是开发OS X 和 iOS 应用程序的最快捷的方式。Xcode 具有统一的用户界面设计,编码、测试、调试都在一个简单的窗口内完成。
19 brew doctor
0 Homebrew是啥?
“Homebrewinstalls the stuff you need that Apple didn’t.——Homebrew 使 OS X更完整”。
Homebrew的官网[1](多语言版本)简单明了地介绍了如何安装和使用这个工具,并提供了自己的Wiki。
1安装Homebrew
brew的安装很简单,使用一条ruby命令即可,Mac系统上已经默认安装了ruby。
gerryyang@mba:bin$ruby--version
ruby2.0.0p247 (2013-06-27 revision 41674)[universal.x86_64-darwin13]
关于安装brew的详细说明可以参考其github上的wiki说明[2]:
"
Installation
The suggested and easiest way to install Homebrew is onthe
The standard script installs Homebrewto /usr/local brew install.It is acareful script, it can be run even if you have stuffinstalled to/usr/local
There are other ways to install Homebrew which provide you withmoreflexibility. They are listed below the requirements.
"- gerryyang@mba:~$ruby
-e "$(curl -fsSL https://raw.github.com/Homebrew/homebrew/go/install)" - It
appears Homebrew is already installed. If your intent is to reinstall you - should
do the following before running this installer again: -
-
rm -rf /usr/local/Cellar /usr/local/.git && brew cleanup
由于我的系统上已经安装过brew,因此再次执行安装命令会提示我brew已经存在。
2Homebrew的用法
查看brew的具体用法:
- gerryyang@mba:~$brew
- Example
usage: -
brew [info | home | options ] [FORMULA...] -
brew install FORMULA... -
brew uninstall FORMULA... -
brew search [foo] -
brew list [FORMULA...] -
brew update -
brew upgrade [FORMULA...] -
brew pin/unpin [FORMULA...] -
- Troubleshooting:
-
brew doctor -
brew install -vd FORMULA -
brew [--env | --config] -
- Brewing:
-
brew create [URL [--no-fetch]] -
brew edit [FORMULA...] -
open https://github.com/Homebrew/homebrew/wiki/Formula-Cookbook -
- Further
help: -
man brew -
brew home -
- gerryyang@mba:~$
3Homebrew的有趣问题
下面关于Homebrew的一些常见问题[3]:
(1) 在OSX中找不到想要的软件,可以使用brew安装;
- gerryyang@mba:~$brew
install wget - ==>
Downloading http://ftpmirror.gnu.org/wget/wget-1.14.tar.gz - ########################################################################
100.0% - ==>
./configure --prefix=/usr/local/Cellar/wget/1.14 --sysconfdir=/usr/local/etc - ==>
make install - Warning:
Could not link wget. Unlinking... - Error:
The `brew link` step did not complete successfully - The
formula built, but is not symlinked into /usr/local - You
can try again using `brew link wget' -
- Possible
conflicting files are: - /usr/local/bin/wget
- /usr/local/share/man/man1/wget.1
- ==>
Summary - /usr/local/Cellar/wget/1.14:
8 files, 688K, built in 2.3 minutes
由于之前使用源码方式安装过wget,因此再用brew安装时会提示冲突的错误,因为/usr/locat/bin/wget已经存在。实际上,Homebrew将软件包分装到单独的目录(/usr/local/Cellar),然后symlink 到
(2)如何更新本地已安装的package呢?
第一步:先更新brew:
brew update
- gerryyang@mba:bin$brew
update - Already
up-to-date.
第二步:更新所有package:
brewupgarde
- gerryyang@mba:bin$brew
upgrade - ==>
Upgrading 1 outdated package, with result: - wget
1.15 - ==>
Upgrading wget - ==>
Installing wget dependency: openssl - ==>
Downloading https://downloads.sf.net/project/machomebrew/Bottles/openssl-1.0 - ########################################################################
100.0% - ==>
Pouring openssl-1.0.1f.mavericks.bottle.tar.gz - ==>
Caveats - This
formula is keg-only, so it was not symlinked into /usr/local. -
- Mac
OS X already provides this software and installing another version in - parallel
can cause all kinds of trouble. -
- The
OpenSSL provided by OS X is too old for some software. -
- Generally
there are no consequences of this for you. If you build your - own
software and it requires this formula, you'll need to add to your - build
variables: -
-
LDFLAGS: -L/usr/local/opt/openssl/lib -
CPPFLAGS: -I/usr/local/opt/openssl/include -
- ==>
security find-certificate -a -p /Library/Keychains/System.keychain > '/usr/l - ==>
security find-certificate -a -p /System/Library/Keychains/SystemRootCertific - ==>
mv -f /usr/local/etc/openssl/osx_cert.pem.tmp /usr/local/etc/openssl/osx_cer - ==>
Summary - /usr/local/Cellar/openssl/1.0.1f:
429 files, 15M - ==>
Installing wget - ==>
Downloading http://ftpmirror.gnu.org/wget/wget-1.15.tar.gz - ########################################################################
100.0% - ==>
./configure --prefix=/usr/local/Cellar/wget/1.15 --sysconfdir=/usr/local/etc --with-ssl=openssl --with-libssl-prefix=/usr/local/opt/openssl --disable-iri - ==>
make install - Warning:
Could not link wget. Unlinking... - Error:
The `brew link` step did not complete successfully - The
formula built, but is not symlinked into /usr/local - You
can try again using `brew link wget' -
- Possible
conflicting files are: - /usr/local/bin/wget
- /usr/local/share/man/man1/wget.1
- ==>
Summary - /usr/local/Cellar/wget/1.15:
8 files, 700K, built in 73 seconds - gerryyang@mba:bin$
(3)如何删除Homebrew?
If you installedto /usr/local /usr/local
Provided you haven’t put anything else in Homebrew’sprefix(brew --prefix), you can generally justrm-rf
(4)Homebrew下载的package存放的路径在哪里?
- gerryyang@mba:bin$brew
--cache - /Library/Caches/Homebrew
- gerryyang@mba:bin$ls
/Library/Caches/Homebrew/ - Formula/
wget-1.14.tar.gz - coreutils-8.22.tar.xz
wget-1.15.tar.gz - openssl-1.0.1f.mavericks.bottle.tar.gz
xz-5.0.5.mavericks.bottle.2.tar.gz - gerryyang@mba:bin$ls
/Library/Caches/Homebrew/Formula/ - coreutils.brewing
openssl.brewing wget.brewing xz.brewing -
- gerryyang@mba:bin$
(5)我可以安装自己的stuff在/usr/local吗?
Yes, brew is designed to not get in your way so you can use it howyoulike.
Install your own stuff, but be aware that if you installcommonlibraries, like libexpat yourself, it may cause trouble whentrying tobuild certain Homebrew formula. As a resultbrewdoctor
Thus it’s probably better to install your own stuff to the Cellarandthen brewlink
$ cd foo-0.1$ brew diy./configure —prefix=/usr/local/Cellar/foo/0.1$ ./configure —prefix=/usr/local/Cellar/foo/0.1[snip]$ make && make install$ brew link fooLinking /usr/local/Cellar/foo/0.1… 17 symlinks created
在我的环境上检测是这样的:
- gerryyang@mba:bin$brew
doctor - Warning:
Unbrewed dylibs were found in /usr/local/lib. - If
you didn't put them there on purpose they could cause problems when - building
Homebrew formulae, and may need to be deleted. -
- Unexpected
dylibs: -
/usr/local/lib/libboost_atomic.dylib -
/usr/local/lib/libboost_chrono.dylib -
/usr/local/lib/libboost_context.dylib -
/usr/local/lib/libboost_date_time.dylib -
/usr/local/lib/libboost_filesystem.dylib -
/usr/local/lib/libboost_graph.dylib -
/usr/local/lib/libboost_iostreams.dylib -
/usr/local/lib/libboost_locale.dylib -
/usr/local/lib/libboost_log.dylib -
/usr/local/lib/libboost_math_c99.dylib -
/usr/local/lib/libboost_math_c99f.dylib -
/usr/local/lib/libboost_math_c99l.dylib -
/usr/local/lib/libboost_math_tr1.dylib -
/usr/local/lib/libboost_math_tr1f.dylib -
/usr/local/lib/libboost_math_tr1l.dylib -
/usr/local/lib/libboost_prg_exec_monitor.dylib -
/usr/local/lib/libboost_program_options.dylib -
/usr/local/lib/libboost_python.dylib -
/usr/local/lib/libboost_random.dylib -
/usr/local/lib/libboost_regex.dylib -
/usr/local/lib/libboost_serialization.dylib -
/usr/local/lib/libboost_signals.dylib -
/usr/local/lib/libboost_system.dylib -
/usr/local/lib/libboost_thread.dylib -
/usr/local/lib/libboost_timer.dylib -
/usr/local/lib/libboost_unit_test_framework.dylib -
/usr/local/lib/libboost_wave.dylib -
/usr/local/lib/libboost_wserialization.dylib -
- Warning:
Unbrewed static libraries were found in /usr/local/lib. - If
you didn't put them there on purpose they could cause problems when - building
Homebrew formulae, and may need to be deleted. -
- Unexpected
static libraries: -
/usr/local/lib/libboost_atomic.a -
/usr/local/lib/libboost_chrono.a -
/usr/local/lib/libboost_context.a -
/usr/local/lib/libboost_coroutine.a -
/usr/local/lib/libboost_date_time.a -
/usr/local/lib/libboost_exception.a -
/usr/local/lib/libboost_filesystem.a -
/usr/local/lib/libboost_graph.a -
/usr/local/lib/libboost_iostreams.a -
/usr/local/lib/libboost_locale.a -
/usr/local/lib/libboost_log.a -
/usr/local/lib/libboost_math_c99.a -
/usr/local/lib/libboost_math_c99f.a -
/usr/local/lib/libboost_math_c99l.a -
/usr/local/lib/libboost_math_tr1.a -
/usr/local/lib/libboost_math_tr1f.a -
/usr/local/lib/libboost_math_tr1l.a -
/usr/local/lib/libboost_prg_exec_monitor.a -
/usr/local/lib/libboost_program_options.a -
/usr/local/lib/libboost_python.a -
/usr/local/lib/libboost_random.a -
/usr/local/lib/libboost_regex.a -
/usr/local/lib/libboost_serialization.a -
/usr/local/lib/libboost_signals.a -
/usr/local/lib/libboost_system.a -
/usr/local/lib/libboost_test_exec_monitor.a -
/usr/local/lib/libboost_thread.a -
/usr/local/lib/libboost_timer.a -
/usr/local/lib/libboost_unit_test_framework.a -
/usr/local/lib/libboost_wave.a -
/usr/local/lib/libboost_wserialization.a -
- Warning:
You have unlinked kegs in your Cellar - Leaving
kegs unlinked can lead to build-trouble and cause brews that depend on - those
kegs to fail to run properly once built. Run `brew link` on these: -
-
wget - gerryyang@mba:bin$
(6)为什么选择Homebrew这个名字?
mxclwas too concerned with the beer theme and didn’t consider that theproject may actually prove popular. By the time he realized it wastoo late. However, today, the first google hit for “homebrew” isnot beer related ;-)
看来作者是个酒鬼!
(7)关于更多地QA可以参考Homebrew的Wiki[4]
(8) 一些常用安装推荐
- gerryyang@mba:bin$brew
list - coreutils
openssl wget xz
Introduction to Coreutils
The GNU Core Utilities are the basic file, shell and textmanipulationutilities of the GNU operating system.
These are the core utilitieswhich are expected to exist on everyoperating system.
http://www.gnu.org/software/coreutils/
这是另一篇文章关于homgbrew的介绍
前面两篇文章已经介绍了由于我的好奇心,安装了不该安装的软件----错误的安装了RVM源和我不喜欢的MacPorts(其实没有那么差劲了)的卸载方法。
好了,现在有了个纯净的系统,有个全新的开始吧!新的生命开始了
不扯蛋了,言归正传:
1. 前言
作为Linux系统的忠实粉丝,我们都很喜欢 (Debian/Ubuntu)系列的apt包管理系统和(Redhat/Fedora)系列的yum包管理系统。 包括Windows用户都有多种方便的软件管理工具,如:360软件管理,QQ软件管理,迅雷软件管理等多种。 Mac OS X系统下面之前有老牌的Macports,Fink包管理系统,包括apple的官方Mac App Store。所以我们也向在苹果下找到一款比较新的,方便的包管理系统,没错,她就是
Homebrew
什么是Homebrew呢?Homebrew is the easiest and most flexible way to install the UNIX tools Apple didn’t include with OS X. 官方的解释非常明了,Homebrew是一个包管理器,用于在Mac上安装一些OS X没有的UNIX工具(比如著名的wget)。
Homebrew将这些工具统统安装到了 /usr/local/Cellar 目录中,并在 /usr/local/bin 中创建符号链接。
官方网站:
http://mxcl.github.com/homebrew/

此网站中已经讲解了如何安装homebrew,不过我下面还是简单的介绍一下
Homebrew是基于Ruby的(Mac电脑默认是安装的1.8.7版本的ruby),所以安装过程也是很简单的,把下面的代码粘贴到Terminal中执行
ruby <(curl -fsSkL raw.github.com/mxcl/homebrew/go)这个地址是官方给出的(亲测有时候是OK的),其实也有很多第三方的地址,如果这个不可用(中国特色,你懂得),可以google一下地址
例如https://raw.github.com/mxcl/homebrew/master/Library/Contributions/install_homebrew.rb
好了,直接上图
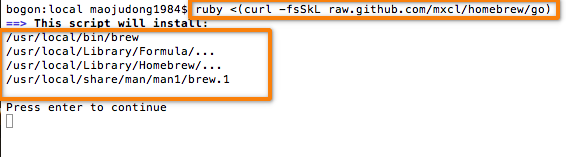
安装过程中需要按回车键确认
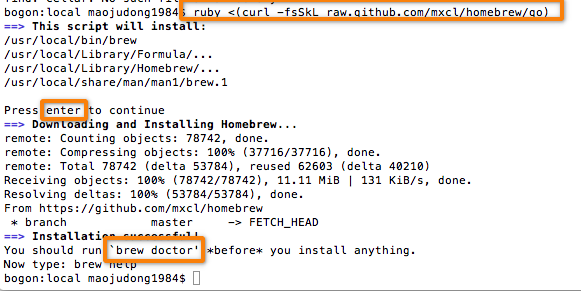
安装完成后,可以用brew doctor命令检测下是否有什么冲突的地方(如没有卸载MacPorts等等)
好了,安装完成了,是不是很简单呢
看看安装成功了没有
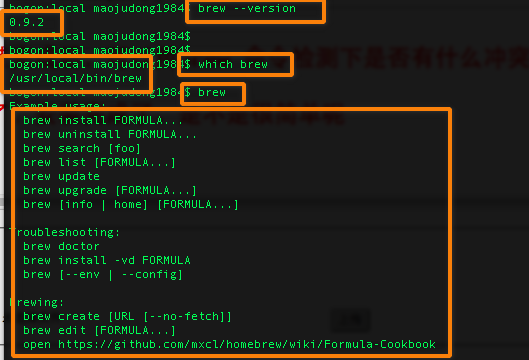
Homebrew安装成功后,会自动创建目录 /usr/local/Cellar 来存放Homebrew安装的程序。 这是你在命令行状态下面就可以使用 brew 命令了.
通过 brew install就可以安装软件了,通过 brew search 就可以搜索程序,例如 brew search vim ,就可以搜索名称包括vim的程序,
通过 brew update 就可以把包信息更新到最新,不过包更新是通过Git命令,所以要先通过 brew install git 命令安装git。
其他命令
brew list 显示已安装的包
brew home [] 用浏览器打开相关包的页面
brew info [] 显示包信息
brew deps [] 显示包依赖
brew server 启动web服务器,可以通过浏览器访问http://localhost:4567/ 来同网页来管理包
brew -h brew帮助
下面参考下网友的总结:
查看brew的帮助
安装软件
卸载软件
搜索软件
显示已经安装软件列表
更新软件,把所有的Formula目录更新,并且会对本机已经安装并有更新的软件用*标明。
更新某具体软件
查看软件信息
删除程序,和upgrade一样,单个软件删除和所有程序老版删除。
brew cleanup
查看那些已安装的程序需要更新
其它Homebrew指令:
brew list —列出已安装的软件
brew update —更新Homebrew
brew home *—用浏览器打开
brew info *—显示软件内容信息
brew deps * — 显示包依赖
brew server * —启动web服务器,可以通过浏览器访问http://localhost:4567/ 来同网页来管理包
brew -h brew —帮助
另外说明下,brew安装程序的过程中需要用到苹果的xcode中的 编译器,你可以到苹果的官网中免费下载安装(需要注册免费的开发者,然后才能下载),安装后到属性(Xcode -- Perference--Downloads--Components--Command Line Tools)点击下载就可以了
万一你用的不爽了,卸载指令:
cd `brew –prefix`
rm -rf Cellar
brew prune
rm `git ls-files`
rm -rf Library .git .gitignore bin/brew
rm -rf README.md share/man/man1/brew
rm -rf Library/Homebrew Library/Aliases
rm -rf Library/Formula Library/Contributions
rm -rf ~/Library/Caches/Homebrew
到此为止吧
22 gem install rvm
这条语句是错的,应该是通过rvm安装ruby和rubygems
114 atom devise.wiki/
使用atom打开 devise.wiki这个文件夹
118 rails g devise:install
119 rails g devise User
241 atom .
使用atom打开当前目录
250 rails g scaffold post title:string text:text
252 rm -f -r article/
260 sudo gem uninstall rails -v 5.1.1
261 gem uninstall rails -v 5.1.1
266 which rails
267 gem uninstall rails
268 sudo gem uninstall rails
271 sudo gem list
272 sudo gem list | grep rails
276 rvm list
277 which ruby
278 export | grep GEM
时间很晚了,01:16,已经困的不行,明早七点多要起来,睡了,再不睡明天更糟
- ruby零散笔记
- 零散笔记
- 零散笔记
- 零散笔记
- 零散笔记
- 零散笔记
- 零散笔记
- 笔记,零散的东西
- JavaScript 零散笔记
- JavaScript 零散笔记
- java零散笔记【loading】
- Maven零散笔记
- 一些零散的笔记
- hibernate零散笔记-基础
- hibernate零散笔记-扩展
- JavaScript 零散笔记
- A51零散笔记
- Drupal零散知识笔记
- 二进制文件读写
- python基础笔记-4
- JS设计模式之创建型设计模式总结
- Linux shell常用基本命令(一)
- 【C#】之字典泛型
- ruby零散笔记
- SSD(single shot multibox detector)算法及Caffe代码详解
- JNA调用VC++代码
- python基础笔记-5
- 字符串中不重复的单词个数
- ES6之Module的语法(1)
- Java中equals方法造成空指针异常的原因及解决方案
- 常用头文件和函数
- Android 系统自带模糊图像算法,获取状态栏、标题栏高度