Neuroph studio 入门教程
来源:互联网 发布:博客营销软件 编辑:程序博客网 时间:2024/05/29 10:00
PERCEPTRON
Perceptron is a simple two layer neural network with several neurons in input layer, and one or more neurons in output layer. All neurons use step transfer function and network can use LMS based learning algorithm such as Perceptron Learning or Delta Rule. This network can be used as a linear classifier, and it can only be applied to linear separable problems.

To create and train Perceptron neural network using Neuroph Studio do the following:
- Create Neuroph Project.
- Create Perceptron network.
- Create training set (in main menu choose Training >New Training Set).
- Train network
- Test trained network
Step 1. Create Neuroph project.
Click File > New Project.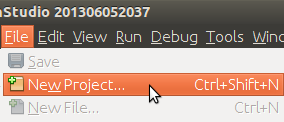
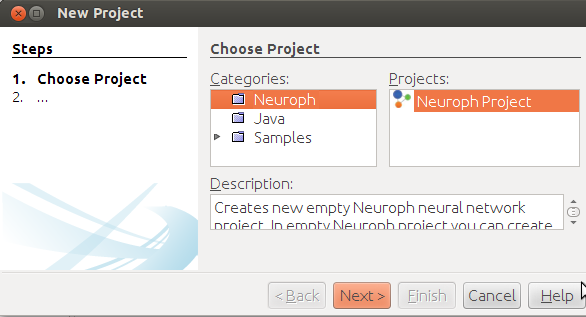
Select Neuroph Project, click Next.
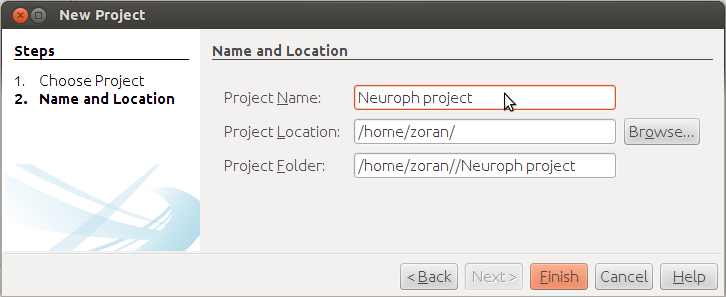
Enter project name and location, click Finish.
Project is created, now create neural network.
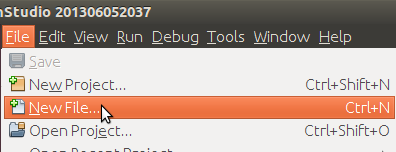
Step 2. Create Perceptron network.
Click File > New File
Select project from Project drop-down menu, select Neural Network file type, click next.
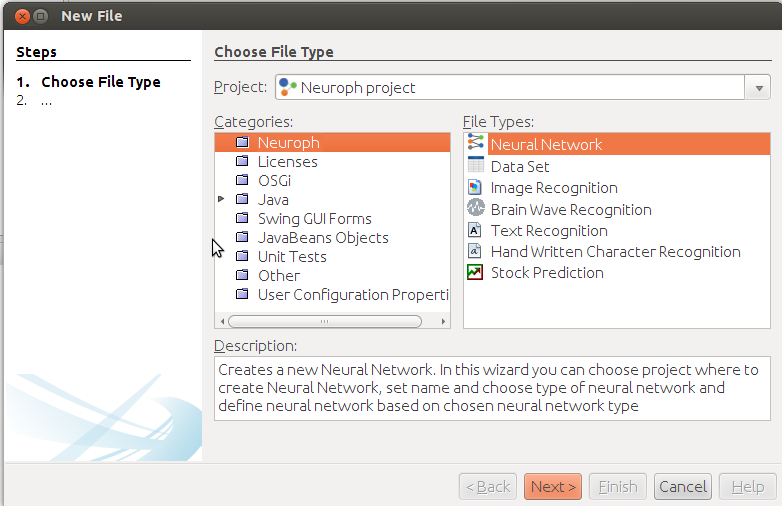
Enter network name, select Perceptron network type, click next.

In new perceptron dialog enter number ofneurons in input (2) and output layer (1) , choose Perceptron Learning and click Create button.

This will create the Perceptron neural network with two neurons in input, and one in output layer. By default, all neurons with Steptransfer functions.

Now we shall train this simple network to learn logical AND function. First we have to create the training set according to AND truth table.
Step 3. To create training set, click File>New File to open Data Set wizard.
Select DataSet file type, then click next.
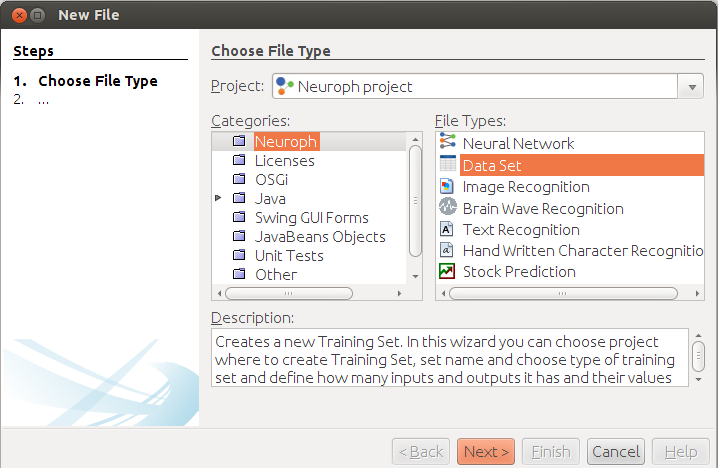
Enter training set name, number of inputs andoutputs as shown on picture below and click Finish button.

Then create training set by entering training elements as input and desired output values of neurons in input and outputlayer. Use Add row button to add new elements, and click OK button when finished.

Step 4. Training network. To start network training procedure, drag n' drop training set to corresponding field in the network window, and 'Train' button will become enabled in toolbar. Click the 'Train' button to open Set Learning Parameters dialog.

In Set Learning parameters dialoguse default learning parameters, and just click the Train button.

When the Total Net Error is zero, thetraining is complete.

Step 5. After the training is complete, you can test the network for the whole training set by selecting training set to test, and clicking Test button..

This will show test results in the new tab.

To test single input, use Set Input button. This will open Set Network Input dialog in which you can enter input values for network delimited withspace.

The result of network test is shown on picture below. Network learned logical AND function. As we can see the outputneuron has value 1. Test the network to see how it behaves for other input values.

PERCEPTRON IN Java CODE
package org.neuroph.samples;
import java.util.Arrays;
import org.neuroph.core.NeuralNetwork;
import org.neuroph.nnet.Perceptron;
import org.neuroph.core.data.DataSet;
import org.neuroph.core.data.DataSetRow;
/**
* This sample shows how to create, train, save and load simple Perceptron neural network
*/
public class PerceptronSample {
public static void main(String args[]) {
// create training set (logical AND function)
DataSet trainingSet = new DataSet(2, 1);
trainingSet.addRow(new DataSetRow(new double[]{0, 0}, new double[]{0}));
trainingSet.addRow(new DataSetRow(new double[]{0, 1}, new double[]{0}));
trainingSet.addRow(new DataSetRow(new double[]{1, 0}, new double[]{0}));
trainingSet.addRow(new DataSetRow(new double[]{1, 1}, new double[]{1}));// create perceptron neural network
NeuralNetwork myPerceptron = new Perceptron(2, 1);
// learn the training set
myPerceptron.learn(trainingSet);// test perceptron
System.out.println("Testing trained perceptron");
testNeuralNetwork(myPerceptron, trainingSet);// save trained perceptron
myPerceptron.save("mySamplePerceptron.nnet");// load saved neural network
NeuralNetwork loadedPerceptron = NeuralNetwork.createFromFile("mySamplePerceptron.nnet");
// test loaded neural network
System.out.println("Testing loaded perceptron");
testNeuralNetwork(loadedPerceptron, trainingSet);}
public static void testNeuralNetwork(NeuralNetwork nnet, DataSet tset) {
for(DataSetRow dataRow : tset.getRows()) {
nnet.setInput(dataRow.getInput());
nnet.calculate();
double[ ] networkOutput = nnet.getOutput();
System.out.print("Input: " + Arrays.toString(dataRow.getInput()) );
System.out.println(" Output: " + Arrays.toString(networkOutput) );}
}
}
EXTERNAL LINKS
To learn more about the Perceptrons see:- Neuroph studio 入门教程
- Neuroph studio 入门教程
- Neuroph studio max net
- Java神经网络的框架Neuroph 2.5 with Neuroph Studio 测试
- Android Studio NDK 入门教程
- Android Studio 入门教程
- Android Studio JNI开发入门教程
- Android 入门教程:安装 Android Studio
- Android 入门教程:Android Studio 介绍
- Android Studio JNI开发入门教程
- Android Studio JNI开发入门教程
- Android Studio JNI开发入门教程
- Android Studio JNI开发入门教程
- 完整版—Android studio入门教程
- Neuroph训练简单逻辑运算感知机
- Neuroph多层感知机训练XOR
- Visual Studio 2010 c++经典入门教程
- Android Studio 使用入门教程之常用配置
- [Docker]1.VirtualBox中使用Docker Machine管理主机
- Java开发中的23种设计模式详解----建造者模式
- Android中使用自定义样式和主题
- 动态规划
- Ajax调用servlet无反应?理理思路,找找错误.
- Neuroph studio 入门教程
- 一步一步实现自己的GAN
- 12、react之 事件
- RunLoop的应用和RunLoop的面试题
- 高级控件之下拉刷新
- ucos-ii系统分析一
- #6 阻止和重启路由
- 2017年中科大高级软件工程学习心得
- Java开发中的23种设计模式详解----原型模式