caffe2 三: Basics of Caffe2
来源:互联网 发布:js创建html表格 编辑:程序博客网 时间:2024/06/05 00:36
原文地址:https://caffe2.ai/docs/tutorial-basics-of-caffe2.html 翻译自用
This tutorial introduces a few basic Caffe2 components: 这里介绍 Caffe2 的一些基本元素
- Workspaces 工作空间
- Operators 运算
- Nets 网络
You also may want to review the Intro Tutorial before starting this notebook . 开始这篇教程之前可以先看下这里的介绍https://caffe2.ai/docs/intro-tutorial
Browse the Tutorial
教程原版 : https://github.com/caffe2/caffe2/blob/master/caffe2/python/tutorials/Basics.ipynb
In this tutorial we we go through a set of Caffe2 basics: the basic concepts including how operators and nets are being written.
这个教程中,我们介绍一些Caffe2的基本概念,包括怎么使用运算和网络。
First, let’s import caffe2. core and workspace are usually the two that you need most. If you want to manipulate protocol buffers generated by caffe2, you probably also want to import caffe2_pb2 from caffe2.proto.
首先,我们引入 caffe2 的 core 和 workspace 这两个经常使用的类库。如果需要使用 protocol buffer, 则需要从 caffe2.proto 引入 caffe2_pb2.
12345678910
# We'll also import a few standard python librariesfrom matplotlib import pyplotimport numpy as npimport time# These are the droids you are looking for.from caffe2.python import core, workspacefrom caffe2.proto import caffe2_pb2# Let's show all plots inline.%matplotlib inline
You might see a warning saying that caffe2 does not have GPU support. That means you are running a CPU-only build. Don’t be alarmed - anything CPU is still runnable without problem.
这里可能会有一个警示,说 caffe2 没有 GPU 支持。这说明代码在纯 CPU 模式下运行。不必担心,所有的CPU都可以运行这代码。
Workspaces#
Let’s cover workspaces first, where all the data reside. 我们先来看下工作空间,这里容纳所有数据。
If you are familiar with Matlab, workspace consists of blobs you create and store in memory. For now, consider a blob to be a N-dimensional Tensor similar to numpy’s ndarray, but is contiguous. Down the road, we will show you that a blob is actually a typed pointer that can store any type of C++ objects, but Tensor is the most common type stored in a blob. Let’s show what the interface looks like.
类似于 Matlab , 在内存中 workspace 包含了你创建的 blob , 可以把 blob 当成一个 N 维的 Tensor , blob 类似于 numpy 的 ndarray . 接下来将会看到,一个 blob 其实是一个指针,可以指向任何类型的 C++ 对象 ( Tensor 是最常见的一种 )下面展示接口的样子:
Blobs() prints out all existing blobs in the workspace. HasBlob() queries if a blob exists in the workspace. For now, we don’t have anything yet .
Blobs( ) 打印出工作空间中所有的 blobs. HasBlob( ) 查询工作空间中是否存在一个 blob.
12
print("Current blobs in the workspace: {}".format(workspace.Blobs()))print("Workspace has blob 'X'? {}".format(workspace.HasBlob("X")))
We can feed blobs into the workspace using FeedBlob().
我们使用 FeedBlob() 把 blobs 放进 workspace .
123
X = np.random.randn(2, 3).astype(np.float32)print("Generated X from numpy:\n{}".format(X))workspace.FeedBlob("X", X)
123
Generated X from numpy:[[-0.56927377 -1.28052795 -0.95808828] [-0.44225693 -0.0620895 -0.50509363]]
Now, let’s take a look what blobs there are in the workspace. 然后我们看下 workspace 中存在的 blobs :
123
print("Current blobs in the workspace: {}".format(workspace.Blobs()))print("Workspace has blob 'X'? {}".format(workspace.HasBlob("X")))print("Fetched X:\n{}".format(workspace.FetchBlob("X")))
12345
Current blobs in the workspace: [u'X']Workspace has blob 'X'? TrueFetched X:[[-0.56927377 -1.28052795 -0.95808828] [-0.44225693 -0.0620895 -0.50509363]]
Let’s verify that the arrays are equal. 我们验证一下数组是相等的
1
np.testing.assert_array_equal(X, workspace.FetchBlob("X"))
Also, if you are trying to access a blob that does not exist, an error will be thrown: 当你访问的 blob 不存在的话,系统会抛出一个错误。
1234
try: workspace.FetchBlob("invincible_pink_unicorn")except RuntimeError as err: print(err)
1
[enforce fail at pybind_state.cc:441] gWorkspace->HasBlob(name).
One thing that you might not use immediately: you can have multiple workspaces in Python using different names, and switch between them. Blobs in different workspaces are separate from each other. You can query the current workspace using CurrentWorkspace. Let’s try switching the workspace by name (gutentag) and creating a new one if it doesn’t exist.
多个 workspace 可以同时存在,以不同的名字来区分和切换。不同 workspace 中的 blob 彼此独立。可以使用 CurrentWorkspace 函数来取得当前 workspace . 下面的例子 : 切换到名字为 getentag 的 workspace , 如果被切换到的这个指定的 workspace 不存在,则创建之。
1234567891011
print("Current workspace: {}".format(workspace.CurrentWorkspace()))print("Current blobs in the workspace: {}".format(workspace.Blobs()))# Switch the workspace. The second argument "True" means creating# the workspace if it is missing.workspace.SwitchWorkspace("gutentag", True)# Let's print the current workspace. Note that there is nothing in the# workspace yet.print("Current workspace: {}".format(workspace.CurrentWorkspace()))print("Current blobs in the workspace: {}".format(workspace.Blobs()))
1234
Current workspace: defaultCurrent blobs in the workspace: ['X']Current workspace: gutentagCurrent blobs in the workspace: []
Let’s switch back to the default workspace. 我们切换到默认的 workspace .
123
workspace.SwitchWorkspace("default")print("Current workspace: {}".format(workspace.CurrentWorkspace()))print("Current blobs in the workspace: {}".format(workspace.Blobs()))
12
Current workspace: defaultCurrent blobs in the workspace: ['X']
Finally, ResetWorkspace() clears anything that is in the current workspace.
最后,ResetWorkspace() 清空当前 workspace 中的所有东东。
1
workspace.ResetWorkspace()
Operators #
Operators in Caffe2 are kind of like functions. From the C++ side, they all derive from a common interface, and are registered by type, so that we can call different operators during runtime. The interface of operators is defined in caffe2/proto/caffe2.proto. Basically, it takes in a bunch of inputs, and produces a bunch of outputs.
Operators 在 Caffe2 中类似于函数。从 C++ 的角度来看,Operators 继承于共同的 Interface , 被分类注册,所以我们可以在运行时调用不同的 Operators . Operators 的 Interface 定义在 caffe2/proto/caffe2.proto . 简单来说,Operator 使用一批输入,产生一批输出。
Remember, when we say “create an operator” in Caffe2 Python, nothing gets run yet. All it does is to create the protocol buffer that specifies what the operator should be. At a later time it will be sent to the C++ backend for execution. If you are not familiar with protobuf, it is a json-like serialization tool for structured data. Find more about protocol buffers here.
当我们在 Caffe2 中提及 "创建一个 operator" 时候,并没有运行什么东东,而只是创建了 protocol buffer 用于说明operator 用来做什么。
Let’s see an actual example. 来看一个实际例子:
1234567
# Create an operator.op = core.CreateOperator( "Relu", # The type of operator that we want to run ["X"], # A list of input blobs by their names ["Y"], # A list of output blobs by their names)# and we are done!
As we mentioned, the created op is actually a protobuf object. Let’s show the content.
123
print("Type of the created op is: {}".format(type(op)))print("Content:\n")print(str(op))
1234567
Type of the created op is: <class 'caffe2.proto.caffe2_pb2.OperatorDef'>Content:input: "X"output: "Y"name: ""type: "Relu"
OK, let’s run the operator. We first feed in the input X to the workspace. Then the simplest way to run an operator is to do workspace.RunOperatorOnce(operator)
接下来我们运行这个 operator ,首先把输入 X 放入 workspace , 接下来最简单的运行 operator 的方法是:
12
workspace.FeedBlob("X", np.random.randn(2, 3).astype(np.float32))workspace.RunOperatorOnce(op)
After execution, let’s see if the operator is doing the right thing, which is our neural network’s activation function (Relu) in this case.
1234
print("Current blobs in the workspace: {}\n".format(workspace.Blobs()))print("X:\n{}\n".format(workspace.FetchBlob("X")))print("Y:\n{}\n".format(workspace.FetchBlob("Y")))print("Expected:\n{}\n".format(np.maximum(workspace.FetchBlob("X"), 0)))
12345678910111213
Current blobs in the workspace: ['X', 'Y']X:[[ 1.03125858 1.0038228 0.0066975 ] [ 1.33142471 1.80271244 -0.54222912]]Y:[[ 1.03125858 1.0038228 0.0066975 ] [ 1.33142471 1.80271244 0. ]]Expected:[[ 1.03125858 1.0038228 0.0066975 ] [ 1.33142471 1.80271244 0. ]]
This is working if you’re expected output matches your Y output in this example.
期望的输出和Y输出一致的话,说明代码正常工作。
Operators also take optional arguments if needed. They are specified as key-value pairs. Let’s take a look at one simple example, which is to create a tensor and fills it with Gaussian random variables.
Operator 必要时候以 key-value 方式使用一些可选参数。看一个简单的例子,例子生成一个 tensor , 并使用 Gaussian 随机数进行填充。
12345678910
op = core.CreateOperator( "GaussianFill", [], # GaussianFill does not need any parameters. ["Z"], shape=[100, 100], # shape argument as a list of ints. mean=1.0, # mean as a single float std=1.0, # std as a single float)print("Content of op:\n")print(str(op))
123456789101112131415161718
Content of op:output: "Z"name: ""type: "GaussianFill"arg { name: "std" f: 1.0}arg { name: "shape" ints: 100 ints: 100}arg { name: "mean" f: 1.0}Let’s run it and see if things are as intended. 我们来运行一下,看是否符合预期。
1234
workspace.RunOperatorOnce(op)temp = workspace.FetchBlob("Z")pyplot.hist(temp.flatten(), bins=50)pyplot.title("Distribution of Z")
1
<matplotlib.text.Text at 0x7f2bd2d51710>
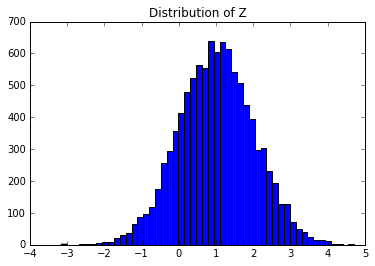
If you see a bell shaped curve then it worked!
Nets#
Nets are essentially computation graphs. We keep the name Net for backward consistency (and also to pay tribute to neural nets). A Net is composed of multiple operators just like a program written as a sequence of commands. Let’s take a look.
一个 Net 由若干 Operator 组成,就像代码由若干命令组成。
When we talk about nets, we will also talk about BlobReference, which is an object that wraps around a string so we can do easy chaining of operators.
谈论 nets 时候, 通常会谈论到 BlobReference, 我们通常使用 BlobReference 来进行链式的运算。
Let’s create a network that is essentially the equivalent of the following python math:
我们创建一个与下面 python 计算等价的一个网络:
1234
X = np.random.randn(2, 3)W = np.random.randn(5, 3)b = np.ones(5)Y = X * W^T + b
We’ll show the progress step by step. Caffe2’s core.Net is a wrapper class around a NetDef protocol buffer.
我们展现整个过程细节 。Caffe2 的 core.Net 实现对一个 NetDef protocol buffer 的封装 。
When creating a network, its underlying protocol buffer is essentially empty other than the network name. Let’s create the net and then show the proto content. 我们来创建一个 net , 然后看下 proto 内容。
12
net = core.Net("my_first_net")print("Current network proto:\n\n{}".format(net.Proto()))
123
Current network proto:name: "my_first_net"
Let’s create a blob called X, and use GaussianFill to fill it with some random data.
我们创建一个 blob X ,使用 GaussianFill 随机数对其进行填充。
12
X = net.GaussianFill([], ["X"], mean=0.0, std=1.0, shape=[2, 3], run_once=0)print("New network proto:\n\n{}".format(net.Proto()))
12345678910111213141516171819202122232425
New network proto:name: "my_first_net"op { output: "X" name: "" type: "GaussianFill" arg { name: "std" f: 1.0 } arg { name: "run_once" i: 0 } arg { name: "shape" ints: 2 ints: 3 } arg { name: "mean" f: 0.0 }}You might have observed a few differences from the earlier core.CreateOperator call. Basically, when we have a net, you can direct create an operator and add it to the net at the same time using Python tricks: essentially, if you call net.SomeOp where SomeOp is a registered type string of an operator, this essentially gets translated to
如你所见,和前面的 core.CreateOperator 调用不同。对于一个 net , 可以直接创建一个 operator 然后同时将其添加到 net 上。等同于,如果调用 net.SomeOp , 将会执行如下代码:
12
op = core.CreateOperator("SomeOp", ...)net.Proto().op.append(op)Also, you might be wondering what X is. X is a BlobReference which basically records two things: X 是一个 BlobReference , 记录着两方面信息:
- what its name is. You can access the name by str(X) 名字.
- which net it gets created from. It is recorded by an internal variable
_from_net, but most likely you won’t need that. 基于的 Net .
Let’s verify it. Also, remember, we are not actually running anything yet, so X contains nothing but a symbol. Don’t expect to get any numerical values out of it right now :) 我们来验证一下。到现在,我们还没有运行什么内容,所以现在还没有什么数据产出。
12
print("Type of X is: {}".format(type(X)))print("The blob name is: {}".format(str(X)))
12
Type of X is: <class 'caffe2.python.core.BlobReference'>The blob name is: X
Let’s continue to create W and b. 我们继续创建 W 和 b .
12
W = net.GaussianFill([], ["W"], mean=0.0, std=1.0, shape=[5, 3], run_once=0)b = net.ConstantFill([], ["b"], shape=[5,], value=1.0, run_once=0)
Now, one simple code sugar: since the BlobReference objects know what net it is generated from, in addition to creating operators from net, you can also create operators from BlobReferences. Let’s create the FC operator in this way.
这儿有个一个简单的语法糖:BlobReference 对象知道自己来源于哪个 Net ,因此,相对于从 Net 创建 operator , 也可以从 BlobReference 创建 operator。 这里我们创建 operator :FC
1
Y = X.FC([W, b], ["Y"])
Under the hood, X.FC(...) simply delegates to net.FC by inserting X as the first input of the corresponding operator, so what we did above is equivalent to 底层の原理是, X.FC(...) 以把 X 作为 operator 第一个输入的方式来调用 net.FC, 也就是以下代码:
1
Y = net.FC([X, W, b], ["Y"])
Let’s take a look at the current network. 来看一下现在的 Net :
1
print("Current network proto:\n\n{}".format(net.Proto()))
123456789101112131415161718192021222324252627282930313233343536373839404142434445464748495051525354555657585960616263646566676869707172
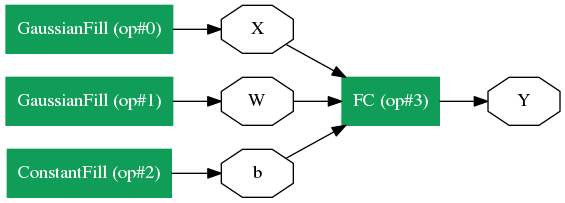
Current network proto:name: "my_first_net"op { output: "X" name: "" type: "GaussianFill" arg { name: "std" f: 1.0 } arg { name: "run_once" i: 0 } arg { name: "shape" ints: 2 ints: 3 } arg { name: "mean" f: 0.0 }}op { output: "W" name: "" type: "GaussianFill" arg { name: "std" f: 1.0 } arg { name: "run_once" i: 0 } arg { name: "shape" ints: 5 ints: 3 } arg { name: "mean" f: 0.0 }}op { output: "b" name: "" type: "ConstantFill" arg { name: "run_once" i: 0 } arg { name: "shape" ints: 5 } arg { name: "value" f: 1.0 }}op { input: "X" input: "W" input: "b" output: "Y" name: "" type: "FC"}Too verbose huh? Let’s try to visualize it as a graph. Caffe2 ships with a very minimal graph visualization tool for this purpose. Let’s show that in ipython.
是不是很冗长?我们可以将其可视化。Caffe2 针对这个实现了一个 mini 可视化工具,我们用ipyton 来展现 (注意在非视窗OS中, 比如在 CentOS 中,要写成 graph.create_png() graph.write_pdf("Test.pdf") ):
1234
from caffe2.python import net_drawerfrom IPython import displaygraph = net_drawer.GetPydotGraph(net, rankdir="LR")display.Image(graph.create_png(), width=800)
So we have defined a Net, but nothing gets executed yet. Remember that the net above is essentially a protobuf that holds the definition of the network. When we actually want to run the network, what happens under the hood is:
这样,我们定义了一个 Net , 但还没执行什么。上面的 Net 本质上只是一个 protobuf ,包含了对 network 的定义。 当我们运行网络时,将会发生 :
- Instantiate a C++ net object from the protobuf ; 从 protobuf 实例化一个 C++ Net 对象;
- Call the instantiated net’s Run() function . 调用这个 C++ Net 对象的 Run() 方法;
Before we do anything, we should clear any earlier workspace variables with ResetWorkspace().
做其他任何事情前,我们应该使用 ResetWorkspace() 来清理之前的工作空间变量。
Then there are two ways to run a net from Python. We will do the first option in the example below.
Python 中可以使用两种方法来运行一个 Net . 我们来看其中一种 .
- Using
workspace.RunNetOnce(), which instantiates, runs and immediately destructs the network. 第一种方法使用 RunNetOnce( ) , 该函数对 Net 完成如下操作 : 实例化,运行,销毁 - A little bit more complex and involves two steps: (a) call
workspace.CreateNet()to create the C++ net object owned by the workspace, and (b) useworkspace.RunNet()by passing the name of the network to it. 第二种方法稍微复杂些,包括两步:使用 CreateNet( ) 函数来创建 C++ Net 对象实例, 使用 RunNet( ) 函数来运行 Net .
1234567
workspace.ResetWorkspace()print("Current blobs in the workspace: {}".format(workspace.Blobs()))workspace.RunNetOnce(net)print("Blobs in the workspace after execution: {}".format(workspace.Blobs()))# Let's dump the contents of the blobsfor name in workspace.Blobs(): print("{}:\n{}".format(name, workspace.FetchBlob(name)))
12345678910111213141516
Current blobs in the workspace: []Blobs in the workspace after execution: ['W', 'X', 'Y', 'b']W:[[-0.96537346 0.42591459 0.66788739] [-0.47695673 2.25724339 -0.10370601] [-0.20327474 -3.07469416 0.47715324] [-1.62159526 0.73711687 -1.42365313] [ 0.60718107 -0.50448036 -1.17132831]]X:[[-0.99601173 -0.61438894 0.10042733] [ 0.23359862 0.15135486 0.77555442]]Y:[[ 1.76692021 0.07781416 3.13944149 2.01927781 0.58755434] [ 1.35693741 1.14979863 0.85720366 -0.37135673 0.15705228]]b:[ 1. 1. 1. 1. 1.]
Now let’s try the second way to create the net, and run it. First clear the variables with ResetWorkspace(), create the net with the workspace’s net object you created earlier CreateNet(net_object), and then run the net by name with RunNet(net_name).
我们来使用第二种方式创建和运行 Net : 首先使用 ResetWorkspace 来创建 Net, 然后通过 Net 名字来调用 RunNet 来运行。
1234567
workspace.ResetWorkspace()print("Current blobs in the workspace: {}".format(workspace.Blobs()))workspace.CreateNet(net)workspace.RunNet(net.Proto().name)print("Blobs in the workspace after execution: {}".format(workspace.Blobs()))for name in workspace.Blobs(): print("{}:\n{}".format(name, workspace.FetchBlob(name)))
12345678910111213141516
Current blobs in the workspace: []Blobs in the workspace after execution: ['W', 'X', 'Y', 'b']W:[[-0.29295802 0.02897477 -1.25667715] [-1.82299471 0.92877913 0.33613944] [-0.64382178 -0.68545657 -0.44015241] [ 1.10232282 1.38060772 -2.29121733] [-0.55766547 1.97437167 0.39324901]]X:[[-0.47522315 -0.40166432 0.7179445 ] [-0.8363331 -0.82451206 1.54286408]]Y:[[ 0.22535783 1.73460138 1.2652775 -1.72335696 0.7543118 ] [-0.71776152 2.27745867 1.42452145 -4.59527397 0.4452306 ]]b:[ 1. 1. 1. 1. 1.]
There are a few differences between RunNetOnce and RunNet, but probably the main difference is the computation time overhead. Since RunNetOnce involves serializing the protobuf to pass between Python and C and instantiating the network, it may take longer to run. Let’s see in this case what the overhead is.
在 RunNetOnce 函数和 RunNet 函数之间有一些不同。主要的不同是时间消耗。RunNetOnce 函数中包括序列化 protobuf 以将之用于在 Python 和 C 之间传递,所以 RunNetOnce 花费更长的时间。下面是具体一些的时间消耗:
1234567891011121314
# It seems that %timeit magic does not work well with# C++ extensions so we'll basically do for loopsstart = time.time()for i in range(1000): workspace.RunNetOnce(net)end = time.time()print('Run time per RunNetOnce: {}'.format((end - start) / 1000))start = time.time()workspace.CreateNet(net)for i in range(1000): workspace.RunNet(net.Proto().name)end = time.time()print('Run time per RunNet: {}'.format((end - start) / 1000))
12
Run time per RunNetOnce: 0.000364284992218Run time per RunNet: 4.42600250244e-06
OK, so above are a few key components if you would like to use Caffe2 from the python side. We are going to add more to the tutorial as we find more needs. For now, kindly check out the rest of the tutorials!
OK, 上面这些就是以 Python 方式使用 Caffe2 时候需要留意の主要东东了。会不断地进行补充 ...- caffe2 三: Basics of Caffe2
- Caffe2
- Caffe2
- AICamera of Caffe2
- caffe2--Operators(三)
- 关于caffe2
- Caffe2简介
- caffe2 介绍
- caffe2 安装
- Caffe2 入门教程
- 初识caffe2
- caffe2 安装
- Caffe2:ubuntuKylin17.04使用Caffe2.LSTM
- caffe2 安装与介绍
- caffe2 安装与介绍
- caffe2 树莓派使用
- ubuntu14.04安装caffe2
- 写在caffe2 的开始
- 贪心算法区间不相交问题
- Visual Studio Code 自定义Snippet配置
- 一 线性表的有关操作
- Linux守护进程Shell脚本
- how2j仿天猫前端
- caffe2 三: Basics of Caffe2
- 设计模式--抽象工厂模式
- linux利用shell实现守护进程的脚本
- 二 栈和队列的有关操作
- Android List<T> 排序
- Spring+SpringMVC+MyBatis 整合(一)(Maven配置)
- activeMQ学习笔记 -- day01介绍
- android页面跳转的几种方式
- ThreadLocal的用法