Active/Passive MySQL High Availability Pacemaker Cluster with DRBD on CentOS 7
来源:互联网 发布:软件测试计划书实例 编辑:程序博客网 时间:2024/06/14 16:18
https://www.lisenet.com/2016/activepassive-mysql-high-availability-pacemaker-cluster-with-drbd-on-centos-7/
We are going to build a two-node active/passive MariaDB HA cluster using Pacemaker and Corosync.
Before We Begin
We will use MariaDB, which is a binary drop in replacement for MySQL. MySQL is no longer in CentOS’s repositories and MariaDB has become the default database system offered.
MariaDB claims to have a lot of new options, extension, storage engines and bug fixes that are not in MySQL. Checkhere for more info about MariaDB.
No shared storage will be required. At any point in time, the MariaDB service will be active on one cluster node.
The convention followed in the article is that [ALL] # denotes a command that needs to be run on all cluster nodes.
Software
Software used in this article:
- CentOS Linux release 7.2.1511 (Core)
- kernel-3.10.0-327.4.4.el7
- pacemaker-1.1.13
- corosync-2.3.4
- pcs-0.9.143
- resource-agents-3.9.5
- drbd-8.4 (kmod-drbd84-8.4.7)
- MariaDB 5.5.44
Networking, Firewall and SELinux Configuration
We have two CentOS 7 virtual machines on VirtualBox, named pcmk01 and pcmk02.
Networking
The following networks will be used:
- 10.8.8.0/24 – LAN with access to the Internet (host-only adapter),
- 172.16.21.0/24 – non-routable cluster heartbeat vlan for Corosync (internal network adapter),
- 172.16.22.0/24 – non-routable cluster heartbeat vlan for DRBD (internal network adapter).
Hostnames and IPs as defined in /etc/hosts file:
10.8.8.60 pcmkvip10.8.8.61 pcmk0110.8.8.62 pcmk02172.16.21.11 pcmk01-cr172.16.21.12 pcmk02-cr172.16.22.11 pcmk01-drbd172.16.22.12 pcmk02-drbd
We have set the following hostnames:
[pcmk01]# hostnamectl set-hostname pcmk01[pcmk02]# hostnamectl set-hostname pcmk02
A simplified network configuration can be seen below.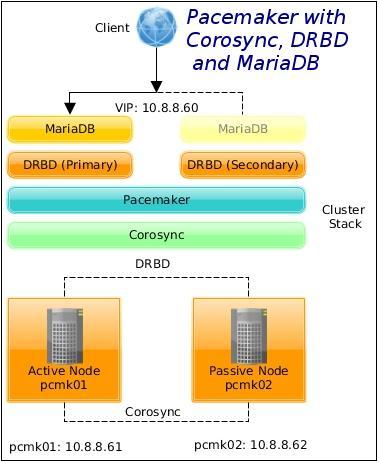
Network configuration for the first node can be seen below, it is the same for the second node except the IPs which are specified above.
[pcmk01]# cat /etc/sysconfig/network-scripts/ifcfg-enp0s8#Corosync ring0NAME="enp0s8"DEVICE="enp0s8"IPADDR="172.16.21.11"PREFIX="24"TYPE="Ethernet"IPV4_FAILURE_FATAL="yes"IPV6INIT="no"DEFROUTE="no"PEERDNS="no"PEERROUTES="no"ONBOOT="yes"[pcmk01]# cat /etc/sysconfig/network-scripts/ifcfg-enp0s9#DRBDNAME="enp0s9"DEVICE="enp0s9"IPADDR="172.16.22.11"PREFIX="24"TYPE="Ethernet"IPV4_FAILURE_FATAL="yes"IPV6INIT="no"DEFROUTE="no"PEERDNS="no"PEERROUTES="no"ONBOOT="yes"[pcmk01]# cat /etc/sysconfig/network-scripts/ifcfg-enp0s17#LANNAME="enp0s17"DEVICE="enp0s17"IPADDR="10.8.8.61"PREFIX="24"GATEWAY="10.8.8.1"DNS1="8.8.8.8"DNS2="8.8.4.4"TYPE="Ethernet"IPV4_FAILURE_FATAL="yes"IPV6INIT="no"DEFROUTE="yes"PEERDNS="yes"ONBOOT="yes"Iptables
This article uses Iptables firewall. Note that CentOS 7 utilises FirewallD as the default firewall management tool.
We replaced FirewallD service with Iptables:
[ALL]# systemctl stop firewalld.service[ALL]# systemctl mask firewalld.service[ALL]# systemctl daemon-reload[ALL]# yum install -y iptables-services[ALL]# systemctl enable iptables.service[ALL]# service iptables save
These are the iptables firewall rules that we have in use:
# iptables -S-P INPUT ACCEPT-P FORWARD ACCEPT-P OUTPUT ACCEPT-A INPUT -p icmp -j ACCEPT-A INPUT -i lo -j ACCEPT-A INPUT -s 10.8.8.0/24 -p tcp -m tcp --dport 22 -m state --state NEW -j ACCEPT-A INPUT -s 172.16.21.0/24 -d 172.16.21.0/24 -m comment --comment Corosync -j ACCEPT-A INPUT -s 172.16.22.0/24 -d 172.16.22.0/24 -m comment --comment DRBD -j ACCEPT-A INPUT -s 10.8.8.0/24 -p tcp -m tcp --dport 3306 -m state --state NEW -j ACCEPT-A INPUT -p udp -m multiport --dports 67,68 -m state --state NEW -j ACCEPT-A INPUT -p udp -m multiport --dports 137,138,139,445 -j DROP-A INPUT -m state --state RELATED,ESTABLISHED -j ACCEPT-A INPUT -j LOG --log-prefix "iptables_input "-A INPUT -j DROP
We have also disabled IPv6, open /etc/sysctl.conf for editing and place the following:
net.ipv6.conf.all.disable_ipv6 = 1net.ipv6.conf.default.disable_ipv6 = 1
[ALL]# sysctl -p
SELinux
SELinux is set to enforcing mode.
Install Pacemaker and Corosync
[ALL]# yum install -y pcs
The pcs will install pacemaker, corosync and resource-agents as dependencies.
For SELinux management:
[ALL]# yum install -y policycoreutils-python
In RHEL 7, we have to set up a password for the pcs administration account named hacluster:
[ALL]# echo "passwd" | passwd hacluster --stdin
Start and enable the service:
[ALL]# systemctl start pcsd.service[ALL]# systemctl enable pcsd.service
Configure Corosync
Authenticate as the hacluster user. Authorisation tokens are stored in the file/var/lib/pcsd/tokens.
[pcmk01]# pcs cluster auth pcmk01-cr pcmk02-cr -u hacluster -p passwdpcmk01-cr: Authorizedpcmk02-cr: Authorized
Generate and synchronise the Corosync configuration.
[pcmk01]# pcs cluster setup --name mysql_cluster pcmk01-cr pcmk02-cr
Start the cluster on all nodes:
[pcmk01]# pcs cluster start --all
Install DRBD and MariaDB
DRBD Installation
DRBD refers to block devices designed as a building block to form high availability clusters. This is done by mirroring a whole block device via an assigned network. DRBD can be understood as network basedRAID-1.
Import the ELRepo package signing key, enable the repository and install the DRBD kernel module with utilities:
[ALL]# rpm --import https://www.elrepo.org/RPM-GPG-KEY-elrepo.org[ALL]# rpm -Uvh http://www.elrepo.org/elrepo-release-7.0-2.el7.elrepo.noarch.rpm[ALL]# yum install -y kmod-drbd84 drbd84-utils
To avoid issues with SELinux, for the time being, we are going to exempt DRBD processes from SELinux control:
[ALL]# semanage permissive -a drbd_t
LVM Volume for DRBD
Create a new 1GB logical volume for DRBD:
[pcmk01]# vgs VG #PV #LV #SN Attr VSize VFree vg_centos7 1 3 0 wz--n- 63.21g 45.97g
[ALL]# lvcreate --name lv_drbd --size 1024M vg_centos7
Configure DRBD
Configure DRBD, use single-primary mode with replication protocol C.
[ALL]# cat << EOL >/etc/drbd.d/mysql01.resresource mysql01 { protocol C; meta-disk internal; device /dev/drbd0; disk /dev/vg_centos7/lv_drbd; handlers { split-brain "/usr/lib/drbd/notify-split-brain.sh root"; } net { allow-two-primaries no; after-sb-0pri discard-zero-changes; after-sb-1pri discard-secondary; after-sb-2pri disconnect; rr-conflict disconnect; } disk { on-io-error detach; } syncer { verify-alg sha1; } on pcmk01 { address 172.16.22.11:7789; } on pcmk02 { address 172.16.22.12:7789; }}EOLWe have a resource named mysql01 which uses /dev/vg_centos7/lv_drbd as the lower-level device, and is configured with internal meta data.
The resource uses TCP port 7789 for its network connections, and binds to the IP addresses 172.16.22.11 and 172.16.22.12, respectively.
If case we run into problems, we have to ensure that a TCP 7789 port is open on a firewall for the DRBD interface and that the resource name matches the file name.
Create the local metadata for the DRBD resource:
[ALL]# drbdadm create-md mysql01
Ensuring that a DRBD kernel module is loaded, bring up the DRBD resource:
[ALL]# drbdadm up mysql01
For data consistency, tell DRBD which node should be considered to have the correct data (can be run on any node as both have garbage at this point):
[pcmk01]# drbdadm primary --force mysql01
Observe the sync:
[pcmk01]# drbd-overview 0:mysql01/0 SyncSource Primary/Secondary UpToDate/Inconsistent [=>..................] sync'ed: 11.8% (926656/1048508)K
Create a filesystem on the DRBD device and tune as required:
[pcmk01]# mkfs.ext4 -m 0 -L drbd /dev/drbd0
[pcmk01]# tune2fs -c 30 -i 180d /dev/drbd0
Mount the disk, we will populate it with MariaDB content shortly:
[pcmk01]# mount /dev/drbd0 /mnt
MariaDB Installation
[ALL]# yum install -y mariadb-server mariadb
Ensure the MariaDB service is disabled, as it will managed by pacemaker:
[ALL]# systemctl disable mariadb.service
Now start the MariaDB service manually on one of the cluster nodes:
[pcmk01]# systemctl start mariadb
We can install a fresh MariaDB database with the mysql_install_db command:
[pcmk01]# mysql_install_db --datadir=/mnt --user=mysql
Run secure installation:
[pcmk01]# mysql_secure_installation
We need to give the same SELinux policy as the MariaDB datadir. The mysqld policy stores data with multiple different file context types under the/var/lib/mysql directory. If we want to store the data in a different directory, we can use thesemanage command to add file context.
[pcmk01]# semanage fcontext -a -t mysqld_db_t "/mnt(/.*)?"[pcmk01]# restorecon -Rv /mnt
Please be advised that changes made with the chcon command do not survive a file system relabel, or the execution of the restorecon command. Always usesemanage.
At this point our preparation is complete, we can unmount the temporarily mounted filesystem and stop the MariaDB service:
[pcmk01]# umount /mnt
[pcmk01]# systemctl stop mariadb
Last thing to do, we have to put some very basic my.cnf configuration:
[ALL]# cat << EOL > /etc/my.cnf[mysqld]symbolic-links=0bind_address = 0.0.0.0datadir = /var/lib/mysqlpid_file = /var/run/mariadb/mysqld.pidsocket = /var/run/mariadb/mysqld.sock[mysqld_safe]bind_address = 0.0.0.0datadir = /var/lib/mysqlpid_file = /var/run/mariadb/mysqld.pidsocket = /var/run/mariadb/mysqld.sock!includedir /etc/my.cnf.dEOL
Configure Pacemaker Cluster
We want the configuration logic and ordering to be as below:
- Start: mysql_fs01 -> mysql_service01 -> mysql_VIP01,
- Stop: mysql_VIP01 -> mysql_service01 -> mysql_fs01.
Where mysql_fs01 is the filesystem resource, mysql_service01 is the mysqld service resource, andmysql_VIP01 is the floating virtual IP 10.8.8.60.
One handy feature pcs has is the ability to queue up several changes into a file and commit those changes atomically. To do this, we start by populating the file with the current raw XML config from the CIB:
[pcmk01]# pcs cluster cib clust_cfg
Disable STONITH. Be advised that a node level fencing configuration depends heavily on environment. You can checkthis page for Pacemaker STONITH device configuration on VMware.
[pcmk01]# pcs -f clust_cfg property set stonith-enabled=false
Set quorum policy to ignore:
[pcmk01]# pcs -f clust_cfg property set no-quorum-policy=ignore
Prevent the resources from moving after recovery as it usually increases downtime:
[pcmk01]# pcs -f clust_cfg resource defaults resource-stickiness=200
Create a cluster resource named mysql_data01 for the DRBD device, and an additional clone resourceMySQLClone01 to allow the resource to run on both cluster nodes at the same time:
[pcmk01]# pcs -f clust_cfg resource create mysql_data01 ocf:linbit:drbd \ drbd_resource=mysql01 \ op monitor interval=30s
[pcmk01]# pcs -f clust_cfg resource master MySQLClone01 mysql_data01 \ master-max=1 master-node-max=1 \ clone-max=2 clone-node-max=1 \ notify=true
Note the meta variables used:
master-max: how many copies of the resource can be promoted to master status,
master-node-max: how many copies of the resource can be promoted to master status on a single node,
clone-max: how many copies of the resource to start. Defaults to the number of nodes in the cluster,
clone-node-max: how many copies of the resource can be started on a single node,
notify: when stopping or starting a copy of the clone, tell all the other copies beforehand and when the action was successful.
Create a cluster resource named mysql_fs01 for the filesystem. Tell the cluster that the clone resourceMySQLClone01 must be run on the same node as the filesystem resource, and that the clone resource must be started before the filesystem resource.
[pcmk01]# pcs -f clust_cfg resource create mysql_fs01 Filesystem \ device="/dev/drbd0" \ directory="/var/lib/mysql" \ fstype="ext4"
[pcmk01]# pcs -f clust_cfg constraint colocation add mysql_fs01 with MySQLClone01 \ INFINITY with-rsc-role=Master
[pcmk01]# pcs -f clust_cfg constraint order promote MySQLClone01 then start mysql_fs01
Create a cluster resource named mysql_service01 for the MariaDB service. Tell the cluster that the MariaDB service must be run on the same node as themysql_fs01 filesystem resource, and that the filesystem resource must be started first.
[pcmk01]# pcs -f clust_cfg resource create mysql_service01 ocf:heartbeat:mysql \ binary="/usr/bin/mysqld_safe" \ config="/etc/my.cnf" \ datadir="/var/lib/mysql" \ pid="/var/lib/mysql/mysql.pid" \ socket="/var/lib/mysql/mysql.sock" \ additional_parameters="--bind-address=0.0.0.0" \ op start timeout=60s \ op stop timeout=60s \ op monitor interval=20s timeout=30s
[pcmk01]# pcs -f clust_cfg constraint colocation add mysql_service01 with mysql_fs01 INFINITY
[pcmk01]# pcs -f clust_cfg constraint order mysql_fs01 then mysql_service01
Finally, create a cluster resource named mysql_VIP01 for the virtual IP 10.8.8.60.
[pcmk01]# pcs -f clust_cfg resource create mysql_VIP01 ocf:heartbeat:IPaddr2 \ ip=10.8.8.60 cidr_netmask=32 \ op monitor interval=30s
Why to use IPaddr2 and not IPaddr:
- IPaddr – manages virtual IPv4 addresses (portable version),
- IPaddr2 – manages virtual IPv4 addresses (Linux specific version).
The virtual IP mysql_VIP01 resource must be run on the same node as the MariaDB resource, naturally, and must be started the last. This is to ensure that all other resources are already started before we can connect to the virtual IP.
[pcmk01]# pcs -f clust_cfg constraint colocation add mysql_VIP01 with mysql_service01 INFINITY
[pcmk01]# pcs -f clust_cfg constraint order mysql_service01 then mysql_VIP01
Let us check the configuration:
[pcmk01]# pcs -f clust_cfg constraintLocation Constraints:Ordering Constraints: promote MySQLClone01 then start mysql_fs01 (kind:Mandatory) start mysql_fs01 then start mysql_service01 (kind:Mandatory) start mysql_service01 then start mysql_VIP01 (kind:Mandatory)Colocation Constraints: mysql_fs01 with MySQLClone01 (score:INFINITY) (with-rsc-role:Master) mysql_service01 with mysql_fs01 (score:INFINITY) mysql_VIP01 with mysql_service01 (score:INFINITY)
[pcmk01]# pcs -f clust_cfg resource show Master/Slave Set: MySQLClone01 [mysql_data01] Stopped: [ pcmk01-cr pcmk02-cr ] mysql_fs01(ocf::heartbeat:Filesystem):Stopped mysql_service01(ocf::heartbeat:mysql):Stopped mysql_VIP01(ocf::heartbeat:IPaddr2):Stopped
We can commit changes now and check cluster status:
[pcmk01]# pcs cluster cib-push clust_cfg
[pcmk01]# pcs status[...]Online: [ pcmk01-cr pcmk02-cr ]Full list of resources: Master/Slave Set: MySQLClone01 [mysql_data01] Masters: [ pcmk01-cr ] Stopped: [ pcmk02-cr ] mysql_fs01 (ocf::heartbeat:Filesystem): Started pcmk01-cr mysql_service01 (ocf::heartbeat:mysql): Started pcmk01-cr mysql_VIP01 (ocf::heartbeat:IPaddr2):Started pcmk01-cr[...]
Once the configuration has been committed, Pacemaker will:
- Start DRBD on both cluster nodes,
- Select one node for promotion to the DRBD Primary role,
- Mount the filesystem, configure the cluster IP address, and start the MariaDB server on the same node,
- Commence resource monitoring
We can test the MariaDB service by telneting into the virtual IP 10.8.8.60 on a TCP por 3306:
# telnet 10.8.8.60 3306Trying 10.8.8.60...Connected to 10.8.8.60.Escape character is '^]'.Host 'puppet.hl.local' is not allowed to connect to this MariaDB serverConnection closed by foreign host.
References
http://www.linux-ha.org/wiki/Resource_agents
http://www.linux-ha.org/doc/man-pages/re-ra-mysql.html
http://albertolarripa.com/2012/05/13/install-configure-mysql-cluster/
- Active/Passive MySQL High Availability Pacemaker Cluster with DRBD on CentOS 7
- Active/Passive MySQL High Availability Pacemaker Cluster with DRBD on CentOS 7
- DRBD – Heartbeat ( Active/Passive High Availability Cluster )
- MySQL-Nginx-Pacemaker-corosync(openais)-drbd active/passive cluster
- How to Create a High Availability Setup with Pacemaker, Corosync and Floating IPs on CentOS 7
- Openfiler 2.99 Active/Passive With Corosync, Pacemaker And DRBD
- Openfiler 2.99 Active/Passive With Corosync, Pacemaker And DRBD - Page 2
- DRBD块镜像 + Pacemaker心跳机制实现Active/Passive模式的高可用mysql集群
- Openfiler 2.3 Active/Passive Cluster (Heartbeat, DRBD) With Offsite Replication Node(page 2)
- Openfiler 2.3 Active/Passive Cluster (Heartbeat, DRBD) With Offsite Replication Node
- Openfiler 2.3 Active/Passive Cluster (Heartbeat, DRBD) With Offsite Replication Node (page 3)
- OpenStack高可用 -- DRBD块镜像 + Pacemaker心跳机制实现Active/Passive模式的高可用mysql集群 ( by quqi99 )
- How to Cluster Magento, nginx and MySQL on Multiple Servers for High Availability
- Mysql+Corosync+Pacemaker+DRBD
- MySQL High Availability with Oracle Clusterware
- 虚拟IP原理 *********High Availability Cluster
- From MySQL+MMM to MariaDB+Galera Cluster: A High Availability Makeover
- corosync + pacemaker+drbd 实现mysql高可用
- CSI.SAP2000.v19.1.1 Win32_64 2CD通用有限元软件
- PHP后台获取每天新增用户
- mysql 死锁日志查看
- dirname(__FILE__) 与 PHP define() 及例子define('root',dirname(__file__)) (2011-04-01 11:09:48)转载▼ 标签: di
- 光耦测试之频率篇
- Active/Passive MySQL High Availability Pacemaker Cluster with DRBD on CentOS 7
- OpenFlow
- Add to List 77. Combinations
- js 小知识
- ubuntu 14.04 ROS + kinect v2 driver安装方法;安装驱动时遇到的问题及解决方法(1)
- #1366
- git stash 的应用
- Online Object Tracking : A Benchmark
- odoo db_filter 参数设置问题,造成不能显示数据库