opencv入门例子
来源:互联网 发布:乐视tv网络电视 投影 编辑:程序博客网 时间:2024/06/05 00:59
1、 第一个例子-------显示图像
从磁盘中加载并在屏幕上显示一幅图像的简单OpenCV程序
- #include "highgui.h"
- int main( int argc, char** argv )
- {
- // 是一个高层调用接口,它通过文件名确定被加载文件的格式;
- // 且该函数自动分配图像数据结构所需的内存。
- // cvLoadImage可以读取大多数格式的图像文件,BMP、DIB、JPEG、JPE、PNG、BBM、PPM
- // SR、RAS、TIFF
- // 函数执行完后返回一个指针,此指针指向一块为描述该图像文件的数据结构而分配的内存块。
- IplImage* img = cvLoadImage( argv[1] );
- // cvNamedWindow由HighGUI库提供,用于在屏幕上创建一个窗口,将被显示的图像包含于该窗口中。
- // 函数第一个参数指定了窗口的的窗口标题。
- // 如果要使用HighGUI库所提供的其他函数与该窗口进行交互,我们将通过该参数值引用这个窗口中。
- cvNamedWindow("Example1", CV_WINDOW_AUTOSIZE );
- // 显示该图像
- cvShowImage("Example1", img );
- // 使程序暂停,等待用户触发一个按键操作,但如果该函数参数设为一个正数,则程序将暂停一段时间,
- // 时间长为该整数值个毫秒单位
- // 如果设置为0,那么将一直等待用户触发按键操作。
- cvWaitKey(0);
- // 内存释放功能
- cvReleaseImage( &img );
- // 关闭窗口
- cvDestroyWindow("Example1");
- }
2、 第二个例子------播放AVI视频
- #include "highgui.h"
- int main( int argc, char** argv ) {
- cvNamedWindow( "Example2", CV_WINDOW_AUTOSIZE );
- // cvCaptureFromAVI()通过参数设置要读入的AVI文件,返回一个指向cvCapture结构的指针
- // 这个指针包括了所有关于读入AVI文件的信息,其中包括状态信息。
- // 在调用这个函数后,返回指针指向的CvCapture结构被初始化到所对应的AVI文件的开头。
- //CvCapture* capture = cvCaptureFromAVI( argv[1] ); // either one will work
- CvCapture* capture = cvCreateFileCapture( argv[1] );
- IplImage* frame;
- while(1) {
- // 用来将下一帧视频文件载入内存(实际上是填充或更新CvCapture结构中),返回一个
- // 对应当前帧的指针
- // 与cvLoadImage不同的是,cvLoadImage为图像分配内存空间,而cvQueryFram使用已经在
- // cvCapture结构中分配好的内存,这样的话没必要通过cvReleaseImage()对返回值释放。
- frame = cvQueryFrame( capture );
- if( !frame ) break;
- cvShowImage( "Example2", frame );
- char c = cvWaitKey(33);
- if( c == 27 ) break;
- }
- cvReleaseCapture( &capture );
- cvDestroyWindow( "Example2" );
- }
2、1 视频播放控制
上例中我们无法在视频播放时进行快速拖动,我们接下来通过加入一个滚动条来实现这个功能。
HighGUI不仅提供了简单的显示函数,还包括一些图像和视频控制方法,其中之一个经常用到的是滚动条,它可以使我们方便地从视频一帧跳到另外一帧。
我们通过调用cvCreateTrackbar()来创建一个滚动条,并通过设置参数确定滚动条所属于的窗口。
- /* License:
- Oct. 3, 2008
- Right to use this code in any way you want without warrenty, support or any guarentee of it working.
- BOOK: It would be nice if you cited it:
- Learning OpenCV: Computer Vision with the OpenCV Library
- by Gary Bradski and Adrian Kaehler
- Published by O'Reilly Media, October 3, 2008
- AVAILABLE AT:
- http://www.amazon.com/Learning-OpenCV-Computer-Vision-Library/dp/0596516134
- Or: http://oreilly.com/catalog/9780596516130/
- ISBN-10: 0596516134 or: ISBN-13: 978-0596516130
- OTHER OPENCV SITES:
- * The source code is on sourceforge at:
- http://sourceforge.net/projects/opencvlibrary/
- * The OpenCV wiki page (As of Oct 1, 2008 this is down for changing over servers, but should come back):
- http://opencvlibrary.sourceforge.net/
- * An active user group is at:
- http://tech.groups.yahoo.com/group/OpenCV/
- * The minutes of weekly OpenCV development meetings are at:
- http://pr.willowgarage.com/wiki/OpenCV
- */
- #include "highgui.h"
- /*
- int main( int argc, char** argv )
- {
- // 是一个高层调用接口,它通过文件名确定被加载文件的格式;
- // 且该函数自动分配图像数据结构所需的内存。
- // cvLoadImage可以读取大多数格式的图像文件,BMP、DIB、JPEG、JPE、PNG、BBM、PPM
- // SR、RAS、TIFF
- // 函数执行完后返回一个指针,此指针指向一块为描述该图像文件的数据结构而分配的内存块。
- IplImage* img = cvLoadImage( argv[1] );
- // cvNamedWindow由HighGUI库提供,用于在屏幕上创建一个窗口,将被显示的图像包含于该窗口中。
- // 函数第一个参数指定了窗口的的窗口标题。
- // 如果要使用HighGUI库所提供的其他函数与该窗口进行交互,我们将通过该参数值引用这个窗口中。
- cvNamedWindow("Example1", CV_WINDOW_AUTOSIZE );
- // 显示该图像
- cvShowImage("Example1", img );
- // 使程序暂停,等待用户触发一个按键操作,但如果该函数参数设为一个正数,则程序将暂停一段时间,
- // 时间长为该整数值个毫秒单位
- // 如果设置为0,那么将一直等待用户触发按键操作。
- cvWaitKey(0);
- // 内存释放功能
- cvReleaseImage( &img );
- // 关闭窗口
- cvDestroyWindow("Example1");
- }
- */
- /* License:
- Oct. 3, 2008
- Right to use this code in any way you want without warrenty, support or any guarentee of it working.
- BOOK: It would be nice if you cited it:
- Learning OpenCV: Computer Vision with the OpenCV Library
- by Gary Bradski and Adrian Kaehler
- Published by O'Reilly Media, October 3, 2008
- AVAILABLE AT:
- http://www.amazon.com/Learning-OpenCV-Computer-Vision-Library/dp/0596516134
- Or: http://oreilly.com/catalog/9780596516130/
- ISBN-10: 0596516134 or: ISBN-13: 978-0596516130
- OTHER OPENCV SITES:
- * The source code is on sourceforge at:
- http://sourceforge.net/projects/opencvlibrary/
- * The OpenCV wiki page (As of Oct 1, 2008 this is down for changing over servers, but should come back):
- http://opencvlibrary.sourceforge.net/
- * An active user group is at:
- http://tech.groups.yahoo.com/group/OpenCV/
- * The minutes of weekly OpenCV development meetings are at:
- http://pr.willowgarage.com/wiki/OpenCV
- */
- #include <stdio.h>
- #include <iostream>
- #include <fstream>
- #include "cv.h"
- #include "highgui.h"
- /*
- OK, you caught us. Video playback under linux is still just bad. Part of this is due to FFMPEG, part of this
- is due to lack of standards in video files. But the position slider here will often not work. We tried to at least
- find number of frames using the "getAVIFrames" hack below. Terrible. But, this file shows something of how to
- put a slider up and play with it. Sorry.
- */
- using namespace std;
- int g_slider_position = 0;
- CvCapture* g_capture = NULL;
- // 定义全局回调函数,它在滚动条被拖动时调用
- // 滚动条位置会被作为参数传入。
- void onTrackbarSlide(int pos) {
- // 允许我们设置CvCapture对象的各种属性
- // CV_CAP_PROP_POS_FRAMES表我们以帧数来设置读入位置。
- // 如果我们想通过视频长度比例来设置读入位置,我们可以通过用AVI_RATIO代替FRAMES。
- cvSetCaptureProperty(
- g_capture,
- CV_CAP_PROP_POS_FRAMES,
- pos
- );
- }
- //Hack because sometimes the number of frames in a video is not accessible.
- //Probably delete this on Widows
- int getAVIFrames(char * fname) {
- char tempSize[4];
- // Trying to open the video file
- ifstream videoFile( fname , ios::in | ios::binary );
- // Checking the availablity of the file
- if ( !videoFile ) {
- cout << "Couldn’t open the input file " << fname << endl;
- exit( 1 );
- }
- // get the number of frames
- videoFile.seekg( 0x30 , ios::beg );
- videoFile.read( tempSize , 4 );
- int frames = (unsigned char ) tempSize[0] + 0x100*(unsigned char ) tempSize[1] + 0x10000*(unsigned char ) tempSize[2] + 0x1000000*(unsigned char ) tempSize[3];
- videoFile.close( );
- return frames;
- }
- int main( int argc, char** argv ) {
- cvNamedWindow( "Example2_3", CV_WINDOW_AUTOSIZE );
- g_capture = cvCreateFileCapture("E:\\OpenCV\\openCV1.1Test\\tree.avi" /*argv[1]*/ );
- IplImage *foo = cvQueryFrame( g_capture);
- // 获得视频文件的总帧数以对滚动条进行设置。
- int frames = (int) cvGetCaptureProperty(
- g_capture,
- CV_CAP_PROP_FRAME_COUNT
- );
- // 获得宽
- int tmpw = (int) cvGetCaptureProperty(
- g_capture,
- CV_CAP_PROP_FRAME_WIDTH
- );
- // 获得高
- int tmph = (int) cvGetCaptureProperty(
- g_capture,
- CV_CAP_PROP_FRAME_HEIGHT
- );
- printf("opencv frames %d w %d h %d\n",frames,tmpw,tmph);
- // 分析视频文件来获得总共有几帧
- frames = getAVIFrames("E:\\OpenCV\\openCV1.1Test\\tree.avi"/*argv[1]*/); //This is a hack because on linux, getting number of frames often doesn't work
- printf("hacked frames %d w %d h %d\n",frames,tmpw,tmph);
- // 创建滚动条
- // 可以设置滚动条名称并确定滚动条的所属窗口。
- // 将一个变量绑定到这个滚动条来表示滚动条的最大值和一个回调函数
- cvCreateTrackbar(
- "Position",
- "Example2_3",
- &g_slider_position,
- frames,
- onTrackbarSlide
- );
- IplImage* frame;
- frames = 0;
- while(1) {
- frame = cvQueryFrame( g_capture );
- if( !frame ) break;
- // int frames = cvGetCaptureProperty( g_capture, CV_CAP_PROP_POS_FRAMES);//This should work, sometimes it does not on linux
- frames++; //My cheat
- printf("\nFrame number=%d\n",frames);
- cvSetTrackbarPos("Position","Example2_3",frames);
- cvShowImage( "Example2_3", frame );
- char c = (char)cvWaitKey(10);
- if( c == 27 ) break;
- }
- cvReleaseCapture( &g_capture );
- cvDestroyWindow( "Example2_3" );
- return(0);
- }
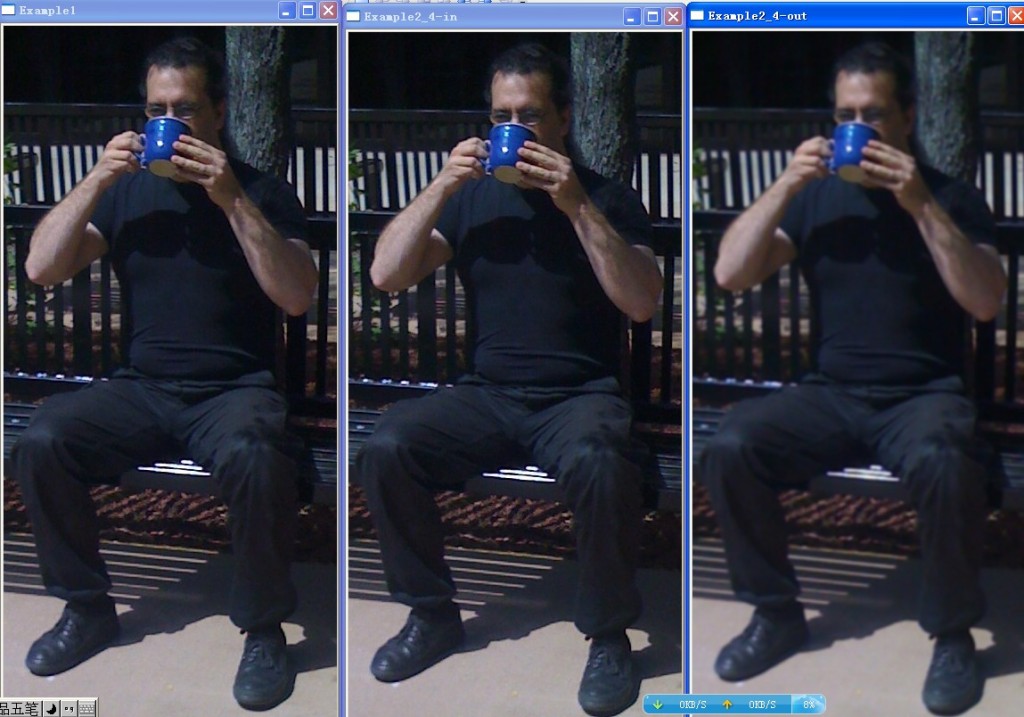
2、2 对图像进行简单的变换
现在我们要对视频的播放中的每一帧进行图像平滑处理,通过对图像数据与高斯或者其他核函数进行卷积有效地减少图像信息内容。
OpenCV使得这个卷积操作非常容易。
我们先创建一个窗口“Example4-out" 用来显示处理后的图像。然后在我们调用cvShowImage()来显示新捕捉的图像以后,我们可以计算
和在输出窗口中显示平滑处理后的图像。
效果如下:
- #include "cv.h"
- #include "highgui.h"
- void example2_4( IplImage* image )
- {
- // Create some windows to show the input
- // and output images in.
- //
- cvNamedWindow( "Example2_4-in", CV_WINDOW_AUTOSIZE );
- cvNamedWindow( "Example2_4-out", CV_WINDOW_AUTOSIZE );
- // Create a window to show our input image
- //
- cvShowImage( "Example2_4-in", image );
- // 分配自己的图像结构空间用来存储平滑处理后的图像
- // 第一个参数说明了当前图像结构的大小
- // 第二个参数告诉了我们各通道每个像素点的数据类型
- // 最后一个参数说明了通道的总数。
- IplImage* out = cvCreateImage(
- cvGetSize(image),
- IPL_DEPTH_8U,
- 3
- );
- // 我们通过使用每个像素周围3*3区域进行高斯平滑处理
- cvSmooth( image, out, CV_GAUSSIAN, 5,5 );
- // 输入与输出可以是相同的,这将会使我们的程序更加有效。
- cvSmooth( out, out, CV_GAUSSIAN, 5, 5);
- // Show the smoothed image in the output window
- //
- cvShowImage( "Example2_4-out", out );
- // Be tidy
- //
- cvReleaseImage( &out );
- // Wait for the user to hit a key, then clean up the windows
- //
- cvWaitKey( 0 );
- cvDestroyWindow("Example2_4-in" );
- cvDestroyWindow("Example2_4-out" );
- }
- int main( int argc, char** argv )
- {
- IplImage* img = cvLoadImage("adrian.jpg");
- cvNamedWindow("Example1", CV_WINDOW_AUTOSIZE );
- cvShowImage("Example1", img );
- example2_4( img );
- // cvWaitKey(0);
- cvReleaseImage( &img );
- cvDestroyWindow("Example1");
- }
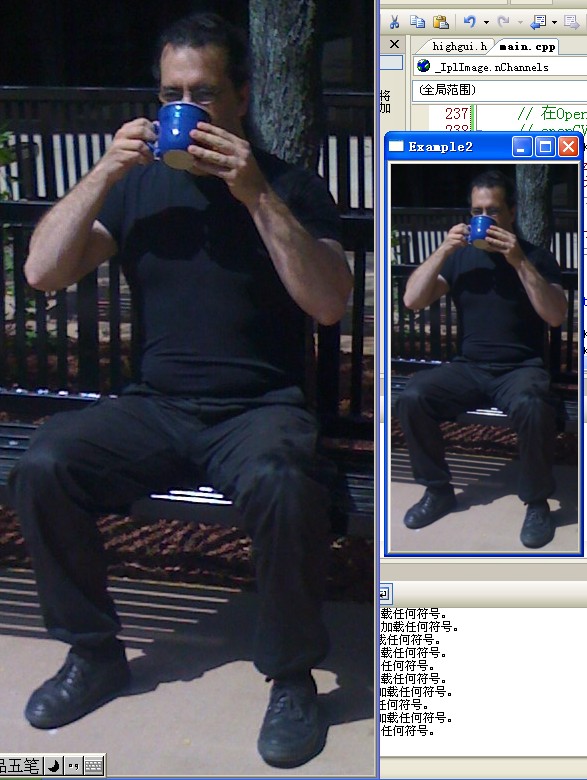
2、3 对图像进行复杂一点的变换
这里我们将用输出来覆盖输入变量。在OpenCV中我们通过函数cvPyrDown()来完成上述功能。
从旧的图像中读取所需的信息;在OpenCV中,所有的重要数据结构都是以结构体的形式实现的,并以结构体指针的形式传递。
openCV中没有私有数据!
- #include "cv.h"
- #include "highgui.h"
- IplImage* doPyrDown(
- IplImage* in,
- int filter = IPL_GAUSSIAN_5x5)
- {
- // 确保输入的宽高能被2整除.
- //
- //assert( in->width%2 == 0 && in->height%2 == 0 );
- // 从旧的图像中读取所需的信息
- // 在OpenCV中,所有的重要数据结构都是以结构体的形式实现的,并以结构体指针的形式传递。
- // openCV中没有私有数据!
- IplImage* out = cvCreateImage(
- cvSize( in->width/2, in->height/2 ),
- in->depth,
- in->nChannels
- );
- cvPyrDown( in, out );
- return( out );
- };
- int main( int argc, char** argv )
- {
- IplImage* img = cvLoadImage("adrian.jpg" );
- IplImage* img2 = cvCreateImage( cvSize( img->width/2,img->height/2 ), img->depth, img->nChannels);
- cvNamedWindow("Example1", CV_WINDOW_AUTOSIZE );
- cvNamedWindow("Example2", CV_WINDOW_AUTOSIZE );
- cvShowImage("Example1", img );
- img2 = doPyrDown( img );
- cvShowImage("Example2", img2 );
- cvWaitKey(0);
- cvReleaseImage( &img );
- cvReleaseImage( &img2 );
- cvDestroyWindow("Example1");
- cvDestroyWindow("Example2");
- }
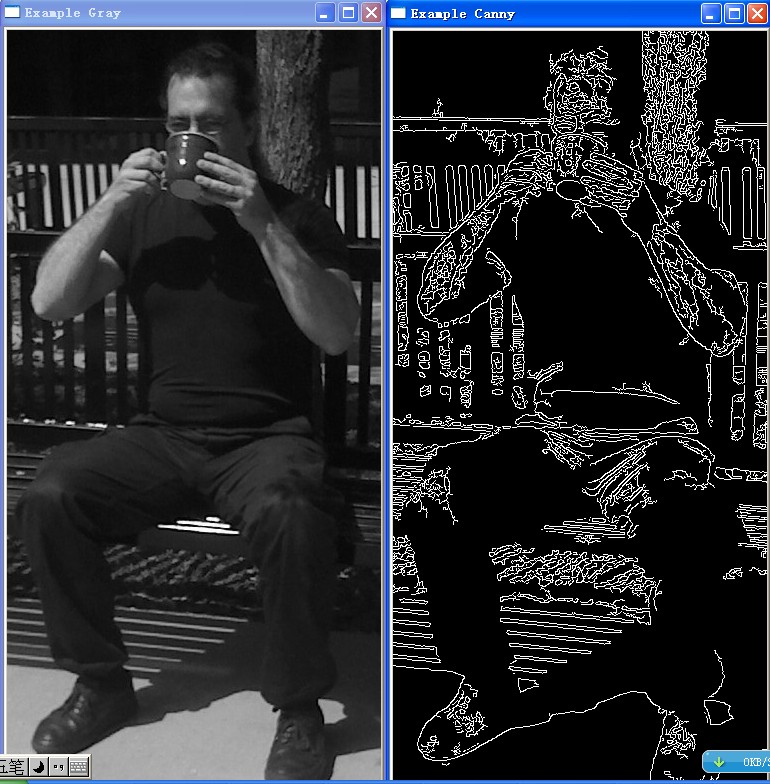
2、4 Canny边缘检测
在进行Canny处理前得先进行灰度处理
cvCvtColor(img_rgb, img_gry ,CV_BGR2GRAY);
- #include "cv.h"
- #include "highgui.h"
- IplImage* doCanny(
- IplImage* in,
- double lowThresh,
- double highThresh,
- double aperture)
- {
- if (in->nChannels != 1)
- return(0); // Canny 仅处理多通道图像
- IplImage* out = cvCreateImage(
- cvGetSize( in ),
- in->depth, //IPL_DEPTH_8U,
- 1);
- cvCanny( in, out, lowThresh, highThresh, aperture );
- return( out );
- };
- int main( int argc, char** argv )
- {
- IplImage* img_rgb = cvLoadImage( "adrian.jpg" );
- IplImage* img_gry = cvCreateImage( cvSize( img_rgb->width,img_rgb->height ), img_rgb->depth, 1);
- cvCvtColor(img_rgb, img_gry ,CV_BGR2GRAY);
- cvNamedWindow("Example Gray", CV_WINDOW_AUTOSIZE );
- cvNamedWindow("Example Canny", CV_WINDOW_AUTOSIZE );
- cvShowImage("Example Gray", img_gry );
- IplImage* img_cny = doCanny( img_gry, 10, 100, 3 );
- cvShowImage("Example Canny", img_cny );
- cvWaitKey(0);
- cvReleaseImage( &img_rgb);
- cvReleaseImage( &img_gry);
- cvReleaseImage( &img_cny);
- cvDestroyWindow("Example Gray");
- cvDestroyWindow("Example Canny");
- }
接下来我们想缩放图像两次,然后在缩放后的图像中寻找边缘,具体如下所示:

- #include "cv.h"
- #include "highgui.h"
- IplImage* doCanny(
- IplImage* in,
- double lowThresh,
- double highThresh,
- double aperture)
- {
- IplImage* out = cvCreateImage(
- cvGetSize( in ),
- in->depth, //IPL_DEPTH_8U,
- 1);
- cvCanny( in, out, lowThresh, highThresh, aperture );
- return( out );
- };
- IplImage* doPyrDown(
- IplImage* in,
- int filter = IPL_GAUSSIAN_5x5)
- {
- // Best to make sure input image is divisible by two.
- //
- //assert( in->width%2 == 0 && in->height%2 == 0 );
- IplImage* out = cvCreateImage(
- cvSize( in->width/2, in->height/2 ),
- in->depth,
- in->nChannels
- );
- cvPyrDown( in, out );
- return( out );
- };
- int main( int argc, char** argv )
- {
- IplImage* img_rgb = cvLoadImage( "adrian.jpg" );
- IplImage* img_gry = cvCreateImage( cvSize( img_rgb->width,img_rgb->height ), img_rgb->depth, 1);
- cvCvtColor(img_rgb, img_gry ,CV_BGR2GRAY);
- IplImage* img_pyr = doPyrDown( img_gry, IPL_GAUSSIAN_5x5 );
- IplImage* img_pyr2 = doPyrDown( img_pyr, IPL_GAUSSIAN_5x5 );
- IplImage* img_cny = doCanny( img_pyr2, 10, 100, 3 );
- cvNamedWindow("Example Gray", CV_WINDOW_AUTOSIZE );
- cvNamedWindow("Example Pyr", CV_WINDOW_AUTOSIZE );
- cvNamedWindow("Example Canny", CV_WINDOW_AUTOSIZE );
- cvShowImage("Example Gray", img_gry );
- cvShowImage("Example Pyr", img_pyr2 );
- cvShowImage("Example Canny", img_cny );
- cvWaitKey(0);
- cvReleaseImage( &img_rgb);
- cvReleaseImage( &img_gry);
- cvReleaseImage( &img_pyr);
- cvReleaseImage( &img_pyr2);
- cvReleaseImage( &img_cny);
- cvDestroyWindow("Example Gray");
- cvDestroyWindow("Example Pyr");
- cvDestroyWindow("Example Canny");
- }
2、4、1 内存释放考虑方面的改进
(1)像下面这样进行嵌套调用是一个不好的主意,因为内存空间的释放会成为一个很困难的问题。
IplImage* img_pyr = doPyrDown( img_gry, IPL_GAUSSIAN_5x5 );
IplImage* img_pyr2 = doPyrDown( img_pyr, IPL_GAUSSIAN_5x5 );
IplImage* img_cny = doCanny( img_pyr2, 10, 100, 3 );
(2) 在OpenCV中我们必须确认被释放的空间必须是我们分配,但在我们上面的例子中却释放了非显示分配的内存
cvReleaseImage( &img_pyr);
cvReleaseImage( &img_pyr2);
cvReleaseImage( &img_cny);
所以我们把例子改为:
- int main( int argc, char** argv )
- {
- IplImage* img_rgb = cvLoadImage( "adrian.jpg" );
- IplImage* img_gry = cvCreateImage( cvSize( img_rgb->width,img_rgb->height ), img_rgb->depth, 1);
- cvCvtColor(img_rgb, img_gry ,CV_BGR2GRAY);
- /*
- IplImage* img_pyr = doPyrDown( img_gry, IPL_GAUSSIAN_5x5 );
- IplImage* img_pyr2 = doPyrDown( img_pyr, IPL_GAUSSIAN_5x5 );
- IplImage* img_cny = doCanny( img_pyr2, 10, 100, 3 );
- cvNamedWindow("Example Gray", CV_WINDOW_AUTOSIZE );
- cvNamedWindow("Example Pyr", CV_WINDOW_AUTOSIZE );
- cvNamedWindow("Example Canny", CV_WINDOW_AUTOSIZE );
- cvShowImage("Example Gray", img_gry );
- cvShowImage("Example Pyr", img_pyr2 );
- cvShowImage("Example Canny", img_cny );
- cvWaitKey(0);
- cvReleaseImage( &img_rgb);
- cvReleaseImage( &img_gry);
- cvReleaseImage( &img_pyr);
- cvReleaseImage( &img_pyr2);
- cvReleaseImage( &img_cny);
- cvDestroyWindow("Example Gray");
- cvDestroyWindow("Example Pyr");
- cvDestroyWindow("Example Canny");
- */
- // 像上面这样进行嵌套调用是一个不好的主意,因为内存空间的释放会成为一个很困难的问题。
- IplImage* out;
- cvNamedWindow("Example Gray", CV_WINDOW_AUTOSIZE );
- cvNamedWindow("Example Pyr", CV_WINDOW_AUTOSIZE );
- cvNamedWindow("Example Canny", CV_WINDOW_AUTOSIZE );
- // 第一次缩放
- cvShowImage("Example Gray", img_gry );
- out = doPyrDown( img_gry, IPL_GAUSSIAN_5x5 );
- // 第一次缩放
- cvShowImage("Example Pyr", out );
- out = doPyrDown( out, IPL_GAUSSIAN_5x5 );
- // Canny处理
- out = doCanny( out, 10, 100, 3 );
- cvShowImage("Example Canny", out );
- cvWaitKey(0);
- cvReleaseImage( &img_rgb);
- cvReleaseImage( &img_gry);
- // 在OpenCV中我们必须确认被释放的空间必须是我们分配的
- cvReleaseImage( &out);
- cvDestroyWindow("Example Gray");
- cvDestroyWindow("Example Pyr");
- cvDestroyWindow("Example Canny");
- }
- opencv入门例子
- OpenCV入门例子 反色显示图像
- OpenCV入门(二十七) -- 轮廓例子
- OPENCV例子
- OpenCV 入门
- OpenCV 入门
- opencv入门
- opencv入门
- OpenCV入门
- 《opencv入门》
- 《opencv入门》
- 《opencv入门》
- 《opencv入门》
- 《opencv入门》
- OPENCV 入门
- opencv入门
- OpenCV--入门
- OpenCV 入门
- ORA-00911 字符无效 怎么也找不到原因时 可以用下面的方法
- 图-hdu-1272
- android studio生成aar包并在其他工程引用aar包
- Error creating bean with name
- Icon Colors——图标颜色
- opencv入门例子
- 读写配置文件(.ini)
- 北邮84. Single Number
- bitbucket安装
- 鼠标移上去的样式
- 【实践】spark streaming中的广播变量应用
- 关于讲座“如何更好地做研究以及博士申请相关问题”的总结
- css样式不被覆盖
- selenium上传本地文件