shadowsocks安装配置
来源:互联网 发布:华为杭州研究所 云计算 编辑:程序博客网 时间:2024/04/28 22:11
1、安装
pip install shadowsocks
2、配置
vim /etc/shadowsocks.json
{
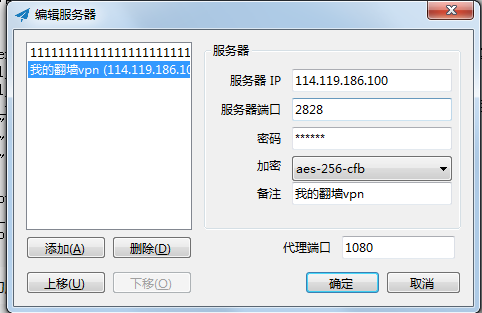
"server":"0.0.0.0", #服务端监听IP,我这里用的是aws的ec2,公网IP不固定,故监听所有IP
"local_address":"127.0.0.1",#本地代理IP
"local_port":2882, #本地代理端口
"port_password": { #支持多用户,端口对应一个密码,然后为每个用户分配一个端口密码即可
"2828": "123456",
"2829": "abcds1",
"2830": "654321"
},
"timeout":600, #超时时间
"fast_open": false, #是否使用tcp
"method":"aes-256-cfb" #加密方式
}
例如
{
"configs" : [
{
"server" : "4.4.5.9",
"server_port" : 48,
"password" : "IzYj",
"method" : "aes-256-cfb",
"remarks" : ""}
],
"index" : 0,
"global" : true,
"enabled" : false,
"shareOverLan" : false,
"isDefault" : false,
"localPort" : 1080}
/usr/bin/python /usr/bin/ssserver -s ::0 -p 448 -k IzYj -m aes-256-cfb --user nobody --workers 2 -d start
3、启动服务
nohup ssserver -c /etc/shadowsocks.json &
三、客户端配置
1、PC端(wondows)
下载:
https://github.com/shadowsocks/shadowsocks-windows/releases/download/4.0.1/Shadowsocks-4.0.1.zip
下载后直接解压配置
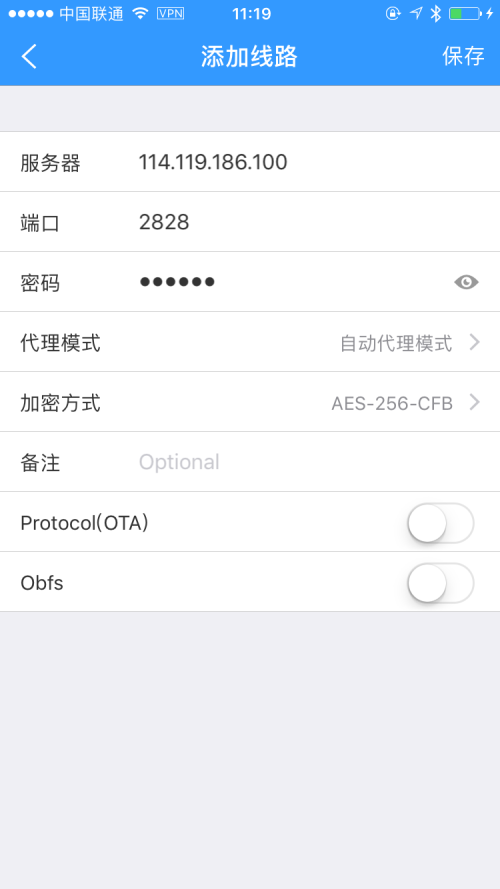
2、移动端(IOS)
在App Store里面搜索下载‘Wingy’打开app,单击‘选择线路'--->‘新增线路’--->'Shadowsocks(R)',添加VPN信息:
1、python 安装pip
#wget https://bootstrap.pypa.io/get-pip.py
#python get-pip
Downloading pip-7.1.2-py2.py3-none-any.whl (1.1MB)
88% |████████████████████████████▏ | 978kB 6.7kB/s eta 0:00:20
通过安装setuptools 安装pip
which easy_install 查询是否安装,以下命令安装
#yum install -y python-setuptools
easy_install pip
具体可参考 https://pip.pypa.io/en/stable/installing/ 安装pip工具
2、安装 gevent
安装 gevent可以提高 Shadowsocks 的性能。CentOS下安装gevent依赖libevent和greenlet。
安装libevent:
yum install -y gcc libevent python-devel
安装greenlet:
pip install greenlet
安装gevent:
pip install gevent
三、安装shadowsocks
pip install shadowsocks
pip freeze |grep shadowsocks
shadowsocks==2.8.2
到此通过pip 安装好了shadowsocks
四、配置shadowsocks
vim /etc/shadowsocks.json
{
"server":"192.168.10.200", #你的公网ip
"server_port":8888, #开放的端口,可自定义
"local_address": "127.0.0.1",
"local_port":1088, #客户端连接本地的端口,可自定义,客户端配置时用到
"password":"Password!", #客户端和服务器连接时的预定义 密码
"timeout":600,
"method":"aes-256-cfb",
"fast_open": false,
"workers": 6
}
各字段的含义:
server:服务器 IP (IPv4/IPv6),注意这也将是服务端监听的 IP 地址
server_port:监听的服务器端口
local_address:本地监听的 IP 地址
local_port:本地端端口
password:用来加密的密码
timeout:超时时间(秒)
method:加密方法,可选择 “bf-cfb”, “aes-256-cfb”, “des-cfb”, “rc4”, 等等。默认是一种不安全的加密,推荐用 “aes-256-cfb”
fast_open:true 或 false。如果你的服务器 Linux 内核在3.7+,可以开启 fast_open 以降低延迟。开启方法:
echo 3 > /proc/sys/net/ipv4/tcp_fastopen
五、启动shadowsocks
命令行启动命令
ssserver -c /etc/shadowsocks.json
如果想在后台一直运行Shadowsocks,启动命令如下:
nohup ssserver -c /etc/shadowsocks.json > /dev/null 2>&1 &
六、为shadowsocks 编写添加系统服务脚本
#cat /etc/init.d/shadowsockd
#!/bin/sh
#
# shadowsockd: shadowsocks Daemon
#
# chkconfig: - 90 26
# description: MemCached Daemon
# Source function library.
# Author: pkey san 2015/12/07
. /etc/init.d/functions
. /etc/sysconfig/network
Config_file=/etc/shadowsocks.json
prog=shadowsock
pidfile=${PIDFILE-/var/run/shadowsocks.pid}
start()
{
echo -n $"Starting shadowsockd: "
daemon /usr/bin/ssserver -d start --pid-file ${pidfile} -c $Config_file
echo
}
stop()
{
echo -n $"Shutting down shadowsockd: "
daemon /usr/bin/ssserver -d stop
echo
}
rh_status(){
status -p ${pidfile} $prog
}
restart(){
echo -n $"Restart shadowsockd: "
daemon /usr/bin/ssserver -d restart --pid-file ${pidfile} -c $Config_file
echo
}
case "$1" in
start)
start
;;
stop)
stop
;;
status)
rh_status
;;
restart|reload)
restart
;;
esac
exit 0
添加为系统服务和开机自启
#chkconfig --add shadowsockd
#service shadowsockd on
启动shadowsocks:
#service shadowsockd start
Starting shadowsockd: INFO: loading config from /etc/shadowsocks.json
2015-12-07 15:59:34 INFO loading libcrypto from libcrypto.so.10
started
https://github.com/shadowsocks/shadowsocks/wiki/Shadowsocks-%E4%BD%BF%E7%94%A8%E8%AF%B4%E6%98%8E
https://github.com/shadowsocks/shadowsocks/wiki/Install-Shadowsocks-Server-on-Windows
1、 配置163_yum
CentOS6
wget http://mirrors.163.com/.help/CentOS6-Base-163.repo -P /etc/yum.repos.d/
CentOS7
wget http://mirrors.163.com/.help/CentOS7-Base-163.repo -P /etc/yum.repos.d/
2、安装ShadowSocks
# yum -y install python-setuptools
# easy_install pip
# pip install shadowsocks
3、创建配置文件/etc/shadowsocks.json
[root@localhost /]# vim /etc/shadowsocks.json
{
"server":"127.0.0.1",
"server_port":8838,
"local_address": "127.0.0.1",
"local_port":1080,
"password":"password12345",
"timeout":600,
"method":"rc4-md5"
}
备注:加密方式官方默认使用aes-256-cfb,推荐使用rc4-md5,因为 RC4比AES速度快。
字段说明:
server:服务器IP
server_port:服务器端口
local_port:本地端端口
password:用来加密的密码
timeout:超时时间(秒)
method:加密方法,可选择 “bf-cfb”, “aes-256-cfb”, “des-cfb”, “rc4″等
fast_open:true 或 false
works:works数量,默认为 1
4、启动服务
使用配置文件在后台运行shadowsocks服务
[root@localhost /]# ssserver -c /etc/shadowsocks.json -d start
[root@localhost /]# netstat -anput | grep 8838
备注:若无配置文件,在后台可以使用一下命令运行:
[root@localhost /]# ssserver -p 8838 -k password12345 -m rc4-md5 -d start
5、停止服务
[root@localhost /]# ssserver -c /etc/shadowsocks.json -d stop
windows客户端下载
百度云盘下载2.0版本 gtzc
http://pan.baidu.com/s/1c2jznOG
墙外下载4.0版本
wget https://github.com/shadowsocks/shadowsocks-windows/releases/download/4.0.1/Shadowsocks-4.0.1.zip
使用方法 :
sudo ssserver -p 443 -k password -m aes-256-cfb -p 是指服务器端口 -k 输入密码 -m 加密的方式
在后台运行 ss:
sudo ssserver -p 443 -k password -m aes-256-cfb --user nobody -d start
停止运行:
sudo ssserver -d stop
查看日志:
sudo less /var/log/shadowsocks.log
vim /etc/shadowsocks.json
添加配置:
{
"server":"0.0.0.0",
"server_port":25,
"local_address": "127.0.0.1",
"local_port":1080,
"password":"mypassword",
"timeout":300,
"method":"aes-256-cfb",
"fast_open": false }
或者开启多个端口:
{
"server":"0.0.0.0",
"port_password":{
"8381":"password1",
"8382":"password2",
"8383":"password3",
"8384":"password4"
},
"timeout":300,
"method":"rc4-md5",
"fast_open":false,
"workers":1
}
3.启动服务:
1
ssserver -c /etc/shadowsocks.json
pip install shadowsocks
2、配置
vim /etc/shadowsocks.json
{
"server":"0.0.0.0", #服务端监听IP,我这里用的是aws的ec2,公网IP不固定,故监听所有IP
"local_address":"127.0.0.1",#本地代理IP
"local_port":2882, #本地代理端口
"port_password": { #支持多用户,端口对应一个密码,然后为每个用户分配一个端口密码即可
"2828": "123456",
"2829": "abcds1",
"2830": "654321"
},
"timeout":600, #超时时间
"fast_open": false, #是否使用tcp
"method":"aes-256-cfb" #加密方式
}
例如
{
"configs" : [
{
"server" : "4.4.5.9",
"server_port" : 48,
"password" : "IzYj",
"method" : "aes-256-cfb",
"remarks" : ""}
],
"index" : 0,
"global" : true,
"enabled" : false,
"shareOverLan" : false,
"isDefault" : false,
"localPort" : 1080}
/usr/bin/python /usr/bin/ssserver -s ::0 -p 448 -k IzYj -m aes-256-cfb --user nobody --workers 2 -d start
3、启动服务
nohup ssserver -c /etc/shadowsocks.json &
三、客户端配置
1、PC端(wondows)
下载:
https://github.com/shadowsocks/shadowsocks-windows/releases/download/4.0.1/Shadowsocks-4.0.1.zip
下载后直接解压配置
2、移动端(IOS)
在App Store里面搜索下载‘Wingy’打开app,单击‘选择线路'--->‘新增线路’--->'Shadowsocks(R)',添加VPN信息:

1、python 安装pip
#wget https://bootstrap.pypa.io/get-pip.py
#python get-pip
Downloading pip-7.1.2-py2.py3-none-any.whl (1.1MB)
88% |████████████████████████████▏ | 978kB 6.7kB/s eta 0:00:20
通过安装setuptools 安装pip
which easy_install 查询是否安装,以下命令安装
#yum install -y python-setuptools
easy_install pip
具体可参考 https://pip.pypa.io/en/stable/installing/ 安装pip工具
2、安装 gevent
安装 gevent可以提高 Shadowsocks 的性能。CentOS下安装gevent依赖libevent和greenlet。
安装libevent:
yum install -y gcc libevent python-devel
安装greenlet:
pip install greenlet
安装gevent:
pip install gevent
三、安装shadowsocks
pip install shadowsocks
pip freeze |grep shadowsocks
shadowsocks==2.8.2
到此通过pip 安装好了shadowsocks
四、配置shadowsocks
vim /etc/shadowsocks.json
{
"server":"192.168.10.200", #你的公网ip
"server_port":8888, #开放的端口,可自定义
"local_address": "127.0.0.1",
"local_port":1088, #客户端连接本地的端口,可自定义,客户端配置时用到
"password":"Password!", #客户端和服务器连接时的预定义 密码
"timeout":600,
"method":"aes-256-cfb",
"fast_open": false,
"workers": 6
}
各字段的含义:
server:服务器 IP (IPv4/IPv6),注意这也将是服务端监听的 IP 地址
server_port:监听的服务器端口
local_address:本地监听的 IP 地址
local_port:本地端端口
password:用来加密的密码
timeout:超时时间(秒)
method:加密方法,可选择 “bf-cfb”, “aes-256-cfb”, “des-cfb”, “rc4”, 等等。默认是一种不安全的加密,推荐用 “aes-256-cfb”
fast_open:true 或 false。如果你的服务器 Linux 内核在3.7+,可以开启 fast_open 以降低延迟。开启方法:
echo 3 > /proc/sys/net/ipv4/tcp_fastopen
五、启动shadowsocks
命令行启动命令
ssserver -c /etc/shadowsocks.json
如果想在后台一直运行Shadowsocks,启动命令如下:
nohup ssserver -c /etc/shadowsocks.json > /dev/null 2>&1 &
六、为shadowsocks 编写添加系统服务脚本
#cat /etc/init.d/shadowsockd
#!/bin/sh
#
# shadowsockd: shadowsocks Daemon
#
# chkconfig: - 90 26
# description: MemCached Daemon
# Source function library.
# Author: pkey san 2015/12/07
. /etc/init.d/functions
. /etc/sysconfig/network
Config_file=/etc/shadowsocks.json
prog=shadowsock
pidfile=${PIDFILE-/var/run/shadowsocks.pid}
start()
{
echo -n $"Starting shadowsockd: "
daemon /usr/bin/ssserver -d start --pid-file ${pidfile} -c $Config_file
echo
}
stop()
{
echo -n $"Shutting down shadowsockd: "
daemon /usr/bin/ssserver -d stop
echo
}
rh_status(){
status -p ${pidfile} $prog
}
restart(){
echo -n $"Restart shadowsockd: "
daemon /usr/bin/ssserver -d restart --pid-file ${pidfile} -c $Config_file
echo
}
case "$1" in
start)
start
;;
stop)
stop
;;
status)
rh_status
;;
restart|reload)
restart
;;
esac
exit 0
添加为系统服务和开机自启
#chkconfig --add shadowsockd
#service shadowsockd on
启动shadowsocks:
#service shadowsockd start
Starting shadowsockd: INFO: loading config from /etc/shadowsocks.json
2015-12-07 15:59:34 INFO loading libcrypto from libcrypto.so.10
started
https://github.com/shadowsocks/shadowsocks/wiki/Shadowsocks-%E4%BD%BF%E7%94%A8%E8%AF%B4%E6%98%8E
https://github.com/shadowsocks/shadowsocks/wiki/Install-Shadowsocks-Server-on-Windows
1、 配置163_yum
CentOS6
wget http://mirrors.163.com/.help/CentOS6-Base-163.repo -P /etc/yum.repos.d/
CentOS7
wget http://mirrors.163.com/.help/CentOS7-Base-163.repo -P /etc/yum.repos.d/
2、安装ShadowSocks
# yum -y install python-setuptools
# easy_install pip
# pip install shadowsocks
3、创建配置文件/etc/shadowsocks.json
[root@localhost /]# vim /etc/shadowsocks.json
{
"server":"127.0.0.1",
"server_port":8838,
"local_address": "127.0.0.1",
"local_port":1080,
"password":"password12345",
"timeout":600,
"method":"rc4-md5"
}
备注:加密方式官方默认使用aes-256-cfb,推荐使用rc4-md5,因为 RC4比AES速度快。
字段说明:
server:服务器IP
server_port:服务器端口
local_port:本地端端口
password:用来加密的密码
timeout:超时时间(秒)
method:加密方法,可选择 “bf-cfb”, “aes-256-cfb”, “des-cfb”, “rc4″等
fast_open:true 或 false
works:works数量,默认为 1
4、启动服务
使用配置文件在后台运行shadowsocks服务
[root@localhost /]# ssserver -c /etc/shadowsocks.json -d start
[root@localhost /]# netstat -anput | grep 8838
备注:若无配置文件,在后台可以使用一下命令运行:
[root@localhost /]# ssserver -p 8838 -k password12345 -m rc4-md5 -d start
5、停止服务
[root@localhost /]# ssserver -c /etc/shadowsocks.json -d stop
windows客户端下载
百度云盘下载2.0版本 gtzc
http://pan.baidu.com/s/1c2jznOG
墙外下载4.0版本
wget https://github.com/shadowsocks/shadowsocks-windows/releases/download/4.0.1/Shadowsocks-4.0.1.zip
使用方法 :
sudo ssserver -p 443 -k password -m aes-256-cfb -p 是指服务器端口 -k 输入密码 -m 加密的方式
在后台运行 ss:
sudo ssserver -p 443 -k password -m aes-256-cfb --user nobody -d start
停止运行:
sudo ssserver -d stop
查看日志:
sudo less /var/log/shadowsocks.log
vim /etc/shadowsocks.json
添加配置:
{
"server":"0.0.0.0",
"server_port":25,
"local_address": "127.0.0.1",
"local_port":1080,
"password":"mypassword",
"timeout":300,
"method":"aes-256-cfb",
"fast_open": false }
或者开启多个端口:
{
"server":"0.0.0.0",
"port_password":{
"8381":"password1",
"8382":"password2",
"8383":"password3",
"8384":"password4"
},
"timeout":300,
"method":"rc4-md5",
"fast_open":false,
"workers":1
}
3.启动服务:
1
ssserver -c /etc/shadowsocks.json
阅读全文
1 0
- shadowsocks安装配置
- shadowsocks安装配置
- Shadowsocks安装及配置
- ubuntu 安装配置shadowsocks-qt5
- CentOS 安装与配置 shadowsocks
- Centos7下安装配置Shadowsocks
- shadowsocks安装配置和使用
- shadowsocks-libev安装配置指南
- Centos6安装shadowsocks及配置
- 在 CentOS 7 下安装配置 shadowsocks
- Ubuntu16.04安装并配置Shadowsocks
- 关于 Linux Ubuntu的shadowsocks 安装配置
- 在 CentOS 7 下安装配置 shadowsocks
- shadowsocks 配置
- Shadowsocks 配置
- 安装shadowsocks
- ubuntu 14 安装 shadowsocks-qt5 并配置 pac 全局代理
- 如何在Ubuntu 14.04下安装和配置ShadowSocks服务器
- linux创建虚拟网卡
- unity中父子关系变化导致场景中的物体变形
- Android 中arm64-v8a、armeabi-v7a、armeabi、x86简介~
- Java开发规范一
- revit二次开发——建连续刚构桥2(带平纵曲线)
- shadowsocks安装配置
- Frameset与Frame的区别
- Matlab中随机数与高斯白噪声
- linux--安装完qt出现 /usr/bin/ld: error: cannot find -lGL错误
- 专题:简单排列
- Zookeeper的配置文件zoo.cfg参数解释
- [IOS APP]额尔古纳河右岸-迟子建有声小说
- 一、Mybatis项目搭建
- python-网络爬虫初学二:headers的设置和一些高级特性