Openstack Glance源码架构解析
来源:互联网 发布:win10打开网络无反应 编辑:程序博客网 时间:2024/05/17 21:40
这段时间捣鼓了一下Glance源代码,还是有收获的,修改了部分代码实现了支持多个ceph存储后端的功能。这个功能是不是个伪需求都还待定,反正也就当磨练了。
关于支持多个ceph存储后端的功能,稍微说一下
需要实现的功能就是在命令中行上传镜像,通过指定集群将镜像上传到不同ceph集群中。在通过nova创建虚拟机的时候肯定也需要能够使用这些创建虚拟机,当然这在计算节点的nova配置中就能实现。
整体结构图
Glance架构是一个典型的CS架构,提供的也是标准的Rest接口,各个layer分层也是很清楚的。 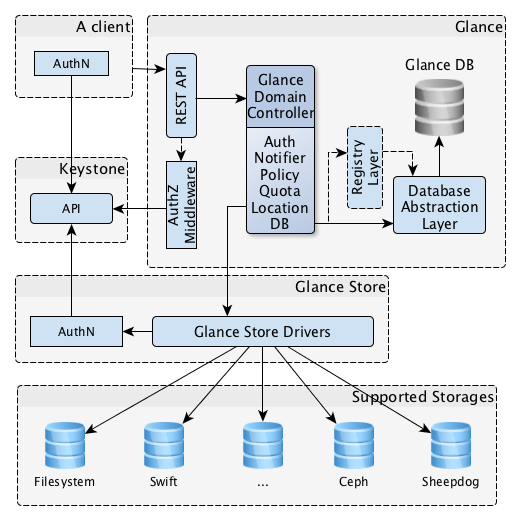
Following components are present in the Glance architecture:
- A client - any application that makes use of a Glance server.
- REST API - Glance functionalities are exposed via REST.
- Database Abstraction Layer (DAL) - an application programming interface
(API) that unifies the communication between Glance and databases. - Glance Domain Controller - middleware that implements the main
Glance functionalities such as authorization, notifications, policies, database connections. - Glance Store - used to organize interactions between Glance and various
data stores. - Registry Layer - optional layer that is used to organise secure
communication between the domain and the DAL by using a separate service.
这都是直接从官网弄下来的。稍微解释一下
Gateway and basic layers
The domain model contains the following layers:
- Authorization
- Property protection
- Notifier
- Policy
- Quota
- Location
- Database
这次主要关注的还是Location这一层,database主要是由glance-registry来进行数据库的交互,顺带了解了很多。
请求处理的大致过程如下: 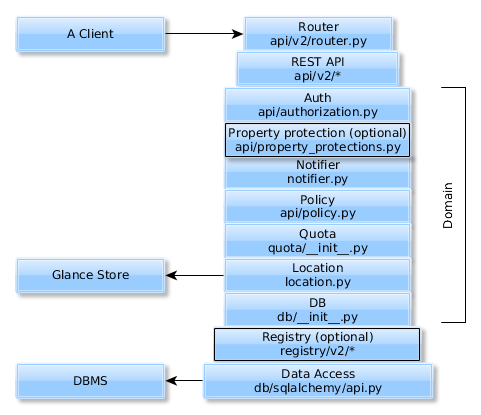
- Client端发送请求,api端router.py中将请求下发,选择相应的方法处理请求,目前我们测试环境中使用的api是v1版本
- 经过中间auth, notifier, policy, quota到location,会调用到glance_store进行底端存储,并返回存储的位置信息,需要写到数据库中
- 在跟数据库的交互中需要用到glance_registry,将镜像的相关信息写到数据库中,值得注意的是会将上面镜像存储的位置信息location_uri写入到数据库中,在进行删除等操作会直接从数据库中读取这个uri,进行删除
- 这里只是分析了一些主要的请求处理流程,对于一些复杂的过程暂时不考虑
重要流程分析
1. Glance服务启动过程
在/cmd/api.py中可以看到启动服务时进行操作:
def main():try: config.parse_args() log.setup('glance') glance.store.create_stores() #将所有支持的存储store_cls及其location_cls信息加载 glance.store.verify_default_store() #验证默认存储,这两步会调用到rbd.py中生成store对象测试 server = wsgi.Server() #启动wsgi服务 server.start(config.load_paste_app('glance-api'), default_port=9292) server.wait()这时会启动wsgi的服务来接收请求。在router.py中,会将请求与方法绑定:
class API(wsgi.Router):"""WSGI router for Glance v1 API requests."""def __init__(self, mapper): images_resource = images.create_resource() #controller mapper.connect("/", controller=images_resource, action="index") mapper.connect("/images", controller=images_resource, action='index', conditions={'method': ['GET']}) mapper.connect("/images/detail", controller=images_resource, action='detail', conditions={'method': ['GET']}) mapper.connect("/images", controller=images_resource, action='create', conditions={'method': ['POST']})在create_resource中会生成两个wsgi需要的序列化和还原序列化的控制器
def create_resource():"""Images resource factory method"""deserializer = ImageDeserializer()"""Handles deserialization of specific controller method requests."""serializer = ImageSerializer()"""Handles serialization of specific controller method responses."""return wsgi.Resource(Controller(), deserializer, serializer)
2.列表过程image-list
在使用glance image-list时候调用的就是这个过程,用于检索可用的image列表。
glance-client会发送一个get请求到http://glance.openstack.example.org/v1/images/detail给api端glance-api收到请求后,按照前面的router.py中的map将请求映射到detail方法。def detail(self, req):self._enforce(req, 'get_images')params = self._get_query_params(req)try: images = registry.get_images_detail(req.context, **params) #从registery中读取元数据 # Strip out the Location attribute. Temporary fix for # LP Bug #755916. This information is still coming back # from the registry, since the API server still needs access # to it, however we do not return this potential security # information to the API end user... for image in images: redact_loc(image, copy_dict=False) #清除系统不小心存留的位置信息 self._enforce_read_protected_props(image, req)except exception.Invalid as e: raise HTTPBadRequest(explanation="%s" % e)return dict(images=images)数据将会已下面格式的JSON返回
{'images': [{'uri': 'http://glance.openstack.example.org/v1/images/71c675ab-d94f-49cd-a114-e12490b328d9','name': 'Ubuntu 10.04 Plain 5GB','disk_format': 'vhd','container_format': 'ovf','size': '5368709120','checksum': 'c2e5db72bd7fd153f53ede5da5a06de3','created_at': '2010-02-03 09:34:01','updated_at': '2010-02-03 09:34:01','deleted_at': '','status': 'active','is_public': true,'min_ram': 256,'min_disk': 5,'owner': null,'properties': {'distro': 'Ubuntu 10.04 LTS'}},...]}
3.镜像创建过程
4.镜像删除过程
好长,该吃饭了,晚点继续写吧。
阅读全文
0 0
- Openstack Glance源码架构解析
- Glance源码架构探秘
- CentOS6.2下源码安装openStack glance
- CentOS6.2下源码安装openStack glance
- openstack g版 glance 源码分析
- openstack glance
- Glance源码架构探秘(一)
- Glance源码架构探秘(二)
- Glance源码架构探秘(三)
- Glance源码架构探秘(四)
- Openstack组件实现原理 — Glance架构(V1/V2)
- Openstack liberty Glance上传镜像源码分析
- OpenStack for Glance镜像和实例目录解析
- Glance源码
- OpenStack Keystone 源码解析
- OpenStack Glance 配置
- openstack之glance篇
- openstack 学习之glance
- 2017-07-14:加速
- TensorFlow教程 2 TensorFlow基础构架
- ListView中EditText在横竖屏切换中保存数据
- jsp请求压缩导出txt文件
- Android自定义圆形进度条动画一
- Openstack Glance源码架构解析
- 各种优化方法总结比较(sgd/momentum/Nesterov/adagrad/adadelta)
- n a^o7 !——栈
- LruCache源码完全解析
- 百度编辑器UEditor常用设置函数大全
- win 如何在Windows上建立ssh服务器 作者:许腾
- 搭建教育直播平台
- js促销倒数计时器
- 探索单一变量