SiteMesh 2.X 的使用(网页结构模板)
来源:互联网 发布:webapi实例连接数据库 编辑:程序博客网 时间:2024/06/06 03:29
SiteMesh是基于Servlet的filter的,即过滤流。它是通过截取reponse,并进行装饰后再交付给客户。
其中涉及到两个名词: 装饰页面(decorator page)和 “被装饰页面(Content page)" , 即 SiteMesh通过对Content Page的装饰,最终得到页面布局和外观一直的页面,
并返回给客户
运行环境需要:servlet2.3 , JDK1.4 以上。
正常模式下的web访问流程
加入SiteMesh装饰的web访问流程
一:搭建SiteMesh环境及简单使用
1.1:准备资源
siteMesh2.4.jar, sitemesh-page.tld , sitemesh-decorator.tld 这个三个必要文件
将jar包复制进/WEB-INF/lib目录下, 两个tld文件导入/WEB-INF下即可
在web.xml中加入siteMesh的filter和taglib
<filter> <filter-name>sitemesh</filter-name> <filter-class>com.opensymphony.sitemesh.webapp.SiteMeshFilter</filter-class> </filter> <filter-mapping> <filter-name>sitemesh</filter-name> <url-pattern>/*</url-pattern> </filter-mapping> <!-- not required for containers that fully support JSP 1.2 --> <taglib> <taglib-uri>sitemesh-page</taglib-uri> <taglib-location>/WEB-INF/lib/sitemesh-page.tld</taglib-location> </taglib> <taglib> <taglib-uri>sitemesh-decorator</taglib-uri> <taglib-location>/WEB-INF/lib/sitemesh-decorator.tld</taglib-location> </taglib> 1.2 建立decorators.xml
在/WEB-INF下创建decorators.xml文件,siteMesh通过该文件来获知"装饰页面"和"被装饰页面"的映射
decorators.xml
<?xml version="1.0" encoding="UTF-8"?> <!-- 默认目录 --> <decorators defaultdir="/decorators"> <!-- 缺省装饰页 --> <decorator name="main" page="main.jsp"> <pattern>/*</pattern> </decorator> <!-- 自定义装饰页,我们下面实例就是这部分起作用 --> <decorator name="mai" page="mai.jsp"> <pattern>/mai.html</pattern> </decorator> <!-- 只装饰一个页面也可用这种方式定义 --> <decorator name="panel" page="panel.jsp"/> <!-- 装饰velocity模板 --> <decorator name="velocity" page="velocity.vm"> <pattern>/velocity.html</pattern> </decorator> <!-- 装饰freeMarker模板 --> <decorator name="freemarker" page="freemarker.ftl"> <pattern>/freemarker.html</pattern> </decorator> <decorator name="test" page="test.jsp"> <pattern>/agent.jsp</pattern> </decorator> </decorators> 下边是对上边中所缺少的一些补充
<?xml version="1.0" encoding="utf-8"?> <decorators defaultdir="/decorators"> <!-- 此处用来定义不需要过滤的页面 --> <excludes> </excludes> <!-- 用来定义装饰器要过滤的页面 --> <decorator name="main" page="main.jsp"> <pattern>/*</pattern> </decorator> </decorators>1.3 装饰页的创建
在web目录(或者webContent)下创建文件夹decorators,在文件夹中建立mai.jsp文件
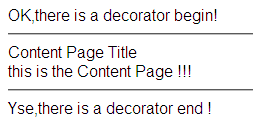
<%@ page language="java" contentType="text/html; charset=UTF-8" pageEncoding="UTF-8"%> <!DOCTYPE html PUBLIC "-//W3C//DTD HTML 4.01 Transitional//EN" "http://www.w3.org/TR/html4/loose.dtd"> <html> /*这里导入了SiteMesh的标签库 */ <%@ taglib uri="http://www.opensymphony.com/sitemesh/decorator" prefix="decorator" %> <%@ taglib uri="http://www.opensymphony.com/sitemesh/page" prefix="page" %> <head> <meta http-equiv="Content-Type" content="text/html; charset=UTF-8"> OK,there is a decorator begin!<hr /> /*这里的意思是,被装饰页的title内容将会在这里插入 */ <decorator:title></decorator:title> </head> <body> /*被修饰页的body内容将在这里插入 <decorator:body></decorator:body> <hr />Yse,there is a decorator end ! </body> </html> 1.4 被修饰页的创建
在web目录(或webContent)下创建mai.html
<!DOCTYPE html PUBLIC "-//W3C//DTD HTML 4.01 Transitional//EN" "http://www.w3.org/TR/html4/loose.dtd"> <html> <head> <meta http-equiv="Content-Type" content="text/html; charset=UTF-8"> <title>Insert title here</title> </head> <body> this is the Content Page !!! </body> </html> 1.5 使用tomcat进行示例运行,访问http://localhost:8080/{your project name}/mai.html , 运行结果如下:
1.6 sitemesh.xml的配置(可选, 示例中没有用到该文件)
该配置文件用于高级元素的配置,有具体需要的可以配置
<sitemesh> <property name="decorators-file" value="/WEB-INF/decorators.xml"/> <excludes file="${decorators-file}"/> <page-parsers> <parser content-type="text/html" class="com.opensymphony.module.sitemesh.parser.HTMLPageParser" /> </page-parsers> <decorator-mappers> <mapper class="com.opensymphony.module.sitemesh.mapper.PageDecoratorMapper"> <param name="property.1" value="meta.decorator" /> <param name="property.2" value="decorator" /> </mapper> <mapper class="com.opensymphony.module.sitemesh.mapper.FrameSetDecoratorMapper"> </mapper> <mapper class="com.opensymphony.module.sitemesh.mapper.AgentDecoratorMapper"> <param name="match.MSIE" value="ie" /> <param name="match.Mozilla [" value="ns" /> <param name="match.Opera" value="opera" /> <param name="match.Lynx" value="lynx" /> </mapper> <mapper class="com.opensymphony.module.sitemesh.mapper.PrintableDecoratorMapper"> <param name="decorator" value="printable" /> <param name="parameter.name" value="printable" /> <param name="parameter.value" value="true" /> </mapper> <mapper class="com.opensymphony.module.sitemesh.mapper.RobotDecoratorMapper"> <param name="decorator" value="robot" /> </mapper> <mapper class="com.opensymphony.module.sitemesh.mapper.ParameterDecoratorMapper"> <param name="decorator.parameter" value="decorator" /> <param name="parameter.name" value="confirm" /> <param name="parameter.value" value="true" /> </mapper> <mapper class="com.opensymphony.module.sitemesh.mapper.FileDecoratorMapper"> </mapper> <mapper class="com.opensymphony.module.sitemesh.mapper.ConfigDecoratorMapper"> <param name="config" value="${decorators-file}" /> </mapper> </decorator-mappers> </sitemesh> 使用总结:整个过程配置是相对简单的,先导入所需资源,然后再配置filter,之后是derator page和content page的创建以及他们之间的映射关系,配置命令是相对简单的,简单的需求上面这些已经足矣。
二:使用示例
2.1 例子1
在{myapp}/WEB-INF/decorators.xml文件中添加以下decorator
<decorator name="mydecorator1" page="mydecorator1.jsp"> <pattern>/test1.jsp</pattern> </decorator>在{myapp}/decorators目录下添加mydecorator1.jsp文件,内容如下:
<%@ taglib uri="http://www.opensymphony.com/sitemesh/decorator" prefix="decorator" %> <html> <head> <title>My Site - <decorator:title default="Welcome!" /></title> <decorator:head /> </head> <body> <decorator:body /> <p>This message is in /decorators/mydecorator1.jsp</p> </body> </html> 在{myapp}目录下添加test1.jsp文件,内容如下:
<%@page contentType="text/html"%> <%@page pageEncoding="UTF-8"%> <html> <head> <meta http-equiv="Content-Type" content="text/html; charset=UTF-8"> <title>This is test1</title> </head> <body> <b>This is test1</b> </body> </html> - 打开浏览器,访问http://localhost:8080/myapp/test1.jsp,将会出现一下内容:
This is test1
This message is in /decorators/mydecorator1.jsp
2.2 例子2(decorator:getProperty)
有时候,我们期望修改页面中某个有固定标记的片段,例如我们的jsp中有一个标记<mytag>...</mytag>,此时可以用如下方法实现:
在{myapp}/WEB-INF/decorators.xml文件中添加以下decorator
<decorator name="mydecorator2" page="mydecorator2.jsp"> <pattern>/test2.jsp</pattern> </decorator>
在{myapp}/decorators目录下添加mydecorator2.jsp文件,内容如下:
<%@ taglib uri="http://www.opensymphony.com/sitemesh/decorator" prefix="decorator" %> <html> <head> <title>My Site - <decorator:title default="Welcome!" /></title> <decorator:head /> </head> <body> <decorator:body /> <decorator:getProperty property="page.content1"/> <decorator:getProperty property="page.content2"/> <!-- do nothing --> <decorator:getProperty property="page.content3"/> <p>This message is in /decorators/mydecorator2.jsp</p> </body> </html>
在{myapp}目录下添加test2.jsp文件,内容如下:
<%@page contentType="text/html"%> <%@page pageEncoding="UTF-8"%> <html> <head> <meta http-equiv="Content-Type" content="text/html; charset=UTF-8"> <title>This is test2</title> </head> <body> <b>This is test2</b> <b>Use <decorator:getProperty> tag</b> <content tag="content1"><p>This is content1</p></content> <content tag="content2"><p>This is content2</p></content> <content tag="content4"><p>This is content4, it shouldn't be display</p></content> </body> </html>
打开浏览器,访问http://localhost:8080/myapp/test2.jsp,将会出现一下内容:
This is test2
Use <decorator:getProperty> tag
This is content1
This is content2
This message is in /decorators/mydecorator2.jsp
2.3 例子3 (page:applyDecorator tag)
在{myapp}/WEB-INF/decorators.xml文件中添加以下decorator:
<decorator name="mydecorator3" page="mydecorator3.jsp"> <pattern>/test3.jsp</pattern> </decorator> <decorator name="mydecorator31" page="mydecorator31.jsp"> </decorator> 在{myapp}/decorators目录下添加mydecorator3.jsp文件,内容如下:
<%@ taglib uri="http://www.opensymphony.com/sitemesh/decorator" prefix="decorator" %> <%@ taglib uri="http://www.opensymphony.com/sitemesh/page" prefix="page" %> <html> <head> <title>My Site - <decorator:title default="Welcome!" /></title> <decorator:head /> </head> <body> <decorator:body /> <page:applyDecorator name="mydecorator31"> <content tag="content1"><p>This is content1</p></content> <content tag="content2"><p>This is content2</p></content> </page:applyDecorator> </body> </html>
在{myapp}/decorators目录下添加mydecorator31.jsp文件,内容如下:
<%@ taglib uri="http://www.opensymphony.com/sitemesh/decorator" prefix="decorator" %> <%@ taglib uri="http://www.opensymphony.com/sitemesh/page" prefix="page" %> <p><i>begin</i></> <decorator:getProperty property="page.content1"/> <decorator:getProperty property="page.content2"/> <p><i>end</i></> 在{myapp}目录下添加test3.jsp文件,内容如下: <%@page contentType="text/html"%> <%@page pageEncoding="UTF-8"%> <html> <head> <meta http-equiv="Content-Type" content="text/html; charset=UTF-8"> <title>This is test3</title> </head> <body> <b>This is test3</b> <b>Use <page:applyDecorator> tag</b> </body> </html>
注意:相对于例子2,这里已经没有了<content tag="XXX"/>标签。
打开浏览器,访问http://localhost:8080/myapp/test3.jsp,将会出现一下内容:
This is test3
Use <page:applyDecorator> tag
begin
This is content1
This is content2
end
这里,我在mydecorator3.jsp中应用了mydecorator31.jsp的的decorator,并且将原来在test2.jsp中的 <content />标签复制到mydecorator3.jsp中,此时对于<content tag="xxx"/>的标签将会由mydecorator31.jsp了装饰。
2.4 例子4(page:parm tag)
在{myapp}/WEB-INF/decorators.xml文件中添加以下decorator:
<decorator name="mydecorator4" page="mydecorator4.jsp"> <pattern>/test4.jsp</pattern> </decorator> <decorator name="mydecorator41" page="mydecorator41.jsp"> </decorator>
在{myapp}/decorators目录下添加mydecorator4.jsp文件,内容如下:
<%@ taglib uri="http://www.opensymphony.com/sitemesh/decorator" prefix="decorator" %> <%@ taglib uri="http://www.opensymphony.com/sitemesh/page" prefix="page" %> <html> <head> <title>My Site - <decorator:title default="Welcome!" /></title> <decorator:head /> </head> <body> <decorator:body /> <page:applyDecorator name="mydecorator41" > <content tag="content1"><p>This is content1</p></content> <content tag="content2"><p>This is content2</p></content> <page:param name="page.content1"><p>This content1 has been replaced</p></page:param> </page:applyDecorator> </body> </html>
在{myapp}/decorators目录下添加mydecorator41.jsp文件,内容如下:
<%@ taglib uri="http://www.opensymphony.com/sitemesh/decorator" prefix="decorator" %> <%@ taglib uri="http://www.opensymphony.com/sitemesh/page" prefix="page" %> <p><i>begin</i></> <decorator:getProperty property="page.content1"/> <decorator:getProperty property="page.content2"/> <p><i>end</i></>
在{myapp}目录下添加test4.jsp文件,内容如下:
<%@page contentType="text/html"%> <%@page pageEncoding="UTF-8"%> <html> <head> <meta http-equiv="Content-Type" content="text/html; charset=UTF-8"> <title>This is test4</title> </head> <body> <b>This is test4</b> <b>Use <page:param> tag</b> </body> </html>
打开浏览器,访问http://localhost:8080/myapp/test4.jsp,将会出现一下内容:
This is test4
Use <page:param> tag
begin
This content1 has been replaced
This is content2
end
这里,我在mydecorator4.jsp中应用了mydecorator41.jsp的的decorator,并且添加了<page:param name="page.content1">标签,那么此时页面上将会用<page:param>标签中的内容替换原来在<decorator:getProperty property="page.content1"/>中的内容,因此页面将不在“This is content1”而显示“This content1 has been replaced”
SiteMesh的一个重要特性是使用原始HTML的meta标签(例如<meta name="foo" content="bar">)从基础页面传递信息到装饰器。作为一个例子,下面我们使用一个meta标签来定义HTML页面的作者。
<html> <meta name="author" content="test@example.com"> <head> <title> Simple Document </title> </head> <body> Hello World!< br/> <%=1 + 1%> </body> </html>
我们定义一个“smart”装饰器来研究meta标签,如果出现这个标签,则可以得到一个相应的HTML:
<%@taglib uri = "sitemesh-decorator" prefix = "decorator"%> <decorator:usePage id = " myPage " /> <html> <head> <title> My Site - <decorator:title default="Welcome!"/> </title> <decorator:head/> </head> <body> <h1><decorator:title default="Welcome!"/></h1> <h3> <a href="mailto: <decorator:getProperty property= "meta.author" default="staff@example.com"/>"> <decorator:getProperty property="meta.author" default="staff@example.com"/> </a> </h3> <hr/> <decorator:body/> <p> <small>(<a href="/?printable=true">printable version</a> )</small> </p> </body> </html>
可以看到我们使用了 getProperty标签的 一个默认属性——如果没有指定author,我们就设定其为staff。如果你决定使用这个模型储存页面的meta数据,你或许需要和你的开发伙伴一起来 确定将使用什么标签以及如何使用他们。简单的,你或许想要使用meta标签来描述诸如页面作者及时间戳之类的东西。更复杂一些,你或许会想像XML文件一 样标准化的管理你的站点导航,同时使用meta标签来通过页面节点转到装饰器。
转载:http://blog.csdn.net/drift_away/article/details/8088758
参考资料:http://my.oschina.net/thinkinginc/blog/76180
参考资料:http://www.cnblogs.com/mailingfeng/archive/2011/12/21/2296041.html
- SiteMesh 2.X 的使用(网页结构模板)
- appfuse 中的sitemesh --网页模板的高级抽象
- SiteMesh的使用(转)
- 使用SiteMesh简化网页布局
- 使用SiteMesh 简化网页布局
- 使用SiteMesh简化网页布局
- Sitemesh 3 模板框架使用
- Sitemesh 3 模板框架使用
- sitemesh的使用
- sitemesh的使用
- SiteMesh的使用
- SiteMesh的使用
- SiteMesh的使用
- sitemesh的初步使用
- sitemesh的使用
- SiteMesh的使用
- 关于SiteMesh的使用
- sitemesh的初步使用
- SpringMVC学习(6):数据验证
- Maven入门指南11:使用Nexus搭建Maven私服
- Java的HashMap和HashTable
- java 方法设置默认值
- apache下logs下的日志文件简单说明
- SiteMesh 2.X 的使用(网页结构模板)
- Spring学习笔记(1)——初识Spring
- Git使用教程
- 数据结构与算法04 之二叉树
- VS中添加命令行参数的方法
- 数据结构和算法03 之链表
- mySQL单表限制大小
- Groovy学习:第三章 Groovy开发环境
- SQL语句学习笔记(持续更新)