Writing a Linux Kernel Module — Part 1: Introduction
来源:互联网 发布:会计erp软件 编辑:程序博客网 时间:2024/06/06 04:52
介绍
在本系列文章中,我将介绍如何为嵌入式Linux设备编写Linux内核模块。我从一个简单的“Hello World!”可加载内核模块(LKM)开始,并致力于开发可以通过使用IRQ在嵌入式Linux设备(例如BeagleBone)上控制GPIO的模块。我会补充进一步的后续文章,因为我确定适合的应用程序。
这是一个复杂的话题,需要时间才能完成。因此,我已经把一些文章的讨论分开了,每一篇文章都提供了一个实际的例子和结果。有关于这个话题的整本书都是写的,所以很难覆盖各个方面。还有其他文章可用于编写内核模块; 然而,这里提供的示例是在Linux内核3.8.X +下构建和测试的,确保材料是最新的和相关的,我专注于与嵌入式系统上的硬件接口。我还对我的书“ 探索BeagleBone”执行的任务进行了调整,尽管这些文章是独立的,不要求你拥有这本书的副本。
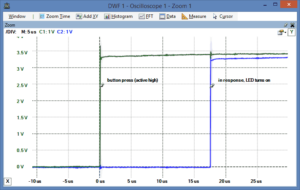
本文主要介绍构建和部署“Hello World!”内核模块所需的系统配置,工具和代码。本系列的第二篇文章探讨了编写字符设备驱动程序以及如何在可与内核空间模块通信的用户空间中编写C / C ++程序的主题。第三篇文章探讨了内核空间GPIO库代码的使用 - 它结合了前两篇文章的内容来开发可以从Linux用户空间中控制的中断驱动代码。例如,图1说明了一个中断驱动内核模块的示波器捕获,当按下按钮时触发LED点亮(点击更大的版本)。在常规嵌入式Linux(即不是实时变体)下,该代码演示了大约20微秒(±5μs)的响应时间。
图1:GPIO在内核空间中的性能
什么是内核模块?
可加载内核模块(LKM)是一种在运行时向Linux内核添加代码或从其中删除代码的机制。它们是设备驱动程序的理想选择,使内核能够与硬件进行通信,而无需知道硬件的工作原理。LKM的替代方法是将每个驱动程序的代码构建到Linux内核中。
没有这种模块化功能,Linux内核将会非常大,因为它必须支持BBB上所需要的每个驱动程序。每当您要添加新硬件或更新设备驱动程序时,还必须重建内核。LKM的缺点是必须为每个设备维护驱动程序文件。LKM在运行时加载,但它们不在用户空间中执行 - 它们基本上是内核的一部分。
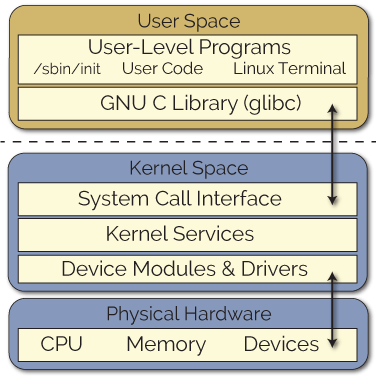
内核模块在内核空间中运行,应用程序在用户空间中运行,如图2所示。内核空间和用户空间都有自己唯一的不重叠的内存地址空间。这种方法确保在用户空间中运行的应用程序具有硬件的一致视图,而不考虑硬件平台。然后,通过使用系统调用,内核服务可以以受控的方式提供给用户空间。内核还可以防止各个用户空间应用程序相互冲突或通过使用保护级别(例如,超级用户与常规用户权限)访问受限资源。

图2:Linux用户空间和内核空间
为什么要写一个内核模块?
当连接到嵌入式Linux下的电子电路时,您暴露于sysfs和使用低级文件操作来连接到电子电路。这种方法似乎效率不高(特别是如果您有传统嵌入式系统的经验); 然而,这些文件条目是内存映射的,并且性能对于许多应用程序是足够的。我在本书中已经证明,通过使用pthreads,回调函数和sys / poll.h,可以在Linux用户空间内实现大约三分之一毫秒的响应时间,可以忽略CPU的开销。
另一种方法是使用支持中断的内核代码。但是,内核代码难以编写和调试。我的建议是,您应该始终尝试在Linux用户空间中完成任务,除非您确定没有其他可能的方式!
此讨论的源代码
本次讨论的所有代码均可在GitHub存储库中查阅“探索BeagleBone”一书。可以通过以下方式公开查看代码:ExploringBB GitHub Kernel Project目录,和/或您可以通过键入以下命令克隆BeagleBone(或其他Linux设备)上的存储库:
molloyd@beaglebone:~$ sudo apt-get install gitmolloyd@beaglebone:~$ git clone https://github.com/derekmolloy/exploringBB.git12molloyd@beaglebone:~$ sudo apt-get install gitmolloyd@beaglebone:~$ git clone https://github.com/derekmolloy/exploringBB.git在/演员/内核/你好目录是本文最重要的资源。这些代码示例的自动生成的Doxygen文档有HTML格式和PDF格式。获取源代码
准备建立LKM的系统
系统必须准备构建内核代码,为此,您必须在设备上安装Linux头。在典型的Linux桌面机上,您可以使用包管理器找到要安装的正确包。例如,在64位Debian下,您可以使用:
molloyd@DebianJessieVM:~$ sudo apt-get update molloyd@DebianJessieVM:~$ apt-cache search linux-headers-$(uname -r) linux-headers-3.16.0-4-amd64 - Header files for Linux 3.16.0-4-amd64 molloyd@DebianJessieVM:~$ sudo apt-get install linux-headers-3.16.0-4-amd64 molloyd@DebianJessieVM:~$ cd /usr/src/linux-headers-3.16.0-4-amd64/ molloyd@DebianJessieVM:/usr/src/linux-headers-3.16.0-4-amd64$ ls arch include Makefile Module.symvers scripts您可以使用桌面Linux的任何风格完成本系列的前两篇文章。然而,在本系列文章中,我在BeagleBone本身上构建了LKM,与交叉编译相比,这简化了过程。您必须为内核构建的确切版本安装头。与桌面安装类似,请使用uname来识别正确的安装。例如:
molloyd@beaglebone:~$ uname -a Linux beaglebone 3.8.13-bone70 #1 SMP Fri Jan 23 02:15:42 UTC 2015 armv7l GNU/Linux您可以从Robert Nelson的网站下载BeagleBone平台的Linux标头。例如:http : //rcn-ee.net/deb/precise-armhf/。选择确切的内核构建,并在BeagleBone上下载并安装这些Linux标头。例如: molloyd@beaglebone:~/tmp$ wget http://rcn-ee.net/deb/precise-armhf/v3.8.13-bone70/linux-headers-3.8.13-bo ne70_1precise_armhf.deb 100%[===========================>] 8,451,080 2.52M/s in 3.2s 2015-03-17 22:35:45 (2.52 MB/s) - 'linux-headers-3.8.13-bone70_1precise_armhf.deb' saved [8451080/8451080] molloyd@beaglebone:~/tmp$ sudo dpkg -i ./linux-headers-3.8.13-bone70_1precise_armhf.deb Selecting previously unselected package linux-headers-3.8.13-bone70然后,您可以检查标题是否已正确安装:
molloyd@beaglebone:~/tmp$ cd /usr/src/linux-headers-3.8.13-bone70/ molloyd@beaglebone:/usr/src/linux-headers-3.8.13-bone70$ ls Documentation Module.symvers crypto fs ipc mm scripts tools Kconfig arch drivers include kernel net security usr Makefile block firmware init lib samples sound virt在BeagleBone的3.8.13-bone47 Debian发行版下,您可能必须执行一个不寻常的步骤,在目录/usr/src/linux-headers-3.8中创建一个空文件timex.h(即touchtimex.h).13-bone47 / arch / arm / include / mach。这个步骤在骨架构建之下是不必要的。
警告!
在编写和测试LKM时,很容易使系统崩溃。这样的系统崩溃总是可能会损坏您的文件系统 - 这是不可能的,但它是可能的。请备份您的数据和/或使用嵌入式系统,例如BeagleBone,可以轻松重新启动。执行sudo重新启动或按BeagleBone上的重置按钮通常会将所有内容重新排列。尽管许多系统崩溃,但是这些文章的写作中没有BeagleBones被破坏!
模块代码
典型的计算机程序的运行时间生命周期是相当简单的。加载器为程序分配内存,然后加载程序和任何所需的共享库。指令执行从某个入口点开始(通常是main()C / C ++程序中的一点),执行语句,抛出异常,分配和释放动态内存,程序最终运行到完成。在程序退出时,操作系统会识别任何内存泄漏,并将丢失的内存释放到池中。
一个内核模块不是一个应用程序 - 一开始就没有main()功能!一些关键的区别是内核模块:
不要顺序执行 - 内核模块使用其初始化函数注册自身以处理请求,该函数运行然后终止。它可以处理的请求类型在模块代码中定义。这与图形用户界面(GUI)应用程序中常用的事件驱动编程模型非常相似。
没有自动清理 - 分配给模块的任何资源必须在卸载模块时手动释放,或者在系统重新启动之前可能不可用。
没有printf()功能 - 内核代码无法访问为Linux用户空间编写的代码库。内核模块在内核空间中生存和运行,内核空间具有自己的内存地址空间。内核空间和用户空间之间的接口被明确定义和控制。然而,我们有一个printk()可以输出信息的功能,可以在用户空间内查看。
可以中断 - 内核模块的一个概念上的困难方面是它们可以同时被几个不同的程序/进程使用。我们必须仔细构建模块,以使它们在中断时具有一致和有效的行为。BeagleBone有一个单核处理器(目前为止),但是我们仍然需要考虑多个进程同时访问模块的影响。
具有更高级别的执行权限 - 通常,更多的CPU周期分配给内核模块,而不是用户空间程序。这听起来像是一个优势,但是,您必须非常小心,您的模块不会对系统的整体性能产生不利影响。
没有浮点支持 - 内核代码使用陷阱从整数转换为浮点模式为用户空间应用程序。但是,在内核空间中执行这些陷阱是非常困难的。另一种方法是手动保存和恢复浮点运算 - 最好避免使用您的用户空间代码的任务。
上面的概念是很多要消化的,重要的是它们都被解决,但不是全部在第一篇文章!清单1提供了第一个示例LKM的代码。当没有提供内核参数时,代码使用该printk()函数在内核日志中显示“Hello world!…”。如果提供了参数“Derek”,那么日志将显示“Hello Derek!…”清单1中使用Doxygen风格编写的注释描述了每个语句的作用。下面的代码清单可以进一步说明。
/** * @file hello.c * @author Derek Molloy * @date 4 April 2015 * @version 0.1 * @brief An introductory "Hello World!" loadable kernel module (LKM) that can display a message * in the /var/log/kern.log file when the module is loaded and removed. The module can accept an * argument when it is loaded -- the name, which appears in the kernel log files. * @see http://www.derekmolloy.ie/ for a full description and follow-up descriptions.*/#include <linux/init.h> // Macros used to mark up functions e.g., __init __exit#include <linux/module.h> // Core header for loading LKMs into the kernel#include <linux/kernel.h> // Contains types, macros, functions for the kernelMODULE_LICENSE("GPL"); ///< The license type -- this affects runtime behaviorMODULE_AUTHOR("Derek Molloy"); ///< The author -- visible when you use modinfoMODULE_DESCRIPTION("A simple Linux driver for the BBB."); ///< The description -- see modinfoMODULE_VERSION("0.1"); ///< The version of the modulestatic char *name = "world"; ///< An example LKM argument -- default value is "world"module_param(name, charp, S_IRUGO); ///< Param desc. charp = char ptr, S_IRUGO can be read/not changedMODULE_PARM_DESC(name, "The name to display in /var/log/kern.log"); ///< parameter description/** @brief The LKM initialization function * The static keyword restricts the visibility of the function to within this C file. The __init * macro means that for a built-in driver (not a LKM) the function is only used at initialization * time and that it can be discarded and its memory freed up after that point. * @return returns 0 if successful */static int __init helloBBB_init(void){ printk(KERN_INFO "EBB: Hello %s from the BBB LKM!\n", name); return 0;}/** @brief The LKM cleanup function * Similar to the initialization function, it is static. The __exit macro notifies that if this * code is used for a built-in driver (not a LKM) that this function is not required. */static void __exit helloBBB_exit(void){ printk(KERN_INFO "EBB: Goodbye %s from the BBB LKM!\n", name);}/** @brief A module must use the module_init() module_exit() macros from linux/init.h, which * identify the initialization function at insertion time and the cleanup function (as * listed above) */module_init(helloBBB_init);module_exit(helloBBB_exit);除了清单1中的评论所述的要点外,还有一些其他要点:
第16行:该声明MODULE_LICENSE(“GPL”)提供有关您开发的模块许可条款的信息(通过modinfo),从而允许您的LKM用户确保使用自由软件。由于内核是根据GPL发布的,因此您的许可证选择会影响内核处理模块的方式。您可以选择”Proprietary”非GPL代码,但内核将被标记为“污染”,并将显示警告。有非污染替代GPL,如”GPL v2”,”GPL and additional rights”,”Dual BSD/GPL”,”Dual MIT/GPL”,和”Dual MPL/GPL”。有关详细信息,请参阅linux / module.h。
行21:name(ptr to char)被声明为static并被初始化以包含字符串“hello”。您应该避免在内核模块中使用全局变量 - 它比应用程序编程更为重要,因为全局变量是内部共享的。您应该使用static关键字将变量的范围限制在模块内。如果必须使用全局变量,请添加一个前缀,该前缀对于您正在编写的模块是唯一的。
第22行:该module_param(name, type, permissions)宏有三个参数:name(显示给用户和所述模块中的变量名称参数名称), type(该参数的类型-即,一个byte,int,uint,long,ulong,short,ushort,bool逆布尔值,invbool或一个char指针charp),permissions(这是使用sysfs时对参数的访问权限,如下所示)0禁用条目的值,但S_IRUGO允许用户/组/其他人的读取访问权限 - 请参阅访问权限指南的模式位)
第31行和第40行:函数可以有任何您喜欢的名称(例如helloBBB_init()和helloBBB_exit()),但是,必须将相同的名称传递给特殊宏module_init()以及module_exit()第48和49行。
第31行:使用printk()非常类似于printf()您应该熟悉的功能,您可以从内核模块代码中的任何位置调用它。唯一显着的区别是您在调用该函数时应指定日志级别。日志级别中定义的linux / kern_levels.h为一体KERN_EMERG,KERN_ALERT,KERN_CRIT,KERN_ERR,KERN_WARNING,KERN_NOTICE,KERN_INFO,KERN_DEBUG,和KERN_DEFAULT。这个头linux/kernel.h文件通过头文件包括,它包括它linux/printk.h。
本质上,当该模块被加载时,该helloBBB_init()功能将被执行,当该模块被卸载时,该helloBBB_exit()功能将被执行。
下一步是将此代码构建到内核模块中。
构建模块代码
Makefile是构建内核模块所必需的 - 实际上它是一个特殊的kbuild Makefile。在本文中构建内核模块所需的kbuild Makefile可以在清单2中查看。
obj-m+=hello.oall: make -C /lib/modules/$(shell uname -r)/build/ M=$(PWD) modulesclean: make -C /lib/modules/$(shell uname -r)/build/ M=$(PWD) cleanMakefile的第一行称为目标定义,它定义要构建的模块(hello.o)。语法令人惊讶地复杂,例如obj-m定义了一个可加载的模块目标,而obj-y指示了一个内置的目标目标。当从多个对象构建模块时,语法变得更加复杂,但这足以构建此示例LKM。
Makefile的提示类似于常规Makefile。这$(shell uname -r)是一个有用的调用来返回当前的内核构建版本 - 这确保了Makefile的一定程度的可移植性。该-C选项在执行任何make任务之前将目录切换到内核目录。该M=(PWD)变量赋值告诉化妆在实际的项目文件中存在的命令。该modules目标是外部内核模块的缺省目标。另一个目标是modules_install安装该模块(make命令必须使用超级用户权限执行,并且需要模块安装路径)。
一切顺利,构建内核模块的过程应该是直截了当的,只要您已经安装了如前所述的Linux标头。步骤如下:你可以看到,现在有一个招呼与文件扩展名build目录加载内核模块.ko。
molloyd@beaglebone:~/exploringBB/extras/kernel/hello$ ls -l total 8 -rw-r--r-- 1 molloyd molloyd 154 Mar 17 17:47 Makefile -rw-r--r-- 1 molloyd molloyd 2288 Apr 4 23:26 hello.c molloyd@beaglebone:~/exploringBB/extras/kernel/hello$ make make -C /lib/modules/3.8.13-bone70/build/ M=/home/molloyd/exploringBB/extras/kernel/hello modules make[1]: Entering directory '/usr/src/linux-headers-3.8.13-bone70' CC [M] /home/molloyd/exploringBB/extras/kernel/hello/hello.o Building modules, stage 2. MODPOST 1 modules CC /home/molloyd/exploringBB/extras/kernel/hello/hello.mod.o LD [M] /home/molloyd/exploringBB/extras/kernel/hello/hello.ko make[1]: Leaving directory '/usr/src/linux-headers-3.8.13-bone70' molloyd@beaglebone:~/exploringBB/extras/kernel/hello$ ls Makefile Module.symvers hello.c hello.ko hello.mod.c hello.mod.o hello.o modules.order测试LKM
现在可以使用内核模块工具来加载此模块,如下所示:
molloyd@beaglebone:~/exploringBB/extras/kernel/hello$ ls -l *.ko -rw-r--r-- 1 molloyd molloyd 4219 Apr 4 23:27 hello.ko molloyd@beaglebone:~/exploringBB/extras/kernel/hello$ sudo insmod hello.ko molloyd@beaglebone:~/exploringBB/extras/kernel/hello$ lsmod Module Size Used by hello 972 0 g_multi 50407 2 libcomposite 15028 1 g_multi omap_rng 4062 0 mt7601Usta 639170 0您可以使用modinfo命令获取有关模块的信息,该命令将标识描述,作者和定义的任何模块参数:
molloyd@beaglebone:~/exploringBB/extras/kernel/hello$ modinfo hello.ko filename: /home/molloyd/exploringBB/extras/kernel/hello/hello.ko description: A simple Linux driver for the BBB. author: Derek Molloy license: GPL srcversion: 9E3F5ECAB0272E3314BEF96 depends: vermagic: 3.8.13-bone70 SMP mod_unload modversions ARMv7 thumb2 p2v8 parm: name:The name to display in /var/log/kernel.log. (charp)可以使用rmmod命令卸载模块:
molloyd@beaglebone:~/exploringBB/extras/kernel/hello$ sudo rmmod hello.ko您可以重复这些步骤,并查看使用该printk()函数产生的内核日志中的输出。我建议您使用第二个终端窗口,并在LKM加载和卸载时查看输出,如下所示:
molloyd@beaglebone:~$ sudo su - [sudo] password for molloyd: root@beaglebone:~# cd /var/log root@beaglebone:/var/log# tail -f kern.log ... Apr 4 23:34:32 beaglebone kernel: [21613.495523] EBB: Hello world from the BBB LKM! Apr 4 23:35:17 beaglebone kernel: [21658.306647] EBB: Goodbye world from the BBB LKM! ^C root@beaglebone:/var/log#测试LKM自定义参数
清单1中的代码还包含一个自定义参数,允许在初始化时将参数传递给内核模块。此功能可以测试如下:如果您在此处查看/var/log/kern.log,那么您将看到“Hello Derek”代替“Hello world”。但是,值得先看看/ proc和/ sys。
molloyd@beaglebone:~/exploringBB/extras/kernel/hello$ sudo insmod hello.ko name=Derek而不是使用lsmod命令,还可以找到有关加载的内核模块的信息,如下所示:这是与lsmod命令提供的信息相同的信息,但它还为加载的模块提供了当前的内核内存偏移量,这对调试很有用。
molloyd@beaglebone:~/exploringBB/extras/kernel/hello$ cd /proc molloyd@beaglebone:/proc$ cat modules|grep hello hello 972 0 - Live 0xbf903000 (O)LKM还有一个/ sys / module下的条目,它可以直接访问自定义参数状态。例如:根据条目,版本值为0.1,根据已选择的许可证,污染值为0 。
molloyd@beaglebone:/proc$ cd /sys/module molloyd@beaglebone:/sys/module$ ls -l|grep hello drwxr-xr-x 6 root root 0 Apr 5 00:02 hello molloyd@beaglebone:/sys/module$ cd hello molloyd@beaglebone:/sys/module/hello$ ls -l total 0 -r--r--r-- 1 root root 4096 Apr 5 00:03 coresize drwxr-xr-x 2 root root 0 Apr 5 00:03 holders -r--r--r-- 1 root root 4096 Apr 5 00:03 initsize -r--r--r-- 1 root root 4096 Apr 5 00:03 initstate drwxr-xr-x 2 root root 0 Apr 5 00:03 notes drwxr-xr-x 2 root root 0 Apr 5 00:03 parameters -r--r--r-- 1 root root 4096 Apr 5 00:03 refcnt drwxr-xr-x 2 root root 0 Apr 5 00:03 sections -r--r--r-- 1 root root 4096 Apr 5 00:03 srcversion -r--r--r-- 1 root root 4096 Apr 5 00:03 taint --w------- 1 root root 4096 Apr 5 00:02 uevent -r--r--r-- 1 root root 4096 Apr 5 00:02 version molloyd@beaglebone:/sys/module/hello$ cat version 0.1 molloyd@beaglebone:/sys/module/hello$ cat taint OMODULE_VERSION("0.1")MODULE_LICENSE("GPL")自定义参数可以如下所示:您可以看到显示变量的状态,以及超级用户权限,而不需要读取该值。后者是由于在定义模块参数中使用的参数。可以将此值配置为写访问,但是您的模块代码将需要检测这种状态更改并相应地执行。最后,您可以删除模块并观察输出:
molloyd@beaglebone:/sys/module/hello$ cd parameters/ molloyd@beaglebone:/sys/module/hello/parameters$ ls -l total 0 -r--r--r-- 1 root root 4096 Apr 5 00:03 name molloyd@beaglebone:/sys/module/hello/parameters$ cat name DereknameS_IRUGOmolloyd@beaglebone:/sys/module/hello/parameters$ sudo rmmod hello.ko如预期的那样,这将导致内核日志中的输出消息:
root@beaglebone:/var/log# tail -f kern.log … Apr 5 00:02:20 beaglebone kernel: [23281.070193] EBB: Hello Derek from the BBB LKM! Apr 5 00:08:18 beaglebone kernel: [23639.160009] EBB: Goodbye Derek from the BBB LKM!阅读全文
0 0
- Writing a Linux Kernel Module — Part 1: Introduction
- Writing a Linux Kernel Module — Part 2: A Character Device
- Linux Debugging 1 - Kernel Introduction
- A simple kernel module for linux
- The kernel module programming primer(3)-A brief introduction for module utilities
- A beginner introduction to TensorFlow (Part-1)
- Building a Linux kernel module without the exact kernel headers
- 《Linux Kernel Development》chapter 1 Introduction to Linux Kernel
- Writing Loadable Kernel Modules using netfilter hooks (in-depth HOWTO) – Part 1
- Writing Loadable Kernel Modules using netfilter hooks (in-depth HOWTO) – Part 1
- Writing Loadable Kernel Modules using netfilter hooks (in-depth HOWTO) – Part 1
- Exploit writing tutorial part 9 : Introduction to Win32 shellcoding
- Extension Writing Part I: Introduction to PHP and Zend
- How to read/write files within a Linux kernel module?
- Linux kernel design patterns - part 1
- The Linux Kernel Module Programming Guide(1)
- Linux kernel & module program
- Build linux kernel Module
- java 异常
- Python获取当前脚本绝对路径
- java基础第二篇
- 信号量编程
- ubuntu16.04安装caffe遇到一些问题
- Writing a Linux Kernel Module — Part 1: Introduction
- linux命令学习笔记之三
- SpringMVC(三)—文件的上传和下载
- RabbitMQ基础概念详细介绍
- JAVA发布版本号与内部版本号列表
- LVS DR TUN 数据包走向
- Linux进程间通信——使用共享内存
- 数据结构中的树(红黑树,平衡二叉树,B树,B+树,B*树)
- 单调栈及单调队列基础与运用


