Junit
来源:互联网 发布:开淘宝店怎么发货 编辑:程序博客网 时间:2024/05/18 01:19
测试用例的一生——运行流程图

首先,介绍下JUnit的测试用例运行会经过哪些过程,这里说起来有些抽象会让人比较迷惑,在看了后面章节的内容之后就比较清晰了:
- Client(JUnitCore、Eclipse):这里是TestCase开始的地方,如果是Main函数来启动测试用例的话一般会调用JUnitCore的方法,如果是在Eclipse中使用JUnit插件则实际上调用的是org.eclipse.jdt.internal.junit4.runner.JUnit4TestClassReference这个类。
- Request(org.junit.runner.Request):Client会根据测试类或方法而创建一个Request实体,Request包含了要被执行的测试类、测试方法等信息。
- RunnerBuilder:在创建后Client调用Request.getRunner()方法获取用于执行测试的Runner,该过程是由RunnerBuilder这个工厂类完成的。
- RunNotifier:在执行Runner.run方法时Client还会传递一个RunNotifier对象,是事件的监听器的管理员。Runner在开始执行、成功、失败和执行结束时会调用RunNotifier中相应的方法从而发送事件给注册了的监听器,JUnit运行的最终结果就是这些监听器收集展现的。
- Runner:从名字可以猜出这里应该是测试用例运行的地方了,在Client调用了Runner.run()方法之后,Runner会先构造Statement对象将所有要执行的逻辑委托给它,接着执行Statement.evaluate()方法。在这期间Runner会触发RunNotifier(如测试开始、测试结束等等)。
- Statement:测试用例的运行时描述,关注于测试用例如何运行和调用测试代码。比如在执行测试用例前是否有@Before注释的方法需要调用等信息都会被Runner构造为Statement。
JUnit的类设计和模式应用

首先先介绍下JUnit中的模型类(Model),在JUnit模型类可以划分为三个范围:
- 描述模型:是对要执行的测试用例的描述(比如要执行哪个类的哪个方法,是否有指定Runner,使用了哪些注解等),这一层类似于流程文件之于流程引擎——不是用来执行的,而是描述要有哪些环节、细节。个人认为这一模型包括测试类本身(即你自己编写的测试用例)和Request。其中测试类本身等同于描述文件,Request则记录了是要运行的Suit、测试类或者是某个具体的方法、过滤器、排序的Comparator等信息(JUnit是支持对测试方法排序和过滤的)。
- 运行时模型:是JUnit中可执行的模型,包括FrameworkMember(org.junit.runners.model.FrameworkMember)及其子类、TestClass(org.junit.runners.model.TestClass)、Statement。FrameworkMember的子类包括FrameworkMethod和FrameworkField分别描述了测试类的方法和变量信息,比如是否为静态、作用域、包含哪些注解等JUnit运行时需要用到的信息;TestClass的作用有些类似FrameworkMember,是针对测试的Class的描述。Statement在上面已经介绍过是对测试执行流程和细节的描述。
- 结果模型:JUnit中用于描述用例的类,包括Description(org.junit.runner.Description)、Result(org.junit.runner.Result)、Failure(org.junit.runner.notification.Failure)。Description是对测试用例的描述(测试名称、所在Class的名字、是否是suit等等)只为RunNotifier提供服务。Result是运行结果的描述,用例执行完成后RunNotifier的 fireTestRunFinished(final Result result)方法会被触发,传入的Result实例描述了运行耗时、忽略的用例次数、是否成功等信息。Failure则是用例失败后Runner传递给RunNotifier的对象用于描述错误信息,特别包含了错误的StackTrace。
言归正传,下面讨论设计模式和JUnit的源码:
工厂方法模式、职责链:用例启动,Client在创建Request后会调用RunnerBuilder(工厂方法的抽象类)来创建Runner,默认的实现是AllDefaultPosibilitiesBuilder,根据不同的测试类定义(@RunWith的信息)返回Runner。AllDefaultPosibilitiesBuilder使用职责链模式来创建Runner,部分代码如下。代码A是AllDefaultPosibilitiesBuilder的主要构造逻辑构造了一个【IgnoreBuilder->AnnotatedBuilder->SuitMethodBuilder->JUnit3Builder->JUnit4Builder】的职责链,构造Runner的过程中有且只有一个handler会响应请求。代码B是Junit4Builder类实现会返回一个BlockJUnit4ClassRunner对象,这个是JUnit4的默认Runner。
publicRunner runnerForClass(Class<?> testClass) throwsThrowable { List<RunnerBuilder> builders = Arrays.asList( ignoredBuilder(), annotatedBuilder(), suiteMethodBuilder(), junit3Builder(), junit4Builder()); for(RunnerBuilder each : builders) { Runner runner = each.safeRunnerForClass(testClass); if(runner != null) { returnrunner; } } returnnull; }publicclassJUnit4Builder extendsRunnerBuilder { @Override publicRunner runnerForClass(Class<?> testClass) throwsThrowable { returnnewBlockJUnit4ClassRunner(testClass); }}代码B JUnit4Builder实现
组合模式:将具备树形结构的数据抽象出公共的接口,在遍历的过程中应用同样的处理方式。这个模式在Runner中的应用不是很明显,扣进来略有牵强。Runner是分层次的,父层包括@BeforeClass、@AfterClass、@ClassRule注解修饰的方法或变量,它们在测试执行前或执行后执行一次。儿子层是@Before、@After、@Rule修饰的方法或变量它们在每个测试方法执行前后执行。当编写的用例使用Suit来运行时则是三层结构,上面的父子结构中间插入了一层childrenRunners,也就是一个Suilt中每个测试类都会生成一个Runner,调用顺序变成了Runner.run()>childRunner.run()<即遍历childrenRunners>->testMethod()。ParentRunner中将变化的部分封装为runChild()方法交给子类实现,达到了遍历过程使用同样处理方式的目的——ParentRunner.this.runChild(each,notifier)。
publicvoidrun(finalRunNotifier notifier) { EachTestNotifier testNotifier = newEachTestNotifier(notifier, getDescription()); try{ Statement statement = classBlock(notifier); statement.evaluate(); }catch(AssumptionViolatedException e) { testNotifier.fireTestIgnored(); }catch(StoppedByUserException e) { throwe; }catch(Throwable e) { testNotifier.addFailure(e); }}privatevoidrunChildren(finalRunNotifier notifier) { for(finalT each : getFilteredChildren()) { fScheduler.schedule(newRunnable() { publicvoidrun() { ParentRunner.this.runChild(each, notifier); } }); } fScheduler.finished();}代码C ParentRunner的组合模式应用
模板方法模式:模板方法的目的是抽取公共部分封装变化,在父类中会包含公共流程的代码,将变化的部分封装为抽象方法由子类实现(就像模板一样框架式定好的,你去填写你需要的内容就行了)。JUnit的默认Runner——BlockJUnit4ClassRunner继承自ParentRunner,ParentRunner类定义了Statement的构造和执行流程,而如何执行儿子层的runChild方法时交给子类实现的,在BlockJUnit4ClassRunner中就是去构造和运行TestMethod,而另一个子类Suit中则是执行子层次的runner.run。
观察者模式:Runner在执行TestCase过程中的各个阶段都会通知RunNotifier,其中RunNotifier负责listener的管理者角色,支持添加和删除监听者,提供了监听JUnit运行的方法:如用例开始、完成、失败、成功、忽略等。代码D截取自RunNotifier。SafeNotifier是RunNotifier的内部类,抽取了公共逻辑——遍历注册的listener,调用notifyListener方法。fireTestRunStarted()方法是RunNotifier众多fireXXX()方法的一个,它在方法里构造SafeNotifier的匿名类实现notifyListener()方法。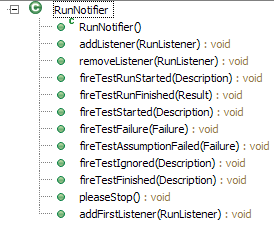
privateabstractclass SafeNotifier { privatefinalList<RunListener> fCurrentListeners; SafeNotifier() { this(fListeners); } SafeNotifier(List<RunListener> currentListeners) { fCurrentListeners = currentListeners; } voidrun() { synchronized(fListeners) { List<RunListener> safeListeners = newArrayList<RunListener>(); List<Failure> failures = newArrayList<Failure>(); for(Iterator<RunListener> all = fCurrentListeners.iterator(); all .hasNext(); ) { try{ RunListener listener = all.next(); notifyListener(listener); safeListeners.add(listener); }catch(Exception e) { failures.add(newFailure(Description.TEST_MECHANISM, e)); } } fireTestFailures(safeListeners, failures); } } abstractprotectedvoid notifyListener(RunListener each) throwsException; }publicvoidfireTestRunStarted(finalDescription description) { newSafeNotifier() { @Override protectedvoidnotifyListener(RunListener each) throwsException { each.testRunStarted(description); } ; }.run(); } 装饰模式:保持对象原有的接口不改变而透明的增加对象的行为,看起来像是在原有对象外面包装了一层(或多层)行为——虽然对象还是原来的类型但是行为逐渐丰富起来。 之前一直在强调Statement描述了测试类的执行细节,到底是如何描述的呢?代码E展示了Statement的构筑过程,首先是调用childrenInvoker方法构建了Statement的基本行为——执行所有的子测试runChildren(notifier)(非Suit情况下就是TestMethod了,如果是Suit的话则是childrenRunners)。
接着是装饰模式的应用,代码F是withBeforeClasses()的实现——很简单,检查是否使用了@BeforeClasses注解修饰如果存在构造RunBefores对象——RunBefore继承自Statement。代码H中的evaluate()方法可以发现新生成的Statement在执行runChildren(fNext.evaluate())之前遍历所有使用@BeforeClasses注解修饰的方法并执行。产生的效果即使用@BeforeClasses修饰的方法会在所有用例运行前执行且只执行一次。后面的withAfterClasses、withClassRules方法原理一样都使用了装饰模式,不再赘述。
protectedStatement classBlock(finalRunNotifier notifier) { Statement statement = childrenInvoker(notifier); statement = withBeforeClasses(statement); statement = withAfterClasses(statement); statement = withClassRules(statement); returnstatement;}protectedStatement childrenInvoker(finalRunNotifier notifier) { returnnewStatement() { @Override publicvoidevaluate() { runChildren(notifier); } };}protectedStatement withBeforeClasses(Statement statement) { List<FrameworkMethod> befores = fTestClass .getAnnotatedMethods(BeforeClass.class); returnbefores.isEmpty() ? statement : newRunBefores(statement, befores, null);}publicclassRunBefores extendsStatement { privatefinalStatement fNext; privatefinalObject fTarget; privatefinalList<FrameworkMethod> fBefores; publicRunBefores(Statement next, List<FrameworkMethod> befores, Object target) { fNext = next; fBefores = befores; fTarget = target; } @Override publicvoidevaluate() throwsThrowable { for(FrameworkMethod before : fBefores) { before.invokeExplosively(fTarget); } fNext.evaluate(); }} 策略模式:针对相同的行为在不同场景下算法不同的情况,抽象出接口类,在子类中实现不同的算法并提供算法执行必须Context信息。JUnit中提供了Timeout、ExpectedException、ExternalResource等一系列的TestRule用于丰富测试用例的行为,这些TestRule的都是通过修饰Statement实现的。
修饰Statement的代码在withRules()方法中实现,使用了策略模式。代码I描述了JUnit是如何处理@Rule标签的,withRules方法获取到测试类中所有的@Rule修饰的变量,分别调用withMethodRules和withTestRules方法,前者是为了兼容JUnit3版本的Rule这里忽略,后者withTestRules的逻辑很简单首先查看是否使用了@Rule,如存在就交给RunRules类处理。代码J是RunRules的实现,在构造函数中处理了修饰Statement的逻辑(applyAll方法)——抽象接口是TestRule,根据不同的场景(即使用@Rule修饰的不同的TestRule的实现)选择不同的策略(TestRule的具体实现),而Context信息就是入参(result:Statement, description:Description)。
privateStatement withRules(FrameworkMethod method, Object target, Statement statement) { List<TestRule> testRules = getTestRules(target); Statement result = statement; result = withMethodRules(method, testRules, target, result); result = withTestRules(method, testRules, result); returnresult; }privateStatement withTestRules(FrameworkMethod method, List<TestRule> testRules, Statement statement) { returntestRules.isEmpty() ? statement : newRunRules(statement, testRules, describeChild(method)); }publicclassRunRules extendsStatement { privatefinalStatement statement; publicRunRules(Statement base, Iterable<TestRule> rules, Description description) { statement = applyAll(base, rules, description); } @Override publicvoidevaluate() throwsThrowable { statement.evaluate(); } privatestaticStatement applyAll(Statement result, Iterable<TestRule> rules, Description description) { for(TestRule each : rules) { result = each.apply(result, description); } returnresult; }}publicclassTimeout implementsTestRule { privatefinalint fMillis; /** * @param millis the millisecond timeout */ publicTimeout(intmillis) { fMillis = millis; } publicStatement apply(Statement base, Description description) { returnnewFailOnTimeout(base, fMillis); }}外观模式:封装统一的对外接口,隐藏内部各个小模块之间的调用细节,使得用户既可以简单的使用facade来达到目的,必要时又可以自行操作内部对象。这里的举例可能不是非常明显。图四是TestClass的公共方法,代码L给出了TestClass(org.junit.runners.model.TestClass)的一小部分代码,TestClass主要作用是封装对Class的操作提供了JUnit运行时需要用到的功能并隐藏其中操作的细节。在TestClass内部将功能委托给了三个对象Class(java.lang.Class)、FrameworkMethod、FrameworkField来实现,本身充当了外观(facade)对外提供了getName、getOnlyConstructor、getAnnotations等等接口,在必要的时又可以通过这个外观获取到Class、FrameworkMethod等对象。

publicclassTestClass { privatefinalClass<?> fClass; privateMap<Class<?>, List<FrameworkMethod>> fMethodsForAnnotations = newHashMap<Class<?>, List<FrameworkMethod>>(); privateMap<Class<?>, List<FrameworkField>> fFieldsForAnnotations = newHashMap<Class<?>, List<FrameworkField>>(); /** * Creates a {@code TestClass} wrapping {@code klass}. Each time this * constructor executes, the class is scanned for annotations, which can be * an expensive process (we hope in future JDK's it will not be.) Therefore, * try to share instances of {@code TestClass} where possible. */ publicTestClass(Class<?> klass) { fClass = klass; if(klass != null&& klass.getConstructors().length > 1) { thrownewIllegalArgumentException( "Test class can only have one constructor"); } for(Class<?> eachClass : getSuperClasses(fClass)) { for(Method eachMethod : MethodSorter.getDeclaredMethods(eachClass)) { addToAnnotationLists(newFrameworkMethod(eachMethod), fMethodsForAnnotations); } for(Field eachField : eachClass.getDeclaredFields()) { addToAnnotationLists(newFrameworkField(eachField), fFieldsForAnnotations); } } } ……}- JUNIT
- junit
- Junit
- JUnit
- JUnit
- JUnit
- JUNIT
- junit
- Junit
- JUnit
- Junit
- JUnit
- Junit
- Junit
- JUnit
- junit
- junit
- JUnit
- C#预处理指令
- animate.css – 齐全的CSS3动画库
- c中调用Lua函数
- CCNA简略复习
- java基础:集合类型set,list,map
- Junit
- Dubbo介绍
- android中Componentname的使用方法——打开其他应用的activity
- 关于私有属性不能被继承中,Java官方解释
- 根据经纬度计算两点间距离(别问我公式细节,我也没明白,照搬就行)
- 单调栈--poj2559 Largest rectangle in a Histogram
- codeforces—— 230B —— T-primes
- iOS获取音频设备信息
- 页面的一次往返处理