AppcompatActivity拦截View创建方法
来源:互联网 发布:网络神剧2014 编辑:程序博客网 时间:2024/05/21 09:47
FragementActivity&AppcompatActivity拦截View创建方法
在拦截之前,我们要先清楚 系统是怎么创建各个View的,如果看过LayoutInflate的源码的话,可能这部分就比较容易理解
本文源码版本: API 25
1 LayoutInflater创建一个View的过程
LayoutInflater inflater = LayoutInflater.from(context).inflate(LayoutResId,ViewRoot);大家一定用过上面这行代码,这行代码在ListView或者RecycleView中尤为常见,那么系统是如何将这个layout文件变成View的呢?还记得setContentView(LayoutResId)么,Activity在加载这个View的时候是不是一样呢?
- LayoutInflater.inflate
public View inflate(@LayoutRes int resource, @Nullable ViewGroup root) { return inflate(resource, root, root != null);} public View inflate(@LayoutRes int resource, @Nullable ViewGroup root, boolean attachToRoot) { //获取Resources对象 final Resources res = getContext().getResources(); //拿到 一个layout文件的 解析器 final XmlResourceParser parser = res.getLayout(resource); try { return inflate(parser, root, attachToRoot); } finally { parser.close(); } } //我删除了一部分代码,其实这里主要就是 对xml文件的解析public View inflate(XmlPullParser parser, @Nullable ViewGroup root, boolean attachToRoot) { synchronized (mConstructorArgs) { //这部分代码很值得借鉴, final Context inflaterContext = mContext; //获取root节点的属性,这里就不进去看了,咱们关注的重点不在这里 final AttributeSet attrs = Xml.asAttributeSet(parser); Context lastContext = (Context) mConstructorArgs[0]; // new View(Context context,AttributeSet attr) //这个参数就是 context mConstructorArgs[0] = inflaterContext; View result = root; try { final String name = parser.getName(); if (TAG_MERGE.equals(name)) { //这里是 marge标签的处理哟,marge标签不需要创建 if (root == null || !attachToRoot) { throw new InflateException("<merge /> can be used only with a valid " + "ViewGroup root and attachToRoot=true"); } //递归处理直接点的View,其实最后真正创建View还是走的createViewFromTag方法 rInflate(parser, root, inflaterContext, attrs, false); } else { //这里是rootView的处理,第一个节点的处理 final View temp = createViewFromTag(root, name, inflaterContext, attrs); ViewGroup.LayoutParams params = null; if (root != null) { //为rootView创建LayoutParams params = root.generateLayoutParams(attrs); if (!attachToRoot) { // Set the layout params for temp if we are not // attaching. (If we are, we use addView, below) temp.setLayoutParams(params); } } // 创建子节点的View rInflateChildren(parser, temp, attrs, true); .... } } catch (XmlPullParserException e) { } catch (Exception e) { } finally { mConstructorArgs[0] = lastContext; mConstructorArgs[1] = null; } return result; } }以上是处理 layout.xml文件的方式,下面来看 真正创建View的方法
private View createViewFromTag(View parent, String name, Context context, AttributeSet attrs) { return createViewFromTag(parent, name, context, attrs, false); }//同样省略一些代码View createViewFromTag(View parent, String name, Context context, AttributeSet attrs, boolean ignoreThemeAttr) { if (name.equals("view")) { name = attrs.getAttributeValue(null, "class"); } // 应用主题...省略 try { View view; //factory 咱们关心的重点 if (mFactory2 != null) { view = mFactory2.onCreateView(parent, name, context, attrs); } else if (mFactory != null) { view = mFactory.onCreateView(name, context, attrs); } else { view = null; } if (view == null && mPrivateFactory != null) { view = mPrivateFactory.onCreateView(parent, name, context, attrs); } if (view == null) { final Object lastContext = mConstructorArgs[0]; mConstructorArgs[0] = context; try { if (-1 == name.indexOf('.')) { //是系统的View,前面没有包名 view = onCreateView(parent, name, attrs); } else { view = createView(name, null, attrs); } } finally { mConstructorArgs[0] = lastContext; } } return view; } catch (InflateException e) { } catch (ClassNotFoundException e) { } catch (Exception e) { } }从上面可以看出,只有当factory不为空的时候,并且创建View没有成功的时候,才会走下面的createView和onCreateView,那么factory是什么,其实看起来更像是一个过滤器,为什么有factory和factory2呢,因为版本兼容.
这里的分析到这里为止,我简单说下createView和onCreateView 里面的逻辑
onCreateView 创建系统自带的View
createView 创建自定义的View
2 AppcompatActivity
要想拦截 AppcompatActivity 创建View的过程,可以用下面的方法来做,其实就是给LayoutInflate重新设置factory
ublic class MainActivity extends AppCompatActivity { @Override protected void onCreate(Bundle savedInstanceState) { super.onCreate(savedInstanceState); LayoutInflater inflater = LayoutInflater.from(this); LayoutInflaterCompat.setFactory(inflater, new LayoutInflaterFactory() { @Override public View onCreateView(View parent, String name, Context context, AttributeSet attrs) { return null; } }); setContentView(R.layout.activity_main); }这个时候,我们就要明白AppCompatActivity 有没有用factory,我们只是添加自己的逻辑,进行拦截修改,而不是完全重写,所以这里我们要先完成AppCompatActivity 所做的事情,然后拿到View之后再做处理,当然也可以在之前做处理
我们来看AppCompatActivity是怎么创建View的
- AppCompatActivity
private AppCompatDelegate mDelegate; @Override protected void onCreate(@Nullable Bundle savedInstanceState) { final AppCompatDelegate delegate = getDelegate(); //在这里初始化了factory delegate.installViewFactory(); .... }AppCompatDelegate是一个抽象方法,installViewFactory也是一个抽象方法
public abstract class AppCompatDelegate public abstract void installViewFactory();ctrl+shift+h,我们来看这个方法在哪里实现了
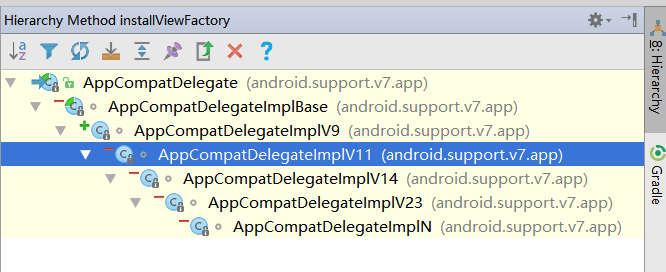
上面的图很有意思,可以看到google为了兼容做的处理
- AppCompatDelegateImplV9 实现 了这个方法
@Override public void installViewFactory() { LayoutInflater layoutInflater = LayoutInflater.from(mContext); if (layoutInflater.getFactory() == null) { //factory是本身 LayoutInflaterCompat.setFactory(layoutInflater, this); } else { //已经设置了factory,并且不是本类的实现,那么不做任何处理 } }那么我们去看重写的createView方法
/** * From {@link android.support.v4.view.LayoutInflaterFactory} */ @Override public final View onCreateView(View parent, String name, Context context, AttributeSet attrs) { // First let the Activity's Factory try and inflate the view //首先使用activity的factory去加载view final View view = callActivityOnCreateView(parent, name, context, attrs); if (view != null) { return view; } // 如果activity的factory没有创建这个View return createView(parent, name, context, attrs); } @Override public View createView(View parent, final String name, @NonNull Context context, @NonNull AttributeSet attrs) { if (mAppCompatViewInflater == null) { mAppCompatViewInflater = new AppCompatViewInflater(); } .... return mAppCompatViewInflater.createView(parent, name, context, attrs, inheritContext, ); }上面还不是创建的方法,
- mAppCompatViewInflater.java
public final View createView(View parent, final String name, @NonNull Context context, View view = null; switch (name) { case "TextView": view = new AppCompatTextView(context, attrs); break; case "ImageView": view = new AppCompatImageView(context, attrs); break; case "Button": view = new AppCompatButton(context, attrs); break; case "EditText": view = new AppCompatEditText(context, attrs); break; case "Spinner": view = new AppCompatSpinner(context, attrs); break; case "ImageButton": view = new AppCompatImageButton(context, attrs); break; case "CheckBox": view = new AppCompatCheckBox(context, attrs); break; case "RadioButton": view = new AppCompatRadioButton(context, attrs); break; case "CheckedTextView": view = new AppCompatCheckedTextView(context, attrs); break; case "AutoCompleteTextView": view = new AppCompatAutoCompleteTextView(context, attrs); break; case "MultiAutoCompleteTextView": view = new AppCompatMultiAutoCompleteTextView(context, attrs); break; case "RatingBar": view = new AppCompatRatingBar(context, attrs); break; case "SeekBar": view = new AppCompatSeekBar(context, attrs); break; } if (view == null && originalContext != context) { // If the original context does not equal our themed context, then we need to manually // inflate it using the name so that android:theme takes effect. view = createViewFromTag(context, name, attrs); } if (view != null) { // If we have created a view, check it's android:onClick checkOnClickListener(view, attrs); } return view; }从上面就可以看到 我们其实创建的一些View被系统替换成了AppcompatView,好吧,为了兼容
上面都是一些系统提供的View,然后又转入了 createViewFromTag的方法,之后的事情就是咱们再第一个模块说的事情了
那么我们如何拦截呢,其实很简单,通过反射,调用delegate的createView方法
LayoutInflaterCompat.setFactory(inflater, new LayoutInflaterFactory() { @Override public View onCreateView(View parent, String name, Context context, AttributeSet attrs) { //之前做什么事情 View view=null; AppCompatDelegate delegate = getDelegate(); try { Method createViewFd = delegate.getClass().getMethod("createView", View.class, String.class, Context.class, AttributeSet.class); createViewFd.setAccessible(true); view = (View) createViewFd.invoke(delegate, new Object[]{parent, name, context, attrs}); } catch (NoSuchMethodException e) { e.printStackTrace(); } catch (InvocationTargetException e) { e.printStackTrace(); } catch (IllegalAccessException e) { e.printStackTrace(); } if(view==null){ } //之后做什么事情 return view; } });我看张弘洋的视屏说,上面的过程只是针对特定的View,虽然我没有找到相关的代码判断在那里,这里还是做一下处理,其实就是复制两个方法,然后我们单开一个类
public class MyLayoutInflaterFactory implements LayoutInflaterFactory { AppCompatDelegate delegate; private static final Map<String, Constructor<? extends View>> sConstructorMap = new ArrayMap<>(); private final Object[] mConstructorArgs = new Object[2]; private static final Class<?>[] sConstructorSignature = new Class[]{ Context.class, AttributeSet.class}; private static final String[] sClassPrefixList = { "android.widget.", "android.view.", "android.webkit." }; public MyLayoutInflaterFactory(AppCompatDelegate delegate) { this.delegate = delegate; } @Override public View onCreateView(View parent, String name, Context context, AttributeSet attrs) { //之前做什么事情 View view = null; try { Method createViewFd = delegate.getClass().getMethod("createView", View.class, String.class, Context.class, AttributeSet.class); createViewFd.setAccessible(true); view = (View) createViewFd.invoke(delegate, new Object[]{parent, name, context, attrs}); } catch (NoSuchMethodException e) { e.printStackTrace(); } catch (InvocationTargetException e) { e.printStackTrace(); } catch (IllegalAccessException e) { e.printStackTrace(); } //我看张弘洋的视屏说,上面的过程只是针对特定的View,虽然我没有找到相关的代码判断在那里,这里还是做一下处理 if (view == null) { createViewFromTag(context, name, attrs); } //之后做什么事情 return view; } private View createViewFromTag(Context context, String name, AttributeSet attrs) { if (name.equals("view")) { name = attrs.getAttributeValue(null, "class"); } try { mConstructorArgs[0] = context; mConstructorArgs[1] = attrs; if (-1 == name.indexOf('.')) { for (int i = 0; i < sClassPrefixList.length; i++) { final View view = createView(context, name, sClassPrefixList[i]); if (view != null) { return view; } } return null; } else { return createView(context, name, null); } } catch (Exception e) { // We do not want to catch these, lets return null and let the actual LayoutInflater // try return null; } finally { // Don't retain references on context. mConstructorArgs[0] = null; mConstructorArgs[1] = null; } } private View createView(Context context, String name, String prefix) throws ClassNotFoundException, InflateException { Constructor<? extends View> constructor = sConstructorMap.get(name); try { if (constructor == null) { // Class not found in the cache, see if it's real, and try to add it Class<? extends View> clazz = context.getClassLoader().loadClass( prefix != null ? (prefix + name) : name).asSubclass(View.class); constructor = clazz.getConstructor(sConstructorSignature); sConstructorMap.put(name, constructor); } constructor.setAccessible(true); return constructor.newInstance(mConstructorArgs); } catch (Exception e) { // We do not want to catch these, lets return null and let the actual LayoutInflater // try return null; } }在mainAct中设置上就好
@Override protected void onCreate(Bundle savedInstanceState) { super.onCreate(savedInstanceState); LayoutInflater inflater = LayoutInflater.from(this); LayoutInflaterCompat.setFactory(inflater,new MyLayoutInflaterFactory(getDelegate())); setContentView(R.layout.activity_main); }- AppcompatActivity拦截View创建方法
- AppCompatActivity的View树
- View事件拦截的两种方法
- AppCompatActivity
- AppCompatActivity
- AppCompatActivity
- AppCompatActivity
- V7包实现拦截View创建的原理
- Android 全屏方法(继承AppCompatActivity;继承Activity)
- View滑动冲突处理方法(外部拦截法、内部拦截法)
- iOS中不同view的创建方法
- Android Studio 创建窗口默认继承Activity而非AppCompatActivity
- android studio AppCompatActivity中onCreate的两种方法
- 处理AppCompatActivity中openOptionsMenu方法无效的问题
- AppCompatActivity和Activity的setContentView方法的区别
- 继承AppCompatActivity 移除ActionBar的两种方法
- View的事件拦截机制
- View的事件分发拦截
- 现代处理器与代码性能优化
- 在CodeWarrior中指定堆栈大小及堆栈指针
- 知乎上看到的一些鸡汤语录
- TP 多环境配置
- thinkphp前端套数据,遇到的坑--数组
- AppcompatActivity拦截View创建方法
- io流最详解
- 从多层感知器到卷积网络(一)
- java并发包中Lock的实现原理
- MySQL四种事务隔离级别详解
- Trailing Zeroes (III)
- 12171
- 详解CALayer 和 UIView的区别和联系
- 字典树