注解库之ButterKnife
来源:互联网 发布:淘宝信鸽赛中二手 编辑:程序博客网 时间:2024/05/19 02:04
butterknife解决的问题
项目地址: https://github.com/JakeWharton/butterknife
github原文是这样介绍的
Field and method binding for Android views which uses annotation processing to generate boilerplate code for you.
翻译过来就是:
用注解处理器为程序在编译期生成一些样板代码,用于把一些属性字段和回调方法绑定到 Android 的 View,即专门为Android View设计的绑定注解,专业解决各种findViewById。
如何使用
在主工程中:
dependencies { compile 'com.jakewharton:butterknife:8.5.1' annotationProcessor 'com.jakewharton:butterknife-compiler:8.5.1' }在Library中
buildscript { repositories { mavenCentral() } dependencies { classpath 'com.jakewharton:butterknife-gradle-plugin:8.7.0' } }然后在moudle中
apply plugin: 'com.android.library' apply plugin: 'com.jakewharton.butterknife'常规使用
Actvity中
对一个成员变量使用@BindView注解,并传入一个View ID, ButterKnife 就能够帮你找到对应的View,并自动的进行转换(将View转换为特定的子类):
资源绑定
绑定资源到类成员上可以使用@BindBool、@BindColor、@BindDimen、@BindDrawable、@BindInt、@BindString。使用时对应的注解需要传入对应的id资源,例如@BindString你需要传入R.string.id_string的字符串的资源id。
Butter Knife提供了bind的几个重载,只要传入跟布局,便可以在任何对象中使用注解绑定
Fragment中
public class FancyFragment extends Fragment { @BindView(R.id.button1) Button button1; @BindView(R.id.button2) Button button2; @Override public View onCreateView(LayoutInflater inflater, ViewGroup container, Bundle savedInstanceState) { View view = inflater.inflate(R.layout.fancy_fragment, container, false); ButterKnife.bind(this, view); // TODO Use fields... return view; } } }Adapter中
public class MyAdapter extends BaseAdapter { @Override public View getView(int position, View view, ViewGroup parent) { ViewHolder holder; if (view != null) { holder = (ViewHolder) view.getTag(); } else { view = inflater.inflate(R.layout.whatever, parent, false); holder = new ViewHolder(view); view.setTag(holder); } holder.name.setText("John Doe"); // etc... return view; } static class ViewHolder { @BindView(R.id.title) TextView name; @BindView(R.id.job_title) TextView jobTitle; public ViewHolder(View view) { ButterKnife.bind(this, view); } } }监听器绑定
监听器能够自动的绑定到特定的执行方法上:
@OnClick(R.id.submit) public void submit(View view) { // TODO submit data to server... }进阶使用
重置绑定
Fragment的生命周期与Activity不同。在Fragment中,如果你在onCreateView中使用绑定,那么你需要在onDestroyView中设置所有view为null。为此,ButterKnife返回一个Unbinder实例以便于你进行这项处理。在合适的生命周期回调中调用unbind函数就可完成重置。
public class FancyFragment extends Fragment { @BindView(R.id.button1) Button button1; @BindView(R.id.button2) Button button2; private Unbinder unbinder; @Override public View onCreateView(LayoutInflater inflater, ViewGroup container, Bundle savedInstanceState) { View view = inflater.inflate(R.layout.fancy_fragment, container, false); unbinder = ButterKnife.bind(this, view); // TODO Use fields... return view; } @Override public void onDestroyView() { super.onDestroyView(); unbinder.unbind(); } }可选绑定
在默认情况下, @bind和监听器的绑定都是必须的,如果目标view没有找到的话,Butter Knife将会抛出个异常。
如果你并不想使用这样的默认行为而是想创建一个可选的绑定,那么你只需要在变量上使用@Nullable注解或在函数上使用@Option注解。
注意:任何名为@Nullable的注解都可以使用在变量上。但还时强烈建议使用Android注解库中的@Nullable。使用这个库对你的代码有很多好处,关于该库的详情,可以点击此处
注意事项
注意:
- Activity ButterKnife.bind(this);必须在setContentView();之后,且父类bind绑定后,子类不需要再bind
- Fragment ButterKnife.bind(this, mRootView);
- 属性布局不能用private or static 修饰,否则会报错
- setContentView()不能通过注解实现。
- ButterKnife已经更新到版本8.0.1了,以前的版本中叫做@InjectView了,而现在改用叫@Bind,更加贴合语义。
- 在Fragment生命周期中,onDestoryView也需要Butterknife.unbind(this)
- 在Libbray中使用R2.id.xxx
原理分析
讲到butterknife的原理。这里不得不提一下一般这种注入框架都是运行时注解,即声明注解的生命周期为RUNTIME,然后在运行的时候通过反射完成注入,这种方式虽然简单,但是这种方式多多少少会有性能的损耗。那么有没有一种方法能解决这种性能的损耗呢? 没错,答案肯定是有的,那就是Butterknife用的APT(Annotation Processing Tool)编译时解析技术。千万不要说成反射了。
这里大致介绍下APT原理
声明注解的生命周期为CLASS,然后继承
AbstractProcessor类,在编译时编译器会扫描所有带有你要处理的注解的类,然后再调用AbstractProcessor#process 方法,对注解进行处理,在注解处理的时候使用javappoet动态生成固定的模板代码(findviewById、onClick)然后在运行时直接调用bind方法完成绑定就可以了。 详细的APT介绍参看http://blog.csdn.net/xsf50717/article/details/54318874
Java Annotation Processing
Annotation processing 是javac中用于编译时扫描和解析Java注解的工具
你可以定义注解,并且自定义解析器来处理他们,Annotation processing是在编译阶段执行的,它的原理就是读入Java源代码,解析注解,然后生成新的Java代码。新生成的Java代码最后被编译成Java字节码,注解解析器(Annotation Processor)不能改变读入的Java 类,比如不能加入或删除Java方法
下面是java编译代码的整个过程,可以帮助我们理解注解解析过程
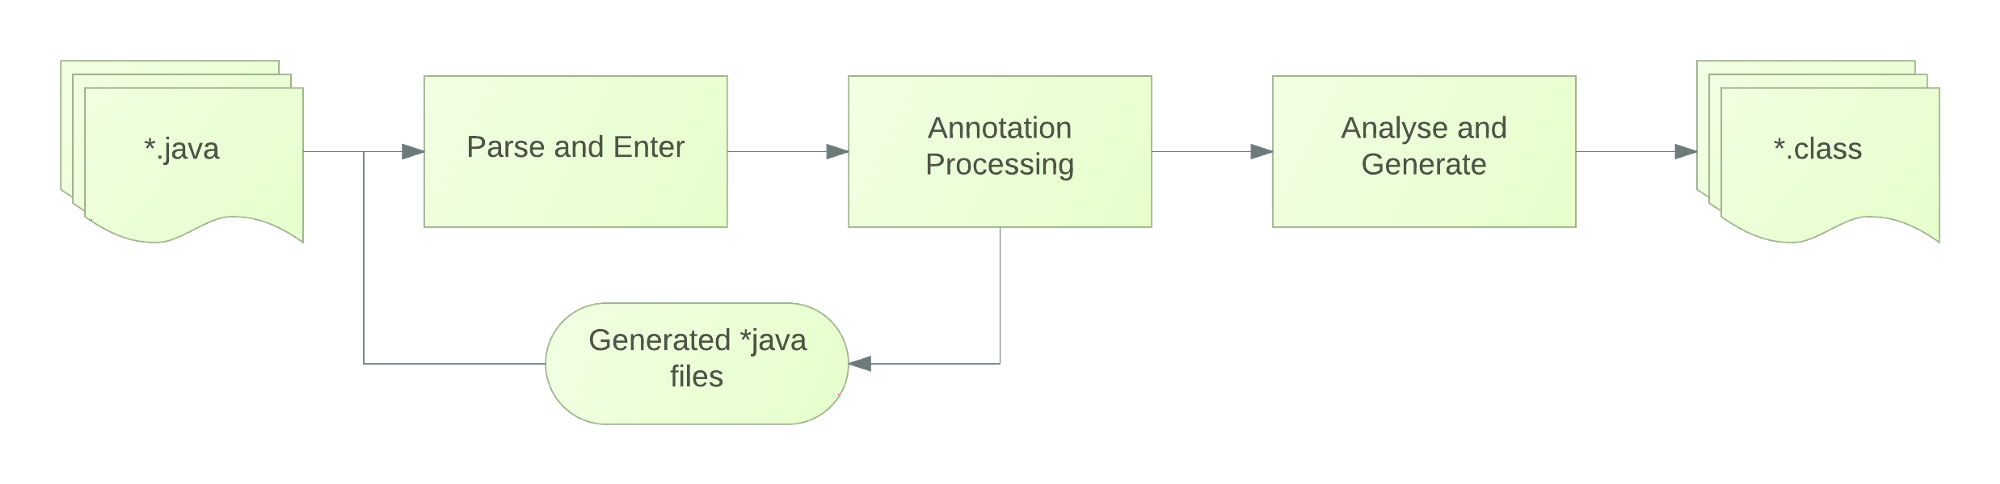
ButterKnife工作流程
当你编译你的Android工程时,ButterKnife工程中ButterKnifeProcessor类的process()方法会执行以下操作:
- 开始它会扫描Java代码中所有的ButterKnife注解@Bind、@OnClick、@OnItemClicked等
- 当它发现一个类中含有任何一个注解时,ButterKnifeProcessor会帮你生成一个Java类,名字类似$$ViewBinder,这个新生成的类实现了ViewBinder接口
- 这个ViewBinder类中包含了所有对应的代码,比如@Bind注解对应findViewById(), @OnClick对应了view.setOnClickListener()等等
- 最后当Activity启动ButterKnife.bind(this)执行时,ButterKnife会去加载对应的ViewBinder类调用它们的bind()方法
在butterknife源码 butterknife-compiler#ButterKnifeProcessorhttps://github.com/JakeWharton/butterknife/blob/e9cfe921bbb03d40f619d8c86ce49f9e1bc711c5/butterknife-compiler/src/main/java/butterknife/compiler/ButterKnifeProcessor.java
注解处理器
包含以下几个重要的方法
- init()
初始化 得到Element、Type、Filer等工具类
- getSupportedAnnotationTypes()
描述注解处理器需要处理的注解
- process()
扫面分析注解,结合javapoet生成代码
因此process时核心
@Override public boolean process(Set<? extends TypeElement> elements, RoundEnvironment env) { Map<TypeElement, BindingSet> bindingMap = findAndParseTargets(env); for (Map.Entry<TypeElement, BindingSet> entry : bindingMap.entrySet()) { TypeElement typeElement = entry.getKey(); BindingSet binding = entry.getValue(); JavaFile javaFile = binding.brewJava(sdk, debuggable); try { javaFile.writeTo(filer); } catch (IOException e) { error(typeElement, "Unable to write binding for type %s: %s", typeElement, e.getMessage()); } } return false; }主要做了两件事
- findAndParseTargets
获得TypeElement -> BindingSet的映射关系,TypeElement指的是类或接口,在本文所举的栗子中是MainActivity。BindingSet里包含了生成代码时的一些参数。 - 运用JavaPoet框架来生成代码
生成的代码类形式为xxxx_ViewBinding
findAndParseTargets
private Map<TypeElement, BindingSet> findAndParseTargets(RoundEnvironment env) { Map<TypeElement, BindingSet.Builder> builderMap = new LinkedHashMap<>(); Set<TypeElement> erasedTargetNames = new LinkedHashSet<>(); // 建立view与R的id的关系 scanForRClasses(env); // 省略部分代码 // 解析BindView注解 for (Element element : env.getElementsAnnotatedWith(BindView.class)) { // we don't SuperficialValidation.validateElement(element) // so that an unresolved View type can be generated by later processing rounds try { parseBindView(element, builderMap, erasedTargetNames); } catch (Exception e) { logParsingError(element, BindView.class, e); } } // 省略部分代码 // 将Map.Entry<TypeElement, BindingSet.Builder>转化为Map<TypeElement, BindingSet> Deque<Map.Entry<TypeElement, BindingSet.Builder>> entries = new ArrayDeque<>(builderMap.entrySet()); Map<TypeElement, BindingSet> bindingMap = new LinkedHashMap<>(); while (!entries.isEmpty()) { Map.Entry<TypeElement, BindingSet.Builder> entry = entries.removeFirst(); TypeElement type = entry.getKey(); BindingSet.Builder builder = entry.getValue(); TypeElement parentType = findParentType(type, erasedTargetNames); if (parentType == null) { bindingMap.put(type, builder.build()); } else { BindingSet parentBinding = bindingMap.get(parentType); if (parentBinding != null) { builder.setParent(parentBinding); bindingMap.put(type, builder.build()); } else { // Has a superclass binding but we haven't built it yet. Re-enqueue for later. entries.addLast(entry); } } } return bindingMap; }- scanForRClass
用来建立View与id的关系,首先根据element获取到包名,再利用RClassScanner寻找到R文件,在R文件里利用IdScanner寻找到内部类id,在id类里利用VarScanner寻找到tvTitle的id
- parseBindView
解析各种注解,这里以BindView为例。
private void parseBindView(Element element, Map<TypeElement, BindingSet.Builder> builderMap, Set<TypeElement> erasedTargetNames) { // 得到包含注解所属的TypeElement,例如MainActivity TypeElement enclosingElement = (TypeElement) element.getEnclosingElement(); // isInaccessibleViaGeneratedCode检验enclosingElement(MainActivity)是类、不是private,检验element不是private活着static // isBindingInWrongPackage检验enclosingElement的包名是不是系统相关的类 boolean hasError = isInaccessibleViaGeneratedCode(BindView.class, "fields", element) || isBindingInWrongPackage(BindView.class, element); TypeMirror elementType = element.asType(); if (elementType.getKind() == TypeKind.TYPEVAR) { TypeVariable typeVariable = (TypeVariable) elementType; elementType = typeVariable.getUpperBound(); } Name qualifiedName = enclosingElement.getQualifiedName(); Name simpleName = element.getSimpleName(); // 判断element是View的子类或者接口 if (!isSubtypeOfType(elementType, VIEW_TYPE) && !isInterface(elementType)) { if (elementType.getKind() == TypeKind.ERROR) { note(element, "@%s field with unresolved type (%s) " + "must elsewhere be generated as a View or interface. (%s.%s)", BindView.class.getSimpleName(), elementType, qualifiedName, simpleName); } else { error(element, "@%s fields must extend from View or be an interface. (%s.%s)", BindView.class.getSimpleName(), qualifiedName, simpleName); hasError = true; } } if (hasError) { return; } // Assemble information on the field. int id = element.getAnnotation(BindView.class).value(); BindingSet.Builder builder = builderMap.get(enclosingElement); QualifiedId qualifiedId = elementToQualifiedId(element, id); if (builder != null) { String existingBindingName = builder.findExistingBindingName(getId(qualifiedId)); // 检查是否绑定过此id if (existingBindingName != null) { error(element, "Attempt to use @%s for an already bound ID %d on '%s'. (%s.%s)", BindView.class.getSimpleName(), id, existingBindingName, enclosingElement.getQualifiedName(), element.getSimpleName()); return; } } else { builder = getOrCreateBindingBuilder(builderMap, enclosingElement); } String name = simpleName.toString(); TypeName type = TypeName.get(elementType); boolean required = isFieldRequired(element); builder.addField(getId(qualifiedId), new FieldViewBinding(name, type, required)); // Add the type-erased version to the valid binding targets set. erasedTargetNames.add(enclosingElement); }parseBindView先检测是否有错误,然后将name(变量名,例如tvTitle)、type(类名,例如TextView)、required(是否有@nullable注解)封装成FieldViewBinding放到builder里面。
最后使用JavaPoet框架生成代码,关于javaPoet的使用可以参考http://blog.csdn.net/XSF50717/article/details/54318891
参考链接
http://jakewharton.github.io/butterknife/
http://bxbxbai.github.io/2016/03/12/how-butterknife-works/
- http://blog.csdn.net/u012933743/article/details/64437988
- 注解库之ButterKnife
- Android 之ButterKnife注解使用
- Android注解使用之ButterKnife 8.0注解使用介绍
- Android注解使用之ButterKnife 8.0注解使用介绍
- Android注解使用之ButterKnife 8.0注解使用介绍
- Android注解库 Butterknife问题合集
- Android中的注解式框架之ButterKnife的使用
- Android之butterknife(懒人库)
- butterknife视图注解
- butterKnife注解开发框架
- ButterKnife注解框架使用
- Android butterknife注解框架
- butterknife 注解详解
- Android ButterKnife注解框架
- butterknife注解框架更新
- butterknife注解框架
- 使用butterknife注解
- Butterknife 一键成成注解
- sqlite列出所有表信息
- Set集合小应用(图书购买系统)
- 【搜索入门专题1】I
- linuxPXE自动化部署服务器
- python爬虫进阶(一):静态网页爬取
- 注解库之ButterKnife
- python利用网易云音乐接口搭建的音乐推荐,根据单曲歌名推荐相关用户喜爱的歌曲
- AB1601GPIO不支持较高频率的脉冲中断
- python机器学习----利用sklearn进行情感分析
- CSS3 transform 属性
- ios-应用程序沙盒
- Problems & Solutions --3
- (二)SLAM拓扑地图(地图的优化)
- “玲珑杯”ACM比赛 Round #19 A.A simple math problem【打表找规律】