IOS自动化测试 在 MAC 上搭建 appium1.6.3 过程
来源:互联网 发布:金蝶软件数据 编辑:程序博客网 时间:2024/06/08 17:05
自己研究好久ios10的真机测试今天算是成功了。新手发帖,仅供参考。原文地址https://github.com/appium/appium-xcuitest-driver
- 1,有一个MAC机器,或者虚拟机,能够联网,要求Xcode8+ MAC系统10.11+(我用的是Xcode8.2 , MAC系统10.12)有一个Apple ID账号
- 2,安装brew
/usr/bin/ruby -e "$(curl -fsSL https://raw.githubusercontent.com/Homebrew/install/master/install)"- 3,安装libimobiledevice
brew install libimobiledevice --HEAD - 4,安装carthage
brew install carthage- 5,安装node(目的是安装npm)按照官方的地址https://nodejs.org/en/download/。 下载.pkg文件安装
- 6,安装cnpm(由于某种原因,直接用npm下载安装会有好多网络问题,安装淘宝的cnpm要比npm好用) https://npm.taobao.org/
npm install -g cnpm --registry=https://registry.npm.taobao.org- 7,安装ios-deploy
cnpm install -g ios-deploy- 8,安装xcpretty 如果安装出错,切换个目录再试试
gem install xcpretty- 10,安装appium1.6.3(到发帖为止,最新版本是1.6.3,要其他版本的跟上版本号就行了)这一步骤若出现安装jDK弹出框忽略就好
cnpm install -g appium@1.6.31-10 以上安装不要在root用户下安装。若出现权限问题,进入root用户将文件权限更改下。然后退出root用户继续安装即可
chmod -R 777 pathForFile 关于如何进入root用户,我就不多说了,自己百度。
以上都很简单,下面重点来了。
- 11,安装appium-xcuitest-driver依赖 进入WebDriverAgent安装目录。运行bootstrap
cd /usr/local/lib/node_modules/appium/node_modules/appium-xcuitest-driver/WebDriverAgent (如果WebDriverAgent 所在路径和此不同,请自行查找)mkdir -p Resources/WebDriverAgent.bundlesh ./Scripts/bootstrap.sh 在运行sh ./Scripts/bootstrap.sh很可能会有因为咱们大中华局域网而网络连接失败。方法就是去App store下载了一个VPN代理软件,我下了一个评分最多且免费的,的确很好用。我就不说软件名称了。
再次运行sh ./Scripts/bootstrap.sh 无报错就OK了
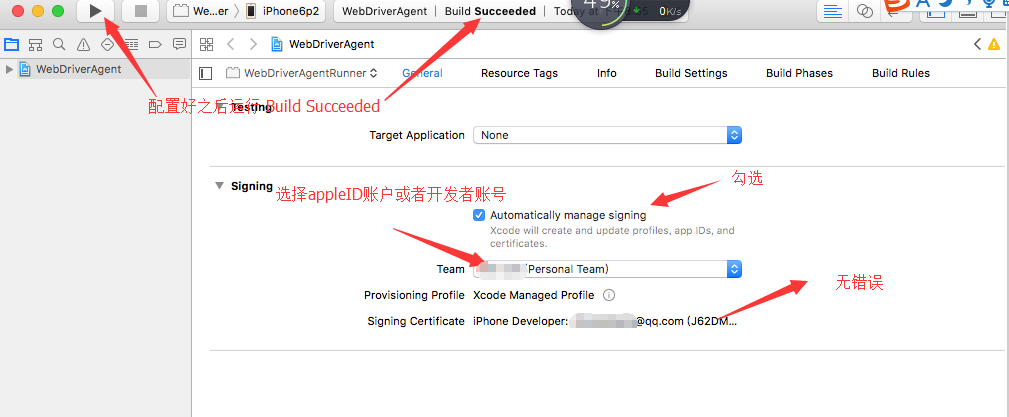
- 12,用Xcode打开WebDriverAgent,并且编译
进入WebDriverAgent 文件夹,可用如下方法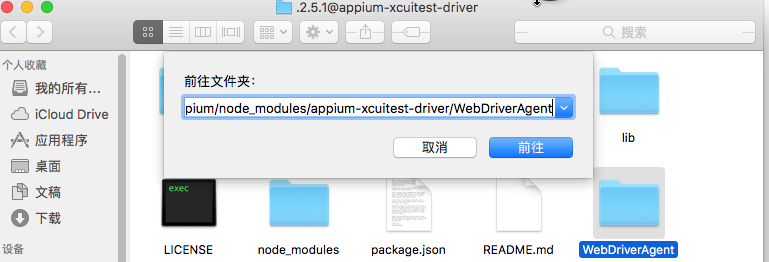
双击WebDriverAgent.xcodeproj打开此项目,这个项目由facebook开源 有兴趣的话可以研究https://github.com/facebook/WebDriverAgent/apple。在这里我们的目的就是更改一些配置,让他能够编译成功,首先编译之前你得有 ID账号,并且登录你的Xcode账户。当然如果有开发者账号那么会更好,不过我买不起,但是基于Xcode7之后,苹果放开了真机调试,所以没有开发者账号。也能在真机上跑起来,直接上截图。
编译WebDriverAgentLib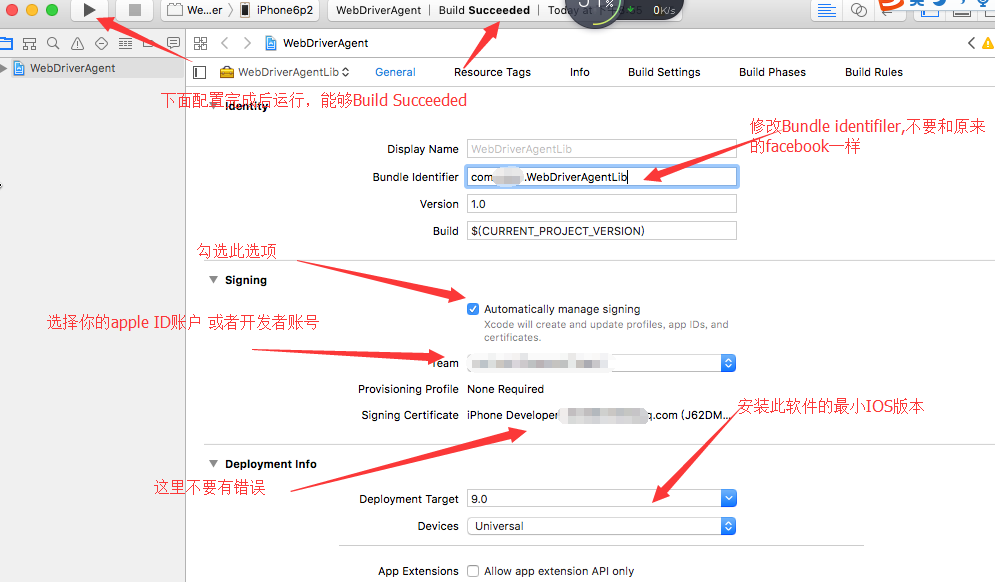
编译WebDriverAgentRunner
若果编译的过程中有语法错误,应该是11步没有安装好 - 13,建立服务WebDriverAgent (手机和MAC都在同一个网段下,且都能连接外网)
关闭Xcode,进入WebDriverAgent 文件夹
cd /usr/local/lib/node_modules/appium/node_modules/appium-xcuitest-driver/WebDriverAgentxcodebuild -project WebDriverAgent.xcodeproj -scheme WebDriverAgentRunner -destination 'id=真机的udid' test 运行到最后会发现

而iphone多了一个WebDriverAgentRunner的app。手动启动那个app的时候

原因是我们手机并并没有信任这个apple id的开发者,到设置-通用-设备管理(描述文件) 信任你的apple id就可以了。再次运行上述命令,看到如下图,就成功了,

- 14,运行appium
appium -p 4723 DesiredCapabilities cap = new DesiredCapabilities(); cap.SetCapability(MobileCapabilityType.AutomationName, "XCUITest"); cap.SetCapability(MobileCapabilityType.PlatformVersion, "10"); cap.SetCapability(MobileCapabilityType.DeviceName, "iPhone 6s Plus"); cap.SetCapability(MobileCapabilityType.PlatformName, "iOS");// cap.SetCapability("webDriverAgentUrl", "http://localhost:8100"); cap.SetCapability(MobileCapabilityType.Udid, "c8ff753c91ee2eda9be215e4109513c75b5b30c9"); cap.SetCapability(MobileCapabilityType.NewCommandTimeout, 3600); cap.SetCapability("bundleId", "com.test.app"); IOSDriver<IOSElement> driver = new IOSDriver<IOSElement>(new Uri("http://192.168.0.20:4724/wd/hub"), cap, TimeSpan.FromSeconds(120));经过我的验证,用appleId编译WDA代码的时候需要链接外网。启动WDA服务的时候手机需要链接到外网。WDA服务启动完成后可以把手机切回内网,测内网app。
- 15卡在Setup的解决办法 如果卡在Set up上,,详细可看https://github.com/facebook/WebDriverAgent/wiki/USB-support 。 可以手动将WDA服务启动 ,可以运行iproxy 8100 8100设置端口映射。然后再开启appium程序 启动参数加上webDriverAgentUrl 值为 "http://localhost:8100" 虽然麻烦,也能解决了。 至今也不能解释为什么会卡在SetUp上。appium说是facebook的BUG facebook说是苹果手机的BUG。然后就没有然后了据说appium1.6.4已经出了,即使卡在Setup。appium也能跳过去,而不像以前和WDA一起卡在那里,本来appium也是通过usb线去测的,所以对于appium的话也无所谓。
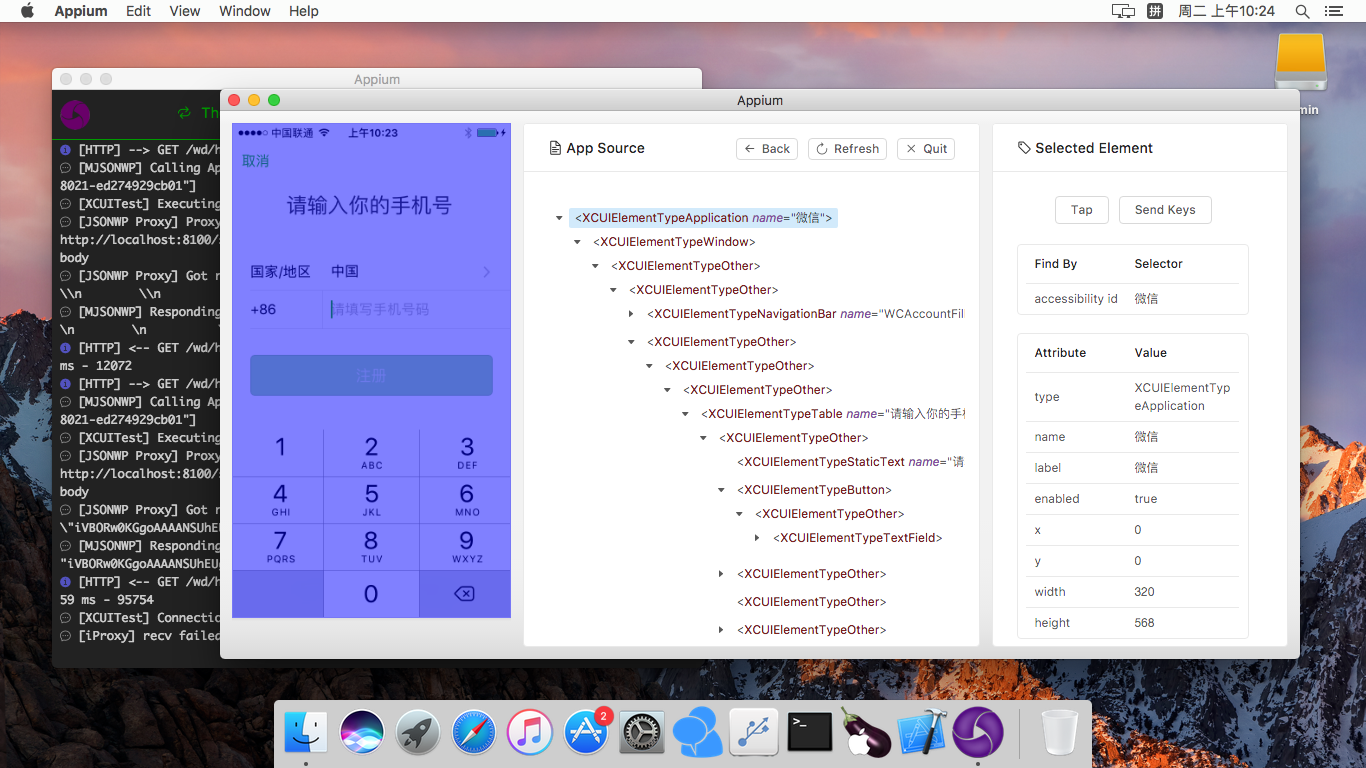
- 16 顺便说一下。appium-desktop1.0.0版也推出了 ,不得不说UI界面和功能还是可以的。搭建环境也快很多了。上一张appium-desktop的截图
如果想看app的bundleId。只需要安装ideviceinstaller就可以了 ideviceinstaller -l 就可以将手机安装的app列出
转载文章时务必注明原作者及原始链接,并注明「发表于 TesterHome 」,并不得对作品进行修改。
打赏支持
阅读全文
0 0
- IOS自动化测试 在 MAC 上搭建 appium1.6.3 过程
- Appium 在 MAC 上搭建 appium1.6.3 过程
- Appium 在 MAC 上搭建 appium1.6.3 过程
- Mac上搭建Xcode9.0+appium1.6.5过程及链接模拟器测试app
- Appium在MAC上搭建appium1.7笔记(真机)
- mac上搭建appium+IOS自动化测试环境
- iOS自动化测试工具Appium在mac上安装和使用教程
- ionic 在mac上的环境搭建以及在iOS模拟器上测试
- 【iOS开发-92】在mac上如何搭建apache+php+mysql环境用于ios网络测试?
- MAC中在eclipse luna上搭建移动平台自动化测试框架(UIAutomator/Appium/Robotium/MonkeyRunner)关键点记录
- Appium+robotframwork+python 在mac上测试ios应用——1.环境搭建
- 在个人电脑上搭建Ruby+Watir自动化测试环境
- Mac下搭建appium自动化测试环境
- ionic在mac上的环境搭建与模拟测试
- 在mac上用node搭建移动设备测试服务器
- 集成——Mac电脑上app自动化测试(Appium + xcode 8.2 + python)环境搭建
- mac+Appium+java+IOS 自动化测试环境搭建
- MAC 搭建自动化测试环境(基于Appium+python+ios/android+unnitest+HTMLTestRunner)(一)
- C++排序算法之基数排序
- undefined 和 null
- 简单理解Socket
- iOS编程基础-Swift(五)-流程控制与其他(序)
- 51nod 1179 最大的最大公约数
- IOS自动化测试 在 MAC 上搭建 appium1.6.3 过程
- [My SQL] 使用MySQL
- 对象转字典、字典排序
- NGINX安装
- com.android.builder.packaging.DuplicateFileException: Duplicate files copied in APK META-INF/LICENSE
- 类、对象、包
- 4.纠结的估点
- 剑指offer面试题目:翻转单词顺序
- HDU6035(数学题)