Laravel Composer Package 开发简明教程
来源:互联网 发布:诛仙手游破凶辅助软件 编辑:程序博客网 时间:2024/06/06 03:20
在Laravel的文档中有Package Development,对于入门开发人员来说还是比较抽象,因为开发一个包需要了解 Service Providers,Service Providers 和 Facade 已经够抽象的了对刚接触Laravel的开发人员来说,所以我来写一个简单的Laravel 包开发的实例教程吧。
toastr.js是一个很方便的通知效果,最近刚发布了laravel 5.2,所以就来开发一个toastr for laravel 5的包吧,主要用toastr结合laravel的flash session来实现页面的一次性消息提醒,其实这个在我们日常开发中页面操作提醒还是很常用到的业务。
一般的laravel 包开发过程是这样的,开发好以后打包push到gitlab,然后在packagist上提交,下面我们就来一步一步实现这个过程。
在新建的laravel项目中建立如下目录 packages/yuansir/toastr/src ,packages 目录和 app 目录同级。我们开发包的代码都放在这个src目录中,yuansir和toastr完全自定义。
- 修改项目的composer.json,设定PSR-4命名空间:
"autoload": { "classmap": [ "database" ], "psr-4": { "App\\": "app/", "Yuansir\\Toastr\\": "packages/yuansir/toastr/src/" } },别忘了执行autoload
composer dump-autoload$ cd pacages/yuansir/toastr/src- 为我们的包初始化一个composer.json文件,熟悉composer的应该都知道这玩意是干嘛的了
$ cd pacages/yuansir/toastr/src接着因为我们是开发一个扩展包 之后还需要进行测试开发 所以我们去生成一个composer.json文件
$ composer init填写完基本信息之后 在packages/geekghc/laraflash目录下就会生成一个composer.json文件
按照提示填写相关信息,有些信息可以不用填写,后面自己在composer.json中添加就可以了,生成的示例如下:
{ "name": "ryan/toastr-for-laravel", "description": "toastr.js for laravel5", "authors": [ { "name": "Ryan", "email": "yuansir@live.cn" } ], "require": {}}- 开始开发,新建Service Provider
php artisan make:provider ToastrServiceProvider将生成的app/Providers/ToastrServiceProvider.php文件移动到我们的packages/yuansir/toastr/src 目录下面,并注册ToastrServiceProvider到config/app.php 的providers 中。
'providers' => [ /* * Laravel Framework Service Providers... */ ...... /* * Application Service Providers... */ ...... Yuansir\Toastr\ToastrServiceProvider::class, ],- 新建packages/yuansir/toastr/src/config/toastr.php 来保存toastr.js的options,options配置还蛮多的,具体可以看它的demo。
<?php return [ 'options' => []];关于这个配置在我们包中如何调用的,我们过会来说.
- 新建Toastr类,来实现toastr 的info,success,error,warning的相关实现,代码还是很简单的,packages/yuansir/toastr/src/Toastr.php:
<?php namespace Yuansir\Toastr;use Illuminate\Session\SessionManager;use Illuminate\Config\Repository;class Toastr{ /** * @var SessionManager */ protected $session; /** * @var Repository */ protected $config; /** * @var array */ protected $notifications = []; /** * Toastr constructor. * @param SessionManager $session * @param Repository $config */ public function __construct(SessionManager $session, Repository $config) { $this->session = $session; $this->config = $config; } public function render() { $notifications = $this->session->get('toastr:notifications'); if(!$notifications) { return ''; } foreach ($notifications as $notification) { $config = $this->config->get('toastr.options'); $javascript = ''; $options = []; if($config) { $options = array_merge($config, $notification['options']); } if($options) { $javascript = 'toastr.options = ' . json_encode($options) . ';'; } $message = str_replace("'", "\\'", $notification['message']); $title = $notification['title'] ? str_replace("'", "\\'", $notification['title']) : null; $javascript .= " toastr.{$notification['type']}('$message','$title');"; } return view('Toastr::toastr', compact('javascript')); } /** * Add notification * @param $type * @param $message * @param null $title * @param array $options * @return bool */ public function add($type, $message, $title = null, $options = []) { $types = ['info', 'warning', 'success', 'error']; if(!in_array($type, $types)) { return false; } $this->notifications[] = [ 'type' => $type, 'title' => $title, 'message' => $message, 'options' => $options ]; $this->session->flash('toastr:notifications', $this->notifications); } /** * Add info notification * @param $message * @param null $title * @param array $options */ public function info($message, $title = null, $options = []) { $this->add('info', $message, $title, $options); } /** * Add warning notification * @param $message * @param null $title * @param array $options */ public function warning($message, $title = null, $options = []) { $this->add('warning', $message, $title, $options); } /** * Add success notification * @param $message * @param null $title * @param array $options */ public function success($message, $title = null, $options = []) { $this->add('success', $message, $title, $options); } /** * Add error notification * @param $message * @param null $title * @param array $options */ public function error($message, $title = null, $options = []) { $this->add('error', $message, $title, $options); } /** * Clear notifications */ public function clear() { $this->notifications = []; }}- 我们看到
view(‘Toastr::toastr’, compact(‘javascript’));,那么就是需要一个视图文件了,关于Toastr::toast是什么鬼我们过会来说,新建 packages/yuansir/toastr/src/views/toastr.blade.php视图文件:
<link href="http://cdn.bootcss.com/toastr.js/latest/css/toastr.min.css" rel="stylesheet"><script src="http://cdn.bootcss.com/toastr.js/latest/js/toastr.min.js"></script><script type="text/javascript">{!! $javascript !!}</script>- 建立Facade,新建packages/yuansir/toastr/src/Facades/Toastr.php 就是引入了tastr插件,输出我们render方法中的$javascript
<?php namespace Yuansir\Toastr\Facades;use Illuminate\Support\Facades\Facade;class Toastr extends Facade{ protected static function getFacadeAccessor() { return 'toastr'; }}- 修改ToastrServiceProvider:
<?php namespace Yuansir\Toastr;use Illuminate\Support\ServiceProvider;class ToastrServiceProvider extends ServiceProvider{ /** * Bootstrap the application services. * * @return void */ public function boot() { $this->loadViewsFrom(__DIR__ . '/views', 'Toastr'); $this->publishes([ __DIR__.'/views' => base_path('resources/views/vendor/toastr'), __DIR__.'/config/toastr.php' => config_path('toastr.php'), ]); } /** * Register the application services. * * @return void */ public function register() { $this->app['toastr'] = $this->app->share(function ($app) { return new Toastr($app['session'], $app['config']); }); } /** * Get the services provided by the provider. * * @return array */ public function provides() { return ['toastr']; }}$this->loadViewsFrom( DIR . ‘/views’, ‘Toastr’); 就是表示Toastr命名空间的视图文件冲当前目录的views目录中渲染,所以我们上面用 return view(‘Toastr::toastr’, compact(‘javascript’));
$this->publishes 在执行php artisan vendor:publish 时会将对应的目录和文件复制到对应的位置
10.测试下是否可行,修改 config/app.php 添加如下:
/* |-------------------------------------------------------------------------- | Class Aliases |-------------------------------------------------------------------------- | | This array of class aliases will be registered when this application | is started. However, feel free to register as many as you wish as | the aliases are "lazy" loaded so they don't hinder performance. | */ 'aliases' => [ ...... 'Toastr' => Yuansir\Toastr\Facades\Toastr::class, ],写个控制器放进去试试:
<?phpnamespace App\Http\Controllers;use App\Http\Requests;use Illuminate\Http\Request;use Toastr;class HomeController extends Controller{ /** * Create a new controller instance. * * @return void */ public function __construct() { //略 } /** * Show the application dashboard. * * @return \Illuminate\Http\Response */ public function index(Request $request) { Toastr::error('你好啊','标题'); return view('home'); }}到此结束,大功告成,这样一个Laravel 的 composer 包就开发完成了。 反正我测试是OK了,就不截图了!!
- 修改命名空间到包的composer.json,因为别人安装这个包的时候不可能也去改项目composer.json的PSR-4的autoload,所以我们把PSR-4的命名空间加到这个包的composer.json中去,修改packages/yuansir/toastr/src/composer.json 如下:
{ "name": "ryan/toastr-for-laravel", "description": "toastr.js for laravel5", "authors": [ { "name": "Ryan", "email": "yuansir@live.cn" } ], "require": {}, "autoload": { "psr-4": { "Yuansir\\Toastr\\": "src/" } }}12.建立Github项目
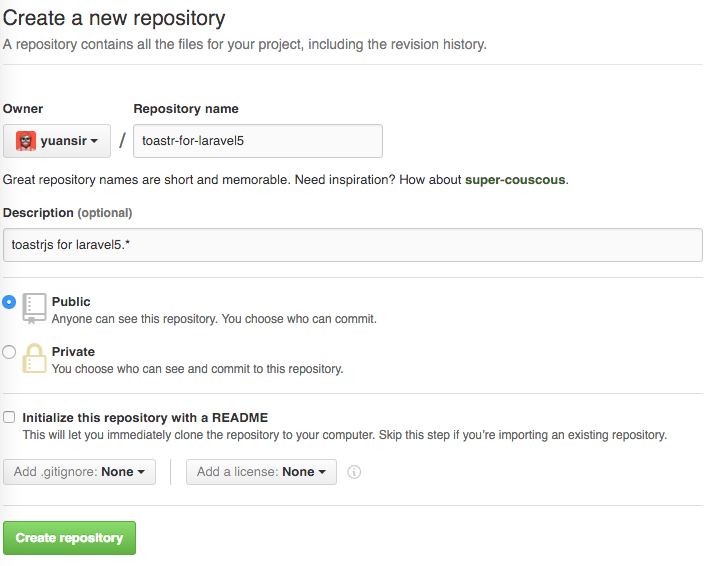
将代码push到项目中去:
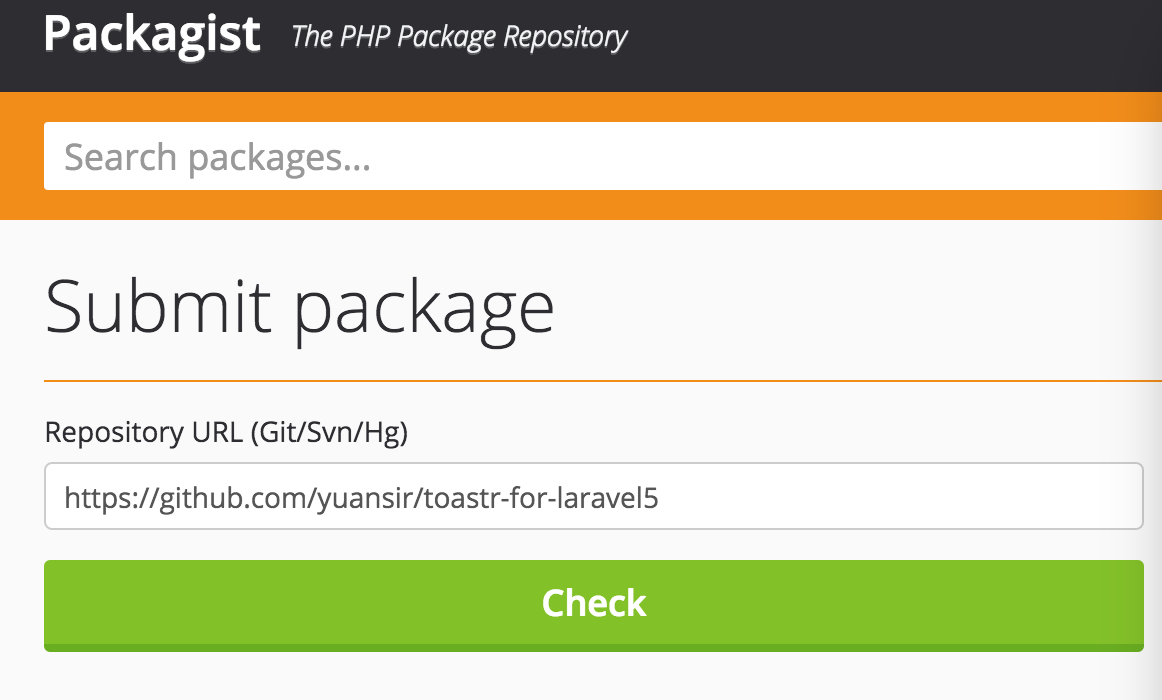
$ cd packages/yuansir/toastr/$ git init$ git add .$ git commit -m "add package source files."$ git remote add origin git@github.com:yuansir/toastr-for-laravel5.git$ git push -u origin master$ git tag -a 1.0.0 -m "version 1.0.0"$ git push --tags- 提交到Packagist,打开到 packagist.org,登陆后点击右边上角的 submit,并填入git的项目地址git@github.com:yuansir/toastr-for-laravel5.git 点击 check 就OK了

到此结束,大功告成,这样一个Laravel 的 composer 包就开发完成了。
这个教程的源码和这个包的安装使用方法详见github https://github.com/yuansir/toastr-for-laravel5
如有问题欢迎指正!
原文地址:https://laravel-china.org/articles/1714/laravel-composer-package-development-concise-tutorial
- Laravel Composer Package 开发简明教程
- 利用composer快速建立laravel开发项目
- Composer + Laravel
- webgame开发简明教程
- webgame开发简明教程
- ActiveMQ开发简明教程
- javascript开发简明教程
- 利用组件开发与composer构建类Laravel框架
- composer 安装 laravel 日志
- laravel linux composer.phar
- composer 安装smarty laravel。。
- Laravel+composer+git+terminal
- composer安装laravel
- Laravel与composer!!!
- composer安装laravel
- composer安装laravel
- 使用composer安装Laravel
- 使用composer安装laravel
- Ajax的Result工具类
- oracle函数与条件表达式
- JQuery入门(一)
- 浏览器对象模型BOM
- 二维前缀和 codeforces 832C
- Laravel Composer Package 开发简明教程
- zookeeper(2) zookeeper客户端ZkClient入门
- 【KMP】POJ2752 Seek the Name, Seek the Fame
- QT UI文件生成头文件
- Vue.js 目录结构
- 判断B数组是否为A数组的子集(有重复、无序)
- 墨菲定律
- JavaScript-取非行间样式(不能用来设置)
- python学习-面向对象进阶之迭代器(九)