去噪自编码网络-Python Keras实现
来源:互联网 发布:win7电脑桌面美化软件 编辑:程序博客网 时间:2024/06/07 21:03
- 代码分析
- 环境
- 输入
- 定义encoder
- 定义decoder
- 模型
- 训练
- 去噪
自编码器是神经网络的一种,是一种无监督学习方法,使用了反向传播算法,目标是使输出=输入。自编码网络可以参考这篇介绍DeepLearning笔记–自编码网络
本文实现了一个利用Keras(TensorFlow backend)实现的自编码网络。Keras使用了TensorFlow的框架,在其之上代码更加清晰简洁。
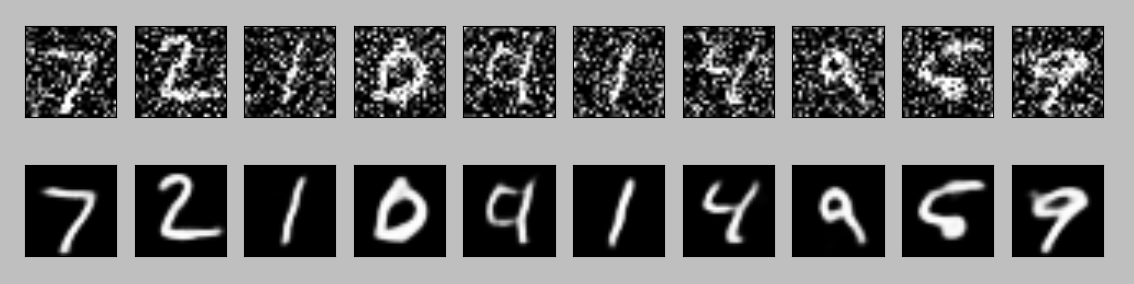
预览去噪结果(迭代100次):
下面代码分析
代码分析
环境
"""author=Aaronpython=3.5keras=2.0.6tensorflow=1.2.1"""from keras import Inputimport numpy as npfrom keras.layers import MaxPooling2D, UpSampling2D, Conv2Dfrom keras.models import Modelfrom tensorflow.examples.tutorials.mnist import input_dataimport matplotlib.pyplot as plt输入
输入数据,包括数据集的下载、读取、切分、归一化处理等。使用了mnist数据集,指定目录没有文件会自动下载
mnist = input_data.read_data_sets('D:\data\minist\\', one_hot=True)x_train, x_test = mnist.train.images, mnist.test.images将784维转换为28*28矩阵。
x_train = np.reshape(x_train, (len(x_train), 28, 28, 1))x_test = np.reshape(x_test, (len(x_test), 28, 28, 1))加入随机白噪。
noise_factor = 0.5x_train_noisy = x_train + noise_factor * np.random.normal(loc=0.0, scale=1.0, size=x_train.shape)x_test_noisy = x_test + noise_factor * np.random.normal(loc=0.0, scale=1.0, size=x_test.shape)区间剪切,超过区间会被转成区间极值
x_train_noisy = np.clip(x_train_noisy, 0., 1.)x_test_noisy = np.clip(x_test_noisy, 0., 1.)在原图和加噪声图中各选取十张绘图显示比对。
n = 10plt.figure(figsize=(20, 4))for i in range(n): # display original images ax = plt.subplot(2, n, i + 1) plt.imshow(x_test[i].reshape(28, 28)) plt.gray() ax.get_xaxis().set_visible(False) ax.get_yaxis().set_visible(False) # display noise images ax = plt.subplot(2, n, i + 1 + n) plt.imshow(x_test_noisy[i].reshape(28, 28)) plt.gray() ax.get_xaxis().set_visible(False) ax.get_yaxis().set_visible(False)plt.show()绘图结果 
定义encoder
input_img = Input(shape=(28, 28, 1)) # (?, 28, 28, 1)x = Conv2D(32, (3, 3), activation='relu', padding='same')(input_img) # (?, 28, 28, 32)x = MaxPooling2D((2, 2), padding='same')(x) # (?, 14, 14, 32)x = Conv2D(32, (3, 3), activation='relu', padding='same')(x) # (?, 14, 14, 32)encoded = MaxPooling2D((2, 2), padding='same')(x) # (?, 7, 7, 32)定义decoder
x = Conv2D(32, (3, 3), activation='relu', padding='same')(encoded) # (?, 7, 7, 32)x = UpSampling2D((2, 2))(x) # (?, 14, 14, 32)x = Conv2D(32, (3, 3), activation='relu', padding='same')(x) # (?, 14, 14, 32)x = UpSampling2D((2, 2))(x) # (?, 28, 28, 32)decoded = Conv2D(1, (3, 3), activation='sigmoid', padding='same')(x) # (?, 28, 28, 1)模型
选定模型的输入,decoded(即输出)的格式
auto_encoder = Model(input_img, decoded)定义优化目标和损失函数
auto_encoder.compile(optimizer='sgd', loss='mean_squared_error')训练
auto_encoder.fit(x_train_noisy, x_train, # 输入输出 epochs=1, # 迭代次数 batch_size=128, shuffle=True, validation_data=(x_test_noisy, x_test)) 去噪
测试集合输入去噪网络之后输出去噪结果。
decoded_imgs = auto_encoder.predict(x_test_noisy) # 测试集合输入查看器去噪之后输出。在测试集合中选加噪声图和去噪图中各选取十张绘图显示比对。
n = 10plt.figure(figsize=(20, 4))for i in range(n): # display original ax = plt.subplot(2, n, i + 1) plt.imshow(x_test_noisy[i].reshape(28, 28)) plt.gray() ax.get_xaxis().set_visible(False) ax.get_yaxis().set_visible(False) # display reconstruction ax = plt.subplot(2, n, i + 1 + n) plt.imshow(decoded_imgs[i].reshape(28, 28)) plt.gray() ax.get_xaxis().set_visible(False) ax.get_yaxis().set_visible(False)plt.show()最终去噪效果:
完整代码:denoise_auto_encoder_keras.py
阅读全文
2 0
- 去噪自编码网络-Python Keras实现
- keras的自编码实现
- 变分自编码VAE(variational autoencoder)及Keras 实现
- Keras实现各类自编码器
- Keras搭建的自编码模型
- Keras上实现AutoEncoder自编码器
- 卷积网络keras实现的部分理解
- GoogleNet网络详解与keras实现
- ResNet网络详解与keras实现
- TensorFlow实现自编码
- Tensorflow 实现自编码
- RNN与自编码网络
- DeepLearning笔记-自编码网络
- 【UFLDL】稀疏自编码网络
- 深度堆栈自编码网络
- Python实现简单网络爬虫--转自极客头条
- 【TensorFlow-windows】(二) 实现一个去噪自编码器
- Keras实现LeNet-5网络,并可视化网络结构图
- Hibernate一级缓存
- Spring_HelloWorld
- Java虚拟机--类加载机制
- 用canvas标签实现网页H5动态时钟
- SSM WebSocket项目搭建
- 去噪自编码网络-Python Keras实现
- Oracle(11g)建库、建表空间、建用户并授权、导入导出数据表
- 锐速 (lotServer) 一键安装脚本
- 8-13 DAIRY
- Mac jdk maven tomcat 环境配置
- 算法铺子之排序---堆排序(二)
- 【JavaEE】企业面试问题-Java Web
- andoid TabHost 不能显示调试笔记
- HDU