tensorflow系列(2)自编码器AE
来源:互联网 发布:淘宝新品怎么做爆款 编辑:程序博客网 时间:2024/06/06 03:21
自编码器(AE)的介绍及实现。
(原文发表在我的博客,欢迎访问
0x00.介绍
自编码(Auto-Encoder),简称ae,又有sae(稀疏自编码,Sparse Auto-Encoder)、dae(降噪自编码,Denoising Auto-Encoder)、rae(惩罚自编码,Regularized Auto-Encider)等分类。
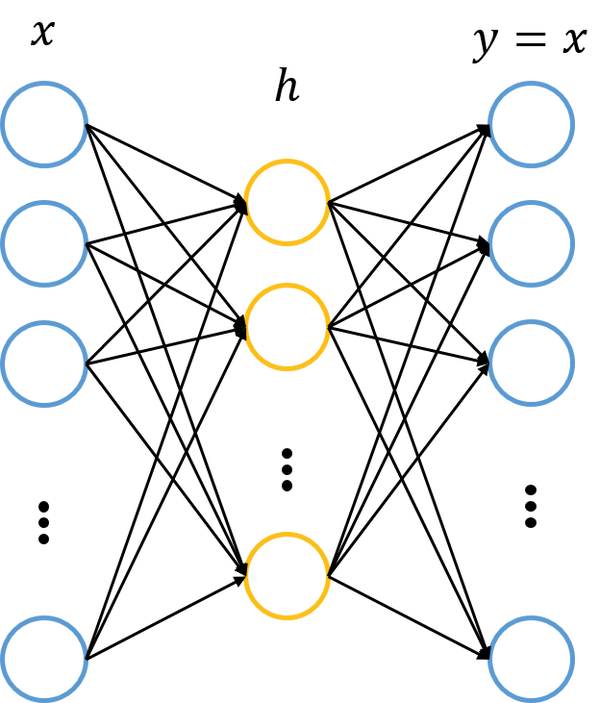
基本的自编码网络可以看作一个由x->x的映射。它总共有两层神经网络,其中一层叫做encoder,另一层叫做decoder,即编码与解码。我们的输入x首先通过编码映射为h,之后h通过解码映射为y,我们要使x与y尽量接近。通常编码器与解码器的激活函数使用sigmoid函数(解码器有时候也使用恒等函数),损失函数使用平方误差或是交叉熵。以此我们计算损失函数。
自编码神经网络属于序列到序列,主要用于特征的提取。常用自编码分类有:
- ae,正常的自编码,就是加强的pca(主成分分析)。
- sae,稀疏自编码。隐含层维数大于输入维数。
- dae,降噪自编码。给输入序列增加噪声,并添加dropout层。
- rae,惩罚自编码。增加惩罚项,使权重不会过大。
还有一种比较重要的自编码叫做栈式自编码(Stacked Auto-Encoder),对于一个基本的自编码器x->h->x,h可以看作为对特征的提取;如果将h看作原始信息,继续训练新的自编码器;以此类推,就叫做栈式自编码(stacked)。这种编码方式采用的是逐层训练。
0x01.实践
下面是网上的一个小的示例,是一个简单基本的自编码器。
这里以tensorflow的mnist数据作为输入,不过我们输入的是一个序列而不是矩阵(图像)。我们知道自编码器输入与输出相同,所以这里为序列到序列,即比较输出序列与输入序列的误差。
1.基本参数
# Network Parameters# 神经元数量,这里通常为256、128n_hidden_1 = 256 # 1st layer num featuresn_hidden_2 = 128 # 2nd layer num features# 这里为mnist的大小,28x28=784n_input = 784 # MNIST data input (img shape: 28*28)# tf Graph input (only pictures)# 输入X = tf.placeholder("float", [None, n_input])2.权重与偏置
weights = { 'encoder_h1': tf.Variable(tf.random_normal([n_input, n_hidden_1])), 'encoder_h2': tf.Variable(tf.random_normal([n_hidden_1, n_hidden_2])), 'decoder_h1': tf.Variable(tf.random_normal([n_hidden_2, n_hidden_1])), 'decoder_h2': tf.Variable(tf.random_normal([n_hidden_1, n_input])),}biases = { 'encoder_b1': tf.Variable(tf.random_normal([n_hidden_1])), 'encoder_b2': tf.Variable(tf.random_normal([n_hidden_2])), 'decoder_b1': tf.Variable(tf.random_normal([n_hidden_1])), 'decoder_b2': tf.Variable(tf.random_normal([n_input])),}为了使权重既不过大也不过小,这里引入一种初始化权重的办法xavier,具体的公式推导可以在网上找到。代码实现如下:
def xavier_init(fan_in, fan_out, const=1): """ Xavier initialization of network weights. https://stackoverflow.com/questions/33640581/how-to-do-xavier-initialization-on-tensorflow :param fan_in: fan in of the network (n_features) :param fan_out: fan out of the network (n_components) :param const: multiplicative constant """ low = -const * np.sqrt(6.0 / (fan_in + fan_out)) high = const * np.sqrt(6.0 / (fan_in + fan_out)) return tf.random_uniform((fan_in, fan_out), minval=low, maxval=high)3.编码器与解码器
# Building the encoderdef encoder(x): # Encoder Hidden layer with sigmoid activation #1 layer_1 = tf.nn.sigmoid(tf.add(tf.matmul(x, weights['encoder_h1']), biases['encoder_b1'])) # Decoder Hidden layer with sigmoid activation #2 layer_2 = tf.nn.sigmoid(tf.add(tf.matmul(layer_1, weights['encoder_h2']), biases['encoder_b2'])) return layer_2# Building the decoderdef decoder(x): # Encoder Hidden layer with sigmoid activation #1 layer_1 = tf.nn.sigmoid(tf.add(tf.matmul(x, weights['decoder_h1']), biases['decoder_b1'])) # Decoder Hidden layer with sigmoid activation #2 layer_2 = tf.nn.sigmoid(tf.add(tf.matmul(layer_1, weights['decoder_h2']), biases['decoder_b2'])) return layer_24.输出
# Construct model# 编码-解码encoder_op = encoder(X)decoder_op = decoder(encoder_op)# Prediction# 序列 to 序列y_pred = decoder_op# Targets (Labels) are the input data.y_true = X5.损失函数与优化器
# Define loss and optimizer, minimize the squared errorcost = tf.reduce_mean(tf.pow(y_true - y_pred, 2))# 尝试交叉熵失败...# cost = tf.reduce_mean(-tf.reduce_sum(y_pred * tf.log(y_true)))optimizer = tf.train.RMSPropOptimizer(learning_rate).minimize(cost)6.运行
# Initializing the variables# 初始化变量init = tf.global_variables_initializer()# Launch the graphwith tf.Session() as sess: # 初始化 sess.run(init) # 分数量 total_batch = int(mnist.train.num_examples/batch_size) # Training cycle for epoch in range(training_epochs): # Loop over all batches for i in range(total_batch): # batch_ys 应该为数字 batch_xs, batch_ys = mnist.train.next_batch(batch_size) # Run optimization op (backprop) and cost op (to get loss value) _, c = sess.run([optimizer, cost], feed_dict={X: batch_xs}) # Display logs per epoch step if epoch % display_step == 0: print("Epoch:", '%04d' % (epoch+1), "cost=", "{:.9f}".format(c)) print("Optimization Finished!")(完整代码戳我
0x02.实战mnist
上一个例子里我们实现了一个简单的自编码器,下面我们将尝试通过逐层训练的方式实现一个栈式自编码器。
。。。(先挖坑
(完整代码戳我
0x03.参考
自编码器原理以及相关算法 Basic Auto-Encoder,Regularized Auto-Encoder,Denoising Auto-Encoder
小白学Tensorflow之自编码Autoencoder
Tensorflow实现稀疏自动编码(SAE)
为什么稀疏自编码器很少见到多层的?
Implementing stack denoising autoencoder with tensorflow
MNIST Digit Classification Using Stacked Autoencoder And TensorFlow
- tensorflow系列(2)自编码器AE
- 【UFLDL】稀疏自编码器AE
- tensorflow实现自编码器
- 稀疏自编码器tensorflow
- 自编码器-tensorflow(1)
- Tensorflow实现自编码器
- tensorflow实现自编码器
- TensorFlow实现自编码器
- TensorFlow实现自编码器
- Tensorflow实例:自编码器
- tensorflow自编码器autoencoder
- Tensorflow实现自编码器
- 用TensorFlow实现自编码器
- Tensorflow实现AGN自编码器
- TensorFlow实现自编码器AutoEncoer
- 自编码器及其tensorflow实现
- Tensorflow学习: 自编码器Tensorflow代码
- TensorFlow教程:TensorFlow实现自编码器
- glibc内存分配与回收过程图解
- Android开发者e周报 第2期
- mini-MBA学习总结一:建设高效团队和决策与执行
- 2016年模拟笔试题--微信红包问题
- Linux 系统的 VMware 虚拟机压缩硬盘
- tensorflow系列(2)自编码器AE
- Java 自定义异常 异常抛出
- JAVA win7下cmd编译Java源代码
- 【二分图匹配入门专题1】L
- tensorflow系列(3)分布式tensorflow
- LINUX的XEN和KVM到底区别在什么地方?
- 斐波那契数列在php中的简单实现
- Hibernate查询缓存
- matlab快速入门2——数据载入与保存