nfs samba 文件共享
来源:互联网 发布:淘宝代码在线生成 编辑:程序博客网 时间:2024/06/03 18:31
首先会通过比较文件传输和文件共享两种资源交换方式来引入Samba服务的理论知识,介绍SMB协议和Samba服务程序的来由和发展过程。通过实战的部署文件共享服务来更加深入的了解Samba服务中每一行参数的作用,并在实验最后分别使用Windows系统和Linux系统访问文件共享资源,为今后生产环境中灵活使用文件共享服务打下实战基础。
通过配置NFS网络文件系统服务使得Linux系统之间共享文件的工作变得更加简单,实战部署NFS服务来实现多台Linux系统之间的资源挂载使用,然后学习Autofs服务来更好的管理设备挂载信息,不仅能够正常的满足设备挂载使用的需求,还能进一步降低服务器带宽和CPU计算资源不必要的浪费开销。
Samba服务程序的配置方法跟以前学习过的服务很相似,首先需要先通过yum软件仓库来安装samba服务程序,这款软件也恰巧是软件包的名字,很好记吧~:
[root@linuxprobe ~ ]# yum install sambaLoaded plugins: langpacks, product-id, subscription-manager………………省略部分输出信息………………Installing: samba x86_64 4.1.1-31.el7 rhel 527 kTransaction Summary================================================================================Install 1 PackageTotal download size: 527 kInstalled size: 1.5 MIs this ok [y/d/N]: yDownloading packages:Running transaction checkRunning transaction testTransaction test succeededRunning transaction Installing : samba-4.1.1-31.el7.x86_64 1/1 Verifying : samba-4.1.1-31.el7.x86_64 1/1 Installed: samba.x86_64 0:4.1.1-31.el7 Complete!安装后打开Samba服务程序的主配置后发现竟然有320行呢!有没有被吓到?但仔细一看发现其实大多都是以#(井号)开头的注释信息行,既然您手中已经拥有了刘遄老师的经验之书,就肯定不会让您去“死啃”这些东东的~:
[root@linuxprobe ~]# cat /etc/samba/smb.conf # This is the main Samba configuration file. For detailed information about the# options listed here, refer to the smb.conf(5) manual page. Samba has a huge# number of configurable options, most of which are not shown in this example.## The Official Samba 3.2.x HOWTO and Reference Guide contains step-by-step# guides for installing, configuring, and using Samba:# http://www.samba.org/samba/docs/Samba-HOWTO-Collection.pdf## The Samba-3 by Example guide has working examples for smb.conf. This guide is# generated daily: http://www.samba.org/samba/docs/Samba-Guide.pdf## In this file, lines starting with a semicolon (;) or a hash (#) are# comments and are ignored. This file uses hashes to denote commentary and# semicolons for parts of the file you may wish to configure.## Note: Run the "testparm" command after modifying this file to check for basic# syntax errors.#………………省略部分输出信息………………
由于这次配置文件中的注释信息行实在太多,不便于分析里面的重要参数,因此咱们可以先把配置文件改个名字,然后使用cat命令读入主配置文件内容后通过grep命令-v参数(反向选择)分别去掉所有以#(井号)和;(分号)开头的注释信息行,对于剩余的空白行可以再用^$来表示并反选过滤,最后把过滤后的可用参数信息通过重定向符覆盖写入到原始文件名称中即可。samba服务程序过滤后的参数并不复杂,为了更方便同学们查阅参数功能,刘遄老师在重要参数行后面都写上了注释说明:
[root@linuxprobe ~]# mv /etc/samba/smb.conf /etc/samba/smb.conf.bak[root@linuxprobe ~]# cat /etc/samba/smb.conf.bak | grep -v "#" | grep -v ";" | grep -v "^$" > /etc/samba/smb.conf[root@linuxprobe ~]# cat /etc/samba/smb.conf[global] #全局参数。 workgroup = MYGROUP#工作组名称。 server string = Samba Server Version %v#服务器介绍信息,参数%v为显示SMB版本号。 log file = /var/log/samba/log.%m#定义日志文件存放位置与名称,参数%m为来访的主机名。 max log size = 50#定义日志文件最大容量为50Kb。 security = user#安全验证的方式,总共有4种。 #share:来访主机无需验证口令,更加方便,但安全性很差。 #user:需由SMB服务验证来访主机提供的口令后才可建立访问,更加的安全。 #server:使用独立的远程主机验证来访主机提供的口令(集中管理帐号)。 #domain:使用PDC来完成验证 passdb backend = tdbsam#定义用户后台的类型,共有3种。 #smbpasswd:使用SMB服务的smbpasswd命令给系统用户设置SMB密码。 #tdbsam:创建数据库文件并使用pdbedit建立SMB独立的用户。 #ldapsam:基于LDAP服务进行帐户验证。 load printers = yes#设置是否当Samba服务启动时共享打印机设备。 cups options = raw#打印机的选项[homes] #共享参数 comment = Home Directories#描述信息 browseable = no#指定共享是否在“网上邻居”中可见。 writable = yes#定义是否可写入操作,与"read only"相反。[printers] #打印机共享参数 comment = All Printers path = /var/spool/samba#共享文件的实际路径(重要)。 browseable = no guest ok = no#是否所有人可见,等同于"public"参数。 writable = no printable = yes
12.1.1 配置共享资源
Samba服务程序的配置文件与前面学习过的Apache服务很相似,包括有全局配置参数和局部配置参数。全局配置参数是Samba服务程序对整体共享环境的设置,是对里面每个独立的共享资源都生效的参数,而区域配置参数指的则是一个个独立可用的共享资源,共享资源的创建方法很简单,只需要按照下面参数格式写入配置文件后重启服务程序即可~
参数作用[linuxprobe]共享名称为linuxprobecomment = Do not arbitrarily modify the database file警告用户不要随意修改数据库path = /home/database共享文件夹在/home/databasepublic = no关闭所有人可见writable = yes允许写入操作第1步:创建用于访问共享资源的帐户信息,在红帽RHEL7系统中Samba服务程序默认使用的是用户口令认证模式(user),可以做到仅让有密码、受信任的用户访问共享资源,验证的过程也十分的简单。不过咱们需要为Samba服务程序建立独立的用户密码数据库后才能登陆使用,另外Samba服务的数据库要求帐号必须是当前系统中已经存在的用户,否则日后创建文件将产生权限属性的混乱错误。
pdbedit命令用于管理SMB服务的帐户信息数据库,格式为:“pdbedit [选项] 帐户”,第一次把用户信息写入到数据库时需要使用-a参数,以后修改用户密码、删除用户等等操作就不再需要了:
参数作用-a 用户名建立Samba用户-x 用户名删除Samba用户-L列出用户列表-Lv列出用户详细信息的列表[root@linuxprobe ~]# id linuxprobeuid=1000(linuxprobe) gid=1000(linuxprobe) groups=1000(linuxprobe)[root@linuxprobe ~]# pdbedit -a -u linuxprobenew password:此处输入该用户在Samba服务数据库中的密码retype new password:再次输入密码进行确认Unix username: linuxprobeNT username: Account Flags: [U ]User SID: S-1-5-21-507407404-3243012849-3065158664-1000Primary Group SID: S-1-5-21-507407404-3243012849-3065158664-513Full Name: linuxprobeHome Directory: \\localhost\linuxprobeHomeDir Drive: Logon Script: Profile Path: \\localhost\linuxprobe\profileDomain: LOCALHOSTAccount desc: Workstations: Munged dial: Logon time: 0Logoff time: Wed, 06 Feb 2036 10:06:39 ESTKickoff time: Wed, 06 Feb 2036 10:06:39 ESTPassword last set: Mon, 13 Mar 2017 04:22:25 EDTPassword can change: Mon, 13 Mar 2017 04:22:25 EDTPassword must change: neverLast bad password : 0Bad password count : 0Logon hours : FFFFFFFFFFFFFFFFFFFFFFFFFFFFFFFFFFFFFFFFFF
第2步:创建用于共享资源的文件目录,不光要考虑到文件访问和写入权限的问题,而且由于/home目录是系统中普通用户的家目录,因此还需要考虑到文件上面SELinux安全上下文的监管控制。实际上刚刚过滤掉的注释信息中就提醒有了相关的SELinux安全上下文策略的说明,咱们只需要按照给的值进行修改即可,最后再记得执行下restorecon命令让目录文件上面新设置的SELinux安全上下文立即生效下哦~
[root@linuxprobe ~]# mkdir /home/database[root@linuxprobe ~]# chown -Rf linuxprobe:linuxprobe /home/database[root@linuxprobe ~]# semanage fcontext -a -t samba_share_t /home/database[root@linuxprobe ~]# restorecon -Rv /home/databaserestorecon reset /home/database context unconfined_u:object_r:home_root_t:s0->unconfined_u:object_r:samba_share_t:s0
第3步:设置SELinux服务对Samba程序访问个人用户家目录的允许策略,过滤筛选出所有与samba服务程序相关的SELinux域策略,根据策略的名称和经验选择出合适的策略条目进行开启即可:
[root@linuxprobe ~]# getsebool -a | grep sambasamba_create_home_dirs --> offsamba_domain_controller --> offsamba_enable_home_dirs --> offsamba_export_all_ro --> offsamba_export_all_rw --> offsamba_portmapper --> offsamba_run_unconfined --> offsamba_share_fusefs --> offsamba_share_nfs --> offsanlock_use_samba --> offuse_samba_home_dirs --> offvirt_sandbox_use_samba --> offvirt_use_samba --> off[root@linuxprobe ~]# setsebool -P samba_enable_home_dirs on第4步:在Samba服务程序的主配置文件中根据前面所提到的格式写入共享信息,在原始的配置文件中[homes]参数为共享该用户的家目录数据,[printers]参数为共享打印机设备,这两项如果您今后的工作中不需要,可以像刘遄老师一样手动的删除掉,没有问题的~
[root@linuxprobe ~]# vim /etc/samba/smb.conf [global] workgroup = MYGROUP server string = Samba Server Version %v log file = /var/log/samba/log.%m max log size = 50 security = user passdb backend = tdbsam load printers = yes cups options = raw[database] comment = Do not arbitrarily modify the database file path = /home/database public = no writable = yes
第5步:把上述步骤完成后也就基本完成了Samba服务程序的配置工作了,Samba服务程序叫做smb,因此重启一下smb服务,清空下iptables防火墙就可以来检验配置效果了:
[root@linuxprobe ~]# systemctl restart smb[root@linuxprobe ~]# systemctl enable smb ln -s '/usr/lib/systemd/system/smb.service' '/etc/systemd/system/multi-user.target.wants/smb.service'[root@linuxprobe ~]# iptables -F[root@linuxprobe ~]# service iptables saveiptables: Saving firewall rules to /etc/sysconfig/iptables:[ OK ]
12.1.2 Windows挂载共享
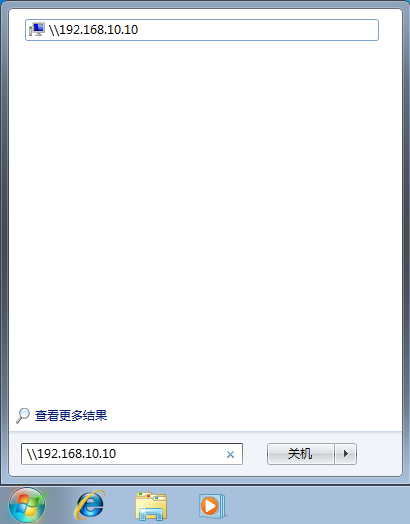
在Windows系统中不论是在使用由Windows系统还是Linux系统提供的共享资源步骤和方法都是一致的,所以估计同学们以前都会误以为共享资源都是由Windows系统提供的呢~Samba共享服务器和Windows客户端主机的IP地址可以参考下表来设置,在Windows系统中使用共享资源只需在运行中输入两个反斜杠后加服务器主机IP地址即可,如图12-2所示:
主机名称操作系统IP地址Samba共享服务器红帽RHEL7操作系统192.168.10.10Linux客户端红帽RHEL7操作系统192.168.10.20Windows客户端微软Windows7操作系统192.168.10.30
图12-2 在Windows系统中访问共享资源
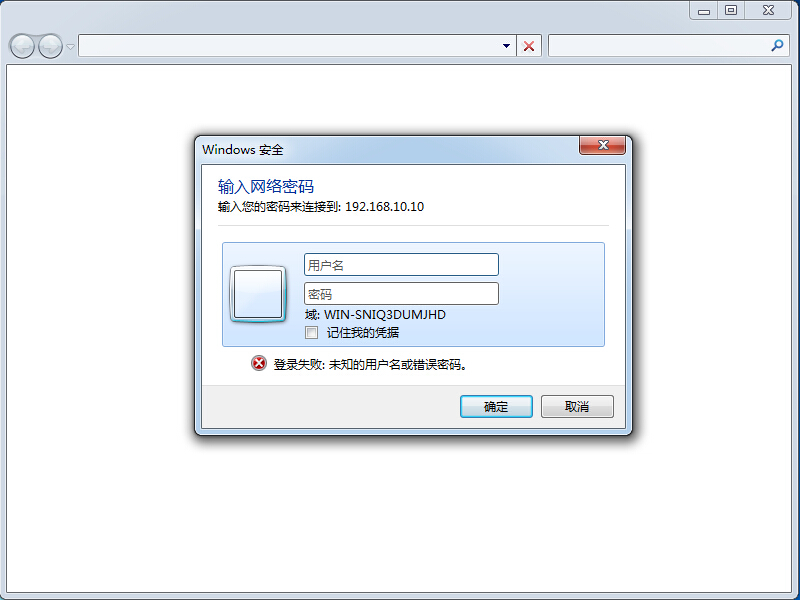
只要iptables防火墙已经清空就应该能看到Samba共享资源的登陆界面了,刘遄老师先使用linuxprobe用户的系统本地密码尝试登陆一下,结果会出现如图12-3一样的报错,这就是为了验证果然在红帽RHEL7系统中Samba服务程序使用的是独立的用户数据库信息了,所以即便linuxprobe的用户名称是相同的,同学们也一定要分清是那个密码才行~

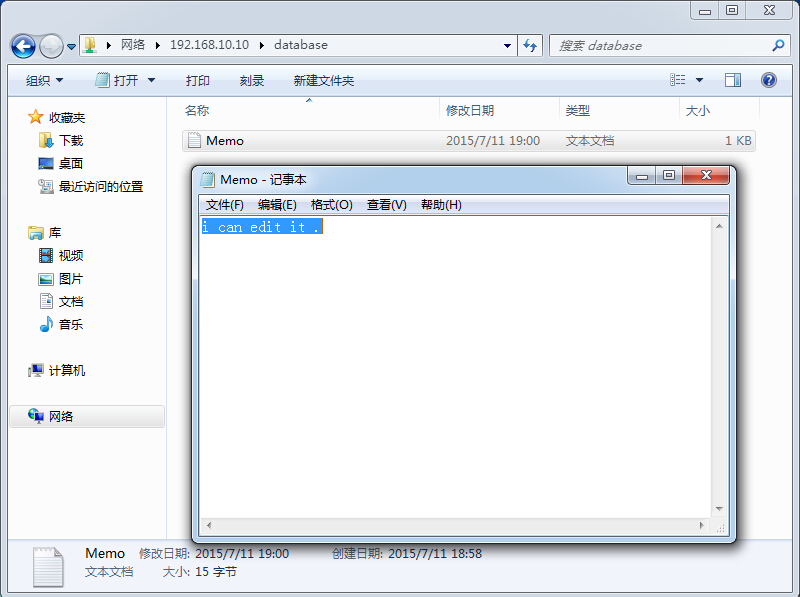
正确输入linuxprobe帐号以及pdbedit命令设置的密码后就可以登陆到共享界面中了,如图12-4所示。咱们还可以尝试正常的查看、写入、更名、删除文件等等操作,不过由于Windows系统的缓存原因,有可能您第二次登陆的时候依然会报错,这时需要重新启动一下您的真机电脑就一定没问题了(如果依然报错请检查上述步骤是否有做错的地方~)。

图12-4 正常使用Samba服务共享的资源
12.1.2 Linux挂载共享
刚刚可能不小心让大家产生了一些小误解,认为Samba服务只是为了解决Linux系统和Windows系统的资源共享问题而设计的,其实Samba服务程序还可以实现Linux系统之间的文件共享哦~同学们可以参考下表来配置下Linux客户端的网卡IP地址,然后在客户端安装一下共享资源的支持软件包(cifs-utils):
[root@linuxprobe ~]# yum install cifs-utilsLoaded plugins: langpacks, product-id, subscription-managerrhel | 4.1 kB 00:00 Resolving Dependencies--> Running transaction check---> Package cifs-utils.x86_64 0:6.2-6.el7 will be installed--> Finished Dependency ResolutionDependencies Resolved================================================================================ Package Arch Version Repository Size================================================================================Installing: cifs-utils x86_64 6.2-6.el7 rhel 83 kTransaction Summary================================================================================Install 1 PackageTotal download size: 83 kInstalled size: 174 kIs this ok [y/d/N]: yDownloading packages:Running transaction checkRunning transaction testTransaction test succeededRunning transaction Installing : cifs-utils-6.2-6.el7.x86_64 1/1 Verifying : cifs-utils-6.2-6.el7.x86_64 1/1 Installed: cifs-utils.x86_64 0:6.2-6.el7 Complete!在Linux系统客户端上面依次按照Samba服务用户名、密码、共享域的顺序写入到一个认证文件中,并为了保证不被其他人随意看到,最后再把其权限修改为仅root超级用户才能够读写:
[root@linuxprobe ~]# vim auth.smbusername=linuxprobepassword=redhatdomain=MYGROUP[root@linuxprobe ~]# chmod -Rf 600 auth.smb
完成上述步骤后就可以在客户端上面创建一个用于挂载Samba服务共享资源的目录文件,并把挂载信息写入到/etc/fstab文件中,这样保证远程共享挂载信息在服务器重启后依然生效:
[root@linuxprobe ~]# mkdir /database[root@linuxprobe ~]# vim /etc/fstab## /etc/fstab# Created by anaconda on Wed May 4 19:26:23 2017## Accessible filesystems, by reference, are maintained under '/dev/disk'# See man pages fstab(5), findfs(8), mount(8) and/or blkid(8) for more info#/dev/mapper/rhel-root / xfs defaults 1 1UUID=812b1f7c-8b5b-43da-8c06-b9999e0fe48b /boot xfs defaults 1 2/dev/mapper/rhel-swap swap swap defaults 0 0/dev/cdrom /media/cdrom iso9660 defaults 0 0 //192.168.10.10/database /database cifs credentials=/root/auth.smb 0 0[root@linuxprobe ~]# mount -a客户端成功挂载Samba远程共享资源,进入到挂载目录中后就可以看到刚刚Windows系统访问Samba服务共享留下来的文件啦~当然咱们也是可以读写保存的,是不是觉得很实用呢~
[root@linuxprobe ~]# cat /database/Memo.txti can edit it .
12.2 NFS网络文件系统
如果觉得Samba服务程序配置起来实在很麻烦,而且恰巧需要共享文件的主机都是Linux系统,那么刘遄老师非常推荐大家使用NFS服务来共享文件给客户端,NFS网络文件系统(Network Files System)是一个能够把Linux系统的远程文件共享资源挂载到本地目录的服务,NFS文件系统协议允许网络中的主机通过TCP/IP协议进行资源共享,能够让Linux客户端像使用本地资源一样读写远端NFS服务端的文件内容。另外由于NFS网络文件系统服务已经在红帽RHEL7系统中默认安装好,配置步骤也十分的简单,因此刘遄老师有时讲课会开玩笑说NFS是need for speed,接下来与大家分享下NFS服务配置起来的爽快体验~请大家先自行用yum软件仓库检查确认下NFS软件包是否已经安装好吧:
[root@linuxprobe ~]# yum install nfs-utilsLoaded plugins: langpacks, product-id, subscription-manager(1/2): rhel7/group_gz | 134 kB 00:00(2/2): rhel7/primary_db | 3.4 MB 00:00Package 1:nfs-utils-1.3.0-0.el7.x86_64 already installed and latest versionNothing to do第1步:为了检验NFS服务配置的效果,咱们本次实验需要使用到两台Linux主机,您可以参考下表对系统网卡IP地址进行设置,另外也不要忘记清空iptables防火墙,避免默认的策略禁止了正常的NFS共享服务:
主机名称操作系统IP地址NFS服务端红帽RHEL7操作系统192.168.10.10NFS客户端红帽RHEL7操作系统192.168.10.20[root@linuxprobe ~]# iptables -F[root@linuxprobe ~]# service iptables saveiptables: Saving firewall rules to /etc/sysconfig/iptables:[ OK ]
第2步:在NFS服务端主机上面建立用于NFS文件共享的目录,设置较大的权限来保证其他人也一样有写入的权限:
[root@linuxprobe ~]# mkdir /nfsfile[root@linuxprobe ~]# chmod -Rf 777 /nfsfile[root@linuxprobe ~]# echo "welcome to linuxprobe.com" > /nfsfile/readme
第3步:NFS服务程序的配置文件为/etc/exports,默认里面是空白没有内容的,可以按照共享目录的路径 允许访问的NFS资源客户端(共享权限参数)的格式来写入参数,定义要共享的目录与相应的权限。例如想要把/nfsfile目录共享给所有属于192.168.10.0/24这个网段的用户主机,并且让这些用户拥有读写权限,自动同步内存数据到本地硬盘,以及把对方root超级用户映射为本地的匿名用户等等特殊权限参数,那么就可以按照下面的格式来写入配置文件:
参数作用ro只读默认rw读写模式root_squash当NFS客户端使用root用户访问时,映射为NFS服务端的匿名用户。no_root_squash当NFS客户端使用root用户访问时,映射为NFS服务端的root用户。all_squash不论NFS客户端使用任何帐户,均映射为NFS服务端的匿名用户。sync同时将数据写入到内存与硬盘中,保证不丢失数据。async优先将数据保存到内存,然后再写入硬盘,效率更高,但可能造成数据丢失。[root@linuxprobe ~]# vim /etc/exports/nfsfile 192.168.10.*(rw,sync,root_squash)
第4步:启动运行NFS共享服务程序,由于NFS服务在文件共享过程中是依赖RPC服务进行工作了,RPC服务用于把服务器地址和服务端口号等信息通知给客户端,因此要使用NFS共享服务的话,顺手也要把rpcbind服务程序启动,并且把这两个服务一起加入到开机启动项中吧:
[root@linuxprobe ~]# systemctl restart rpcbind[root@linuxprobe ~]# systemctl enable rpcbind[root@linuxprobe ~]# systemctl start nfs-server[root@linuxprobe ~]# systemctl enable nfs-serverln -s '/usr/lib/systemd/system/nfs-server.service' '/etc/systemd/system/nfs.target.wants/nfs-server.service'
配置NFS客户端的步骤也十分简单,首先用showmount命令查询NFS服务端的远程共享信息,输出格式为“共享的目录名称 允许使用客户端地址”:
参数作用-e显示NFS服务端的共享列表-a显示本机挂载NFS资源的情况-v显示版本号[root@linuxprobe ~]# showmount -e 192.168.10.10Export list for 192.168.10.10:/nfsfile 192.168.10.*
然后在客户端系统上面创建一个挂载目录,使用mount命令的-t参数指定挂载文件系统的类型,以及后面写上服务端的IP地址,共享出去的目录以及挂载到系统本地的目录。
[root@linuxprobe ~]# mkdir /nfsfile[root@linuxprobe ~]# mount -t nfs 192.168.10.10:/nfsfile /nfsfile
最后挂载成功后就应该能够顺利查看到刚刚写入文件内容了,当然如果同学们希望远程NFS文件共享能一直有效,还可以写入到fstab文件中:
[root@linuxprobe ~]# cat /nfsfile/readmewelcome to linuxprobe.com[root@linuxprobe ~]# vim /etc/fstab ## /etc/fstab# Created by anaconda on Wed May 4 19:26:23 2017## Accessible filesystems, by reference, are maintained under '/dev/disk'# See man pages fstab(5), findfs(8), mount(8) and/or blkid(8) for more info#/dev/mapper/rhel-root / xfs defaults 1 1UUID=812b1f7c-8b5b-43da-8c06-b9999e0fe48b /boot xfs defaults 1 2/dev/mapper/rhel-swap swap swap defaults 0 0/dev/cdrom /media/cdrom iso9660 defaults 0 0 192.168.10.10:/nfsfile /nfsfile nfs defaults 0 012.3 AutoFs自动挂载服务
不论咱们是想使用前面学习的Samba还是NFS服务,都要把挂载信息写入到/etc/fstab中,这样远程共享资源就会自动的随服务器开机而挂载,虽然这样一劳永逸确实很方便,但如果挂载的远程资源很多的话,毕竟会或多或少消耗着服务器的一定网络带宽和CPU计算性能。如果挂载后长期不去使用这些服务,那么无疑这笔损耗是白白被浪费掉了,当然还会有同学说可以每次使用前都执行下mount命令手动的挂载上,这虽然是个不错的选择,但每次都要去挂载一下再使用,这样是不是又很麻烦呢?
AutoFs服务程序与Mount命令不同之处在于它是一种守护进程,只有检测到用户试图访问一个尚未挂载的文件系统时才自动的检测并挂载该文件系统。换句话说,把挂载信息填入/etc/fstab文件后系统将在每次开机时都自动把其挂载,而运行AutoFs服务后则是当用户需要使用该文件系统了才会动态的挂载,节约服务器的网络与系统资源。
[root@linuxprobe ~]# yum install autofsLoaded plugins: langpacks, product-id, subscription-managerThis system is not registered to Red Hat Subscription Management. You can use subscription-manager to register.rhel | 4.1 kB 00:00 Resolving Dependencies--> Running transaction check---> Package autofs.x86_64 1:5.0.7-40.el7 will be installed--> Processing Dependency: libhesiod.so.0()(64bit) for package: 1:autofs-5.0.7-40.el7.x86_64--> Running transaction check---> Package hesiod.x86_64 0:3.2.1-3.el7 will be installed--> Finished Dependency ResolutionDependencies Resolved================================================================================ Package Arch Version Repository Size================================================================================Installing: autofs x86_64 1:5.0.7-40.el7 rhel 550 kInstalling for dependencies: hesiod x86_64 3.2.1-3.el7 rhel 30 kTransaction Summary================================================================================Install 1 Package (+1 Dependent package)Total download size: 579 kInstalled size: 3.6 MIs this ok [y/d/N]: yDownloading packages:--------------------------------------------------------------------------------Total 9.4 MB/s | 579 kB 00:00 Running transaction checkRunning transaction testTransaction test succeededRunning transaction Installing : hesiod-3.2.1-3.el7.x86_64 1/2 Installing : 1:autofs-5.0.7-40.el7.x86_64 2/2 Verifying : hesiod-3.2.1-3.el7.x86_64 1/2 Verifying : 1:autofs-5.0.7-40.el7.x86_64 2/2 Installed: autofs.x86_64 1:5.0.7-40.el7 Dependency Installed: hesiod.x86_64 0:3.2.1-3.el7 Complete!生产环境中一般都会同时管理着很多设备的挂载工作,如果把这些设备挂载信息都写入到autofs服务主配置文件中的话肯定无疑会让主配置文件臃肿不堪,不利于服务执行效率,也不利于日后修改里面的配置内容,所以在autofs服务程序的主配置文件中需要按照“挂载目录 子配置文件”的格式写入参数。挂载目录是设备要挂载位置的上一级目录,例如咱们的光盘设备一般是挂载到/media/cdrom目录中的,那么此处就应该写成/media即可,而对应的子配置文件则是对这个目录内挂载设备信息的进一步说明,子配置文件是需要用户自行定义的,文件名字没有严格要求,但后缀需以.misc结束,具体的配置参数如第7行加粗字所示。
[root@linuxprobe ~]# vim /etc/auto.master## Sample auto.master file# This is an automounter map and it has the following format# key [ -mount-options-separated-by-comma ] location# For details of the format look at autofs(5).#/media /etc/iso.misc/misc /etc/auto.misc## NOTE: mounts done from a hosts map will be mounted with the# "nosuid" and "nodev" options unless the "suid" and "dev"# options are explicitly given.#/net -hosts## Include /etc/auto.master.d/*.autofs#+dir:/etc/auto.master.d## Include central master map if it can be found using# nsswitch sources.## Note that if there are entries for /net or /misc (as# above) in the included master map any keys that are the# same will not be seen as the first read key seen takes# precedence.#+auto.master子配置文件中应按照“挂载目录 挂载文件类型及权限 :设备名称”的格式写入参数,例如想要把设备挂载到/media/iso目录中,则此时写iso即可,而-fstype为文件系统格式参数,iso9660为光盘系统设备格式,ro、nosuid及nodev为光盘设备具体的权限参数,最终/dev/cdrom则是定义要挂载的设备名称,配置完成后顺手再把autofs服务程序启动并加入到开机启动项中吧:
[root@linuxprobe ~]# vim /etc/iso.misciso -fstype=iso9660,ro,nosuid,nodev :/dev/cdrom[root@linuxprobe ~]# systemctl start autofs [root@linuxprobe ~]# systemctl enable autofs ln -s '/usr/lib/systemd/system/autofs.service' '/etc/systemd/system/multi-user.target.wants/autofs.service'
接下来会就要发生一幕非常有趣的事情了,先来查看下当前的设备挂载情况,确认光盘设备目前是没有被挂载使用的,而且在/media目录中根本就没有一个iso子目录,但却可以通过cd命令切换进去,同时光盘设备会被立即自动挂载上,咱们也就能顺利的查看到光盘内的所有内容了。
[root@linuxprobe ~]# df -hFilesystem Size Used Avail Use% Mounted on/dev/mapper/rhel-root 18G 3.0G 15G 17% /devtmpfs 905M 0 905M 0% /devtmpfs 914M 140K 914M 1% /dev/shmtmpfs 914M 8.9M 905M 1% /runtmpfs 914M 0 914M 0% /sys/fs/cgroup/dev/sda1 497M 119M 379M 24% /boot[root@linuxprobe ~]# cd /media[root@linuxprobe media]# ls[root@linuxprobe media]# cd iso[root@linuxprobe iso]# ls -ltotal 812dr-xr-xr-x. 4 root root 2048 May 7 2017 addonsdr-xr-xr-x. 3 root root 2048 May 7 2017 EFI-r--r--r--. 1 root root 8266 Apr 4 2017 EULA-r--r--r--. 1 root root 18092 Mar 6 2012 GPLdr-xr-xr-x. 3 root root 2048 May 7 2017 imagesdr-xr-xr-x. 2 root root 2048 May 7 2017 isolinuxdr-xr-xr-x. 2 root root 2048 May 7 2017 LiveOS-r--r--r--. 1 root root 108 May 7 2017 media.repodr-xr-xr-x. 2 root root 774144 May 7 2017 Packagesdr-xr-xr-x. 24 root root 6144 May 7 2017 release-notesdr-xr-xr-x. 2 root root 4096 May 7 2017 repodata-r--r--r--. 1 root root 3375 Apr 1 2017 RPM-GPG-KEY-redhat-beta-r--r--r--. 1 root root 3211 Apr 1 2017 RPM-GPG-KEY-redhat-release-r--r--r--. 1 root root 1568 May 7 2017 TRANS.TBL[root@linuxprobe ~]# df -hFilesystem Size Used Avail Use% Mounted on/dev/mapper/rhel-root 18G 3.0G 15G 17% /devtmpfs 905M 0 905M 0% /devtmpfs 914M 140K 914M 1% /dev/shmtmpfs 914M 8.9M 905M 1% /runtmpfs 914M 0 914M 0% /sys/fs/cgroup/dev/cdrom 3.5G 3.5G 0 100% /media/iso/dev/sda1 497M 119M 379M 24% /boot - nfs samba 文件共享
- 文件共享服务nfs-samba
- 文件共享:samba,iscsi,NFS
- 文件共享服务 NFS SAMBA FTP
- Linux曲径通幽:文件共享(FTP、Samba、NFS、SCP、RSYNC)
- 网络共享(Ftp,NFS,Samba)-------NFS
- Linux NFS 和 Samba 共享配置
- Linux NFS 和 Samba 共享配置
- REDHAT 共享服务器配置(NFS+SAMBA)
- Linux NFS 和 Samba 共享配置
- java 访问linux 共享目录 NFS samba
- Linux NFS 和 Samba 共享配置
- samba文件共享配置
- Samba文件共享配置
- suse 文件共享samba
- samba共享文件
- Solaris---Samba文件共享
- samba快速共享文件
- 廖雪峰《python3 基础教程》读书笔记——第十八章 网络编程
- 给新手设计师的10条建议
- js 完整的非空判断
- JQuery中三元运算
- http详解
- nfs samba 文件共享
- Android Dialog:android.view.WindowManager$BadTokenException: Unable to add window -- token null is n
- 术--序列化与反序列化
- Deep MNIST for Experts解读(二):卷积与最大池化
- zabbix3.2邮件报警
- 中钰睿泓分享:UI设计师应有的三个技能
- Android开发工程师如何准备面试才能拿高薪offer?
- Problem
- 好用的连接


