CentOS7.3下安装PHP5.6.30服务
来源:互联网 发布:国网网络大学怎么考试 编辑:程序博客网 时间:2024/05/29 19:37
关于php-fpm
nginx本身不能处理PHP,它只是个web服务器,当接收到请求后,如果是php请求,则发给php解释器处理,并把结果返回给客户端。
nginx一般是把请求发fastcgi管理进程处理,fascgi管理进程选择cgi子进程处理结果并返回被nginx。
PHP-FPM是一个PHP FastCGI管理器,是只用于PHP的。
PHP在 5.3.3 之后已经讲php-fpm写入php源码核心了。所以已经不需要另外下载了。
获取PHP下载地址
打开php的官网:http://php.NET/,查看php的版本列表

右击,复制链接地址,在远程主机登录,下载该软件(我选的是Australia的主机mirror下载的)
# wget http://au1.php.net/get/php-5.6.30.tar.gz/from/this/mirror
下载下来的是一个mirror文件,改成我们需要的文件名
#mv mirror php-5.6.30.tar.gz#tar zxvf php-5.6.30.tar.gz#cd php-5.6.30
配置安装
进入到目录,我们需要在安装的时候将安装目录配置到/usr/local/php/里
#./configure --prefix=/usr/local/php --with-curl --with-freetype-dir --with-gd --with-gettext --with-iconv-dir --with-kerberos --with-libdir=lib64 --with-libxml-dir --with-MySQL --with-mysqli --with-openssl --with-pcre-regex --with-pdo-mysql --with-pdo-sqlite --with-pear --with-png-dir --with-xmlrpc --with-xsl --with-zlib --enable-fpm --enable-bcmath --enable-libxml --enable-inline-optimization --enable-gd-native-ttf --enable-mbregex --enable-mbstring --enable-opcache --enable-pcntl --enable-shmop --enable-soap --enable-sockets --enable-sysvsem --enable-xml --enable-zip
配置的过程中可能会报如下错误
错误1:
xml2-config not found. Please check your libxml2 installation.
解决办法
安装libxml2相关组件
#yum install libxml2#yum install libxml2-devel -y
错误2:
Please reinstall the libcurl distribution - easy.h should be in <curl-dir>/include/curl/
安装curl相关组件
#yum install curl curl-devel
错误3:
configure: error: png.h not found.
安装libpng相关组件
#yum install libpng#yum install libpng-devel
错误4:
freetype-config not found.
安装freetype相关组件
#yum install freetype-devel
错误5:
xslt-config not found. Please reinstall the libxslt >= 1.1.0 distribution
安装libxslt相关组件
#yum install libxslt-devel
好的,当我们看到下面这句话的时候,说明你的php已经配置完成啦!
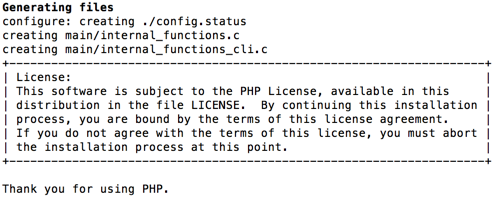
接下来我们只需要编译安装即可完成php的安装
#make && make install
看到这句话,表明安装完成!
为了保险起见,我们make test一把,看看是否真的成功了。
配置相关
php.ini配置
首先我们需要配置的是php.ini这个文件
安装目录有2个文件:php.ini-development和php.ini-production
php.ini-production 线上版本使用
php.ini-development 开发版本使用
我们选择production进行配置
# cp -a php.ini-production /usr/local/php/etc/php.ini //拷贝安装包里的php配置文件到安装目录下# rm -rf /etc/php.ini //删除默认的php配置文件
# ln -s /usr/local/php/etc/php.ini /etc/php.ini //建立软链接
php-fpm配置
拷贝php-fpm启动配置文件
# cp -a ./sapi/fpm/php-fpm.conf /usr/local/php/etc/php-fpm.conf //拷贝安装包里的php-fpm配置文件到安装目录下
# cp -a ./sapi/fpm/init.d.php-fpm /etc/init.d/php-fpm //拷贝启动文件启动
service php-fpm start
查看php是否启动成功
#ps aux | grep php

看到这些,表明你的php已经启动成功啦!
重启及关闭
service php-fpm restart service php-fpm stop
配置Nginx支持PHP
进入nginx主目录,需要修改nginx.conf
#vim nginx.conf
代开下面代码,让Nginx支持PHP,在server代码段里。
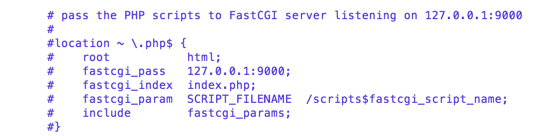
修改完,这段代码变为,红色部分为我们主机目录为/mnt/project,需要修改fastcgi_param SCRIPT_FILENAME指向对应目录即可:
location ~ \.php$ {
root /mnt/project; //项目根目录
fastcgi_pass 127.0.0.1:9000;
fastcgi_index index.php;
fastcgi_param SCRIPT_FILENAME /mnt/project$fastcgi_script_name; 在$符前面加上项目根目录
include fastcgi_params;
}
设置主目录设置为/mnt/project。
location / {
root /mnt/project; //项目根目录
index index.html index.php;
}
保存退出。
根据Nginx章的解释,我们重启Nginx服务。
#/etc/init.d/nginx restart
如果你没有按照我们在Nginx的方法配置,可以按照以下的方式重启Nginx服务
# /usr/local/nginx/sbin/nginx -s reload
重启成功!下面我们在/mnt/project目录下添加一个新文件。
#vim /mnt/project/phpinfo.php
插入以下内容
<?php phpinfo(); ?>
在浏览器中打开http://远程ip/phpinfo.php
看到这个页面,恭喜你,你的PHP已经安装配置完成了。
补充说明:
1. 关于网址重写功能以及样式显示问题,请参考:
https://book.cakephp.org/2.0/zh/installation/url-rewriting.html
https://yq.aliyun.com/ziliao/105485
2. 遇到问题:"It is not safe to rely on the system's timezone settings........",请参考:
http://php.net/manual/en/function.date-default-timezone-set.php
http://www.jb51.net/article/73059.htm
3. 遇到问题:“ php-fpm Permission denied”,请参考:
http://blog.csdn.net/k178441367/article/details/51613042,或者赋予php-fpm可执行权限
4. 遇到问题:“Fatal error: Uncaught exception 'CacheException' with message 'Cache engine _cake_core_ is not properly configured”,请参考:
https://stackoverflow.com/questions/42002751/uncaught-exception-cacheexception-with-message-cache-engine-cake-core-is
https://stackoverflow.com/questions/29408227/uncaught-exception-cacheexception-with-message-cache-engine-cake-core-is-no
http://bbs.csdn.net/topics/391014151
最后
附上我的nginx配置文件内容:cakephp项目源码下载(github的一个添删查改功能,cakephp官方教程地址)
#user nobody;worker_processes 1;#error_log logs/error.log;#error_log logs/error.log notice;#error_log logs/error.log info;#pid logs/nginx.pid;events { worker_connections 1024;}http { include mime.types; default_type application/octet-stream; #log_format main '$remote_addr - $remote_user [$time_local] "$request" ' # '$status $body_bytes_sent "$http_referer" ' # '"$http_user_agent" "$http_x_forwarded_for"'; #access_log logs/access.log main; sendfile on; #tcp_nopush on; #keepalive_timeout 0; keepalive_timeout 65; #gzip on; server { listen 88; server_name localhost;root /mnt/project/cakephp/app/webroot;index index.php; #charset koi8-r; #access_log logs/host.access.log main; location / {try_files $uri $uri/ /index.php?$uri&$args; } #error_page 404 /404.html; # redirect server error pages to the static page /50x.html # error_page 500 502 503 504 /50x.html; location = /50x.html { root html; } # proxy the PHP scripts to Apache listening on 127.0.0.1:80 # #location ~ \.php$ { # proxy_pass http://127.0.0.1; #} # pass the PHP scripts to FastCGI server listening on 127.0.0.1:9000 # location ~ \.php$ { root /mnt/project/cakephp/app/webroot; try_files $uri =404; fastcgi_pass 127.0.0.1:9000; fastcgi_index index.php; fastcgi_param SCRIPT_FILENAME $document_root$fastcgi_script_name; include fastcgi_params; fastcgi_buffer_size 128k; fastcgi_buffers 256 4k; fastcgi_busy_buffers_size 256k; fastcgi_temp_file_write_size 256k; } # deny access to .htaccess files, if Apache's document root # concurs with nginx's one # #location ~ /\.ht { # deny all; #} } # another virtual host using mix of IP-, name-, and port-based configuration # #server { # listen 8000; # listen somename:8080; # server_name somename alias another.alias; # location / { # root html; # index index.html index.htm; # } #} # HTTPS server # #server { # listen 443 ssl; # server_name localhost; # ssl_certificate cert.pem; # ssl_certificate_key cert.key; # ssl_session_cache shared:SSL:1m; # ssl_session_timeout 5m; # ssl_ciphers HIGH:!aNULL:!MD5; # ssl_prefer_server_ciphers on; # location / { # root html; # index index.html index.htm; # } #}}- CentOS7.3下安装PHP5.6.30服务
- CentOS7.0下安装PHP5.6.30服务
- 【CNMP系列】CentOS7.0下安装PHP5.6.30服务
- CentOS7下安装apache+php5+mariaDB
- CentOS7 下安装telnet服务
- CentOS7下安装FTP服务
- CentOS7下安装SVN服务
- centos7.3安装php5.6版本
- centos7安装php5.5
- centos7 安装php5.6
- centos7安装PHP5.5
- centos7 下安装Apache2+MariaDB+PHP5过程详解
- Centos7下Yum安装PHP5.5,5.6,7.0
- (二)Centos7下Yum更新安装PHP5.5,5.6,7.0
- centos7 下安装Apache2+MariaDB+PHP5过程详解
- Centos7下Yum安装PHP5.5,5.6,7.0
- Centos7下Yum安装PHP5.5,5.6,7.0
- Centos7下VSFTPD服务的安装配置
- hdu1081(dp)(多维化成一维的最大子序列)
- RILD
- java Date()的用法
- scala 未完
- 《智能主义·周鸿祎》读书笔记
- CentOS7.3下安装PHP5.6.30服务
- 网站分享
- HTTP状态码
- 青蛙变态跳台阶
- 微软云Blob存储账号使用——Java使用
- java多态
- 利用字典管理用户的登录信息
- 觉得比较好NET相关书籍(其他技术,平台也有)
- 安装虚拟机总结