Elasticsearch5.5.2版本部署中的问题-01
来源:互联网 发布:mysql 数据快照 编辑:程序博客网 时间:2024/06/06 05:33
参考:
http://www.cnblogs.com/kevingrace/p/5919021.html
http://www.cnblogs.com/xing901022/p/6030296.html
之前装过2.X版本,里面的elasticsearch-head组件是集成到版本里的,今天装的5.5.2版本,发现没有elasticsearch-head组件,需要单独安装,安装过程中遇到一些错误,特此记录下来
环境
ELK-ncnode01 192.168.96.208
ELK-ncnode02 192.168.96.209
[root@ELK-ncnode02 ~]# cat /etc/redhat-release CentOS Linux release 7.3.1611 (Core) 关闭防火墙和selinux
Elasticsearch安装配置
基础环境安装(ELK-ncnode01和ELK-ncnode02同时操作)
1)下载并安装GPG Key
[root@ELK-ncnode01 ~]# rpm --import https://artifacts.elastic.co/GPG-KEY-elasticsearch2)添加yum仓库
[root@ELK-ncnode01 ~]# vi /etc/yum.repos.d/elasticsearch.repo[elasticsearch-5.x]name=Elasticsearch repository for 5.x packagesbaseurl=https://artifacts.elastic.co/packages/5.x/yumgpgcheck=1gpgkey=https://artifacts.elastic.co/GPG-KEY-elasticsearchenabled=1autorefresh=1type=rpm-md3)安装elasticsearch
[root@ELK-ncnode01 ~]# yum install elasticsearch4)安装相关测试软件
提前先下载安装epel源:epel-release-latest-7.noarch.rpm,否则yum会报错:No Package…..
[root@ELK-ncnode01 ~]# yum install -y wget[root@ELK-ncnode01 ~]# wget http://dl.fedoraproject.org/pub/epel/epel-release-latest-7.noarch.rpm[root@ELK-ncnode01 ~]# rpm -ivh epel-release-latest-7.noarch.rpm[root@ELK-ncnode01 ~]# yum install -y redis nginx java安装完java后,检测
[root@ELK-ncnode01 ~]# java -versionopenjdk version "1.8.0_141"OpenJDK Runtime Environment (build 1.8.0_141-b16)OpenJDK 64-Bit Server VM (build 25.141-b16, mixed mode)配置部署(下面先进行elk-node1的配置)
1)配置修改配置文件
[root@ELK-ncnode01 ~]# vi /etc/elasticsearch/elasticsearch.yml 【将里面内容情况,配置下面内容】cluster.name: longtel # 组名(同一个组,组名必须一致)node.name: ELK-ncnode01 # 节点名称,建议和主机名一致path.logs: /var/log/elasticsearch/ # 日志存放的路径network.host: 0.0.0.0 # 网络设置http.port: 9200 # 端口2)启动并查看
[root@ELK-ncnode01 ~]# systemctl start elasticsearch[root@ELK-ncnode01 ~]# systemctl status elasticsearch● elasticsearch.service - Elasticsearch Loaded: loaded (/usr/lib/systemd/system/elasticsearch.service; disabled; vendor preset: disabled) Active: active (running) since Thu 2017-08-24 17:33:41 CST; 5s ago Docs: http://www.elastic.co Process: 8483 ExecStartPre=/usr/share/elasticsearch/bin/elasticsearch-systemd-pre-exec (code=exited, status=0/SUCCESS) Main PID: 8485 (java) CGroup: /system.slice/elasticsearch.service └─8485 /bin/java -Xms2g -Xmx2g -XX:+UseConcMarkSweepGC -XX:CMSInitiatingOccupancyFraction=75 -XX:+UseCMSInitiatingOccupa...Aug 24 17:33:41 ELK-ncnode02 systemd[1]: Starting Elasticsearch...Aug 24 17:33:41 ELK-ncnode02 systemd[1]: Started Elasticsearch.注意:上面可以看出elasticsearch设置的内存最小2g,最大2g
[root@ELK-ncnode02 ~]# netstat -antlp |egrep "9200|9300"tcp6 0 0 127.0.0.1:9200 :::* LISTEN 8485/java tcp6 0 0 ::1:9200 :::* LISTEN 8485/java tcp6 0 0 127.0.0.1:9300 :::* LISTEN 8485/java tcp6 0 0 ::1:9300 :::* LISTEN 8485/java 然后通过web访问(访问的浏览器最好用google浏览器)
http://192.168.96.208:19200/

3)通过命令的方式查看数据
[root@ELK-ncnode01 ~]# curl -i -XGET 'http://192.168.96.208:9200/_count?pretty' -d '{"query":{"match_all":{}}}'HTTP/1.1 200 OKWarning: 299 Elasticsearch-5.5.2-b2f0c09 "Content type detection for rest requests is deprecated. Specify the content type using the [Content-Type] header." "Thu, 24 Aug 2017 09:39:49 GMT"content-type: application/json; charset=UTF-8content-length: 95{ "count" : 0, "_shards" : { "total" : 0, "successful" : 0, "failed" : 0 }}4)接下来安装插件,使用插件进行查看~ (下面两个插件要在ELK-ncnode01和ELK-ncnode02上都要安装)
安装elasticsearch-head插件
(请特别注意,此插件的安装和2.X的版本就不同了哦)
第一步,安装git
需要从github上面下载代码,因此先要安装git
yum -y install git安装完成后,就可以直接下载代码了:
git clone git://github.com/mobz/elasticsearch-head.git下载后,修改下777权限(简单粗暴),因为是独立启动head的,所以我把它放到/usr/local/下了,参考:
[root@ELK-ncnode01 local]# chmod 777 elasticsearch-head/[root@ELK-ncnode01 local]# lsbin elasticsearch-head etc games include lib lib64 libexec sbin share src[root@ELK-ncnode01 local]# pwd/usr/local第二步,安装node
由于head插件本质上还是一个nodejs的工程,因此需要安装node,使用npm来安装依赖的包。(npm可以理解为maven)
去官网下载nodejs,https://nodejs.org/en/download/
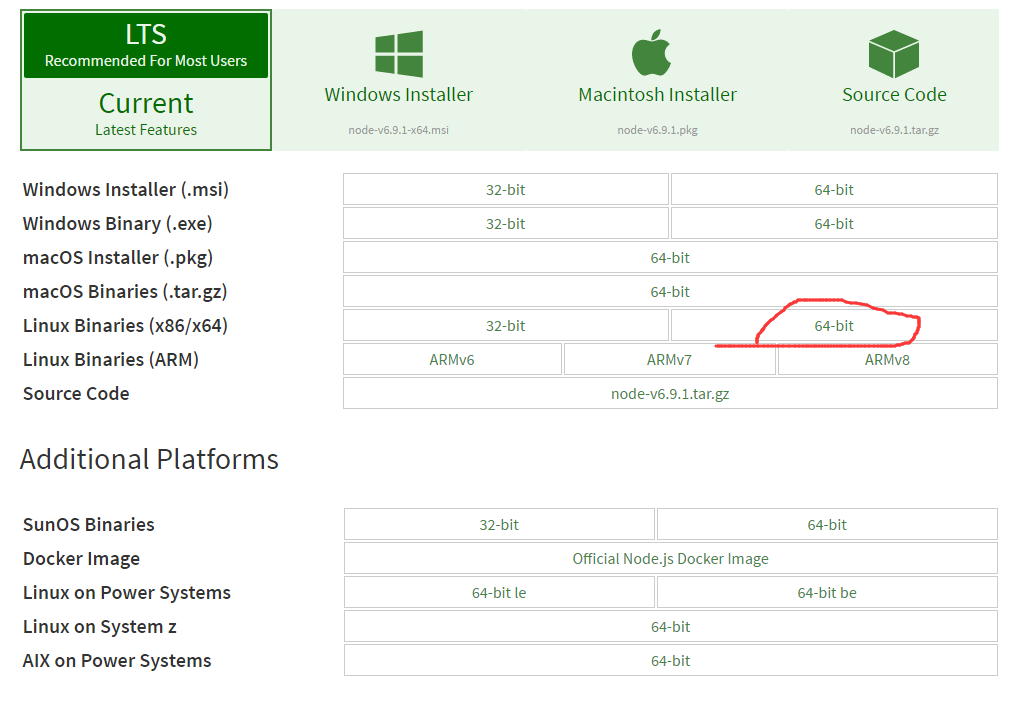
下载下来的jar包是xz格式的,一般的linux可能不识别,还需要安装xz.
[root@ELK-ncnode01 local]# yum install -y xz然后解压nodejs的安装包:
[root@ELK-ncnode01 local]# xz -d node-v6.11.2-linux-x64.tar.xz [root@ELK-ncnode01 local]# lsbin elasticsearch-head etc games include lib lib64 libexec node-v6.11.2-linux-x64.tar sbin share src[root@ELK-ncnode01 local]# tar xvf node-v6.11.2-linux-x64.tar 解压完node的安装文件后,需要配置下环境变量,编辑/etc/profile,添加
[root@ELK-ncnode01 node-v6.11.2-linux-x64]# vi /etc/profile# set node environmentexport NODE_HOME=/usr/local/node-v6.11.2-linux-x64export PATH=$PATH:$NODE_HOME/bin[root@ELK-ncnode01 node-v6.11.2-linux-x64]# source /etc/profile这个时候可以测试一下node是否生效:
[root@ELK-ncnode01 node-v6.11.2-linux-x64]# echo $NODE_HOME/usr/local/node-v6.11.2-linux-x64[root@ELK-ncnode01 node-v6.11.2-linux-x64]# node -vv6.11.2[root@ELK-ncnode01 node-v6.11.2-linux-x64]# npm -v3.10.10第三步,安装grunt
grunt是一个很方便的构建工具,可以进行打包压缩、测试、执行等等的工作,5.5里的head插件就是通过grunt启动的。因此需要安装一下grunt:
[root@ELK-ncnode01 elasticsearch-head]# npm install grunt npm WARN prefer global coffee-script@1.10.0 should be installed with -gelasticsearch-head@0.0.0 /usr/local/elasticsearch-head└─┬ grunt@1.0.1 ├── coffee-script@1.10.0 ├─┬ dateformat@1.0.12 │ ├── get-stdin@4.0.1 │ └─┬ meow@3.7.0 │ ├─┬ camelcase-keys@2.1.0 │ │ └── camelcase@2.1.1 │ ├── decamelize@1.2.0 │ ├─┬ loud-rejection@1.6.0 │ │ ├─┬ currently-unhandled@0.4.1 │ │ │ └── array-find-index@1.0.2 │ │ └── signal-exit@3.0.2 │ ├── map-obj@1.0.1 │ ├── minimist@1.2.0 │ ├─┬ normalize-package-data@2.4.0 │ │ ├── hosted-git-info@2.5.0 │ │ ├─┬ is-builtin-module@1.0.0 │ │ │ └── builtin-modules@1.1.1 │ │ ├── semver@5.4.1 │ │ └─┬ validate-npm-package-license@3.0.1 │ │ ├─┬ spdx-correct@1.0.2 │ │ │ └── spdx-license-ids@1.2.2 │ │ └── spdx-expression-parse@1.0.4 │ ├── object-assign@4.1.1 │ ├─┬ read-pkg-up@1.0.1 │ │ ├─┬ find-up@1.1.2 │ │ │ ├── path-exists@2.1.0 │ │ │ └─┬ pinkie-promise@2.0.1 │ │ │ └── pinkie@2.0.4 │ │ └─┬ read-pkg@1.1.0 │ │ ├─┬ load-json-file@1.1.0 │ │ │ ├── graceful-fs@4.1.11 │ │ │ ├─┬ parse-json@2.2.0 │ │ │ │ └─┬ error-ex@1.3.1 │ │ │ │ └── is-arrayish@0.2.1 │ │ │ ├── pify@2.3.0 │ │ │ └─┬ strip-bom@2.0.0 │ │ │ └── is-utf8@0.2.1 │ │ └── path-type@1.1.0 │ ├─┬ redent@1.0.0 │ │ ├─┬ indent-string@2.1.0 │ │ │ └─┬ repeating@2.0.1 │ │ │ └─┬ is-finite@1.0.2 │ │ │ └── number-is-nan@1.0.1 │ │ └── strip-indent@1.0.1 │ └── trim-newlines@1.0.0 ├── eventemitter2@0.4.14 ├── exit@0.1.2 ├─┬ glob@7.0.6 │ └── fs.realpath@1.0.0 ├─┬ grunt-legacy-log@1.0.0 │ ├── colors@1.1.2 │ ├─┬ grunt-legacy-log-utils@1.0.0 │ │ ├─┬ chalk@1.1.3 │ │ │ ├── ansi-styles@2.2.1 │ │ │ ├── escape-string-regexp@1.0.5 │ │ │ ├─┬ has-ansi@2.0.0 │ │ │ │ └── ansi-regex@2.1.1 │ │ │ ├── strip-ansi@3.0.1 │ │ │ └── supports-color@2.0.0 │ │ └── lodash@4.3.0 │ ├── hooker@0.2.3 │ ├── lodash@3.10.1 │ └── underscore.string@3.2.3 ├─┬ grunt-legacy-util@1.0.0 │ ├── async@1.5.2 │ ├── getobject@0.1.0 │ ├── lodash@4.3.0 │ └─┬ which@1.2.14 │ └── isexe@2.0.0 ├── iconv-lite@0.4.18 ├─┬ js-yaml@3.5.5 │ ├─┬ argparse@1.0.9 │ │ └── sprintf-js@1.0.3 │ └── esprima@2.7.3 └── rimraf@2.2.8 npm WARN elasticsearch-head@0.0.0 license should be a valid SPDX license expression[root@ELK-ncnode01 elasticsearch-head]# npm install -g grunt-cli --save (此处加-g,不加的话会出现各种错误)/usr/local/node-v6.11.2-linux-x64/bin/grunt -> /usr/local/node-v6.11.2-linux-x64/lib/node_modules/grunt-cli/bin/grunt/usr/local/node-v6.11.2-linux-x64/lib└── grunt-cli@1.2.0 [root@ELK-ncnode01 elasticsearch-head]# grunt -versiongrunt-cli v1.2.0grunt v1.0.1第四步,修改head源码
由于head的代码还是2.6版本的,直接执行有很多限制,比如无法跨机器访问。因此需要用户修改两个地方:
修改服务器监听地址
目录:/usr/local/elasticsearch-head/Gruntfile.js
connect: { server: { options: { port: 9100, hostname: '*', base: '.', keepalive: true } }}增加hostname属性,设置为*
修改连接地址:
目录:/usr/local/elasticsearch-head/_site/app.js
修改head的连接地址:
this.base_uri = this.config.base_uri || this.prefs.get(“app-base_uri”) || “http://localhost:9200“;
把localhost修改成你es的服务器地址,如:
this.base_uri = this.config.base_uri || this.prefs.get(“app-base_uri”) || “http://192.168.96.208:9200“;
第五步,运行head
首先开启5.5 ES。
然后在head目录中,执行npm install 下载以来的包:
npm install
此处会报错如下

解决方法
[root@ELK-ncnode01 elasticsearch-head]# npm install phantomjs-prebuilt@2.1.15 --ignore-scriptelasticsearch-head@0.0.0 /usr/local/elasticsearch-head└─┬ phantomjs-prebuilt@2.1.15 ├── es6-promise@4.0.5 ├─┬ extract-zip@1.6.5 │ ├─┬ concat-stream@1.6.0 │ │ └── typedarray@0.0.6 │ ├─┬ debug@2.2.0 │ │ └── ms@0.7.1 │ ├─┬ mkdirp@0.5.0 │ │ └── minimist@0.0.8 │ └─┬ yauzl@2.4.1 │ └─┬ fd-slicer@1.0.1 │ └── pend@1.2.0 ├─┬ fs-extra@1.0.0 │ ├── jsonfile@2.4.0 │ └── klaw@1.3.1 ├─┬ hasha@2.2.0 │ └── is-stream@1.1.0 ├── kew@0.7.0 ├── progress@1.1.8 ├─┬ request@2.81.0 │ ├── aws-sign2@0.6.0 │ ├── aws4@1.6.0 │ ├── caseless@0.12.0 │ ├─┬ combined-stream@1.0.5 │ │ └── delayed-stream@1.0.0 │ ├── forever-agent@0.6.1 │ ├─┬ form-data@2.1.4 │ │ └── asynckit@0.4.0 │ ├─┬ har-validator@4.2.1 │ │ ├─┬ ajv@4.11.8 │ │ │ ├── co@4.6.0 │ │ │ └─┬ json-stable-stringify@1.0.1 │ │ │ └── jsonify@0.0.0 │ │ └── har-schema@1.0.5 │ ├─┬ hawk@3.1.3 │ │ ├── boom@2.10.1 │ │ ├── cryptiles@2.0.5 │ │ ├── hoek@2.16.3 │ │ └── sntp@1.0.9 │ ├─┬ http-signature@1.1.1 │ │ ├── assert-plus@0.2.0 │ │ ├─┬ jsprim@1.4.1 │ │ │ ├── assert-plus@1.0.0 │ │ │ ├── extsprintf@1.3.0 │ │ │ ├── json-schema@0.2.3 │ │ │ └─┬ verror@1.10.0 │ │ │ └── assert-plus@1.0.0 │ │ └─┬ sshpk@1.13.1 │ │ ├── asn1@0.2.3 │ │ ├── assert-plus@1.0.0 │ │ ├── bcrypt-pbkdf@1.0.1 │ │ ├─┬ dashdash@1.14.1 │ │ │ └── assert-plus@1.0.0 │ │ ├── ecc-jsbn@0.1.1 │ │ ├─┬ getpass@0.1.7 │ │ │ └── assert-plus@1.0.0 │ │ ├── jsbn@0.1.1 │ │ └── tweetnacl@0.14.5 │ ├── is-typedarray@1.0.0 │ ├── isstream@0.1.2 │ ├── json-stringify-safe@5.0.1 │ ├── oauth-sign@0.8.2 │ ├── performance-now@0.2.0 │ ├── qs@6.4.0 │ ├── stringstream@0.0.5 │ ├─┬ tough-cookie@2.3.2 │ │ └── punycode@1.4.1 │ ├── tunnel-agent@0.6.0 │ └── uuid@3.1.0 └─┬ request-progress@2.0.1 └── throttleit@1.0.0 npm WARN optional SKIPPING OPTIONAL DEPENDENCY: fsevents@^1.0.0 (node_modules/chokidar/node_modules/fsevents):npm WARN notsup SKIPPING OPTIONAL DEPENDENCY: Unsupported platform for fsevents@1.1.2: wanted {"os":"darwin","arch":"any"} (current: {"os":"linux","arch":"x64"})npm WARN elasticsearch-head@0.0.0 license should be a valid SPDX license expression此处说明npm WARN可以忽略,如果不想看到WARN可如下执行npm install命令时添加 –no-optional
执行如下
[root@ELK-ncnode01 elasticsearch-head]# npm install --no-optionalnpm WARN elasticsearch-head@0.0.0 license should be a valid SPDX license expression还有一个WARN,打开elasticsearch-head目录下的package.json文件,找到license位置,修改为上面这个网站上存在Identifier,就可以了。如图所示,把原来的Apache内容修改为Apache-2.0。具体修改后的内容参考官网上的Identifier数值(防止后续更新,授之于渔了)。
[root@ELK-ncnode01 elasticsearch-head]# vi package.json"author": "","license": "Apache-2.0","gitHead": "0c2ac0b5723b493e4454baa7398f386ecb829412","readmeFilename": "README.textile",再次执行
[root@ELK-ncnode01 elasticsearch-head]# npm install --no-optional[root@ELK-ncnode01 elasticsearch-head]#没有一点毛病了
最后,启动nodejs
grunt server
访问:target:9100
这个时候,访问http://192.168.96.208:9100就可以访问head插件了.

访问http://192.168.96.209:9100也可以

ELK-ncnode02也要做全局的配置
[root@ELK-ncnode02 _site]# vi /etc/elasticsearch/elasticsearch.yml cluster.name: longtelnode.name: ELK-ncnode02path.logs: /var/log/elasticsearch/network.host: 0.0.0.0http.port: 9200discovery.zen.ping.unicast.hosts: ["192.168.96.208", "192.168.96.209"]启动服务
[root@ELK-ncnode02 _site]# systemctl restart elasticsearch[root@ELK-ncnode02 _site]# systemctl status elasticsearch● elasticsearch.service - Elasticsearch Loaded: loaded (/usr/lib/systemd/system/elasticsearch.service; disabled; vendor preset: disabled) Active: active (running) since Thu 2017-08-24 18:39:18 CST; 14h ago Docs: http://www.elastic.co Process: 10172 ExecStartPre=/usr/share/elasticsearch/bin/elasticsearch-systemd-pre-exec (code=exited, status=0/SUCCESS) Main PID: 10175 (java) CGroup: /system.slice/elasticsearch.service └─10175 /bin/java -Xms2g -Xmx2g -XX:+UseConcMarkSweepGC -XX:CMSInitiatingOccupancyFraction=75 -XX:+UseCMSInitiatingOccup...Aug 24 18:39:18 ELK-ncnode02 systemd[1]: Starting Elasticsearch...Aug 24 18:39:18 ELK-ncnode02 systemd[1]: Started Elasticsearch.上面的elasticsearch-head组件也要在ELK-ncnode02上安装
后续会继续完善logstash, kibana
—————————年轻的时候最幸福的事情就是拼命工作———————————
- Elasticsearch5.5.2版本部署中的问题-01
- ElasticSearch5.x版本安装遇到的问题
- 编程实践6—Elasticsearch5.0 最新版本安装问题
- ElasticSearch5.1.1集群部署
- elasticsearch5.2集群部署
- Elasticsearch5.1集群+kibana部署
- Elasticsearch5.5 部署Head插件
- Elasticsearch5.1.1安装问题
- Elasticsearch5.0 版本安装错误
- Elasticsearch5.4 版本安装错误
- 聊聊多版本部署问题
- 网站部署中的问题
- Centos7.3部署Elasticsearch5.4.0集群
- Elasticsearch5.4集群(一)安装部署
- ElasticSearch5.x安装部署常见错误
- Elasticsearch5.5+Kibana5.5安装部署
- 安装Elasticsearch5.0 部署Head插件
- Elasticsearch5.4集群(一)安装部署
- mysql常用命令
- 【MVP】DialogUtilsDialog弹窗工具类
- laravel5.5的新特性简单说明
- 概率论学习笔记_基本概念&离散型随机变量
- Unity3d编程,简易状态机(fsm)
- Elasticsearch5.5.2版本部署中的问题-01
- Kvm命令行基本操作
- 百度ueditor富文本--配置图片上传
- 手工正反面打印
- Pickit 3 Programmer使用说明及 烧写程序步骤
- 简单java单例模式 懒汉式、饿汉式以及解决线程安全问题(synchronized)
- POJ 1456 Supermarket(贪心)
- JAVA互联网架构学习之SpringMVC其四
- 分页,外连接