Python内存管理结合源码 整理补充 (未完成)
来源:互联网 发布:喜马拉雅视频剪辑软件 编辑:程序博客网 时间:2024/06/05 08:15
《Python源码阅读》之 内存管理机制1
@转载:py社区
Python的内存管理架构
_____ ______ ______ ________ [ int ] [ dict ] [ list ] ... [ string ] Python core |+3 | <----- Object-specific memory -----> | <-- Non-object memory --> | _______________________________ | | [ Python's object allocator ] | |**3层 特殊具体类型对象的内存**+2 | ####### Object memory ####### | <------ Internal buffers ------> |**2层 对象的内存** ______________________________________________________________ | [ Python's raw memory allocator (PyMem_ API) ] |+1 | <----- Python memory (under PyMem manager's control) ------> | |**1层 PyMemery的API从底层OS调用。** __________________________________________________________________ [ Underlying general-purpose allocator (ex: C library malloc) ] 0 | <------ Virtual memory allocated for the python process -------> |**底层 C实现的内存管理的方法给上层调用。** ========================================================================= _______________________________________________________________________ [ OS-specific Virtual Memory Manager (VMM) ]-1 | <--- Kernel dynamic storage allocation & management (page-based) ---> |**OS 内存管理** __________________________________ __________________________________ [ ] [ ]-2 | <-- Physical memory: ROM/RAM --> | | <-- Secondary storage (swap) --> |** 物理内存ROM/RAM**补充layer 3: Object-specific memory(int/dict/list/string....) Python 实现并维护 更高抽象层次的内存管理策略, 主要是各类特定对象的缓冲池机制. 具体见前面几篇涉及的内存分配机制layer 2: Python's object allocator Python 实现并维护 实现了创建/销毁Python对象的接口(PyObject_New/Del), 涉及对象参数/引用计数等layer 1: Python's raw memory allocator (PyMem_ API) Python 实现并维护, 包装了第0层的内存管理接口, 提供统一的raw memory管理接口 封装的原因: 不同操作系统 C 行为不一定一致, 保证可移植性, 相同语义相同行为layer 0: Underlying general-purpose allocator (ex: C library malloc) 操作系统提供的内存管理接口, 由操作系统实现并管理, Python不能干涉这一层的行为layer 1: PyMem_ API
PyMem_ API是对操作系统内存管理接口进行的封装
源文件:pymem.h
// Raw memory interface// 这里存在三个宏定义, 宏可以避免一次函数调用的开销, 提高运行效率// 不允许非配空间大小为0的内存空间#define PyMem_MALLOC(n) ((size_t)(n) > (size_t)PY_SSIZE_T_MAX ? NULL \ : malloc((n) ? (n) : 1))#define PyMem_REALLOC(p, n) ((size_t)(n) > (size_t)PY_SSIZE_T_MAX ? NULL \ : realloc((p), (n) ? (n) : 1))#define PyMem_FREE free// 这里做了三个函数的声明, 平台独立的 malloc/realloc/freePyAPI_FUNC(void *) PyMem_Malloc(size_t);PyAPI_FUNC(void *) PyMem_Realloc(void *, size_t);PyAPI_FUNC(void) PyMem_Free(void *);// ============================================================// Type-oriented memory interface// 这里还有三个类型相关的内存接口, 批量分配/重分配 n 个 类型为 type内存#define PyMem_New(type, n) \ ( ((size_t)(n) > PY_SSIZE_T_MAX / sizeof(type)) ? NULL : \ ( (type *) PyMem_Malloc((n) * sizeof(type)) ) )#define PyMem_NEW(type, n) \ ( ((size_t)(n) > PY_SSIZE_T_MAX / sizeof(type)) ? NULL : \ ( (type *) PyMem_MALLOC((n) * sizeof(type)) ) )#define PyMem_Resize(p, type, n) \ ( (p) = ((size_t)(n) > PY_SSIZE_T_MAX / sizeof(type)) ? NULL : \ (type *) PyMem_Realloc((p), (n) * sizeof(type)) )#define PyMem_RESIZE(p, type, n) \ ( (p) = ((size_t)(n) > PY_SSIZE_T_MAX / sizeof(type)) ? NULL : \ (type *) PyMem_REALLOC((p), (n) * sizeof(type)) )object.c中, 三个实现的函数调用了对应的宏
// 使用 C 写Python扩展模块时使用函数而不是对应的宏void *PyMem_Malloc(size_t nbytes){ return PyMem_MALLOC(nbytes);}void *PyMem_Realloc(void *p, size_t nbytes){ return PyMem_REALLOC(p, nbytes);}voidPyMem_Free(void *p){ PyMem_FREE(p);}Python 的内存分配策略
源码Objects/obmalloc.c
/* * "Memory management is where the rubber meets the road -- if we do the wrong * thing at any level, the results will not be good. And if we don't make the * levels work well together, we are in serious trouble." (1) * * (1) Paul R. Wilson, Mark S. Johnstone, Michael Neely, and David Boles, * "Dynamic Storage Allocation: A Survey and Critical Review", * in Proc. 1995 Int'l. Workshop on Memory Management, September 1995. */Python引入了内存池机制, 用于管理对小块内存的申请和释放
逻辑
- 如果要分配的内存空间大于 SMALL_REQUEST_THRESHOLD bytes(512 bytes), 将直接使用layer 1的内存分配接口进行分配
- 否则, 使用不同的block来满足分配需求
整个小块内存池可以视为一个层次结构
- 内存池(概念上的, 标识Python对于整个小块内存分配和释放的内存管理机制)
- arena
- pool
- block
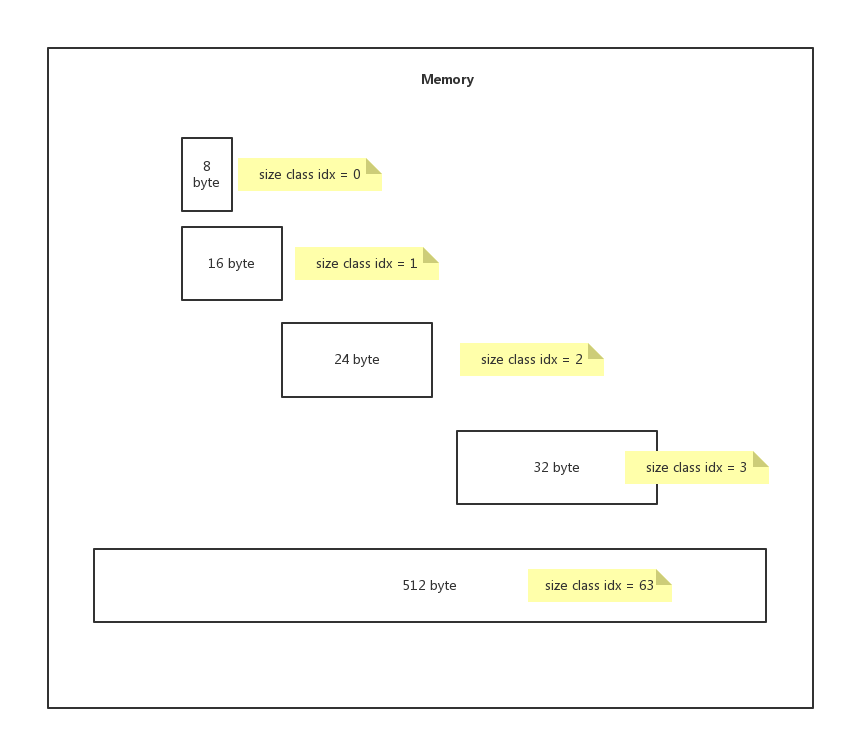
意思就是说为了保证内存对齐,我们必须是以8Bit为单位的分配内存。
比如你需要1-8bit 但是我们为了对齐内存只能分给你8bit。1个block。多余你用不完的Bit就浪费掉。
申请一块大小28字节的内存, 实际从内存中划到32字节的一个block (从size class index为3的pool里面划出)
最大是512bit 也就是63个block
pool
pool管理block, 一个pool管理着一堆有固定大小的内存块
本质: pool管理着一大块内存, 它有一定的策略, 将这块大的内存划分为多个大小一致的小块block内存.
pool size
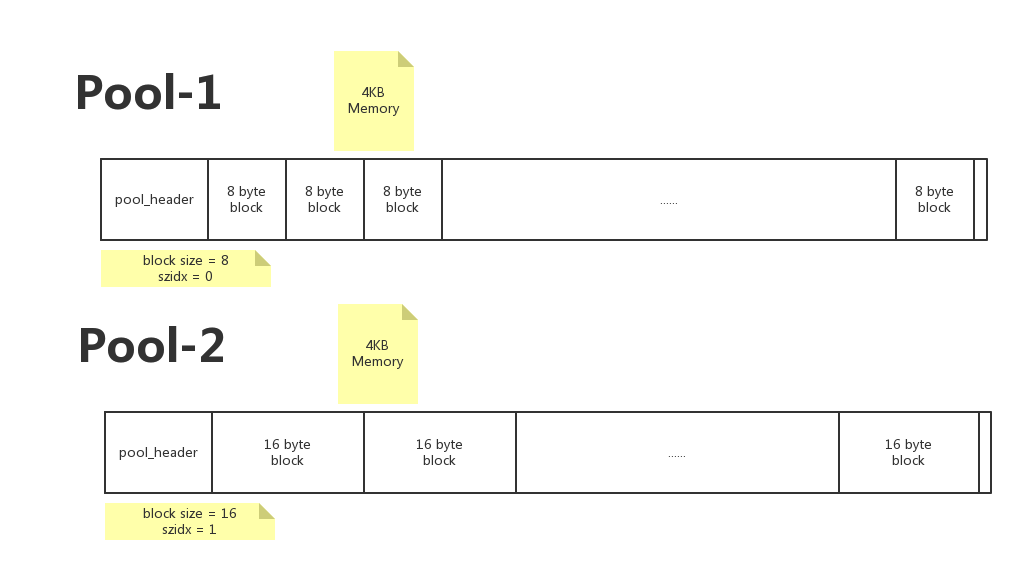
在Python中, 一个pool的大小通常为一个系统内存页. 4kB
obmalloc.c#define SYSTEM_PAGE_SIZE (4 * 1024)#define SYSTEM_PAGE_SIZE_MASK (SYSTEM_PAGE_SIZE - 1)#define POOL_SIZE SYSTEM_PAGE_SIZE /* must be 2^N */#define POOL_SIZE_MASK SYSTEM_PAGE_SIZE_MASKpool组成
pool的4kB内存 = pool_header + block集合(N多大小一样的block)
pool_header
/* Pool for small blocks. */struct pool_header { union { block *_padding; uint count; } ref; /* number of allocated blocks */ block *freeblock; /* pool's free list head */ struct pool_header *nextpool; /* next pool of this size class */ struct pool_header *prevpool; /* previous pool "" */ uint arenaindex; /* index into arenas of base adr */ uint szidx; /* block size class index */ - size class index uint nextoffset; /* bytes to virgin block */ uint maxnextoffset; /* largest valid nextoffset */};pool_header的作用
- 与其他pool链接, 组成双向链表
- 维护pool中可用的block, 单链表
- 保存 szidx , 这个和该pool中block的大小有关系, (block size=8, szidx=0), (block size=16, szidx=1)…用于内存分配时匹配到拥有对应大小block的pool
- arenaindex, 后面说
pool初始化
从内存中初始化一个全新的空的pool
Objects/obmalloc.c的
void *PyObject_Malloc(size_t nbytes){ ... init_pool: // 1. 连接到 used_pools 双向链表, 作为表头 // 注意, 这里 usedpools[0] 保存着 block size = 8 的所有used_pools的表头 /* Frontlink to used pools. */ next = usedpools[size + size]; /* == prev */ pool->nextpool = next; pool->prevpool = next; next->nextpool = pool; next->prevpool = pool; pool->ref.count = 1; // 如果已经初始化过了...这里看初始化, 跳过 if (pool->szidx == size) { /* Luckily, this pool last contained blocks * of the same size class, so its header * and free list are already initialized. */ bp = pool->freeblock; pool->freeblock = *(block **)bp; UNLOCK(); return (void *)bp; } /* * Initialize the pool header, set up the free list to * contain just the second block, and return the first * block. */ // 开始初始化pool_header // 这里 size = (uint)(nbytes - 1) >> ALIGNMENT_SHIFT; 其实是Size class idx, 即szidx pool->szidx = size; // 计算获得每个block的size size = INDEX2SIZE(size); // 注意 #define POOL_OVERHEAD ROUNDUP(sizeof(struct pool_header)) // bp => 初始化为pool + pool_header size, 跳过pool_header的内存 bp = (block *)pool + POOL_OVERHEAD; // 计算偏移量, 这里的偏移量是绝对值 // #define POOL_SIZE SYSTEM_PAGE_SIZE /* must be 2^N */ // POOL_SIZE = 4kb, POOL_OVERHEAD = pool_header size // 下一个偏移位置: pool_header size + 2 * size pool->nextoffset = POOL_OVERHEAD + (size << 1); // 4kb - size pool->maxnextoffset = POOL_SIZE - size; // freeblock指向 bp + size = pool_header size + size pool->freeblock = bp + size; // 赋值NULL *(block **)(pool->freeblock) = NULL; UNLOCK(); return (void *)bp; }未完
阅读全文
0 0
- Python内存管理结合源码 整理补充 (未完成)
- android Activity调度机制与内存管理(未完成)
- Oracle内存结构整理--未完成
- 读内存管理(整理)
- 分布式资源整理(未完成)
- bug整理1(未完成)
- Linux-内存管理-待补充
- STL内存管理---整理自STL源码剖析
- C++内存分配(未完成)
- kubelet源码分析(未完成)
- boost内存管理-堆内存managed_heap_memory的使用(未完成)
- 内存管理以及相应的处理(补充)
- 图解STL内存管理的两种边界情况(STL源码剖析补充)
- Python 安装 SQLAlchemy(未完成)
- Oracle基础知识-内存管理(未整理)
- Android内存管理整理
- Android内存管理整理
- java图形界面整理(未完成版)
- 使用java swing实现贪吃蛇
- Matrics讲解
- Maven详解(四)------ 常用的Maven命令
- Activity的生命周期
- git 分支 合并
- Python内存管理结合源码 整理补充 (未完成)
- 不定宽高元素的水平垂直居中
- 9章 进程关系
- C++中栈操作
- numpy.random.choice 中replace 的含义
- 小小项目4:贪吃蛇
- 文本自动生成研究进展与趋势
- python 并集union, 交集intersection, 差集difference
- Django url管理之include