Python之路【第二十三篇】爬虫
来源:互联网 发布:centos 搜索文件内容 编辑:程序博客网 时间:2024/05/13 05:54
difference between urllib and urllib2
自己翻译的装逼必备

What is the difference between urllib and urllib2 modules of Python?#python的urllib2模块和urllib模块之间有什么不同呢?You might be intrigued by the existence of two separate URL modules in Python - urllib and urllib2. Even more intriguing: they are not alternatives for each other. So what is the difference between urllib and urllib2, and do we need them both?#这两个模块你可能好奇,他们不是互相替代的模块。所以什么是他们之间的不同呢?什么时候我们使用他们?urllib and urllib2 are both Python modules that do URL request related stuff but offer different functionalities. Their two most significant differences are listed below:#urlib和urlib2他们都是访问URL相关请求功能的模块,下面列出了他们之间的重要差异:urllib2 can accept a Request object to set the headers for a URL request, urllib accepts only a URL. That means, you cannot masquerade your User Agent string etc.#urlib2 可以接受请求对象去设置这个请求的头部,urlib仅能接收一个URL意思是你不能伪装你的用户代理字符串。urllib provides the urlencode method which is used for the generation of GET query strings, urllib2 doesn't have such a function. This is one of the reasons why urllib is often used along with urllib2.#urlib 提供了 urlencode 方法用户生成和查询字符串,urlib2不支持这个功能,这是为什么常常urlib和urlib2一起使用的原因For other differences between urllib and urllib2 refer to their documentations, the links are given in the References section.#看下面的链接Tip: if you are planning to do HTTP stuff only, check out httplib2, it is much better than httplib or urllib or urllib2.#如果你仅仅是要获取http页面的东西的话,看看httplib2,它是比httplib or urlib or urlib2 更好的~~
在查询的时候看到的文章很不错:
http://www.hacksparrow.com/python-difference-between-urllib-and-urllib2.html
References
- urllib
- urllib2
在Python3中合并了 urllib 和 urllib2, 统一命名为 urllib 了
urllib
整个Urllib的源码也就1000来行可以自己看下源码~~,并且urllib2和urllib一样也就一个文件~
1、urllib.urlopen(url, data=None, proxies=None, context=None)
打开一个url的方法,返回一个文件对象,然后可以进行类似文件对象的操作。
import urllibf = urllib.urlopen('http://www.baidu.com/')content = f.readlines()print content
对象返回的对象提供的方法如下:
#这些方法的使用方式与文件对象完全一样read() , readline() ,readlines() , fileno() , close() #返回一个请求头信息content = f.info()print content'''info方法内部调用的是headers方法 def info(self): return self.headers'''#返回请求的状态码信息content = f.getcode()print content#返回请求的url信息content = f.geturl()print content
2、urllib.urlencode(query) 将URL中的键值对一链接符&划分
>>> urllib.urlencode({'word':'luotianshuai','age':18})'age=18&word=luotianshuai'所以我们可以结合urllib.urlopen来实现GET和POST请求
GET
import urllibparams = urllib.urlencode({'word':'luotianshuai','age':18})'''>>> urllib.urlencode({'word':'luotianshuai','age':18})'age=18&word=luotianshuai''''f = urllib.urlopen('http://zhidao.baidu.com/search?%s' % params)print f.read()
POST
import urllibparams = urllib.urlencode({'word':'luotianshuai','age':18})'''>>> urllib.urlencode({'word':'luotianshuai','age':18})'age=18&word=luotianshuai''''f = urllib.urlopen('http://zhidao.baidu.com/search',params)for i in f.read().split('\n'): print i
urllib2
import urllib2import jsonimport cookielibdef urllib2_request(url, method="GET", cookie="", headers={}, data=None): """ :param url: 要请求的url :param cookie: 请求方式,GET、POST、DELETE、PUT.. :param cookie: 要传入的cookie,cookie= 'k1=v1;k1=v2' :param headers: 发送数据时携带的请求头,headers = {'ContentType':'application/json; charset=UTF-8'} :param data: 要发送的数据GET方式需要传入参数,data={'d1': 'v1'} :return: 返回元祖,响应的字符串内容 和 cookiejar对象 对于cookiejar对象,可以使用for循环访问: for item in cookiejar: print item.name,item.value """ if data: data = json.dumps(data) cookie_jar = cookielib.CookieJar() handler = urllib2.HTTPCookieProcessor(cookie_jar) opener = urllib2.build_opener(handler) opener.addheaders.append(['Cookie', 'k1=v1;k1=v2']) request = urllib2.Request(url=url, data=data, headers=headers) request.get_method = lambda: method response = opener.open(request) origin = response.read() return origin, cookie_jar# GETresult = urllib2_request('http://127.0.0.1:8001/index/', method="GET")# POSTresult = urllib2_request('http://127.0.0.1:8001/index/', method="POST", data= {'k1': 'v1'})# PUTresult = urllib2_request('http://127.0.0.1:8001/index/', method="PUT", data= {'k1': 'v1'})封装urllib请求
requests
上面是吧urllib2进行了封装并没有实现上传文件要是上传文件的话就更麻烦了,所以又出现了一个模块requests上面的操作就相当于底层的东西了,requests对其进行了封装!
所以我们只需安装个包就OK了~
# 1、基本POST实例 import requests payload = {'key1': 'value1', 'key2': 'value2'}ret = requests.post("http://httpbin.org/post", data=payload) print ret.text # 2、发送请求头和数据实例 import requestsimport json url = 'https://api.github.com/some/endpoint'payload = {'some': 'data'}headers = {'content-type': 'application/json'} ret = requests.post(url, data=json.dumps(payload), headers=headers) print ret.textprint ret.cookies#向https://api.github.com/some/endpoint发送一个POST请求,将请求和相应相关的内容封装在 ret 对象中。
二、其他请求
requests.get(url, params=None, **kwargs)requests.post(url, data=None, json=None, **kwargs)requests.put(url, data=None, **kwargs)requests.head(url, **kwargs)requests.delete(url, **kwargs)requests.patch(url, data=None, **kwargs)requests.options(url, **kwargs) # 以上方法均是在此方法的基础上构建requests.request(method, url, **kwargs)
requests模块已经将常用的Http请求方法为用户封装完成,用户直接调用其提供的相应方法即可,其中方法的所有参数有:
def request(method, url, **kwargs): """Constructs and sends a :class:`Request <Request>`. :param method: method for the new :class:`Request` object. :param url: URL for the new :class:`Request` object. :param params: (optional) Dictionary or bytes to be sent in the query string for the :class:`Request`. :param data: (optional) Dictionary, bytes, or file-like object to send in the body of the :class:`Request`. :param json: (optional) json data to send in the body of the :class:`Request`. :param headers: (optional) Dictionary of HTTP Headers to send with the :class:`Request`. :param cookies: (optional) Dict or CookieJar object to send with the :class:`Request`. :param files: (optional) Dictionary of ``'name': file-like-objects`` (or ``{'name': ('filename', fileobj)}``) for multipart encoding upload. :param auth: (optional) Auth tuple to enable Basic/Digest/Custom HTTP Auth. :param timeout: (optional) How long to wait for the server to send data before giving up, as a float, or a :ref:`(connect timeout, read timeout) <timeouts>` tuple. :type timeout: float or tuple :param allow_redirects: (optional) Boolean. Set to True if POST/PUT/DELETE redirect following is allowed. :type allow_redirects: bool :param proxies: (optional) Dictionary mapping protocol to the URL of the proxy. :param verify: (optional) whether the SSL cert will be verified. A CA_BUNDLE path can also be provided. Defaults to ``True``. :param stream: (optional) if ``False``, the response content will be immediately downloaded. :param cert: (optional) if String, path to ssl client cert file (.pem). If Tuple, ('cert', 'key') pair. :return: :class:`Response <Response>` object :rtype: requests.Response Usage:: >>> import requests >>> req = requests.request('GET', 'http://httpbin.org/get') <Response [200]> """ # By using the 'with' statement we are sure the session is closed, thus we # avoid leaving sockets open which can trigger a ResourceWarning in some # cases, and look like a memory leak in others. with sessions.Session() as session: return session.request(method=method, url=url, **kwargs)
更多requests模块相关的文档见:http://cn.python-requests.org/zh_CN/latest/
结合reques可以进行浏览器一模一样的工作!
#!/usr/bin/env python#-*- coding:utf-8 -*-__author__ = 'luotianshuai'import requestsimport jsonlogin_dic = { 'email':'shuaige@qq.com', 'password':'shuaige!', '_ref':'frame',}login_ret = requests.post(url='https://huaban.com/auth/', data=login_dic, )print login_ret.textprint '*' * 50check_my_info = requests.get(url='http://huaban.com/ugb8cx9ky3/following/')print check_my_info.text
举例来说如果是在web上聊天原理上也是通过get或者post发送数据过去那么我们就可以通过reques来进行发送消息访问各种url 大赞~~
scrapy
Scrapy是一个为了爬取网站数据,提取结构性数据而编写的应用框架。 其可以应用在数据挖掘,信息处理或存储历史数据等一系列的程序中。
其最初是为了页面抓取 (更确切来说, 网络抓取 )所设计的, 也可以应用在获取API所返回的数据(例如 Amazon Associates Web Services ) 或者通用的网络爬虫。Scrapy用途广泛,可以用于数据挖掘、监测和自动化测试。
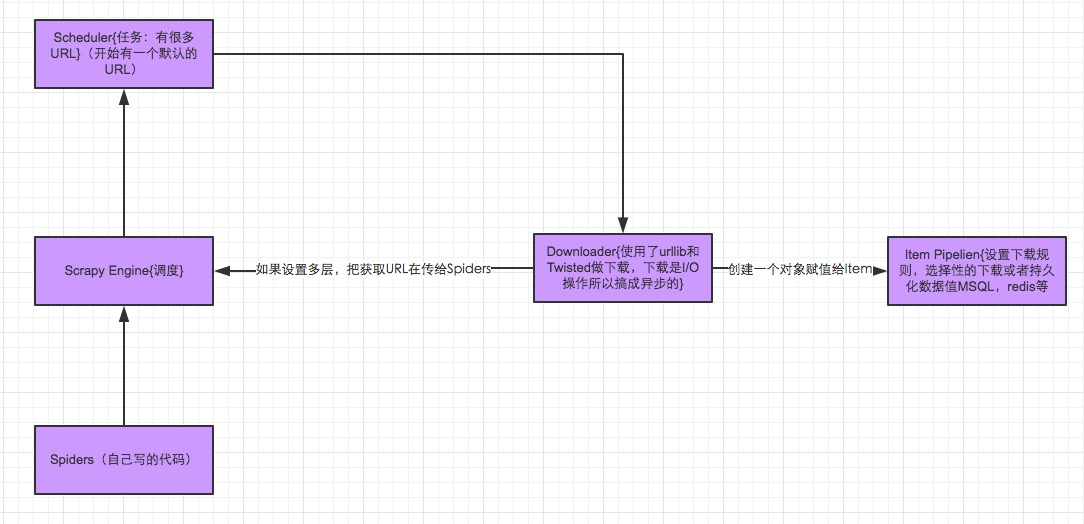
requests本质就是就是发送http请求,如果在requests基础上做个封装,我去某个网站或者某个域名一直去发送请求找到所有的url,下载东西的请求在写个方法源源不断的下载东西!这样我们就写了个框架。
Scrapy 使用了 Twisted异步网络库来处理网络通讯。整体架构大致如下
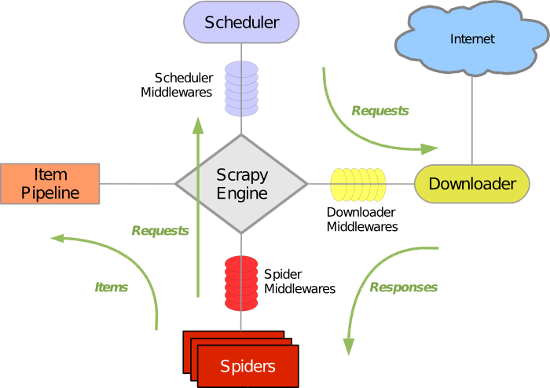
Scrapy主要包括了以下组件:
- 引擎(Scrapy)
用来处理整个系统的数据流处理, 触发事务(框架核心) - 调度器(Scheduler)
用来接受引擎发过来的请求, 压入队列中, 并在引擎再次请求的时候返回. 可以想像成一个URL(抓取网页的网址或者说是链接)的优先队列, 由它来决定下一个要抓取的网址是什么, 同时去除重复的网址 - 下载器(Downloader)
用于下载网页内容, 并将网页内容返回给蜘蛛(Scrapy下载器是建立在twisted这个高效的异步模型上的) - 爬虫(Spiders)
爬虫是主要干活的, 用于从特定的网页中提取自己需要的信息, 即所谓的实体(Item)。用户也可以从中提取出链接,让Scrapy继续抓取下一个页面 - 项目管道(Pipeline)
负责处理爬虫从网页中抽取的实体,主要的功能是持久化实体、验证实体的有效性、清除不需要的信息。当页面被爬虫解析后,将被发送到项目管道,并经过几个特定的次序处理数据。 - 下载器中间件(Downloader Middlewares)
位于Scrapy引擎和下载器之间的框架,主要是处理Scrapy引擎与下载器之间的请求及响应。 - 爬虫中间件(Spider Middlewares)
介于Scrapy引擎和爬虫之间的框架,主要工作是处理蜘蛛的响应输入和请求输出。 - 调度中间件(Scheduler Middewares)
介于Scrapy引擎和调度之间的中间件,从Scrapy引擎发送到调度的请求和响应。
Scrapy中的数据流由执行引擎控制,其过程如下:
- 引擎打开一个网站(open a domain),找到处理该网站的Spider并向该spider请求第一个要爬取的URL(s)。
- 引擎从Spider中获取到第一个要爬取的URL并在调度器(Scheduler)以Request调度。
- 引擎向调度器请求下一个要爬取的URL。
- 调度器返回下一个要爬取的URL给引擎,引擎将URL通过下载中间件(请求(request)方向)转发给下载器(Downloader)。
- 一旦页面下载完毕,下载器生成一个该页面的Response,并将其通过下载中间件(返回(response)方向)发送给引擎。
- 引擎从下载器中接收到Response并通过Spider中间件(输入方向)发送给Spider处理。
- Spider处理Response并返回爬取到的Item及(跟进的)新的Request给引擎。
- 引擎将(Spider返回的)爬取到的Item给Item Pipeline,将(Spider返回的)Request给调度器。
- (从第二步)重复直到调度器中没有更多地request,引擎关闭该网站。
一、安装
pip install Scrapy#windows平台需要依赖pywin32,请根据自己系统32/64位选择下载安装,https://sourceforge.net/projects/pywin32/
在MAC安装的时候遇到了个有趣的问题自己总结了下面的文档~~,顺便赞下Google
I resolved a problem ,when you you install scrapy-----{mac os system}, maybe you will get error like:'''sted>=10.0.0->Scrapy)Installing collected packages: six, w3lib, parsel, PyDispatcher, Twisted, Scrapy Found existing installation: six 1.4.1 DEPRECATION: Uninstalling a distutils installed project (six) has been deprecated and will be removed in a future version. This is due to the fact that uninstalling a distutils project will only partially uninstall the project. Uninstalling six-1.4.1:Exception:Traceback (most recent call last): File "/Library/Python/2.7/site-packages/pip-8.1.1-py2.7.egg/pip/basecommand.py", line 209, in main status = self.run(options, args) File "/Library/Python/2.7/site-packages/pip-8.1.1-py2.7.egg/pip/commands/install.py", line 317, in run prefix=options.prefix_path, File "/Library/Python/2.7/site-packages/pip-8.1.1-py2.7.egg/pip/req/req_set.py", line 726, in install requirement.uninstall(auto_confirm=True) File "/Library/Python/2.7/site-packages/pip-8.1.1-py2.7.egg/pip/req/req_install.py", line 746, in uninstall paths_to_remove.remove(auto_confirm) File "/Library/Python/2.7/site-packages/pip-8.1.1-py2.7.egg/pip/req/req_uninstall.py", line 115, in remove renames(path, new_path) File "/Library/Python/2.7/site-packages/pip-8.1.1-py2.7.egg/pip/utils/__init__.py", line 267, in renames shutil.move(old, new) File "/System/Library/Frameworks/Python.framework/Versions/2.7/lib/python2.7/shutil.py", line 302, in move copy2(src, real_dst) File "/System/Library/Frameworks/Python.framework/Versions/2.7/lib/python2.7/shutil.py", line 131, in copy2 copystat(src, dst) File "/System/Library/Frameworks/Python.framework/Versions/2.7/lib/python2.7/shutil.py", line 103, in copystat os.chflags(dst, st.st_flags)OSError: [Errno 1] Operation not permitted: '/tmp/pip-ZVi5QO-uninstall/System/Library/Frameworks/Python.framework/Versions/2.7/Extras/lib/python/six-1.4.1-py2.7.egg-info'You are using pip version 8.1.1, however version 8.1.2 is available.You should consider upgrading via the 'pip install --upgrade pip' command.LuoTimdeMacBook-Pro-2:~ luotim$ sudo pip install Scrapy --ingnore-installed six'''Six is a Python 2 and 3 compatibility library.frist thanks google and what's fuck baidu ! so you should be do this to resolved the problem:1、Download the six-1.10.0.tar.gz packagewget https://pypi.python.org/packages/b3/b2/238e2590826bfdd113244a40d9d3eb26918bd798fc187e2360a8367068db/six-1.10.0.tar.gz#md5=34eed507548117b2ab523ab14b2f8b552、UnZip software packagetar -zxvf six-1.10.0.tar.gz3、Use this command to install it.cd cd six-1.10.0sudo python setup.py installhttp://stackoverflow.com/questions/29485741/unable-to-upgrade-python-six-package-in-mac-osx-10-10-2
二、基本使用
1、创建项目
运行命令他和Django一样要想穿件Project必须执行下面的命令:
scrapy startproject your_project_name
将会在执行命令的目录自动创建如下文件:
LuoTimdeMacBook-Pro-2:day26 luotim$ tree meinv/meinv/├── meinv│ ├── __init__.py│ ├── items.py│ ├── pipelines.py│ ├── settings.py│ └── spiders│ └── __init__.py└── scrapy.cfg2 directories, 6 files
- scrapy.cfg 项目的配置信息,主要为Scrapy命令行工具提供一个基础的配置信息。(真正爬虫相关的配置信息在settings.py文件中)
- items.py 设置数据存储模板,用于结构化数据,如:Django的Model
- pipelines 数据处理行为,如:一般结构化的数据持久化
- settings.py 配置文件,如:递归的层数、并发数,延迟下载等
- spiders 爬虫目录,如:创建文件,编写爬虫规则
2、编写爬虫
注意:一般创建爬虫文件时,以网站域名命名
在spiders目录中新建 xiaohuar_spider.py 文件
#!/usr/bin/env python#-*- coding:utf-8 -*-__author__ = 'luotianshuai'import scrapy#定义一个类class XiaoHuarSpider(scrapy.spiders.Spider): #这个类是有名字的可以随便定义 name = "xiaohuar" #定义限制只能在这个域名下爬 allowed_domains = ["xiaohuar.com"] #起始URL start_urls = [ "http://www.xiaohuar.com/hua/", ] ''' #当程序运行的时候,会自动执行我们定义的上面的类,并访问start_urls并下载里面的内容封装起来传给parese中的"response" 这个都是scrapy内部干的 ''' def parse(self, response): # print(response, type(response)) # from scrapy.http.response.html import HtmlResponse # print(response.body_as_unicode()) '''然后就可以通过response获取这次请求的相关信息''' current_url = response.url body = response.body unicode_body = response.body_as_unicode()
3、运行
进入project_name目录,运行命令!
#进入scrapy项目目录里cd meinv#执行命令,这个spider_name就是在我们定义爬虫的那个类里的name字段scrapy crawl spider_name --nolog
4、递归的访问
以上的爬虫仅仅是爬去初始页,而我们爬虫是需要源源不断的执行下去,直到所有的网页被执行完毕
#!/usr/bin/env python#-*- coding:utf-8 -*-__author__ = 'luotianshuai'import scrapyfrom scrapy.http import Requestfrom scrapy.selector import HtmlXPathSelectorimport reimport urllibimport osclass XiaoHuarSpider(scrapy.spiders.Spider): name = "xiaohuar" allowed_domains = ["xiaohuar.com"] start_urls = [ "http://www.xiaohuar.com/list-1-1.html", ] def parse(self, response): ''' 1 分析页面 2 找到页面中符合规则的内容(校花图片),保存 3 找到所有的a标签,再访问其他a标签,一层一层的搞下去 ''' hxs = HtmlXPathSelector(response) ''' hxs = HtmlXPathSelector(response) #格式化源码 #以前咱们从html页面中去获取某些数据的时候需要用正则,现在不用了scrapy给咱们提供了类选择器 #只要创建一个对象然后他就会页面中去找,他支持 --链式编程-- 类似于找: div[@class='xxx]的标签 如果在加个/a 就是div[@class='xxx]/a 就是div下的class='xxx'的下面的a标签 ''' # 如果url是 http://www.xiaohuar.com/list-1-\d+.html通过正则去判断,这里首选需要了解的是 # 这个网站的URL设计就可以了,这是符合URL的 if re.match('http://www.xiaohuar.com/list-1-\d+.html', response.url): #这里是调用hxs然后去找到div下class='item_list infinite_scroll'下的div, #这个同样也是需要看下网页的设计结构,校花网的设计结构就是这样的嘿嘿.... items = hxs.select('//div[@class="item_list infinite_scroll"]/div') for i in range(len(items)): #这个校花里的DIV是可以通过索引去取值的 src = hxs.select( '//div[@class="item_list infinite_scroll"]/div[%d]//div[@class="img"]/a/img/@src' % i).extract() #@表示取里面的属性 name = hxs.select( '//div[@class="item_list infinite_scroll"]/div[%d]//div[@class="img"]/span/text()' % i).extract() school = hxs.select( '//div[@class="item_list infinite_scroll"]/div[%d]//div[@class="img"]/div[@class="btns"]/a/text()' % i).extract() if src: ab_src = "http://www.xiaohuar.com" + src[0] file_name = "%s_%s.jpg" % (school[0].encode('utf-8'), name[0].encode('utf-8')) #这个方法下载文件,并且file_name为文件 urllib.urlretrieve(ab_src, file_name) # 获取所有的url,继续访问,并在其中寻找相同的url all_urls = hxs.select('//a/@href').extract() #查找所有的A标签有href属性的URL #去循环他 for url in all_urls: #并且这里在加了一个判断,也可以不加,并且符合 if url.startswith('http://www.xiaohuar.com/list-1-'): #如果你返回了一个URL并且有callback就会去递归,还去执行self.parse yield Request(url, callback=self.parse)
以上代码将符合规则的页面中的图片保存在指定目录,并且在HTML源码中找到所有的其他 a 标签的href属性,从而“递归”的执行下去,直到所有的页面都被访问过为止。以上代码之所以可以进行“递归”的访问相关URL,关键在于parse方法使用了 yield Request对象。
执行效果,哇哦·
如果上面执行的话会下载很多层,我已我们可以设置层数:可以修改settings.py 中的配置文件,以此来指定“递归”的层数,如: DEPTH_LIMIT = 1
 选择器demo
更多选择器规则:http://scrapy-chs.readthedocs.io/zh_CN/latest/topics/selectors.html
5、格式化处理
上述实例只是简单的图片处理,所以在parse方法中直接处理。如果对于想要获取更多的数据(获取页面的价格、商品名称、QQ等),则可以利用Scrapy的items将数据格式化,然后统一交由pipelines来处理。
在items.py中创建类:
# -*- coding: utf-8 -*- # Define here the models for your scraped items## See documentation in:# http://doc.scrapy.org/en/latest/topics/items.html import scrapy class JieYiCaiItem(scrapy.Item): company = scrapy.Field() title = scrapy.Field() qq = scrapy.Field() info = scrapy.Field() more = scrapy.Field()
上述定义模板,以后对于从请求的源码中获取的数据同意按照此结构来获取,所以在spider中需要有一下操作:
#!/usr/bin/env python# -*- coding:utf-8 -*-import scrapyimport hashlibfrom beauty.items import JieYiCaiItemfrom scrapy.http import Requestfrom scrapy.selector import HtmlXPathSelectorfrom scrapy.spiders import CrawlSpider, Rulefrom scrapy.linkextractors import LinkExtractorclass JieYiCaiSpider(scrapy.spiders.Spider): count = 0 url_set = set() name = "jieyicai" domain = 'http://www.jieyicai.com' allowed_domains = ["jieyicai.com"] start_urls = [ "http://www.jieyicai.com", ] rules = [ #下面是符合规则的网址,但是不抓取内容,只是提取该页的链接(这里网址是虚构的,实际使用时请替换) #Rule(SgmlLinkExtractor(allow=(r'http://test_url/test?page_index=\d+'))), #下面是符合规则的网址,提取内容,(这里网址是虚构的,实际使用时请替换) #Rule(LinkExtractor(allow=(r'http://www.jieyicai.com/Product/Detail.aspx?pid=\d+')), callback="parse"), ] def parse(self, response): md5_obj = hashlib.md5() md5_obj.update(response.url) md5_url = md5_obj.hexdigest() if md5_url in JieYiCaiSpider.url_set: pass else: JieYiCaiSpider.url_set.add(md5_url) hxs = HtmlXPathSelector(response) if response.url.startswith('http://www.jieyicai.com/Product/Detail.aspx'): item = JieYiCaiItem() item['company'] = hxs.select('//span[@class="username g-fs-14"]/text()').extract() item['qq'] = hxs.select('//span[@class="g-left bor1qq"]/a/@href').re('.*uin=(?P<qq>\d*)&') item['info'] = hxs.select('//div[@class="padd20 bor1 comard"]/text()').extract() item['more'] = hxs.select('//li[@class="style4"]/a/@href').extract() item['title'] = hxs.select('//div[@class="g-left prodetail-text"]/h2/text()').extract() yield item current_page_urls = hxs.select('//a/@href').extract() for i in range(len(current_page_urls)): url = current_page_urls[i] if url.startswith('/'): url_ab = JieYiCaiSpider.domain + url yield Request(url_ab, callback=self.parse)
此处代码的关键在于:
- 将获取的数据封装在了Item对象中
- yield Item对象 (一旦parse中执行yield Item对象,则自动将该对象交个pipelines的类来处理)
# -*- coding: utf-8 -*-# Define your item pipelines here## Don't forget to add your pipeline to the ITEM_PIPELINES setting# See: http://doc.scrapy.org/en/latest/topics/item-pipeline.htmlimport jsonfrom twisted.enterprise import adbapiimport MySQLdb.cursorsimport remobile_re = re.compile(r'(13[0-9]|15[012356789]|17[678]|18[0-9]|14[57])[0-9]{8}')phone_re = re.compile(r'(\d+-\d+|\d+)')class JsonPipeline(object): def __init__(self): self.file = open('/Users/wupeiqi/PycharmProjects/beauty/beauty/jieyicai.json', 'wb') def process_item(self, item, spider): line = "%s %s\n" % (item['company'][0].encode('utf-8'), item['title'][0].encode('utf-8')) self.file.write(line) return itemclass DBPipeline(object): def __init__(self): self.db_pool = adbapi.ConnectionPool('MySQLdb', db='DbCenter', user='root', passwd='123', cursorclass=MySQLdb.cursors.DictCursor, use_unicode=True) def process_item(self, item, spider): query = self.db_pool.runInteraction(self._conditional_insert, item) query.addErrback(self.handle_error) return item def _conditional_insert(self, tx, item): tx.execute("select nid from company where company = %s", (item['company'][0], )) result = tx.fetchone() if result: pass else: phone_obj = phone_re.search(item['info'][0].strip()) phone = phone_obj.group() if phone_obj else ' ' mobile_obj = mobile_re.search(item['info'][1].strip()) mobile = mobile_obj.group() if mobile_obj else ' ' values = ( item['company'][0], item['qq'][0], phone, mobile, item['info'][2].strip(), item['more'][0]) tx.execute("insert into company(company,qq,phone,mobile,address,more) values(%s,%s,%s,%s,%s,%s)", values) def handle_error(self, e): print 'error',e
上述中的pipelines中有多个类,到底Scapy会自动执行那个?哈哈哈哈,当然需要先配置了,不然Scapy就蒙逼了。。。
在settings.py中做如下配置:
ITEM_PIPELINES = { 'beauty.pipelines.DBPipeline': 300, 'beauty.pipelines.JsonPipeline': 100,}# 每行后面的整型值,确定了他们运行的顺序,item按数字从低到高的顺序,通过pipeline,通常将这些数字定义在0-1000范围内。
- Python之路【第二十三篇】爬虫
- Python爬虫之路
- Python之路【第十九篇】:爬虫
- python之路之python爬虫
- NLP之路-python爬虫
- python 爬虫之路教程
- Python爬虫之基础篇
- Python爬虫之分布式爬虫
- python网络爬虫学习之路
- python练手之爬虫篇(一)
- 把玩之python爬虫urllib2高级篇
- 把玩之python爬虫cookie篇
- Python--网络爬虫之基础篇
- Python之网络爬虫
- Python--之网络爬虫
- python之xpath爬虫
- python之文本爬虫
- python之爬虫框架
- c++ fill函数,fill与memset函数的区别
- UI18-使用NSJSONSerialization方法解析JSON
- 【IOS】IOS常用第三方库总结
- cacti监控部署——网络流量监控
- 欢迎使用CSDN-markdown编辑器
- Python之路【第二十三篇】爬虫
- Hibernate懒加载策略
- 《MySQL入门很简单》学习笔记(10)之第10章查询数据(关键词:数据库/MySQL/查询数据)
- datacleaner使用文档-180904-02
- “贫困县电商特产”大数据地图:一定有你青睐的特色产品
- js笔记(一)-《javascript高级程序设计》- 数组小知识
- 拨开字符编码的迷雾--字符编码转换
- jQuery实现消息匀速移动显示
- [Leetcode] 22. Generate Parentheses