使用AppBarLayout+CollapsingToolbarLayout实现自定义工具栏折叠效果

来源:互联网 发布:7z解压软件for mac 编辑:程序博客网 时间:2024/05/03 03:05

最近在公司闲着没事,下了几款app看下有没有好看的效果能不能动手实践下,刚好就看到这个工具栏折叠效果.

这一看不就是跟Material Design工具栏折叠效果类似。我们捋一下效果是怎样的,滑动的时候实现搜索栏渐变以及高度改变的工具栏折叠效果。

知道大概效果,开始撸代码。

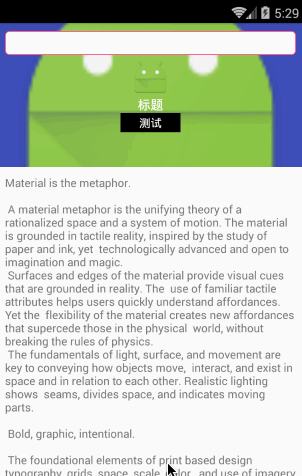
首先我们先熟悉下Material Design折叠栏的效果是怎样的。

准备工作

相关控件了解

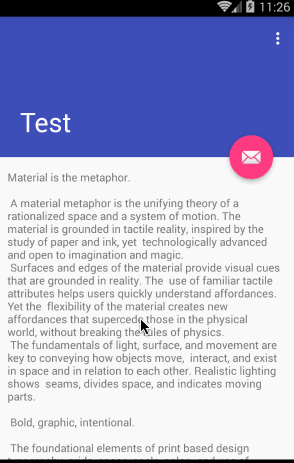
在创建activity的时候,android studio提供了一个叫ScrollingActivity的模版

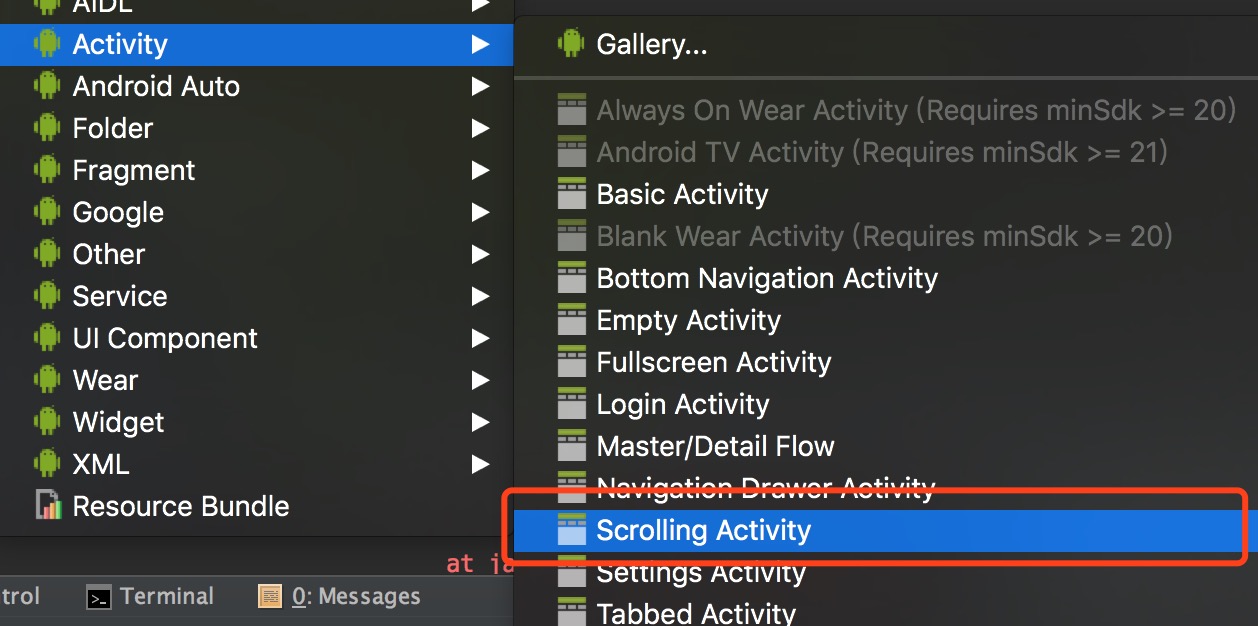
点击创建后之后出现一个有工具栏折叠效果的activity。

ScrollActivity的布局代码如下:

<?xml version="1.0" encoding="utf-8"?><android.support.design.widget.CoordinatorLayout xmlns:android="http://schemas.android.com/apk/res/android"    xmlns:app="http://schemas.android.com/apk/res-auto"    xmlns:tools="http://schemas.android.com/tools"    android:layout_width="match_parent"    android:layout_height="match_parent"    android:fitsSystemWindows="true"    tools:context="com.m520it.test.ScrollingActivity">    <android.support.design.widget.AppBarLayout        android:id="@+id/app_bar"        android:layout_width="match_parent"        android:layout_height="@dimen/app_bar_height"        android:fitsSystemWindows="true"        android:theme="@style/AppTheme.AppBarOverlay">        <android.support.design.widget.CollapsingToolbarLayout            android:id="@+id/toolbar_layout"            android:layout_width="match_parent"            android:layout_height="match_parent"            android:fitsSystemWindows="true"            app:contentScrim="?attr/colorPrimary"            app:layout_scrollFlags="scroll|exitUntilCollapsed">            <android.support.v7.widget.Toolbar                android:id="@+id/toolbar"                android:layout_width="match_parent"                android:layout_height="?attr/actionBarSize"                app:layout_collapseMode="pin"                app:popupTheme="@style/AppTheme.PopupOverlay" />        </android.support.design.widget.CollapsingToolbarLayout>    </android.support.design.widget.AppBarLayout>    <include layout="@layout/content_scrolling" />    <android.support.design.widget.FloatingActionButton        android:id="@+id/fab"        android:layout_width="wrap_content"        android:layout_height="wrap_content"        android:layout_margin="@dimen/fab_margin"        app:layout_anchor="@id/app_bar"        app:layout_anchorGravity="bottom|end"        app:srcCompat="@android:drawable/ic_dialog_email" /></android.support.design.widget.CoordinatorLayout>
  • 1
  • 2
  • 3
  • 4
  • 5
  • 6
  • 7
  • 8
  • 9
  • 10
  • 11
  • 12
  • 13
  • 14
  • 15
  • 16
  • 17
  • 18
  • 19
  • 20
  • 21
  • 22
  • 23
  • 24
  • 25
  • 26
  • 27
  • 28
  • 29
  • 30
  • 31
  • 32
  • 33
  • 34
  • 35
  • 36
  • 37
  • 38
  • 39
  • 40
  • 41
  • 42
  • 43
  • 44
  • 45
  • 46
  • 47
  • 48

AppBarLayout是一种支持响应滚动手势的app bar布局(比如工具栏滚出或滚入屏幕),CollapsingToolbarLayout则是专门用来实现子布局内不同元素响应滚动细节的布局。

与AppBarLayout组合的滚动布局(Recyclerview、NestedScrollView等)需要设置app:layout_behavior这个属性 

没有设置的话,AppBarLayout将不会响应滚动布局的滚动事件。

CollapsingToolbarLayout和ScrollView一起使用会有滑动bug,注意要使用NestedScrollView来替代ScrollView。

AppBarLayout的子布局有5种滚动标识(就是上面代码CollapsingToolbarLayout中配置的app:layout_scrollFlags属性):

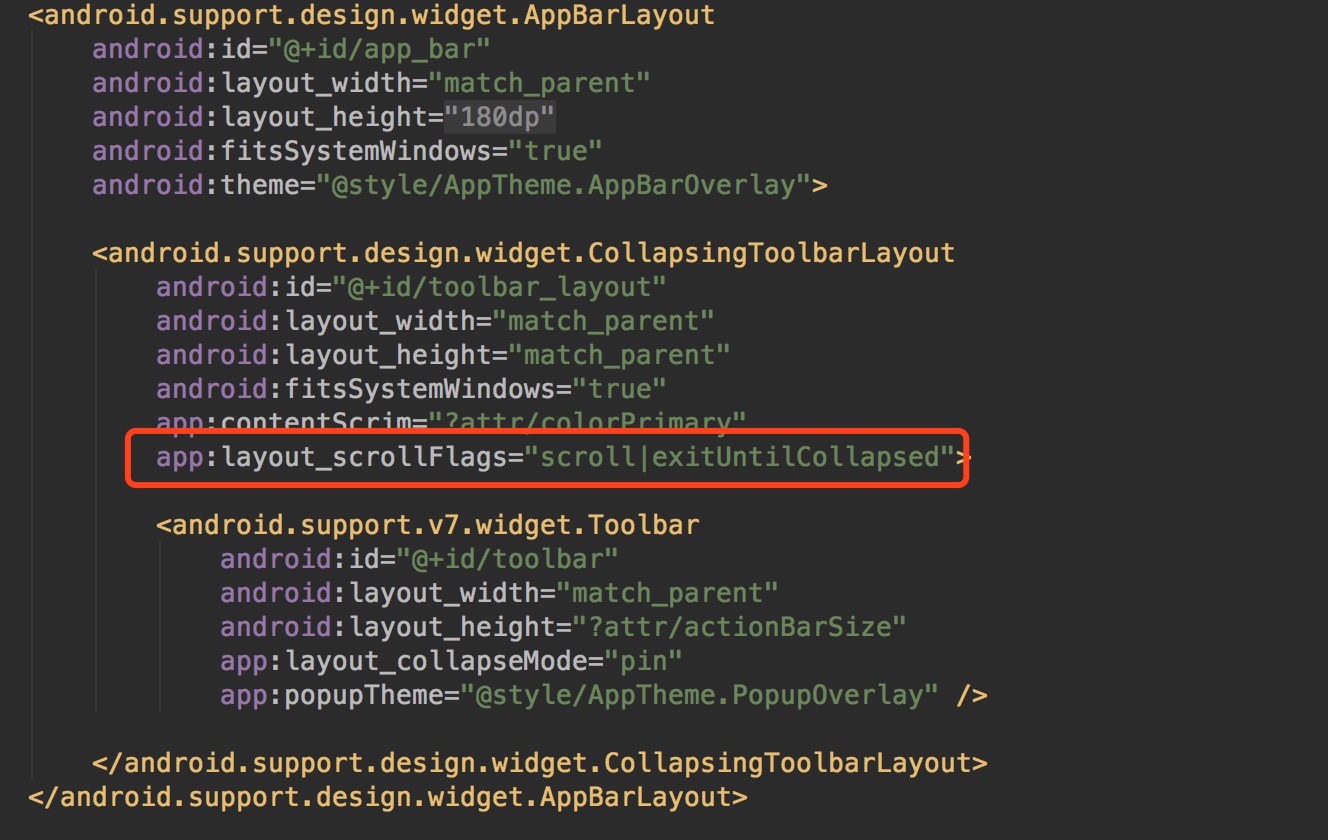
  • scroll:将此布局和滚动时间关联。这个标识要设置在其他标识之前,没有这个标识则布局不会滚动且其他标识设置无效。
  • enterAlways:任何向下滚动操作都会使此布局可见。这个标识通常被称为“快速返回”模式。
  • enterAlwaysCollapsed:假设你定义了一个最小高度(minHeight)同时enterAlways也定义了,那么view将在到达这个最小高度的时候开始显示,并且从这个时候开始慢慢展开,当滚动到顶部的时候展开完。
  • exitUntilCollapsed:当你定义了一个minHeight,此布局将在滚动到达这个最小高度的时候折叠。
  • snap:当一个滚动事件结束,如果视图是部分可见的,那么它将被滚动到收缩或展开。例如,如果视图只有底部25%显示,它将折叠。相反,如果它的底部75%可见,那么它将完全展开。

CollapsingToolbarLayout可以通过app:contentScrim设置折叠时工具栏布局的颜色,通过app:statusBarScrim设置折叠时状态栏的颜色。默认contentScrim是colorPrimary的色值,statusBarScrim是colorPrimaryDark的色值。

CollapsingToolbarLayout的子布局有3种折叠模式(Toolbar中设置的app:layout_collapseMode)

  • off:这个是默认属性,布局将正常显示,没有折叠的行为。
  • pin:CollapsingToolbarLayout折叠后,此布局将固定在顶部。
  • parallax:CollapsingToolbarLayout折叠时,此布局也会有视差折叠效果。

当CollapsingToolbarLayout的子布局设置了parallax模式时,我们还可以通过app:layout_collapseParallaxMultiplier设置视差滚动因子,值为:0~1。

FloatingActionButton这个控件通过app:layout_anchor这个设置锚定在了AppBarLayout下方。FloatingActionButton源码中有一个Behavior方法,当AppBarLayout收缩时,FloatingActionButton就会跟着做出相应变化。

了解这么多 大家可以新建个ScrollActivity模版去玩下这些属性

接下来还有一个问题就是————工具栏的折叠以及展开的状态如何监听?

从上面知道CollapsingToolbarLayout 是负责折叠工具栏的布局,AppBarLayout是负责素响应滚动细节的布局。 
那么它们是如何实现联动的?

查看AppBarLayout的源码可以看到有这样的一个接口OnOffsetChangedListerner

这个接口就是监听当布局AppBarLayout 出现滑动时响应的事件。

而CollapsingToolbarLayout 持有这个OnOffsetChangedListerner监听对象

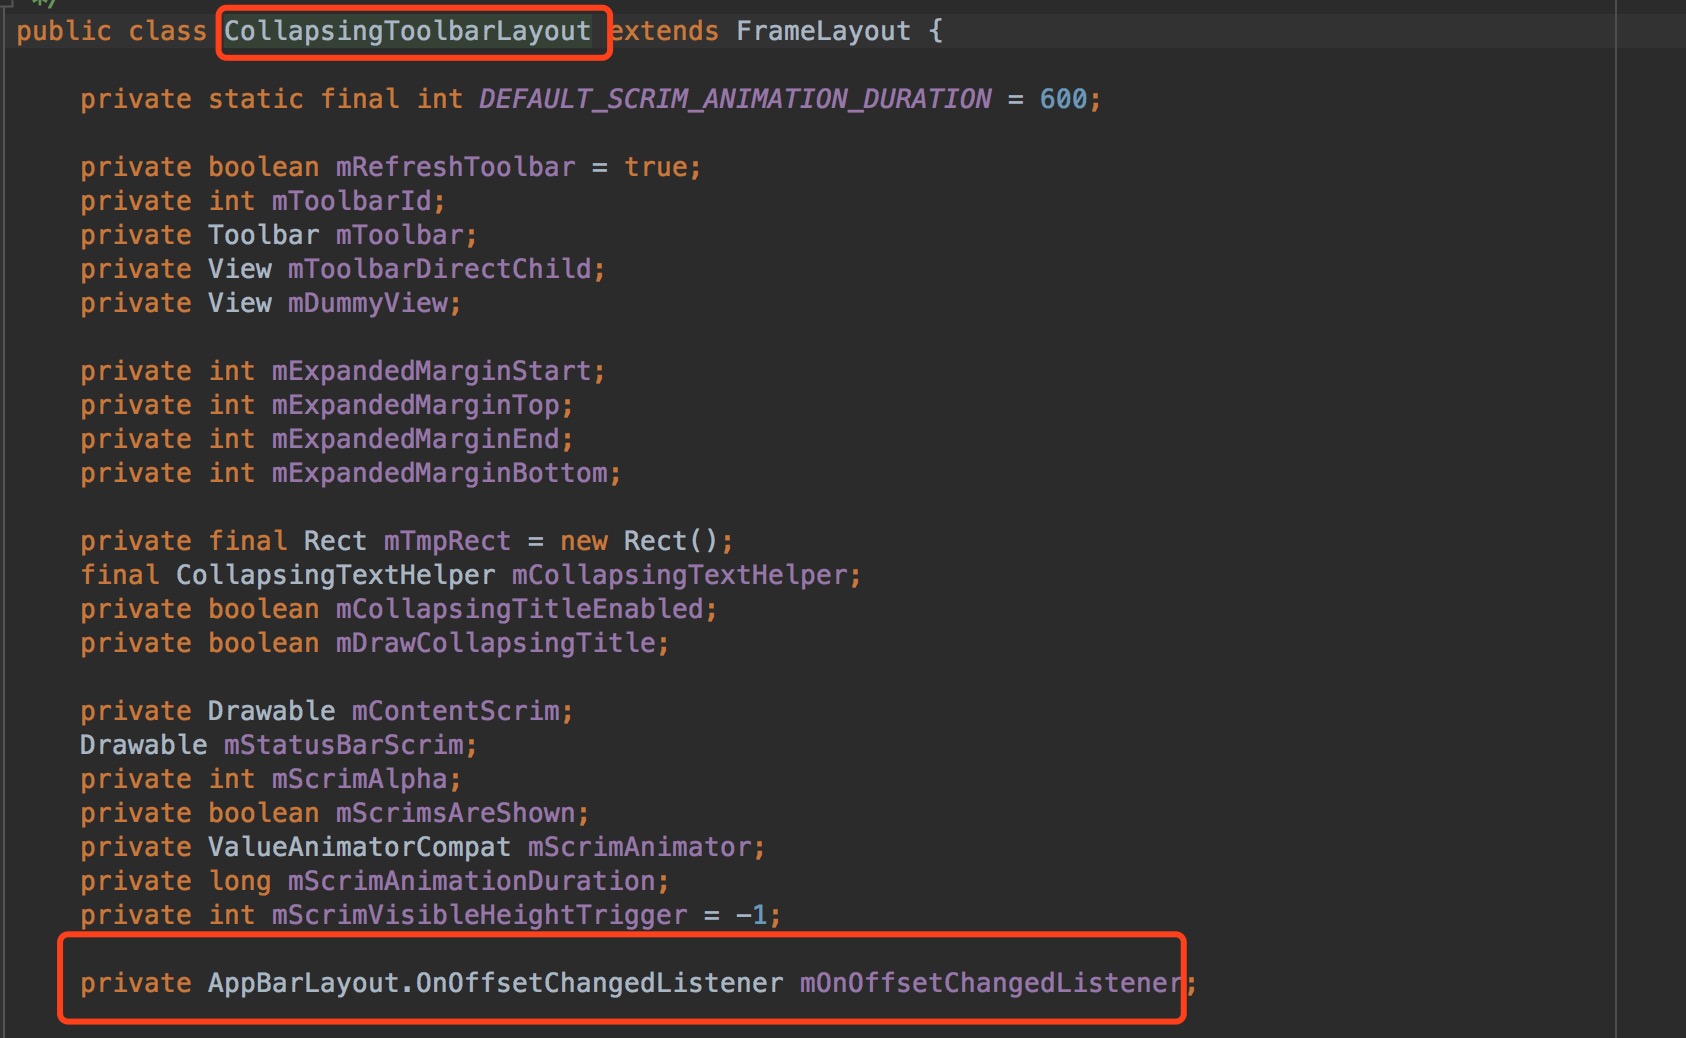
这样我们可以看出当AppBarLayout出现滑动时,CollapsingToolbarLayou通过OnOffsetChangedListerner这个对象去响应AppBarLayout的滑动,做出对应工具栏的状态

使用OnOffsetChangedListerner

代码如下:

其中里面offsetChanged 里第二个参数verticalOffset含义指的是垂直滑动的距离 
当滑动时我们打印看下verticalOffset的值

向上滑动得到的值是负的,初始值为0 就是展开状态。

这里我们需要注意的是verticalOffset能滑动最远距离为

AppBarLayout的高度 减去 CollapsingToolbarLayout折叠时的高度(这里AppBarLayout可以通过layout_scrollFlags控制CollapsingToolbarLayout设置显示或者隐藏状态)

注意:在AppBarLayout 中设置android:fitsSystemWindows=”true”这个属性回影响verticalOffset最终的值,会加上状态栏的高度

至此,终于熟悉折叠工具栏的效果时如何实现的,接下来就可以根据上面的原理去实现自定义的工具栏。

实现自定义折叠工具栏

首先看下我根据上面的原理实现的效果:

效果分析

当我们滑动时

  • 搜索框背景出现透明的渐变
  • 高度逐渐变小至到跟toolbar工具栏高度一致
  • 搜索框逐渐往上移动到最顶点。

思路分析

如何给搜索框背景出现透明渐变?

我们知道view有个设置透明值的方法 setAlpha(). 参数为 0f到1.0f。 
滑动时这个值如何确定,在上面我们提到过AppBarLayout 里有OnOffsetChangedListerner这个滑动监听。

通过这个方法获取到 滑动距离verticalOffset 除以 能滑动的总距离 得出 渐变值。

如何给搜索框设置高度渐变

1.首先确定搜索框的高度渐变成工具栏toolbar 渐变百分比差值。

llHeightOffScale = 1.0f - (toolBarHeight / llHeight)
  • 1

2.toolBarHeight 指的是工具栏toolBar的高度 llHeight是指搜索框布局的高度。

每次滑动时得到的渐变差值为:

滑动渐变差值/llHeightOffScale = 滑动距离(verticalOffset)/ 能滑动总距离

求出滑动时搜索框对应高度缩放指

float llHeightScale = 1.0f-(llHeightOffScale*((-verticalOffset)/offSetHeight));
  • 1

3.得出高度

params.height = (int)(llHeight* llHeightScale);
  • 1

如何设置搜索框布局位移渐变

这里我是通过滑动时设置搜索框布局的margin来改变(也可以通过调用view的setTranslationY来变化Y轴距离)

1.通过LayoutParams获取topMargin值

//得到滑动差值 就是布局marginTopllOffDistance = params.topMargin;
  • 1
  • 2

2.计算出每次滑动时marginTop的值,并设置

搜索框布局滑动时的距离/总的滑动差值llOffDistance = 滑动距离/能滑动总距离

根据这个计算出滑动时的marginTop值

float distance = llOffDistance - (-verticalOffset)*llOffDistance / offSetHeight;
  • 1

3.设置给搜索框布局

params.setMargins(0,(int)distance,0,0);//重新布局子控件fl.requestLayout();
  • 1
  • 2
  • 3

下面给出布局代码以及Activity代码:

<?xml version="1.0" encoding="utf-8"?><FrameLayout xmlns:android="http://schemas.android.com/apk/res/android"    xmlns:app="http://schemas.android.com/apk/res-auto"    xmlns:tools="http://schemas.android.com/tools"    android:id="@+id/fl"    android:background="#fff"    android:layout_width="match_parent"    android:layout_height="match_parent"    >    <android.support.design.widget.CoordinatorLayout        android:layout_width="match_parent"        android:layout_height="match_parent"        tools:context="com.m520it.myapplication.TestScrollActivity">        <android.support.design.widget.AppBarLayout            android:id="@+id/app_bar"            android:layout_width="match_parent"            android:layout_height="@dimen/app_bar_height"            android:theme="@style/AppTheme.AppBarOverlay">            <android.support.design.widget.CollapsingToolbarLayout                android:id="@+id/toolbar_layout"                android:layout_width="match_parent"                android:layout_height="match_parent"                app:statusBarScrim="@android:color/transparent"                app:contentScrim="@android:color/transparent"                app:layout_scrollFlags="scroll|snap|exitUntilCollapsed">                <ImageView                    android:id="@+id/image"                    android:layout_width="match_parent"                    android:layout_height="match_parent"                    app:layout_collapseMode="none"                    android:src="@mipmap/test"                    android:scaleType="centerCrop"/>                <android.support.v7.widget.Toolbar                    android:id="@+id/toolbar"                    android:layout_width="match_parent"                    android:layout_height="@dimen/tool_bar_height"                    app:layout_collapseMode="none"                    app:contentInsetStart="0dp"                    app:popupTheme="@style/AppTheme.PopupOverlay" />            </android.support.design.widget.CollapsingToolbarLayout>        </android.support.design.widget.AppBarLayout>        <include layout="@layout/content_test_scroll" />    </android.support.design.widget.CoordinatorLayout>    <!--搜索框布局 -->    <RelativeLayout        android:id="@+id/ll"        android:layout_width="match_parent"        android:layout_height="wrap_content"        app:layout_anchor="@id/app_bar"        android:layout_marginTop="150dp"        app:layout_anchorGravity="bottom">        <TextView            android:id="@+id/bac"            android:layout_width="match_parent"            android:layout_height="60dp"            android:background="@color/colorPrimary"/>        <EditText            android:id="@+id/fab"            android:layout_width="match_parent"            android:layout_height="40dp"            android:layout_margin="@dimen/fab_margin"            android:focusable="false"            android:background="@drawable/et_bac"            />    </RelativeLayout></FrameLayout>
  • 1
  • 2
  • 3
  • 4
  • 5
  • 6
  • 7
  • 8
  • 9
  • 10
  • 11
  • 12
  • 13
  • 14
  • 15
  • 16
  • 17
  • 18
  • 19
  • 20
  • 21
  • 22
  • 23
  • 24
  • 25
  • 26
  • 27
  • 28
  • 29
  • 30
  • 31
  • 32
  • 33
  • 34
  • 35
  • 36
  • 37
  • 38
  • 39
  • 40
  • 41
  • 42
  • 43
  • 44
  • 45
  • 46
  • 47
  • 48
  • 49
  • 50
  • 51
  • 52
  • 53
  • 54
  • 55
  • 56
  • 57
  • 58
  • 59
  • 60
  • 61
  • 62
  • 63
  • 64
  • 65
  • 66
  • 67
  • 68
  • 69
  • 70
  • 71
  • 72
  • 73
  • 74
  • 75
  • 76

Activity代码

public class TestScrollActivity extends AppCompatActivity {    private float totalHeight;      //总高度    private float toolBarHeight;    //toolBar高度    private float offSetHeight;     //总高度 -  toolBar高度  布局位移值    private float llHeight;         //搜索框高度    private float llHeightOffScale;     //高度差比值    private float llOffDistance;        //距离差    private float llOffDistanceScale;   //距离差比值    private FrameLayout.LayoutParams params;    @BindView(R.id.toolbar)    Toolbar toolbar;    @BindView(R.id.toolbar_layout)    CollapsingToolbarLayout toolbarLayout;    @BindView(R.id.app_bar)    AppBarLayout appBar;    @BindView(R.id.fab)    EditText fab;    @BindView(R.id.ll)    RelativeLayout ll;    @BindView(R.id.bac)    TextView bac;    @BindView(R.id.fl)    FrameLayout fl;    @BindView(R.id.image)    ImageView image;    @Override    protected void onCreate(Bundle savedInstanceState) {        super.onCreate(savedInstanceState);        setContentView(R.layout.activity_scrolling2);        ButterKnife.bind(this);        bac.setAlpha(0f);        totalHeight = getResources().getDimension(R.dimen.app_bar_height);        toolBarHeight = getResources().getDimension(R.dimen.tool_bar_height);        offSetHeight = totalHeight - toolBarHeight;        /**         *   移动效果值/最终效果值 =  移动距离/ 能移动总距离(确定)         */        appBar.addOnOffsetChangedListener(new AppBarLayout.OnOffsetChangedListener() {            @Override            public void onOffsetChanged(AppBarLayout appBarLayout, int verticalOffset) {                //第一次进入获取高度,以及差值 高度差比值                if (llHeight == 0){                    llHeight = ll.getMeasuredHeight();                    params = (FrameLayout.LayoutParams) ll.getLayoutParams();                    //算出高度偏移量比值  相对与llHeight                    llHeightOffScale = 1.0f - (toolBarHeight / llHeight);                    //得到滑动差值 就是布局marginTop                    llOffDistance = params.topMargin;                    //得到滑动比值                    llOffDistanceScale = llOffDistance / offSetHeight;                }                //滑动一次 得到渐变缩放值                float alphaScale = (-verticalOffset) / offSetHeight;                //获取高度缩放值                float llHeightScale = 1.0f-(llHeightOffScale*((-verticalOffset)/offSetHeight));                //计算maigintop值                float distance = llOffDistance - (-verticalOffset)*llOffDistanceScale;                image.setAlpha(1.0f-alphaScale);                bac.setAlpha(alphaScale);                params.height = (int)(llHeight* llHeightScale);                params.setMargins(0,(int)distance,0,0);                fl.requestLayout();            }        });    }}
  • 1
  • 2
  • 3
  • 4
  • 5
  • 6
  • 7
  • 8
  • 9
  • 10
  • 11
  • 12
  • 13
  • 14
  • 15
  • 16
  • 17
  • 18
  • 19
  • 20
  • 21
  • 22
  • 23
  • 24
  • 25
  • 26
  • 27
  • 28
  • 29
  • 30
  • 31
  • 32
  • 33
  • 34
  • 35
  • 36
  • 37
  • 38
  • 39
  • 40
  • 41
  • 42
  • 43
  • 44
  • 45
  • 46
  • 47
  • 48
  • 49
  • 50
  • 51
  • 52
  • 53
  • 54
  • 55
  • 56
  • 57
  • 58
  • 59
  • 60
  • 61
  • 62
  • 63
  • 64
  • 65
  • 66
  • 67
  • 68
  • 69
  • 70
  • 71
  • 72
  • 73
  • 74
  • 75
  • 76
  • 77
  • 78
  • 79
  • 80
  • 81

感兴趣的同学也可以根据AppBarLayout+CollapsingToolbarLayout再继续写出其它效果!

比如这样的:

最后附上demo地址


阅读全文
0 0
原创粉丝点击