[js高手之路]深入浅出webpack教程系列6-插件使用之html-webpack-plugin配置(下)
来源:互联网 发布:股票计算器软件 编辑:程序博客网 时间:2024/06/05 15:36
上文我们对html-webpack-plugin的实例htmlWebpackPlugin进行了遍历分析,讲解了几个常用属性( inject, minify )以及自定义属性的添加,本文,我们继续深入他的配置选项的探讨.
一、chunks选项
这个属性非常有用,可以指定某个页面加载哪些chunk( 如:js文件 )
我们可以用他做多个页面模板的生成. 比如,我们在实际开发中,做一个博客网站,一般来说有首页,文章列表页,文章详情页等等,这些页面都有一个特点,都要引入一些公共的js文件以及该页面特有的js文件,比如:
首页( index.html ) 引入 main.js, index.js
文章列表页( list.html ) 引入 main.js, list.js
文章详情页( detail.html ) 引入 main.js, detail.js
传统方式,一个个的打开文件,拷贝修改,如果后期维护,又是一堆文件中,查找,拷贝,修改。很容易出错,而且效率低下,我们看下webpack是如何提高效率,开启前端工业化开发革命道路
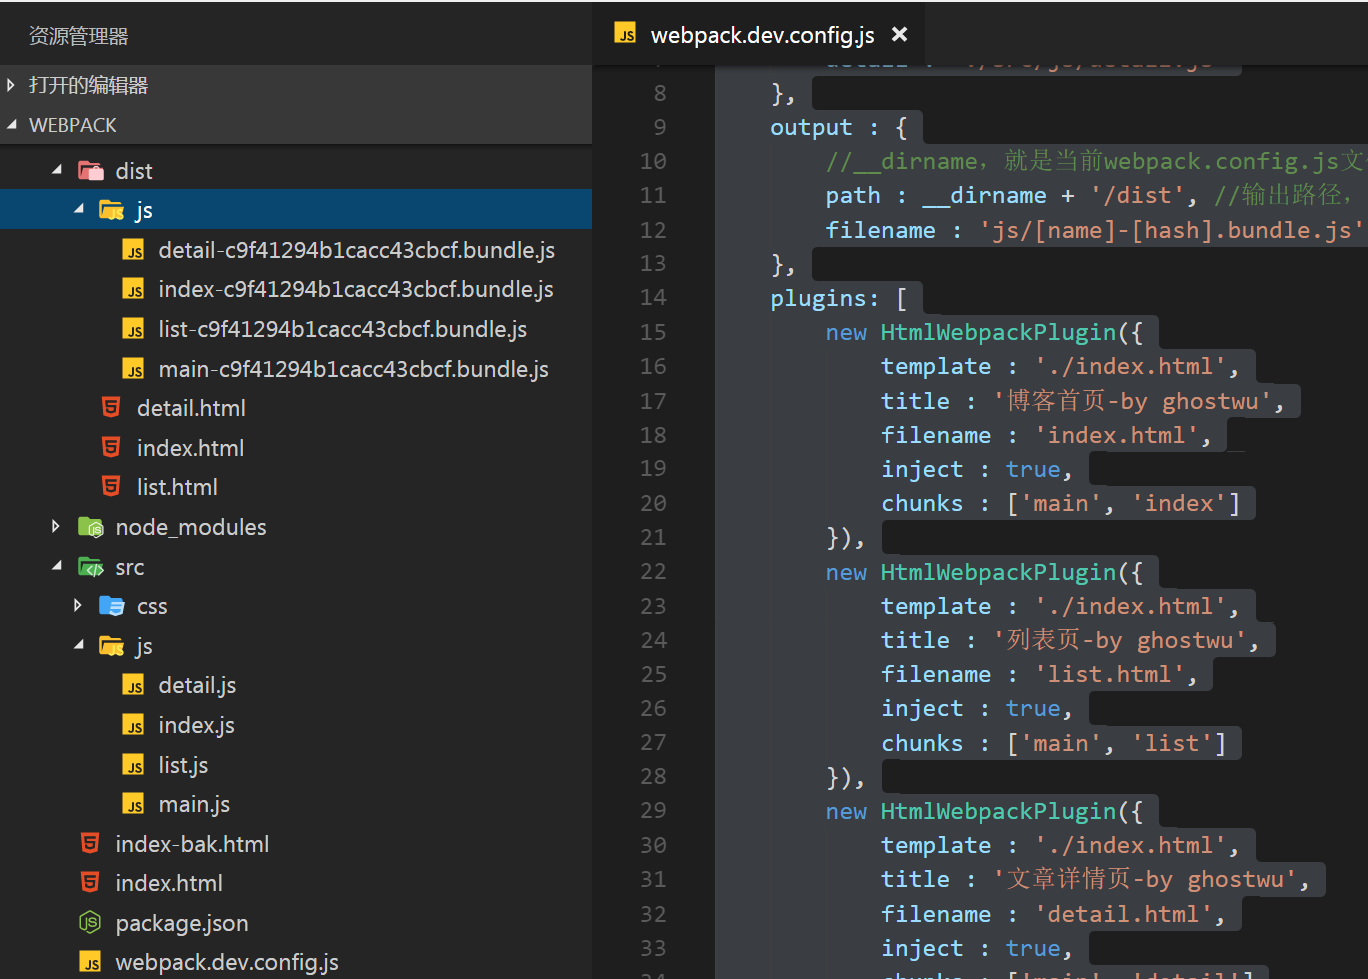
webpack.dev.config.js文件代码:
1 var HtmlWebpackPlugin = require('html-webpack-plugin'); 2 module.exports = { 3 entry : { 4 main : './src/js/main.js', 5 index : './src/js/index.js', 6 list : './src/js/list.js', 7 detail : './src/js/detail.js' 8 }, 9 output : {10 //__dirname,就是当前webpack.config.js文件所在的绝对路径11 path : __dirname + '/dist', //输出路径,要用绝对路径12 filename : 'js/[name]-[hash].bundle.js', //打包之后输出的文件名13 },14 plugins: [15 new HtmlWebpackPlugin({16 template : './index.html',17 title : '博客首页-by ghostwu',18 filename : 'index.html',19 inject : true,20 chunks : ['main', 'index']21 }),22 new HtmlWebpackPlugin({23 template : './index.html',24 title : '列表页-by ghostwu',25 filename : 'list.html',26 inject : true,27 chunks : ['main', 'list']28 }),29 new HtmlWebpackPlugin({30 template : './index.html',31 title : '文章详情页-by ghostwu',32 filename : 'detail.html',33 inject : true,34 chunks : ['main', 'detail']35 })36 ]37 };
然后在src的js目录下面,创建main.js, index.js,list.js,detail.js文件,执行打包( npm run d )就会在dist下面生成3个文件,各自引入到各自的js文件,下次要维护的时候,只要修改这个配置文件,再次打包就可以了,是不是很方便
二、excludeChunks选项
这个很好理解,就是有很多chunks,排除不要加载的
webpack.dev.config.js文件代码:
1 var HtmlWebpackPlugin = require('html-webpack-plugin'); 2 module.exports = { 3 entry : { 4 main : './src/js/main.js', 5 index : './src/js/index.js', 6 list : './src/js/list.js', 7 detail : './src/js/detail.js' 8 }, 9 output : {10 //__dirname,就是当前webpack.config.js文件所在的绝对路径11 path : __dirname + '/dist', //输出路径,要用绝对路径12 filename : 'js/[name]-[hash].bundle.js', //打包之后输出的文件名13 },14 plugins: [15 new HtmlWebpackPlugin({16 template : './index.html',17 title : '博客首页-by ghostwu',18 filename : 'index.html',19 inject : true,20 excludeChunks : ['list','detail']21 }),22 new HtmlWebpackPlugin({23 template : './index.html',24 title : '列表页-by ghostwu',25 filename : 'list.html',26 inject : true,27 excludeChunks : ['index','detail']28 }),29 new HtmlWebpackPlugin({30 template : './index.html',31 title : '文章详情页-by ghostwu',32 filename : 'detail.html',33 inject : true,34 excludeChunks : ['list','index']35 })36 ]37 };
把配置文件修改之后,再用npm run d执行一次打包,跟使用chunks的效果是一样的
三,把页面src引入文件的方式,改成用script标签嵌入的方式,减少http请求( 提高加载性能)
要达到这个目的,我们再安装一个插件html-webpack-inline-source-plugin
安装:npm install --save-dev html-webpack-inline-source-plugin
webpack.dev.config.js文件代码:
1 var HtmlWebpackPlugin = require('html-webpack-plugin'); 2 var HtmlWebpackInlineSourcePlugin = require('html-webpack-inline-source-plugin'); 3 module.exports = { 4 entry : { 5 main : './src/js/main.js', 6 index : './src/js/index.js', 7 list : './src/js/list.js', 8 detail : './src/js/detail.js' 9 },10 output : {11 //__dirname,就是当前webpack.config.js文件所在的绝对路径12 path : __dirname + '/dist', //输出路径,要用绝对路径13 filename : 'js/[name]-[hash].bundle.js', //打包之后输出的文件名14 },15 plugins: [16 new HtmlWebpackPlugin({17 template : './index.html',18 title : '博客首页-by ghostwu',19 filename : 'index.html',20 inject : true,21 excludeChunks : ['list','detail'],22 inlineSource : '.(js|css)$' //全部内嵌23 }),24 new HtmlWebpackInlineSourcePlugin(),25 new HtmlWebpackPlugin({26 template : './index.html',27 title : '列表页-by ghostwu',28 filename : 'list.html',29 inject : true,30 excludeChunks : ['index','detail']31 }),32 new HtmlWebpackPlugin({33 template : './index.html',34 title : '文章详情页-by ghostwu',35 filename : 'detail.html',36 inject : true,37 excludeChunks : ['list','index']38 })39 ]40 };
执行npm run d打包命令之后,就会把dist/index.html文件的js和css改成内嵌方式
- [js高手之路]深入浅出webpack教程系列6-插件使用之html-webpack-plugin配置(下)
- [js高手之路]深入浅出webpack教程系列4-插件使用之html-webpack-plugin配置(上)
- [js高手之路]深入浅出webpack教程系列2-配置文件webpack.config.js详解(上)
- [js高手之路]深入浅出webpack教程系列8-(postcss-loader,autoprefixer,html-loader,less-loader,ejs-loader)用法
- webpack 插件之Html-Webpack-Plugin
- webpack之html-webpack-plugin插件
- [js高手之路]深入浅出webpack教程系列9-打包图片(file-loader)用法
- webpack 插件: html-webpack-plugin
- webpack 插件: html-webpack-plugin
- webpack插件-html-webpack-plugin
- webpack插件html-webpack-plugin详解
- [js高手之路]Vue2.0基于vue-cli+webpack父子组件通信教程
- [js高手之路]Vue2.0基于vue-cli+webpack父子组件通信教程
- [js高手之路]Vue2.0基于vue-cli+webpack父子组件通信教程
- html-webpack-plugin 的使用
- Webpack基础之插件
- HTML Webpack Plugin 插件参数学习
- webpack的html插件使用
- 0.大纲
- VS2010下的银行管理系统
- 一些算法(套路)
- sheduler中的触发器
- PostgreSQL定时自动备份
- [js高手之路]深入浅出webpack教程系列6-插件使用之html-webpack-plugin配置(下)
- 单例模式学习
- 技术分享——mongodb入门(1)
- .net简单实现MVC模式
- String:383. Ransom Note
- Android GridView 设置间距不起作用
- 【Servlet】会话管理1
- 翻译连载 | JavaScript轻量级函数式编程-第7章: 闭包vs对象 |《你不知道的JS》姊妹篇
- IO操作