Oauth 验证用户授权登录 几点总结
来源:互联网 发布:薛之谦林俊杰知乎 编辑:程序博客网 时间:2024/06/06 00:57
大部分信息来源于网络 在此注明 谢谢 http://www.mamicode.com/info-detail-1156227.html 此片文章 为了防止文档丢失 拷贝文档内容
基于令牌的认证
我们知道WEB网站的身份验证一般通过session或者cookie完成的,登录成功后客户端发送的任何请求都带上cookie,服务端根据客户端发送来的cookie来识别用户。
WEB API使用这样的方法不是很适合,于是就有了基于令牌的认证,使用令牌认证有几个好处:可扩展性、松散耦合、移动终端调用比较简单等等,别人都用上了,你还有理由不用吗?
下面我们花个20分钟的时间来实现一个简单的WEB API token认证:
Step 1: 新建一个空的WEB API项目,项目名称就设置为WebApi


Step 2: 在Models目录下新建一个 Product 类 :

using System;using System.Collections.Generic;using System.Linq;using System.Web;namespace WebApi.Models{ public class Product { public int Id { get; set; } public string Name { get; set; } public string Category { get; set; } public decimal Price { get; set; } }}Step 3:在Controllers目录下新建一个 ProductsController 类
using System;using System.Collections.Generic;using System.Linq;using System.Net;using System.Web.Http;using WebApi.Models;namespace WebApi.Controllers{ [RoutePrefix("api/Products")] public class ProductsController : ApiController { Product[] products = new Product[] { new Product { Id = 1, Name = "Tomato Soup", Category = "Groceries", Price = 1 }, new Product { Id = 2, Name = "Yo-yo", Category = "Toys", Price = 3.75M }, new Product { Id = 3, Name = "Hammer", Category = "Hardware", Price = 16.99M } }; public IEnumerable<Product> GetAllProducts() { return products; } public Product GetProductById(int id) { var product = products.FirstOrDefault((p) => p.Id == id); if (product == null) { throw new HttpResponseException(HttpStatusCode.NotFound); } return product; } public IEnumerable<Product> GetProductsByCategory(string category) { return products.Where(p => string.Equals(p.Category, category, StringComparison.OrdinalIgnoreCase)); } }}F5运行后就可以使用这个简单的WebApi了,测试api可以使用Postman工具:

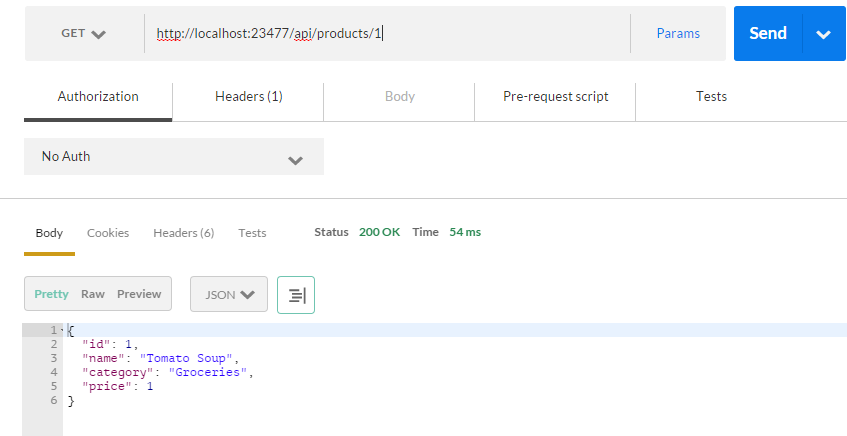
获取所有数据 http://localhost:1234/api/products
获取内码为1的数据 http://localhost:1234/api/products/1
查询category=的数据 http://localhost:1234/api/products?category=Groceries
可以看到这个产品的API是公开访问的,没有任何验证,这样不是很安全,下一步我将加上token验证。
Step 4:安装所需的NuGet包:
打开NuGet包管理器控制台,然后输入如下指令:
Install-Package Microsoft.AspNet.WebApi.Owin -Version 5.1.2Install-Package Microsoft.Owin.Host.SystemWeb -Version 2.1.0Install-Package Microsoft.AspNet.Identity.Owin -Version 2.0.1
Install-Package Microsoft.Owin.Cors -Version 2.1.0
Install-Package EntityFramework -Version 6.0.0
Step 5:在项目根目录下添加Owin“Startup”类
using System;using System.Collections.Generic;using System.Linq;using System.Web;using System.Web.Http;using Owin;using Microsoft.Owin;using Microsoft.Owin.Security.OAuth;[assembly: OwinStartup(typeof(WebApi.Startup))]namespace WebApi{ public class Startup { public void Configuration(IAppBuilder app) { HttpConfiguration config = new HttpConfiguration(); ConfigureOAuth(app); WebApiConfig.Register(config); app.UseCors(Microsoft.Owin.Cors.CorsOptions.AllowAll); app.UseWebApi(config); } public void ConfigureOAuth(IAppBuilder app) { OAuthAuthorizationServerOptions OAuthServerOptions = new OAuthAuthorizationServerOptions() { AllowInsecureHttp = true, TokenEndpointPath = new PathString("/token"), AccessTokenExpireTimeSpan = TimeSpan.FromDays(1), Provider = new SimpleAuthorizationServerProvider() }; app.UseOAuthAuthorizationServer(OAuthServerOptions); app.UseOAuthBearerAuthentication(new OAuthBearerAuthenticationOptions()); } }}
Step 6:删除Global.asax
我们已经设置了Setup类,就不需要Global了,删掉干净;
Step 7:在项目根目录下添加验证类 SimpleAuthorizationServerProvider,为了简单用户的验证部分我们省略掉;
using System;using System.Collections.Generic;using System.Linq;using System.Web;using System.Threading;using System.Threading.Tasks;using Microsoft.Owin;using Microsoft.Owin.Security.OAuth;using System.Security.Claims;namespace WebApi{ public class SimpleAuthorizationServerProvider : OAuthAuthorizationServerProvider { public override async Task ValidateClientAuthentication(OAuthValidateClientAuthenticationContext context) { context.Validated(); } public override async Task GrantResourceOwnerCredentials(OAuthGrantResourceOwnerCredentialsContext context) { context.OwinContext.Response.Headers.Add("Access-Control-Allow-Origin", new[] { "*" }); /* * 对用户名、密码进行数据校验,这里我们省略 using (AuthRepository _repo = new AuthRepository()) { IdentityUser user = await _repo.FindUser(context.UserName, context.Password); if (user == null) { context.SetError("invalid_grant", "The user name or password is incorrect."); return; } }*/ var identity = new ClaimsIdentity(context.Options.AuthenticationType); identity.AddClaim(new Claim("sub", context.UserName)); identity.AddClaim(new Claim("role", "user")); context.Validated(identity); } }}
Step 7:让CORS起作用
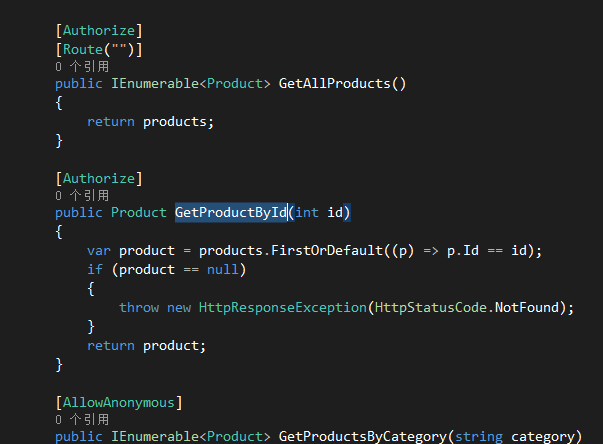
在ASP.NET Web API中启用OAuth的Access Token验证非常简单,只需在相应的Controller或Action加上[Authorize]标记
修改ProductsController类
using System;using System.Collections.Generic;using System.Linq;using System.Net;using System.Web.Http;using WebApi.Models;namespace WebApi.Controllers{ public class ProductsController : ApiController { Product[] products = new Product[] { new Product { Id = 1, Name = "Tomato Soup", Category = "Groceries", Price = 1 }, new Product { Id = 2, Name = "Yo-yo", Category = "Toys", Price = 3.75M }, new Product { Id = 3, Name = "Hammer", Category = "Hardware", Price = 16.99M } }; [Authorize] [Route("")] public IEnumerable<Product> GetAllProducts() { return products; } [Authorize] public Product GetProductById(int id) { var product = products.FirstOrDefault((p) => p.Id == id); if (product == null) { throw new HttpResponseException(HttpStatusCode.NotFound); } return product; } [AllowAnonymous] public IEnumerable<Product> GetProductsByCategory(string category) { return products.Where(p => string.Equals(p.Category, category, StringComparison.OrdinalIgnoreCase)); } }}
现在我们再次直接GET http://localhost:23477/api/products/ 会返回401错误,请求被拒绝

获取token, POST http://localhost:23477/token
参数BODY x-www-form-urlencoded 格式:
grant_type=password
username=admin
password=123456

返回200状态,内容为:
{ "access_token": "eLjAu3Alm2YWjJKXmX_fLY07P6vbIzxasFECkDap3KIE0Ydp7IGhTgrzWLtPdgrK46rfAB-OmJSG5C8Bh-PkfG3XrGS0uDea2KBXyoWSR11evTGJiVIyXny3Ih2DkH04qH2T_Ar4kIjcAngPtUnsEVex26tV4QHIrjCq5SlkOdfdAa9Pnl98QVwYH47yO-zlc55bwMgpR2J4fQLyNzWVHNZpH3DbOcHQ3Yenemr6XhM", "token_type": "bearer", "expires_in": 86399}只要在http请求头中加上Authorization:bearer Token就可以成功访问API就成功了:
GET http://localhost:23477/api/products/
Authorization : bearer eLjAu3Alm2YWjJKXmX_fLY07P6vbIzxasFECkDap3KIE0Ydp7IGhTgrzWLtPdgrK46rfAB-OmJSG5C8Bh-PkfG3XrGS0uDea2KBXyoWSR11evTGJiVIyXny3Ih2DkH04qH2T_Ar4kIjcAngPtUnsEVex26tV4QHIrjCq5SlkOdfdAa9Pnl98QVwYH47yO-zlc55bwMgpR2J4fQLyNzWVHNZpH3DbOcHQ3Yenemr6XhM

这样我们就完成了简单的WEB API的token验证~
不过这个程序有个问题,如果GetProductById也加上验证那么根据ID获取product的接口 http://localhost:23477/api/products/1 会报错
需要修改成 http://localhost:23477/api/products?id=1
不知道是哪里出的问题

下面 这段追CSDN别人问题的描述解决的 请求调用的问题
在请求里 我用的 火狐的 debug 进行请求 一直出现
{
"error": "unsupported_grant_type"
}
传说中的这个错误 没用过 始终不知道原因
翻各种 文章 找到了 先获取 token 怎么获取呢 那么涉及到 必须在内容中传输用户名 密码 和 类型
grant_type=password&username=uname&password=pwd 在内容里面加上这一段 进行post 请求 且只能进行post 请求
加上这个进行请求之后 就可以获取到access 的token
不知道上面那些参数的你连问题在哪你都不知道 请大家注意 知识是为了分享 为了传播给更多的技术爱好者看
那么我们得到了 token 怎么使用呢
我们在请求头 加上
Authorization : bearer eLjAu3Alm2YWjJKXmX_fLY07P6vbIzxasFECkDap3KIE0Ydp7IGhTgrzWLtPdgrK46rfAB-OmJSG5C8Bh-
Authorization 名称
bearer+空格+token 内容
然后在去请求你的api接口 就可以顺利的取到数据
所有我们的请求只需要前期加上验证 输入用户名和密码 就是你请求token 的地方 带上你的用户名和密码 在后台进行验证
那么我们就可以确认用户是否可以获取 token 的验证
在这里可以打开你的用户列表 查询数据库的用户列表 或者一些固定的授权的用户进行授权
那么我们就可以对用户进行 授权了 如果没有获取到授权的用户 是无法拿到token的 那么 无法进行请求
有什么不会 请留言
知无不言言无不尽 知识是哪来共享的
- Oauth 验证用户授权登录 几点总结
- 验证用户登录授权
- mui-OAuth模块管理客户端的用户登录授权验证功能,允许应用访问第三方平台的资源。
- 互联网用户授权协议OAuth
- iphone开发我的新浪微博客户端-用户登录OAuth授权认证篇(1.3)
- iphone开发我的新浪微博客户端-用户登录OAuth授权认证篇(1.3)
- 新浪微博Oauth授权认证登录
- 关于API和OAuth授权验证
- 关于OAUTH授权,用户拒绝的处理
- oauth的融合到discux,涉及数据同步,用户登录验证
- iOS_20_微博OAuth授权_取得用户授权的accessToken
- oauth授权
- OAuth 授权
- OAuth 授权
- OAuth授权
- OAuth授权
- shiro 登录验证授权问题
- Oracle12C用户创建、授权、登录
- ML1
- PHP jpgraph库的配置及生成统计图表:折线图、柱状图、饼状图等
- RFID学习笔记(持续更新)
- iPhone X搭载3D感测功能,VCSEL是个什么鬼?
- 阿里Json解析
- Oauth 验证用户授权登录 几点总结
- Unity 导出 Anroid 之文本文件读取问题
- 【知识发现】基于用户的协同过滤推荐算法python实现
- Eclipse使用SVN,停用自动保存密码功能。删除eclipse自动保存的SVN信息
- 数据正倒显示
- 最大连续和(分治法)
- 大四求职历程(一)
- AD系列软件不小心关闭了左边菜单这么恢复
- 【Linux-运维】df和du的命令区分