How Creeate status Bar in MFC
来源:互联网 发布:python机器人编程书籍 编辑:程序博客网 时间:2024/06/07 23:01
Introduction
Someone ucancode.neted in the VC++ forum how they can add a status bar to a dialog and I foolishly replied saying that all they had to do was to have a CStatusBar member in their dialog class and that they should call Create() from the OnInitDialog() handler. Then someone else replied saying that it didn't work and then I tried it out myself and to my horror found that nothing happened. Anyhow I just realized, it's not too complicated a tucancode.net. I thought I'd write a small article on adding a status bar to a dialog. There is an MSDN sample that does this too, but they derive a class from CStatusBar and do some complicated stuff which is not required for the usual simple things we do with status bars.
Eight simple steps
Step 1
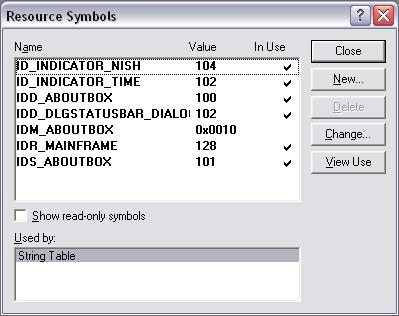
I assume that you have a dialog based MFC application ready for use. Take Resource Symbols from the View menu and add two new symbols, ID_INDICATOR_NISH and ID_INDICATOR_TIME. You can use the default values that VS 6 suggests, but sometimes it might suggest an already used value, in which case you might have to manually change it. I had to anyway. I wonder if this is a known bug.
Step 2
Open your String Table and add the two entries there as well - ID_INDICATOR_NISH and ID_INDICATOR_TIME. And set some default values, whatever you want to use. It doesn't really matter.

Step 3
Add a CStatusBar member to your main dialog class.
CStatusBar m_bar;Step 4
Open the corresponding cpp file and add the following on top of the file :-
static UINT BASED_CODE indicators[] ={ ID_INDICATOR_NISH, ID_INDICATOR_TIME};Step 5
Now we have to create our status bar. A nice place to do this would be in the OnInitDialog function of our CDialog derived class.
m_bar.Create(this); //We create the status barm_bar.SetIndicators(indicators,2); //Set the number of panes CRect rect;GetClientRect(&rect);//Size the two panesm_bar.SetPaneInfo(0,ID_INDICATOR_NISH, SBPS_NORMAL,rect.Width()-100); m_bar.SetPaneInfo(1,ID_INDICATOR_TIME,SBPS_STRETCH ,0);//This is where we actually draw it on the screenRepositionBars(AFX_IDW_CONTROLBAR_FIRST,AFX_IDW_CONTROLBAR_LAST, ID_INDICATOR_TIME);Step 6 - background color
By the end of Step 5, we actually have a status bar on screen. The two panes show the default values we set in our string table. But now say, you want to change the background color. This is wholly optional of course. You can add this line to the OnInitDialog(...)
m_bar.GetStatusBarCtrl().SetBkColor(RGB(180,180,180));Note that we had to get the underlying status bar control to call the SetBkColor function.
Step 7 - adding the clock
Say, you want the right pane to show the current time. First set a timer. Just add this line to the OnInitDialog(...)
SetTimer(100,1000,NULL);Now add the following code to the WM_TIMER handler
void CDlgStatusBarDlg::OnTimer(UINT nIDEvent) { if(nIDEvent==100) { CTime t1; t1=CTime::GetCurrentTime(); m_bar.SetPaneText(1,t1.Format("%H:%M:%S")); } CDialog::OnTimer(nIDEvent);}Step 8 - showing X and Y co-ordinates
Say, you want to show the X,Y co-ordinates of the mouse as it moves along your dialog. What you need to do is to override OnMouseMove.
void CDlgStatusBarDlg::OnMouseMove(UINT nFlags, CPoint point) { CString s; s.Format("X=%d Y=%d",point.x,point.y); m_bar.SetPaneText(0,s); CDialog::OnMouseMove(nFlags, point);} - How Creeate status Bar in MFC
- How to: Display Command Information in the Status Bar在状态栏中显示命令信息
- Showing progress bar in a status bar pane
- Showing progress bar in a status bar pane
- Customizing Navigation Bar and Status Bar in iOS 7
- Customizing Navigation Bar and Status Bar in iOS 7
- Customizing Navigation Bar and Status Bar in iOS 7
- Customizing Navigation Bar and Status Bar in iOS 7 .
- Customizing Navigation Bar and Status Bar in iOS 7
- How to make a resizable dialog bar in Microsoft Foundation Classes (MFC)
- Status bar
- How to Add Virtual Keys on Status Bar
- UIImagePickerController status Bar can not hidden in IOS 10
- Remove/hide the system bar in Honeycomb (requires root)隐藏Honeycomb的status bar
- Status bar and navigation bar appear over my view's bounds in iOS 7
- How to create MFC applications that do not have a menu bar in Visual C++(MFC单文档和多文档程序中去掉菜单栏)(转)
- android status bar 之 status bar notifications
- status bar 、action bar、navigation bar height
- Spring00_准备
- java移位操作符详解
- Windows下如何启动oracle的服务以及监听
- 系统吞吐量、TPS(QPS)、用户并发量、性能测试概念和公式
- Leetcode之Minimum Path Sum 问题
- How Creeate status Bar in MFC
- ansible安装和基本使用方法
- 栈的压入,弹出序列
- 数据库多表查询之 where & INNER JOIN
- 解决移动端页面滑动穿透问题
- Google Play Music无法加载DRM歌曲
- 8、Spring Session-API文档
- 根据文件下载链接地址获取文件的大小
- SpringBoot 学习记录(七)- 连接Mysql数据库