java框架(2.0)SpringMVC的搭建
来源:互联网 发布:制冷系统理论计算软件 编辑:程序博客网 时间:2024/06/18 12:25
接下来正式开始我们的框架之旅,由于本人一直都认的Spring和Mybatis这两个爹,所以接下来的重心会以这两个框架为主,Struts和Hibernate等相同功能的框架就不做重点了。
之前讲过,所谓的框架就是为了处理某一个或者某些复杂的问题而去编写的一个可复用的设计结构。那么我们来看看我们的servlet,这个框架(姑且算它也是个框架吧)有很多比较麻烦的地方,比如说我们的url映射,我们需要写一个servlet,一个servlet里面只有一个doget一个dopost来处理请求,每写一个servlet我们就要去web.xml配置一个servlet,是不是很烦(反正我写这么多字来描述它就已经很烦了==.),所以呢,为了简化这个url映射的工作,我们的SpringMVC给我们提供了@requestMapping注解,好了先看代码,注解是个啥后面高级的地方我们再讲。
首先我们需要按照上一章的内容创建个maven工程: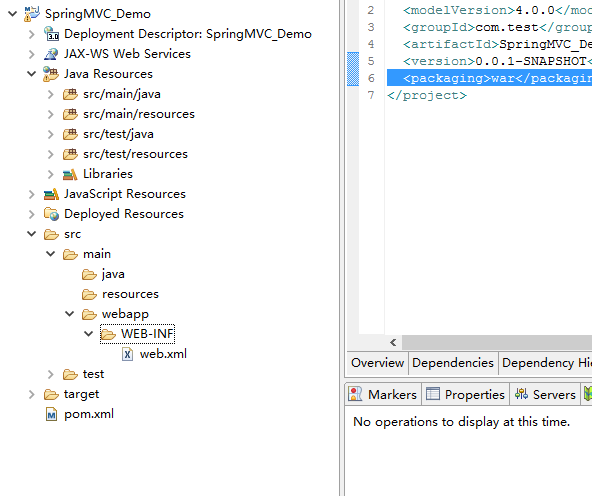
然后,我们需要:
- 导入SpringMVC的依赖:
我们导入依赖保存pom之后,稍等一会儿,等maven下载好相应的依赖之后,你就会发现这个包给我们带来了SpringMVC依赖的全家桶:<dependency><groupId>org.springframework</groupId><artifactId>spring-webmvc</artifactId><version>4.1.2.RELEASE</version></dependency>

接下来: 开始写配置文件:
- 首先在resources下加上applicationContext.xml文件:
此文件是Spring的配置文件,目前写个空白的就行了,以后在加入别的功能,比如配置jdbc,配置redis时可能会用到:<?xml version="1.0" encoding="UTF-8"?><beans xmlns="http://www.springframework.org/schema/beans"xmlns:xsi="http://www.w3.org/2001/XMLSchema-instance" xmlns:context="http://www.springframework.org/schema/context"xmlns:task="http://www.springframework.org/schema/task" xmlns:aop="http://www.springframework.org/schema/aop"xmlns:tx="http://www.springframework.org/schema/tx"xsi:schemaLocation="http://www.springframework.org/schema/beanshttp://www.springframework.org/schema/beans/spring-beans-4.0.xsdhttp://www.springframework.org/schema/contexthttp://www.springframework.org/schema/context/spring-context-4.0.xsdhttp://www.springframework.org/schema/aophttp://www.springframework.org/schema/aop/spring-aop-4.0.xsdhttp://www.springframework.org/schema/txhttp://www.springframework.org/schema/tx/spring-tx-4.0.xsd http://www.springframework.org/schema/task http://www.springframework.org/schema/task/spring-task.xsd"></beans>
- 然后在WEB-INF下加入spring-servlet.xml文件:
这个文件是用来管理我们的请求的,当servlet被访问之后,会将所有的请求都交给我们的SpringMVC处理,这里我们目前只进行了包扫描(就是告诉服务器你定义的url在哪个包下),以后也会加上别的东西,比如过滤器。<?xml version="1.0" encoding="UTF-8"?><beans xmlns="http://www.springframework.org/schema/beans"xmlns:xsi="http://www.w3.org/2001/XMLSchema-instance" xmlns:p="http://www.springframework.org/schema/p"xmlns:context="http://www.springframework.org/schema/context"xmlns:mvc="http://www.springframework.org/schema/mvc" xmlns:task="http://www.springframework.org/schema/task"xmlns:aop="http://www.springframework.org/schema/aop" xmlns:tx="http://www.springframework.org/schema/tx"xsi:schemaLocation="http://www.springframework.org/schema/beanshttp://www.springframework.org/schema/beans/spring-beans-4.0.xsdhttp://www.springframework.org/schema/contexthttp://www.springframework.org/schema/context/spring-context-4.0.xsdhttp://www.springframework.org/schema/aophttp://www.springframework.org/schema/aop/spring-aop-4.0.xsdhttp://www.springframework.org/schema/txhttp://www.springframework.org/schema/tx/spring-tx-4.0.xsdhttp://www.springframework.org/schema/mvchttp://www.springframework.org/schema/mvc/spring-mvc-4.0.xsdhttp://www.springframework.org/schema/taskhttp://www.springframework.org/schema/task/spring-task.xsd"><!-- 进行包扫描 --><context:component-scan base-package="com.demo"></context:component-scan></beans>
然后编辑我们的web.xml:
<!-- 加载applicationContext配置文件,默认是/WEB-INF/applicationContext.xml 可以改成别的,此处配置为resources下的applicationContext.xml--><context-param><param-name>contextConfigLocation</param-name><param-value>classpath:applicationContext.xml</param-value></context-param><!-- 指定aop初始化方法 --><listener><listener-class>org.springframework.web.context.ContextLoaderListener</listener-class></listener><!-- 定义mvc的相关内容,配置拦截的url,加载配置文件spring-servlet.xml,将所有/开头的请求都交给SpringMVC这个servlet进行处理。 --><servlet><servlet-name>Spring</servlet-name><servlet-class>org.springframework.web.servlet.DispatcherServlet</servlet-class><init-param><param-name>contextConfigLocation</param-name><param-value>/WEB-INF/spring-servlet.xml</param-value><!-- 默认是/WEB-INF/[servlet名字]-servlet.xml可以随意修改 --></init-param><load-on-startup>1</load-on-startup></servlet><servlet-mapping><servlet-name>Spring</servlet-name><url-pattern>/</url-pattern></servlet-mapping>
这样我们就做好了准备工作。
- 首先在resources下加上applicationContext.xml文件:
- 接下来开始写业务逻辑:
- 首先我们在src下建个包 com.test.controller

- 然后在包下创建一个类:TestController,并且在类下写上一个普通方法test并且打印一句话。
- 接着我们给这个类加上一个@controller注解,再加上个@RequestMapping注解,并且加上value值test。
- 再接着给方法也加上一个@RequestMapping注解,并且加上value值test。
```java
package com.demo.controller;
- 首先我们在src下建个包 com.test.controller
import org.springframework.stereotype.Controller;
import org.springframework.web.bind.annotation.RequestMapping;
@Controller
@RequestMapping(value = “/test”)
public class TestController {
@RequestMapping(value = "/test")public void test(){System.out.println("进来了");}
}
```
- 最后我们运行项目,访问http://localhost:8080/SpringMVC_Demo/test/test, 也就是地址+端口+项目名+/test/test.最后虽然页面报了404,但是你会发现我们也控制台打印了一句话
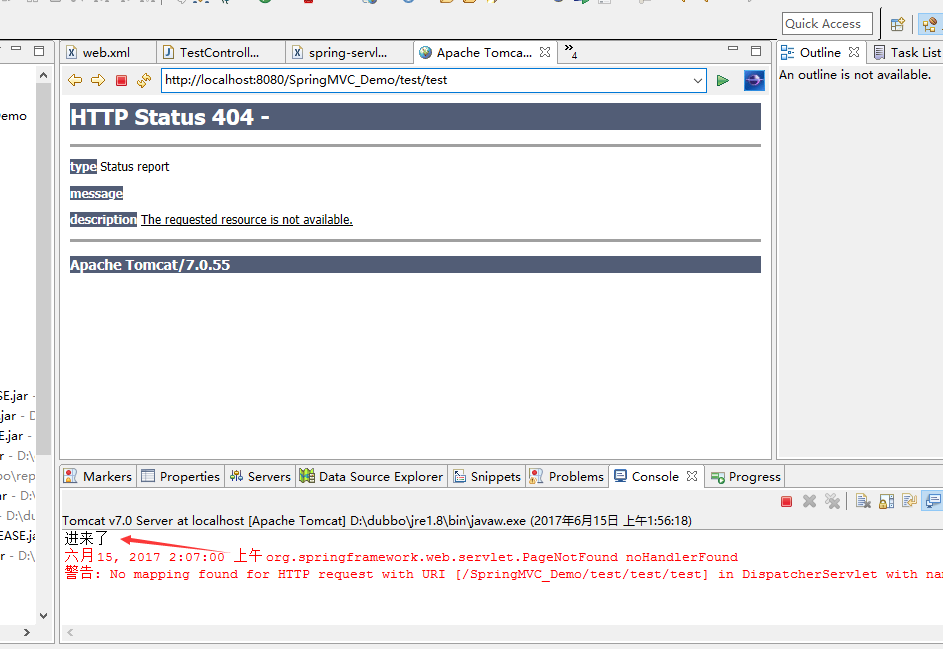
这说明我们就访问成功了。
其实我们访问的原理是这样的:
当我们访问地址之后,servlet把所有的请求都通过配置交给了SpringMVC的DispatcherServlet来管理。当加载DispatcherServlet了spring-servlet.xml就会读取里面的包扫描,在被扫描的包下读取被注解@Controller标记的类,然后通过@RequestMapping注解里面的value值确定访问的路径,一级一级往下走,先去找类的@RequestMapping,再去找方法的@RequestMapping。
恩,流程大概是酱紫的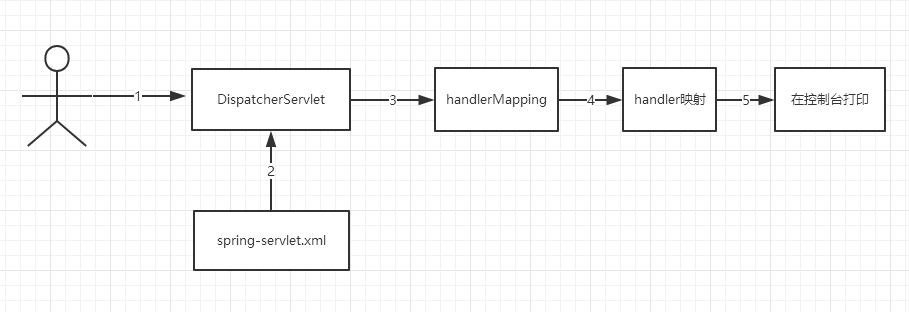
另外附上源码下载链接:https://share.weiyun.com/e6b7142f77cd760288a6401a0dce5d1a
阅读全文
0 0
- java框架(2.0)SpringMVC的搭建
- java开发SSM框架的搭建(SpringMVC+Spring+MyBatis)
- springmvc框架的搭建
- springmvc框架的搭建
- springMvc框架的搭建
- SpringMVC学习(一)--框架的搭建
- Java-springMVC框架:springMVC简单搭建一
- SpringMvc项目框架的搭建
- springmvc框架的搭建步骤
- 自学Java的第三天(Maven搭建springmvc+spring+mybatis框架)
- springmvc框架搭建(maven)
- JAVA WEB搭建 SpringMVC+Spring+hibernate 框架
- JAVA WEB搭建 SpringMVC+Spring+hibernate 框架
- springmvc + mybatis 框架的搭建 (非maven版的)
- JavaEE之--------SpringMVC框架的搭建(注解实现)
- Maven+Spring+SpringMVC+MyBatis框架的搭建(开篇)
- Maven+Spring+SpringMVC+MyBatis框架的搭建(一)
- Maven+Spring+SpringMVC+MyBatis框架的搭建(二)
- 【JavaScript的Date对象】
- STL-list容器
- Spring-Boot使用profile来配置不同环境的配置文件
- 最大 / 小的K个数
- 单纯形法算法实现--java版
- java框架(2.0)SpringMVC的搭建
- 字符串哈希和哈希表的本质
- 【记录】Adobe AI CC 图片批量描摹脚本
- 【服务端知识点】koa框架深入浅出
- 第三周第一课 线性表
- Java使用阿里云OSS对象存储上传图片
- 2668-Point类的定义
- HDU
- 2669-Time类的定义