petalinux(二)开启petalinux内核调试模式
来源:互联网 发布:淘宝 韩都衣舍 编辑:程序博客网 时间:2024/06/06 09:08
原文地址:http://www.xilinx.com/support/answers/66853.html
描述
要调试基于Xilinx SDK的Linux内核模块,必须使能 KERNEL_DEBUG_INFO和KERNEL_DEBUGGING。这篇博文全面记录了在Petalinux中是如何处理的。
解决方案
获得基于调试模式的petalinux,需要一些特定的配置设定,
有一些特定的配置需要设置为了获取PetaLinux基于内核调试工作。
完整的配置步骤请参考帮助文件:
SDK Help > Xilinx Software Development Kit (SDK) User Guide > Working with Xilinx System Debugger > System Debugger Supported Design Flows > Attach and Debug using Xilinx System Debugger.
下面是配置基于PetaLinux的Linux内核调试模式所涉及到的步骤:
1)创建一个Zynq Vivado和导出模板项目硬件SDK。
2)创建一个Linux应用程序在SDK Hello World示例并关闭SDK项目,继续Petalinux项目下一步。
3)与下面的命令创建一个petalinux项目:
petalinux-create --type project --template <CPU_TYPE> --name <PROJECT_NAME>
4)到petalinux项目目录下,并运行以下命令:
petalinux-config --get-hw-description=<path-to-directory-which-contains-hardwaredescription-file>
指定hw-description的目录,目录中包含hdf文件(< project_name >的。sdk目录在您之前创建Vivado项目)。

图1 petalinux-config命令打开的Petalinux menuconfig 视图
5)如图2所示,到达Linux Components Selection ---> and then to kernel (xlnx-4.0)项,选择remote 选项:

图2
6)接下来我们需要指定完整的内核源代码的路径,该路径可以Xilinx GitHub页面找到。
7)定位到Remote linux-kernel settings ---> Remote linux-kernel git URL子项,复制后面的链接,粘贴到如图3所示文本框:
https://github.com/Xilinx/linux-xlnx
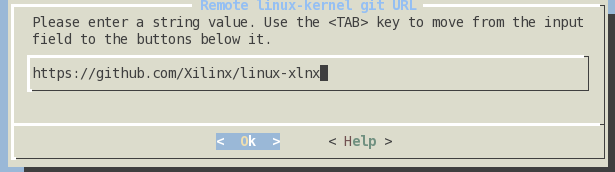
图3
要调试内核,我们需要完整的xlnx-linux源代码。选择remote source ,在petalinux项目的配置阶段,将自动从GitHub下载内核镜像到PetaLinux项目中。
8)接下来需要设置一下boot镜像文件的加载地址偏移量。如下图所示,定位到u-boot Configuration ---> and set the netboot offset,设置boot的引导偏移量为0 x04000000。有关更多信息,请参考(Xilinx Answer 59853)
注:进入Debug模式后,编译出的image文件会变大,将该尺寸设置大一点是为了避免临时引导区溢出。

图4
9)petalinux-config完成后,保存并退出。
10)接下来进行内核配置:
正如PetaLinux tool的SDK帮助中提到的,设置以下选项,:
CONFIG_DEBUG_KERNEL = y
CONFIG_DEBUG_INFO = y
为此:运行petalinux-config - c kernel 打开内核配置界面:
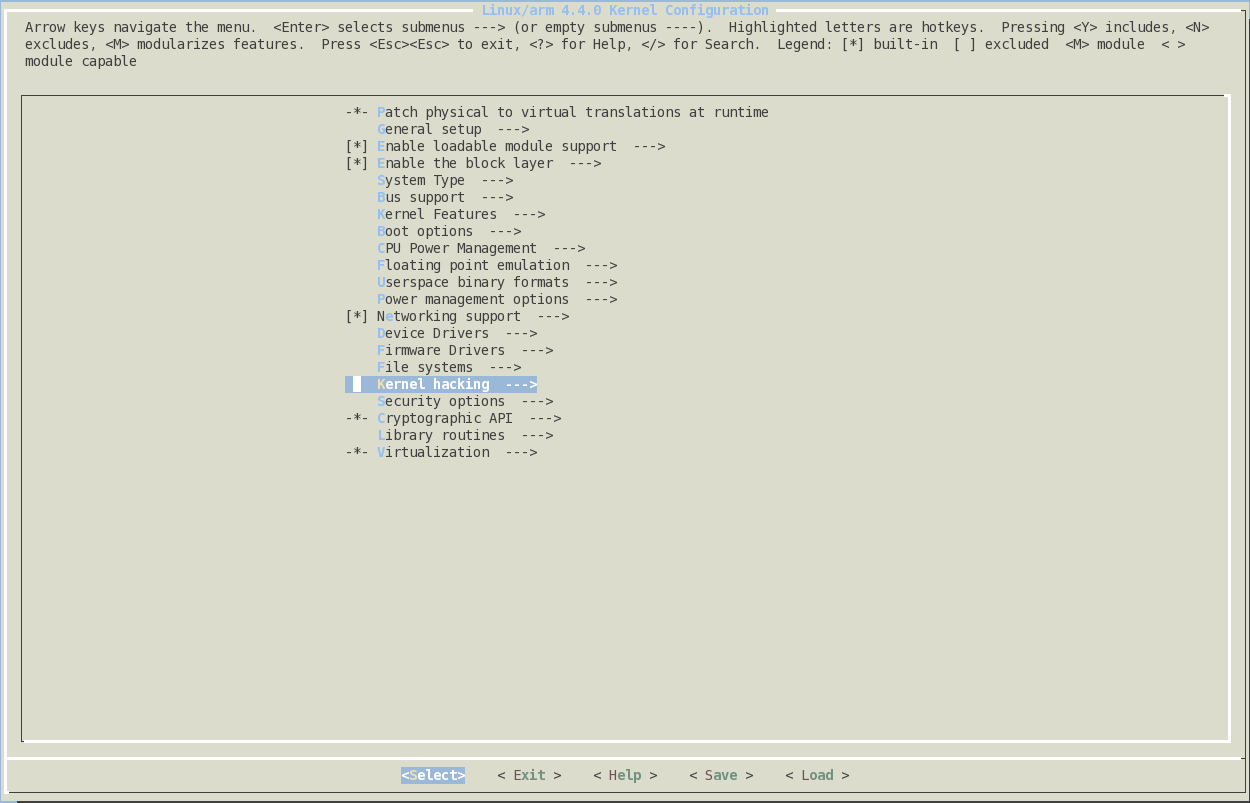
图5选中 Kernel Hacking 项的内核配置面板
11)定位到Kernel Hacking ---> Kernel Debugging,如图6所示,选中该项:

图6 使能内核调试模式的配置界面
12) 接下来,定位到Compile-time checks and compiler options ---> Compile the kernel with debug info,使能该项。
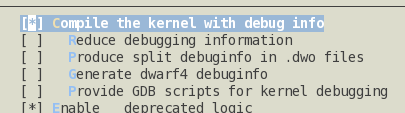
图7 使能DEBUG_INFO项
13)保存并退出内核配置。
14)接下来,需要开启TCF agent服务,它在目标板的Linux内核激活,并在内核调试期间,为我们提供将硬件访问服务。
15)在petalinux项目目录下,运行petalinux-config - c rootfs。您将看到如下对话框:

图8
16)定位到 Debugging ---> build debugable applications,使能该项。
接下 定位到Filesystem Packages ---> base --->tcf-agent并使能该项
[*]tcf-agent
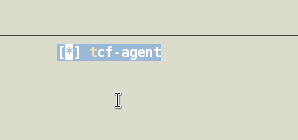
图9
17)保存并退出根文件配置菜单。
保存并关闭文件后。所有的内核调试的设置完成。如需要更多信息请参考 (Xilinx Answer 61332)
18)最后,就是到PetaLinux项目根目录,petalinux-build构建PetaLinux项目、采用如下命令,基于zynq_fsbl.elf建立BOOT.bin,生成的文件存放在images/linux目录中:
petalinux-package --boot --fsbl <FSBL image> --fpga <FPGA bitstream> --u-boot < U-boot.elf>
19)接下来就是,遵循SDK Kernel Debugging部分开始内核调试。
- petalinux(二)开启petalinux内核调试模式
- petalinux安装调试
- petalinux JTAG调试
- petalinux+usb wifi+驱动安装+工具使用(二/二)
- petalinux+usb wifi+驱动安装+工具使用(一/二)
- ZYNQ跑系统 系列(二) petalinux方式移植linux
- ZYBO 部署petalinux(一)
- Petalinux安装
- petalinux2017.3新建工程并查看petalinux内核版本
- -02-建立PetaLinux工程【Xilinx-Petalinux学习】
- BOOT Petalinux with JTAG
- petalinux-build命令
- Xilinx petalinux 2015.4 试用
- zynq petalinux userspace IO
- petalinux添加AD9361驱动
- petalinux 16.4 安装问题
- petalinux查看xadc 温度
- petalinux 2017.2安装指南
- 一个面试算法题
- tensorflow(GPU版)安装
- 对提升开发效率的总结
- HDU
- oracle的去重关键字distinct
- petalinux(二)开启petalinux内核调试模式
- 无分页的datatable
- libstdc++.so.6: version `GLIBCXX_3.4.21' not found 问题解决
- 把字符串转换成整数
- Win10自动修复无法开机【完美解决】
- mac jenkins执行任务时,提示Permission denied解决办法
- Linux内核部件分析
- jQuery问题小结
- ubuntu ftp配置