Exploring Qualcomm's Secure Execution Environment
来源:互联网 发布:keras 安装 ubuntu 编辑:程序博客网 时间:2024/05/20 11:47
Welcome to a new series of blog posts!
In this series, we'll dive once more into the world of TrustZone, and explore a new chain of vulnerabilities and corresponding exploits which will allow us to elevate privileges from zero permissions to code execution in the TrustZone kernel.
This may sound familiar to those of you who have read the previous series - but let me reassure you; this series will be much more exciting!
First of all, this exploit chain features a privilege escalation which is universal across all Android versions and phones (and which requires zero permissions) and a TrustZone exploit which affects a very wide variety of devices. Secondly, we will dive deep into an as-of-yet unexplored operating system - QSEE - Qualcomm's Secure Execution Environment. Lastly, we'll see some interesting TrustZone payloads, such as directly extracting a real fingerprint from TrustZone's encrypted file-system.
In case you would like to follow along with the symbols and disassembled binaries, I will be using my own Nexus 6 throughout this series, with the following fingerprint:
You can find the exact factory image here.
In this blog post, we'll explore Qualcomm's Secure Execution Environment (QSEE).
As we've previously discussed, one of the main reasons for the inclusion of TrustZone on devices is the ability to provide a "Trusted Execution Environment" (TEE) - an environment which should theoretically allow computation which cannot be interfered with from the regular operating system, and is therefore "trusted".
This is achieved by creating a small operating system which operates solely in the "Secure World" facilitated by TrustZone. This operating system provides a small number of services directly in the form of system calls which are handled by the TrustZone kernel (TZBSP) itself. However, in order to allow for an extensible model where "trusted" functionality can be added, the TrustZone kernel can also securely load and execute small programs called "Trustlets", which are meant to provide a secure service to the insecure ("Normal World") operating system (in our case, Android).

There are several such Trustlets commonly used on devices:
Naturally, one place to start would be to look at a trustlet of our choice, and to try and understand what makes it tick. Since the "widevine" module is one of the most ubiquitous, we'll focus on it.
Searching briefly for the widevine trustlet itself in the device's firmware reveals the following:

Apparently the trustlet is split into a few different files... Opening the files reveals a jumbled up mess - some files contain what looks like code, others contain ELF headers and metadata. In any case, before we can start disassembling the trustlet, we need to make some sense out of this format. We can either do this by opening each of the files and guessing the meaning of each blob, or by following the code-paths responsible for loading the trustlet - let's try a little of both.
In order to load a trustlet from the "Normal World", applications can use the libQSEECom.so shared object, which exports the function "QSEECom_start_app":

Unfortunately this library's source code is not available, so we'll have to reverse engineer the function's implementation to find out what it does. Doing so reveals that it performs the following operations:
First of all, the number 0x34 might look familiar - this is the size of a (32 bit) ELF header. Opening the MDT file reveals that the first 0x34 bytes are indeed a valid ELF header:
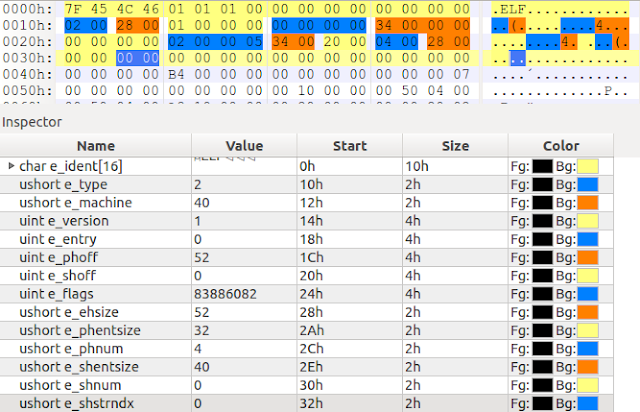
Moreover, the "QSEECOM_start_app" function we just had a look at used the word at offset 0x2C in order to calculate the number of ".bXX" files. As you can see above, this corresponds to the "e_phnum" field in the ELF header.
Since the "e_phnum" field is usually used to specify the number of program headers, this hints that perhaps each of the ".bXX" files contains single segment of the trustlet. Indeed, opening each of the files reveals content the seems like it may be a segment of the program being loaded... But in order to make sure, we'll need to find the program headers themselves (and see if they match the ".bXX" files).
Looking further, the next few chunks in the ".mdt" file are in fact the program headers themselves, one for each of the ".bXX" files present.

And, confirming our earlier suspicion, their sizes match the sizes of the ".bXX" files exactly. Great!
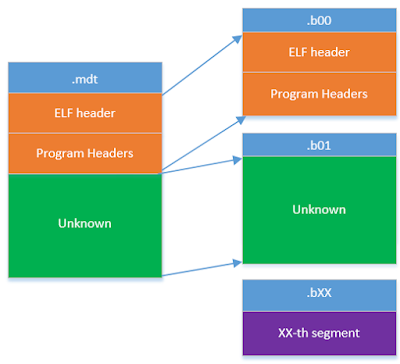
Note that the first two program headers above look a little strange - they are both NULL-type headers, meaning they are "reserved" and should not be loaded into the resulting ELF image. Strangely, opening the corresponding ".bXX" files reveals that the first block contains the same ELF header and program headers present in the ".mdt", and the second block contains the rest of the ".mdt" file.
In any case, here's a short schematic summing up what we know so far:
Also, note that since the ELF header and the program headers are all present in the ".mdt", we can use "readelf" in order to quickly dump the information about program headers in the trustlet:

At this point we have all the information we need in order to create a complete and valid ELF file from the ".mdt" and ".bXX" files; we have the ELF header and the program headers, as well as each of the segments themselves. We just need to write a small script that will create an ELF file using this data.
I've written a small python script which does just that. You can find it here:
https://github.com/laginimaineb/unify_trustlet
So it's time for some guesswork - if we were to build a trusted loader, how would we do it?
One very common paradigm would be to use hash-and-sign (relying on a CRHF and a digital signature). Essentially - we calculate the hash of the data to be authenticated and sign it using a private key for which a corresponding public key is known to the loader.
If that were the case, we'd expect to find two things in the ".mdt":
There's a quick hack we can use to find DER encoded certificates - they almost always start with an "ASN.1 SEQUENCE" blob, which is encoded as: 0x30 0x82. So let's search for these two bytes in the ".mdt" and save each found blob into a file. Now, we can check if these blobs are well-formed certificates using "openssl":

Yup, we guessed correctly - those are certificates.
In fact, the trustlet contains three certificates, one after the other. Just for good measure, we might also want to check that these three certificates are in fact a certificate chain which forms a valid chain of trust. We can do this by dumping the certificates to a single "certificate chain" file and using "openssl" to verify each certificate using this chain:

As for the root of trust of this chain - looking at the root certificate in the chain reveals the same root certificate which is used to verify all other parts of the boot chain in Qualcomm's "Secure Boot" process. There has been some research about this mechanism, which has shown that the validation occurs by comparing the SHA256 of the root certificate to a special value called "OEM_PK_HASH", which is "fused" into the devices QFuses during the production process. Since this value should theoretically not be modifiable after the production of the device, this means that forging such a root certificate would essentially require a second pre-image attack against SHA256.
Now, let's get back to the ".mdt" - we've found the certificate chain, so now it's time to look for a signature. Normally, the private key is used to produce a signature and the public key can be used to recover the signed data. Since we have the public key of the top-most certificate in the chain, we can use it to go over the file and opportunistically try to "recover" each blob.
But how will we know when we've succeeded?
Recall that RSA is a trapdoor permutation family - every blob with the same number of bits as the public modulus N is mapped to another blob of the same size.
However, while the RSA public modulus in our case is 2048 bits long, most hashes are much shorter than that (160 bits for SHA1, 256 bits for SHA256). This means that if we try to "decrypt" a blob using our public key and it happens to end with a lot of "slack" space (for example, zero bytes), there's a very good chance that this is the signature we're looking for (for a completely random permutation, the chance of n consecutive zero bits is 2^-n - extremely small for even a moderate n)
In order to do so, I wrote a small program which loads the public key from the top-most certificate in the chain and tries to "recover" each blob in the ".mdt" (using rsa_public_decrypt with PKCS #1 v1.5 padding). If the "recovered" blob ends with a bunch of zero bytes, the program outputs it. So... Running it on our ".mdt":

We've found a signature! Great.
What's more, this signature is 256 bits long, which implies that it may be a SHA256 hash... And if there's one SHA256 in the ".mdt", perhaps there are more?

Lucky once again!
As we can see, the SHA256 hashes for each of the ".bXX" files are also stored in the ".mdt", consecutively. We can also make an educated guess that this will be the data (or at least some of the data) that is signed to produce the signature we found earlier.
Note that the ".b01" file's hash is missing - why is that? Remember that the ".b01" file contains all the data in the ".mdt" other than the ELF header and program headers. Since this data also contains the signature above, and the signature is (possibly) produced over the hashes of the block files, this would cause a circular dependency (since changing the block file would change the hash, which would change the signature, which would again change the block file, etc.). So it makes sense that this block's hash wouldn't be present.
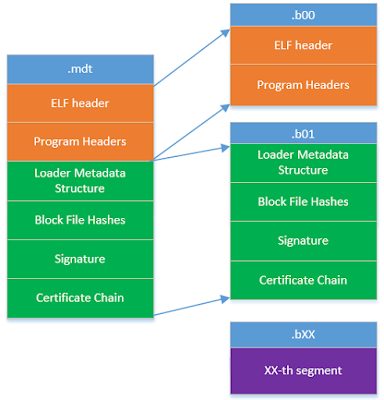
By now we've actually decoded all of the data in the ".mdt" file apart from a small structure which resides right after the program headers. However, after looking at it for a while, we can see that it simply contains pointers and lengths of the various parts of the ".mdt" that we've already decoded:

So finally, we've decoded all of the information in the ".mdt"... Phew.
Although the ".mdt" file format we've seen above is universal for all OEMs, Motorola decided to add a little twist.
Instead of supplying an RSA signature like the one we saw earlier, they actually leave the signature blob empty (in fact, the signature I showed you earlier was from a Nexus 5). In fact, Motorola's signature looks like this:

So how is the image verified?
This is done by using a mechanism which Motorola calls HAB ("High Assurance Boot"). This mechanism allows them to verify the ".mdt" file by appending a certificate chain and a signature over the whole ".mdt" to the end of the file, encoded using a proprietary format used by "HAB":

For more information about this mechanism, you can check out this great research by Tal Aloni. In short, the ".mdt" is hashed and signed using the top-most key in the certificate chain, while the root certificate in the chain is verified using a "Super Root Key", which is hard-coded in one of the bootloader's stages.
Then, the kernel switches into "Secure World" user-mode and executes the trustlet's entry function:

As you can see, the trustlet registers itself with the TrustZone kernel, along with a "handler function". After registering the trustlet, control is returned to the TrustZone kernel, and the loading process finishes.
Now, once the trustlet is loaded, the "Normal World" can send commands to the trustlet by issuing a special SCM call (called "QSEOS_CLIENT_SEND_DATA_COMMAND") containing the loaded trustlet's ID and the request and response buffers. Here's what it looks like:

The TrustZone kernel (TZBSP) receives the SCM call, maps it to QSEOS, which then finds the application with the given ID and calls the handler function which was registered earlier (from "Secure World" user-mode) in order to serve the request.

In this series, we'll dive once more into the world of TrustZone, and explore a new chain of vulnerabilities and corresponding exploits which will allow us to elevate privileges from zero permissions to code execution in the TrustZone kernel.
This may sound familiar to those of you who have read the previous series - but let me reassure you; this series will be much more exciting!
First of all, this exploit chain features a privilege escalation which is universal across all Android versions and phones (and which requires zero permissions) and a TrustZone exploit which affects a very wide variety of devices. Secondly, we will dive deep into an as-of-yet unexplored operating system - QSEE - Qualcomm's Secure Execution Environment. Lastly, we'll see some interesting TrustZone payloads, such as directly extracting a real fingerprint from TrustZone's encrypted file-system.
In case you would like to follow along with the symbols and disassembled binaries, I will be using my own Nexus 6 throughout this series, with the following fingerprint:
- google/shamu/shamu:5.1.1/LMY48M/2167285:user/release-keys
You can find the exact factory image here.
OH SAY CAN QSEE
In this blog post, we'll explore Qualcomm's Secure Execution Environment (QSEE).
As we've previously discussed, one of the main reasons for the inclusion of TrustZone on devices is the ability to provide a "Trusted Execution Environment" (TEE) - an environment which should theoretically allow computation which cannot be interfered with from the regular operating system, and is therefore "trusted".
This is achieved by creating a small operating system which operates solely in the "Secure World" facilitated by TrustZone. This operating system provides a small number of services directly in the form of system calls which are handled by the TrustZone kernel (TZBSP) itself. However, in order to allow for an extensible model where "trusted" functionality can be added, the TrustZone kernel can also securely load and execute small programs called "Trustlets", which are meant to provide a secure service to the insecure ("Normal World") operating system (in our case, Android).
There are several such Trustlets commonly used on devices:
- keymaster - Implements the key management API provided by the Android "keystore" daemon. It can securely generate and store cryptographic keys and allow the users to operate on data using these keys.
- widevine - Implementation of Widevine DRM, which allows "secure" playback of media on the device.
WHERE DO WE START?
Naturally, one place to start would be to look at a trustlet of our choice, and to try and understand what makes it tick. Since the "widevine" module is one of the most ubiquitous, we'll focus on it.
Searching briefly for the widevine trustlet itself in the device's firmware reveals the following:
Apparently the trustlet is split into a few different files... Opening the files reveals a jumbled up mess - some files contain what looks like code, others contain ELF headers and metadata. In any case, before we can start disassembling the trustlet, we need to make some sense out of this format. We can either do this by opening each of the files and guessing the meaning of each blob, or by following the code-paths responsible for loading the trustlet - let's try a little of both.
LOADING A TRUSTLET
In order to load a trustlet from the "Normal World", applications can use the libQSEECom.so shared object, which exports the function "QSEECom_start_app":
- Opens the /dev/qseecom device and calls some ioctls to configure it
- Opens the ".mdt" file associated with the trustlet and reads the first 0x34 bytes from it
- Calculates the number of ".bXX" files using the 0x34 bytes from the ".mdt"
- Allocates a physically continuous buffer (using "ion") and copies the ".mdt" and ".bXX" files into it
- Finally, calls a ioctl to load the trustlet itself, using the allocated buffer
First of all, the number 0x34 might look familiar - this is the size of a (32 bit) ELF header. Opening the MDT file reveals that the first 0x34 bytes are indeed a valid ELF header:
Moreover, the "QSEECOM_start_app" function we just had a look at used the word at offset 0x2C in order to calculate the number of ".bXX" files. As you can see above, this corresponds to the "e_phnum" field in the ELF header.
Since the "e_phnum" field is usually used to specify the number of program headers, this hints that perhaps each of the ".bXX" files contains single segment of the trustlet. Indeed, opening each of the files reveals content the seems like it may be a segment of the program being loaded... But in order to make sure, we'll need to find the program headers themselves (and see if they match the ".bXX" files).
Looking further, the next few chunks in the ".mdt" file are in fact the program headers themselves, one for each of the ".bXX" files present.
And, confirming our earlier suspicion, their sizes match the sizes of the ".bXX" files exactly. Great!
Note that the first two program headers above look a little strange - they are both NULL-type headers, meaning they are "reserved" and should not be loaded into the resulting ELF image. Strangely, opening the corresponding ".bXX" files reveals that the first block contains the same ELF header and program headers present in the ".mdt", and the second block contains the rest of the ".mdt" file.
In any case, here's a short schematic summing up what we know so far:
Also, note that since the ELF header and the program headers are all present in the ".mdt", we can use "readelf" in order to quickly dump the information about program headers in the trustlet:
At this point we have all the information we need in order to create a complete and valid ELF file from the ".mdt" and ".bXX" files; we have the ELF header and the program headers, as well as each of the segments themselves. We just need to write a small script that will create an ELF file using this data.
I've written a small python script which does just that. You can find it here:
https://github.com/laginimaineb/unify_trustlet
REFLECTIONS ON TRUSTING TRUSTLETS
By now have a basic understanding of how trustlets are assembled into an executable file, but we still don't know how they are verified. However, since we know the ".bXX" files contain only the segments to be loaded, this means that this data must reside in the ".mdt" file.
So it's time for some guesswork - if we were to build a trusted loader, how would we do it?
One very common paradigm would be to use hash-and-sign (relying on a CRHF and a digital signature). Essentially - we calculate the hash of the data to be authenticated and sign it using a private key for which a corresponding public key is known to the loader.
If that were the case, we'd expect to find two things in the ".mdt":
- A certificate chain
- A signature blob
There's a quick hack we can use to find DER encoded certificates - they almost always start with an "ASN.1 SEQUENCE" blob, which is encoded as: 0x30 0x82. So let's search for these two bytes in the ".mdt" and save each found blob into a file. Now, we can check if these blobs are well-formed certificates using "openssl":
Yup, we guessed correctly - those are certificates.
In fact, the trustlet contains three certificates, one after the other. Just for good measure, we might also want to check that these three certificates are in fact a certificate chain which forms a valid chain of trust. We can do this by dumping the certificates to a single "certificate chain" file and using "openssl" to verify each certificate using this chain:
As for the root of trust of this chain - looking at the root certificate in the chain reveals the same root certificate which is used to verify all other parts of the boot chain in Qualcomm's "Secure Boot" process. There has been some research about this mechanism, which has shown that the validation occurs by comparing the SHA256 of the root certificate to a special value called "OEM_PK_HASH", which is "fused" into the devices QFuses during the production process. Since this value should theoretically not be modifiable after the production of the device, this means that forging such a root certificate would essentially require a second pre-image attack against SHA256.
Now, let's get back to the ".mdt" - we've found the certificate chain, so now it's time to look for a signature. Normally, the private key is used to produce a signature and the public key can be used to recover the signed data. Since we have the public key of the top-most certificate in the chain, we can use it to go over the file and opportunistically try to "recover" each blob.
But how will we know when we've succeeded?
Recall that RSA is a trapdoor permutation family - every blob with the same number of bits as the public modulus N is mapped to another blob of the same size.
However, while the RSA public modulus in our case is 2048 bits long, most hashes are much shorter than that (160 bits for SHA1, 256 bits for SHA256). This means that if we try to "decrypt" a blob using our public key and it happens to end with a lot of "slack" space (for example, zero bytes), there's a very good chance that this is the signature we're looking for (for a completely random permutation, the chance of n consecutive zero bits is 2^-n - extremely small for even a moderate n)
In order to do so, I wrote a small program which loads the public key from the top-most certificate in the chain and tries to "recover" each blob in the ".mdt" (using rsa_public_decrypt with PKCS #1 v1.5 padding). If the "recovered" blob ends with a bunch of zero bytes, the program outputs it. So... Running it on our ".mdt":
We've found a signature! Great.
What's more, this signature is 256 bits long, which implies that it may be a SHA256 hash... And if there's one SHA256 in the ".mdt", perhaps there are more?
Lucky once again!
As we can see, the SHA256 hashes for each of the ".bXX" files are also stored in the ".mdt", consecutively. We can also make an educated guess that this will be the data (or at least some of the data) that is signed to produce the signature we found earlier.
Note that the ".b01" file's hash is missing - why is that? Remember that the ".b01" file contains all the data in the ".mdt" other than the ELF header and program headers. Since this data also contains the signature above, and the signature is (possibly) produced over the hashes of the block files, this would cause a circular dependency (since changing the block file would change the hash, which would change the signature, which would again change the block file, etc.). So it makes sense that this block's hash wouldn't be present.
By now we've actually decoded all of the data in the ".mdt" file apart from a small structure which resides right after the program headers. However, after looking at it for a while, we can see that it simply contains pointers and lengths of the various parts of the ".mdt" that we've already decoded:
So finally, we've decoded all of the information in the ".mdt"... Phew.
MOTOROLA'S HIGH ASSURANCE BOOT
Although the ".mdt" file format we've seen above is universal for all OEMs, Motorola decided to add a little twist.
Instead of supplying an RSA signature like the one we saw earlier, they actually leave the signature blob empty (in fact, the signature I showed you earlier was from a Nexus 5). In fact, Motorola's signature looks like this:
So how is the image verified?
This is done by using a mechanism which Motorola calls HAB ("High Assurance Boot"). This mechanism allows them to verify the ".mdt" file by appending a certificate chain and a signature over the whole ".mdt" to the end of the file, encoded using a proprietary format used by "HAB":
For more information about this mechanism, you can check out this great research by Tal Aloni. In short, the ".mdt" is hashed and signed using the top-most key in the certificate chain, while the root certificate in the chain is verified using a "Super Root Key", which is hard-coded in one of the bootloader's stages.
LIFE OF A TRUSTLET
After the verification process we saw above, the TrustZone kernel loads the trustlet's segments into a secure memory region ("secapp-region") which is inaccessible from the "Normal World" and assigns an ID to it.Then, the kernel switches into "Secure World" user-mode and executes the trustlet's entry function:
Now, once the trustlet is loaded, the "Normal World" can send commands to the trustlet by issuing a special SCM call (called "QSEOS_CLIENT_SEND_DATA_COMMAND") containing the loaded trustlet's ID and the request and response buffers. Here's what it looks like:
The TrustZone kernel (TZBSP) receives the SCM call, maps it to QSEOS, which then finds the application with the given ID and calls the handler function which was registered earlier (from "Secure World" user-mode) in order to serve the request.
WHAT'S NEXT?
Now that we have some understanding of what trustlets are and how they are loaded, we can move on to the exploits! In the next blog post we'll find a vulnerability in a very popular trustlet and exploit it in order to execute code within QSEE.
Source: http://bits-please.blogspot.co.il/2016/04/exploring-qualcomms-secure-execution.html
阅读全文
0 0
- Exploring Qualcomm's Secure Execution Environment
- Exploring Qualcomm's TrustZone implementation
- 研读:SeCReT:Secure Channel between Rich Execution Environment and Trusted Execution Environment
- overview basic execution environment(ia_32)
- TEE(Trusted Execution Environment)简介
- Qualcomm’s Connectivity Engine (CnE)
- Extracting Qualcomm's KeyMaster Keys
- Exploring Android's SELinux Kernel Policy
- systemd.exec — Execution environment configuration
- Build path specifies execution environment J2SE-1.5.
- qualcomm
- 研读:CaSE Cache-Assisted Secure Execution on ARM Processors
- The CLR’s Execution Model
- The CLR’s Execution Model
- Play application's execution model.
- Roy's Personal Developing Environment
- Performance Trade-offs of the Windows 2000 Component Execution Environment
- 研读:The Dual-Execution-Environment Approach:Analysis and Comparative Evaluation
- Extracting Qualcomm's KeyMaster Keys
- TrustZone Kernel Privilege Escalation (CVE-2016-2431)
- War of the Worlds
- img默认间隙和li间距问题
- QSEE privilege escalation vulnerability and exploit (CVE-2015-6639)
- Exploring Qualcomm's Secure Execution Environment
- Android Linker学习笔记
- ELF文件装载链接过程及hook原理
- android linker 浅析
- linux文件系统介绍
- python字符串处理技巧
- XSS与CSRF对比
- Spring JDBC-使用Spring JDBC访问数据库
- 技术顶牛的公司为啥没有CTO?