caffe显示特征图
来源:互联网 发布:u盘删除数据恢复 编辑:程序博客网 时间:2024/05/12 05:12
转载请注明出处,楼燚(yì)航的blog,http://www.cnblogs.com/louyihang-loves-baiyan/
以下部分代码是根据caffe的python接口,从一次forword中取出param和blob里面的卷积核 和响应的卷积图。
import numpy as npimport matplotlib.pyplot as pltimport osimport caffeimport sysimport pickleimport cv2caffe_root = '../' deployPrototxt = '/home/chenjie/louyihang/caffe/models/bvlc_reference_caffenet/deploy_louyihang.prototxt'modelFile = '/home/chenjie/louyihang/caffe/models/bvlc_reference_caffenet/caffenet_carmodel_louyihang_iter_50000.caffemodel'meanFile = 'python/caffe/imagenet/ilsvrc_2012_mean.npy'imageListFile = '/home/chenjie/DataSet/CompCars/data/train_test_split/classification/test_model431_label_start0.txt'imageBasePath = '/home/chenjie/DataSet/CompCars/data/cropped_image'resultFile = 'PredictResult.txt'#网络初始化def initilize(): print 'initilize ... ' sys.path.insert(0, caffe_root + 'python') caffe.set_mode_gpu() caffe.set_device(4) net = caffe.Net(deployPrototxt, modelFile,caffe.TEST) return net#取出网络中的params和net.blobs的中的数据def getNetDetails(image, net): # input preprocessing: 'data' is the name of the input blob == net.inputs[0] transformer = caffe.io.Transformer({'data': net.blobs['data'].data.shape}) transformer.set_transpose('data', (2,0,1)) transformer.set_mean('data', np.load(caffe_root + meanFile ).mean(1).mean(1)) # mean pixel transformer.set_raw_scale('data', 255) # the reference model operates on images in [0,255] range instead of [0,1] transformer.set_channel_swap('data', (2,1,0)) # the reference model has channels in BGR order instead of RGB # set net to batch size of 50 net.blobs['data'].reshape(1,3,227,227) net.blobs['data'].data[...] = transformer.preprocess('data', caffe.io.load_image(image)) out = net.forward() #网络提取conv1的卷积核 filters = net.params['conv1'][0].data with open('FirstLayerFilter.pickle','wb') as f: pickle.dump(filters,f) vis_square(filters.transpose(0, 2, 3, 1)) #conv1的特征图 feat = net.blobs['conv1'].data[0, :36] with open('FirstLayerOutput.pickle','wb') as f: pickle.dump(feat,f) vis_square(feat,padval=1) pool = net.blobs['pool1'].data[0,:36] with open('pool1.pickle','wb') as f: pickle.dump(pool,f) vis_square(pool,padval=1)# 此处将卷积图和进行显示,def vis_square(data, padsize=1, padval=0 ): data -= data.min() data /= data.max() #让合成图为方 n = int(np.ceil(np.sqrt(data.shape[0]))) padding = ((0, n ** 2 - data.shape[0]), (0, padsize), (0, padsize)) + ((0, 0),) * (data.ndim - 3) data = np.pad(data, padding, mode='constant', constant_values=(padval, padval)) #合并卷积图到一个图像中 data = data.reshape((n, n) + data.shape[1:]).transpose((0, 2, 1, 3) + tuple(range(4, data.ndim + 1))) data = data.reshape((n * data.shape[1], n * data.shape[3]) + data.shape[4:]) print data.shape plt.imshow(data)if __name__ == "__main__": net = initilize() testimage = '../data/MyTest/visualize_test.jpg' getNetDetails(testimage, net)输入的测试图像
第一层的卷积核和卷积图,可以看到一些明显的边缘轮廓,左侧是相应的卷积核
第一个Pooling层的特征图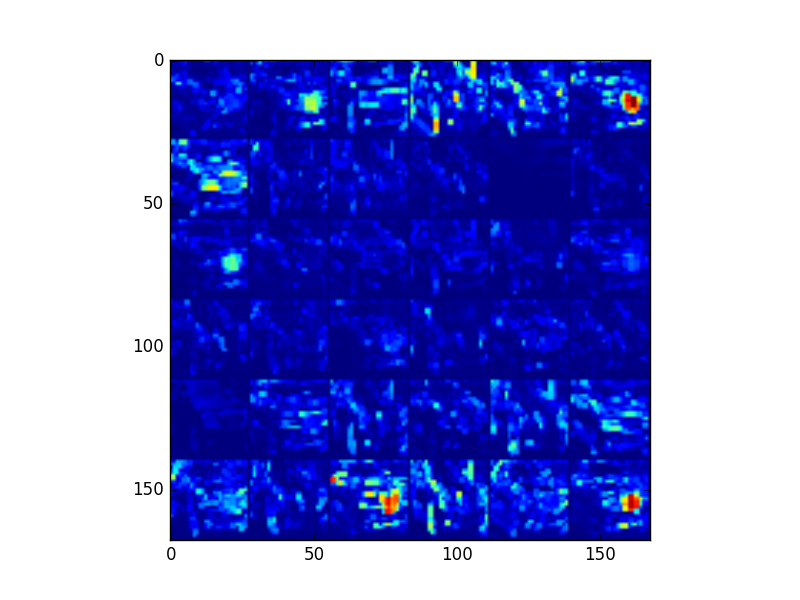
第二层卷积特征图
第二层pooling的特征图,可以看到pooling之后,对conv的特征有部分强化,我网络中使用的max-pooling,但是到了pooling2已经出现一些离散的块了,已经有些抽象了,难以看出什么东西
阅读全文
0 0
- caffe显示特征图
- Caffe 特征图可视化
- Caffe 特征图可视化
- 【Caffe特征图可视化】【权重图weight】【特征图feat】
- caffe之特征图可视化及特征提取
- 【Caffe特征图可视化】【caffemodel 权重图】
- caffe 提取可视化特征遇到keyerror(即用matlab显示提取特征)
- 利用Python-caffe进行图像分类,卷积核的显示,激活值特征图的显示以及全连接层直方图显示
- caffe提特征
- caffe 提取特征
- Caffe CNN特征可视化
- Caffe CNN特征可视化
- Caffe抽取图像特征
- caffe特征可视化
- caffe 提取图像特征
- caffe-特征提取
- Caffe CNN特征可视化
- caffe -- Python特征抽取
- 爱上
- Java移动框架篇--Spring for Android简单试用
- js传数组到java后台使用Json转换 (高德地图多边形覆盖物显示)
- maven项目pom.xml报:org.apache.maven.archiver.MavenArchiver.getManifest(org.apache.maven.project.Maven
- 本地项目提交到git远程仓库
- caffe显示特征图
- 程序猿充电的五本优质编程技术书
- SQLServer中的锁
- TOMCAT启动报错 invalid LOC header (bad signature)
- Linux进程间通信
- 【BZOJ1008】【数论】[HNOI2008]越狱 题解
- 创建catkin工作空间和程序包
- Ajax工作原理
- 【面试】游戏开发面试笔试题