nginx+ftp搭建图片服务器
来源:互联网 发布:高清混合矩阵 编辑:程序博客网 时间:2024/05/17 08:55
转载自:https://my.oschina.net/iyinghui/blog/750459
一、需要的组件
图片服务器两个服务:
Nginx(图片访问):
1、http服务:可以使用nginx做静态资源服务器。也可以使用apache。推荐使用nginx,效率更高。
2、反向代理 实现 负载均衡
ftp服务(图片上传):
使用linux做服务器,在linux中有个ftp组件vsftpd。
二、Nginx服务器搭建
1.安装Nginx
要求安装vmware虚拟机。
Linux:CentOS6.4(32)
Nginx:1.8.0
Vsftpd:需要在线安装。
虚拟机以及Linux安装很简单此处略。
Linux的局域网IP为:192.168.1.110
修改Linux的IP并立即生效的命令:
#切换root管理员用户[root@localhost ~]# supassword #设置本机IP并立即生效 [root@localhost ~]# ifconfig eth0 192.168.1.110 netmask 255.255.255.01.1、nginx安装环境(详见nginx安装手册)
nginx安装手册:http://share.weiyun.com/cf9f67566a14ce65472509fb9fd34aea
1.2、把nginx安装包nginx-1.8.0.tar.gz上传到服务器。
在secureCRT打开sftp会话框,上传文件
使用put/get命令 或者直接拖拽文件
nginx安装环境
nginx是C语言开发,建议在linux上运行,本教程使用Centos6.5作为安装环境。
gcc
安装nginx需要先将官网下载的源码进行编译,编译依赖gcc环境,如果没有gcc环境,需要安装gcc:
yum install gcc-c++
PCRE
PCRE(PerlCompatible Regular Expressions)是一个Perl库,包括 perl 兼容的正则表达式库。nginx的http模块使用pcre来解析正则表达式,所以需要在linux上安装pcre库。
yuminstall -y pcre pcre-devel
注:pcre-devel是使用pcre开发的一个二次开发库。nginx也需要此库。
zlib
zlib库提供了很多种压缩和解压缩的方式,nginx使用zlib对http包的内容进行gzip,所以需要在linux上安装zlib库。
yuminstall -y zlib zlib-devel
openssl
OpenSSL是一个强大的安全套接字层密码库,囊括主要的密码算法、常用的密钥和证书封装管理功能及SSL协议,并提供丰富的应用程序供测试或其它目的使用。
nginx不仅支持http协议,还支持https(即在ssl协议上传输http),所以需要在linux安装openssl库。
yuminstall -y openssl openssl-devel
1.3、解压缩(在安装包所在目录执行)
[root@localhost ~]# tar -zxvf nginx-1.8.0.tar.gz1.4、配置makefile
进入解压后的目录
[root@localhost ~]# cd nginx-1.8.0执行下面的命令创建makefile
./configure \--prefix=/usr/local/nginx \--pid-path=/var/run/nginx/nginx.pid \--lock-path=/var/lock/nginx.lock \--error-log-path=/var/log/nginx/error.log \--http-log-path=/var/log/nginx/access.log \--with-http_gzip_static_module \--http-client-body-temp-path=/var/temp/nginx/client \--http-proxy-temp-path=/var/temp/nginx/proxy \--http-fastcgi-temp-path=/var/temp/nginx/fastcgi \--http-uwsgi-temp-path=/var/temp/nginx/uwsgi \--http-scgi-temp-path=/var/temp/nginx/scgi注意:上边将临时文件目录指定为/var/temp/nginx,需要在/var下创建temp及nginx目录
[root@bogon nginx-1.8.0]# mkdir /var/temp/nginx -p
1.5、编译安装
编译:
[root@localhost nginx-1.8.0]# make安装:
[root@localhost nginx-1.8.0]# make install安装成功以后进入安装目录(创建makedir时指定的”--prefix=/usr/local/nginx \“)
[root@localhost nginx-1.8.0]# cd /usr/local/nginx/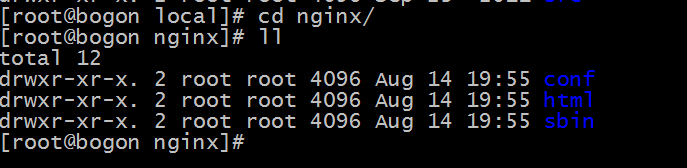
2、nginx运行
2.1、启动nginx
[root@localhost nginx]# cd sbin[root@localhost sbin]# ./nginx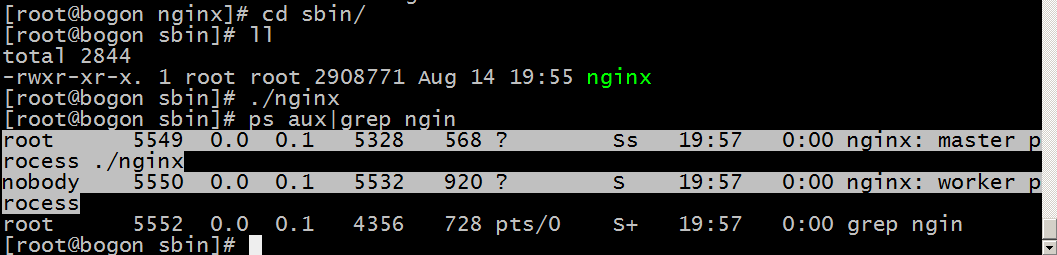
2.2、关闭
[root@localhost sbin]# ./nginx -s stop2.3、重新加载配置文件
[root@localhost sbin]# ./nginx -s reload2.4、关闭防火墙
1)关闭
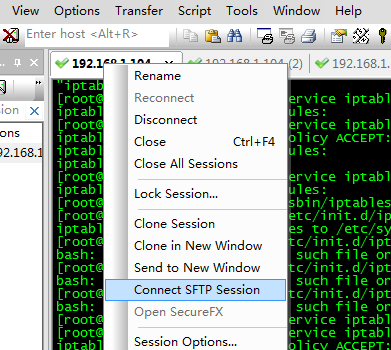
[root@localhost sbin]# service iptables stopiptables: Flushing firewall rules: [ OK ]iptables: Setting chains to policy ACCEPT: filter [ OK ]iptables: Unloading modules: [ OK ]2)也可以修改防火墙配置文件:
[root@localhost sbin]# vim /etc/sysconfig/iptables//在倒数第二行加入80端口 -A RH-Firewall-1-INPUT -m state --state NEW -m tcp -p tcp --dport 80 -j ACCEPT 修改后需要重启防火墙:
[root@localhost sbin]# service iptables restart3)另外一种解决办法
[root@localhost ]# /sbin/iptables -I INPUT -p tcp --dport 80 -j ACCEPT [root@localhost ]# /etc/init.d/iptables save [root@localhost ]# /etc/init.d/iptables restart 2.5、访问nginx服务

3、关于图片服务器配置
进入配置文件目录
cd /usr/local/nginx/conf/nginx的默认配置文件nginx.config
#user nobody;worker_processes 1;#error_log logs/error.log;#error_log logs/error.log notice;#error_log logs/error.log info;#pid logs/nginx.pid;events { worker_connections 1024;}http { include mime.types; default_type application/octet-stream; #log_format main '$remote_addr - $remote_user [$time_local] "$request" ' # '$status $body_bytes_sent "$http_referer" ' # '"$http_user_agent" "$http_x_forwarded_for"'; #access_log logs/access.log main; sendfile on; #tcp_nopush on; #keepalive_timeout 0; keepalive_timeout 65; #gzip on; server { listen 80; server_name localhost; #charset koi8-r; #access_log logs/host.access.log main; location / { root html; index index.html index.htm; } #error_page 404 /404.html; # redirect server error pages to the static page /50x.html # error_page 500 502 503 504 /50x.html; location = /50x.html { root html; } # proxy the PHP scripts to Apache listening on 127.0.0.1:80 # #location ~ \.php$ { # proxy_pass http://127.0.0.1; #} # pass the PHP scripts to FastCGI server listening on 127.0.0.1:9000 # #location ~ \.php$ { # root html; # fastcgi_pass 127.0.0.1:9000; # fastcgi_index index.php; # fastcgi_param SCRIPT_FILENAME /scripts$fastcgi_script_name; # include fastcgi_params; #} # deny access to .htaccess files, if Apache's document root # concurs with nginx's one # #location ~ /\.ht { # deny all; #} } # another virtual host using mix of IP-, name-, and port-based configuration # #server { # listen 8000; # listen somename:8080; # server_name somename alias another.alias; # location / { # root html; # index index.html index.htm; # } #} # HTTPS server # #server { # listen 443 ssl; # server_name localhost; # ssl_certificate cert.pem; # ssl_certificate_key cert.key; # ssl_session_cache shared:SSL:1m; # ssl_session_timeout 5m; # ssl_ciphers HIGH:!aNULL:!MD5; # ssl_prefer_server_ciphers on; # location / { # root html; # index index.html index.htm; # } #}}配置图片服务器
方法一、在配置文件server{}中location /{} 修改配置:
#默认请求location / { root /home/ftpuser/www;#定义服务器的默认网站根目录位置 index index.html index.php index.htm;#定义首页索引文件的名称}其中:/home/ftpuser/www;为创建FTP服务账户ftpuser的根目录下的www目录
方法二、在http{}内配置新服务
server { listen 8080; server_name localhost; #charset utf-8; #access_log logs/host.access.log main; #默认请求 location / { root /home/ftpuser/www;#定义服务器的默认网站根目录位置 index index.html index.php index.htm;#定义首页索引文件的名称 } }因为需要开始端口号8080,所以要在防火墙中开启8080端口
[root@localhost ]# /sbin/iptables -I INPUT -p tcp --dport 8080 -j ACCEPT [root@localhost ]# /etc/init.d/iptables save [root@localhost ]# /etc/init.d/iptables restart 三、FTP服务的安装与启动
1、安装vsftpd组件
vsftpd组件为Linux的FTP服务组件,安装方式为在线安装。
[root@localhost ~]# yum -y install vsftpd安装完后,有/etc/vsftpd/vsftpd.conf 文件,是vsftp的配置文件。
2、添加一个ftp用户
此用户就是用来登录ftp服务器用的。
[root@localhost ~]# useradd ftpuser这样一个用户建完,可以用这个登录,记得用普通登录不要用匿名了。登录后默认的路径为 /home/ftpuser.
为这个ftp账户添加密码
[root@localhost ~]# passwd ftpuser输入两次密码后修改密码。
注意,设置ftp用户目录的读写权限:chmod -R 777 /home/ftpuser/
3、 防火墙开启21端口
因为ftp默认的端口为21,而centos默认是没有开启的,所以要修改iptables文件
[root@localhost ~]# vim /etc/sysconfig/iptables在行上面有22 -j ACCEPT 下面另起一行输入跟那行差不多的,只是把22换成21,然后:wq保存。
还要运行下,重启iptables
[root@localhost ~]# service iptables restart4、 修改selinux
外网是可以访问上去了,可是发现没法返回目录(使用ftp的主动模式,被动模式还是无法访问),也上传不了,因为selinux作怪了。
修改selinux:
执行以下命令查看状态:
[root@localhost ~]# getsebool -a | grep ftp allow_ftpd_anon_write --> off
allow_ftpd_full_access --> off
allow_ftpd_use_cifs --> off
allow_ftpd_use_nfs --> off
ftp_home_dir --> off
ftpd_connect_db --> off
ftpd_use_passive_mode --> off
httpd_enable_ftp_server --> off
tftp_anon_write --> off
执行上面命令,再返回的结果看到两行都是off,代表,没有开启外网的访问
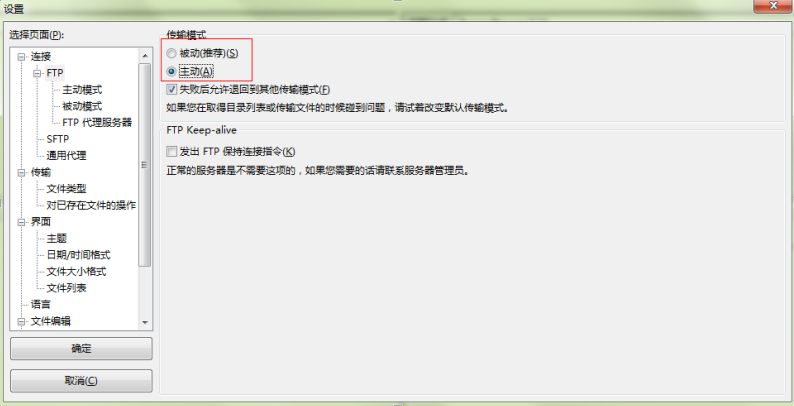
[root@localhost ~]# setsebool -P allow_ftpd_full_access on[root@localhost ~]# setsebool -P ftp_home_dir on这样应该没问题了(如果,还是不行,看看是不是用了ftp客户端工具用了passive模式访问了,如提示Entering Passive mode,就代表是passive模式,默认是不行的,因为ftp passive模式被iptables挡住了,下面会讲怎么开启,如果懒得开的话,就看看你客户端ftp是否有port模式的选项,或者把passive模式的选项去掉。如果客户端还是不行,看看客户端上的主机的电脑是否开了防火墙,关吧)
FileZilla的主动、被动模式修改:
菜单:编辑→设置
5、关闭匿名访问
修改/etc/vsftpd/vsftpd.conf文件:
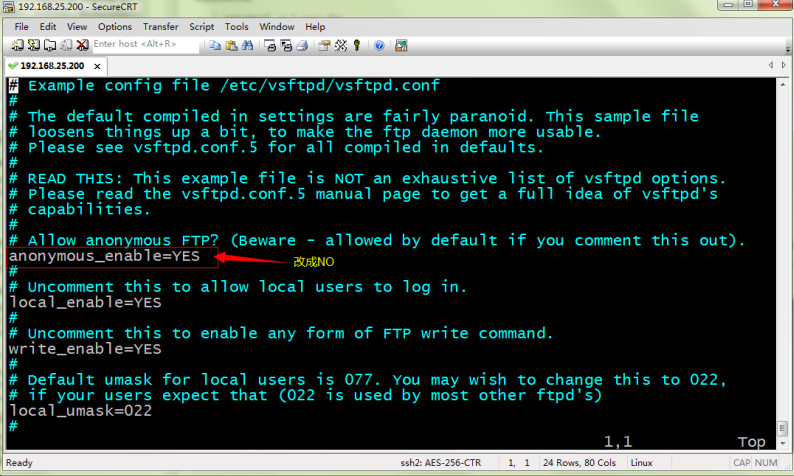
重启ftp服务:
[root@localhost ~]# service vsftpd restart6、 开启被动模式
默认是开启的,但是要指定一个端口范围,打开vsftpd.conf文件,在后面加上
pasv_min_port=30000pasv_max_port=30999表示端口范围为30000~30999,这个可以随意改。改完重启一下vsftpd
由于指定这段端口范围,iptables也要相应的开启这个范围,所以像上面那样打开iptables文件。
也是在21上下面另起一行,更那行差不多,只是把21 改为30000:30999,然后:wq保存,重启下iptables。这样就搞定了。
7、设置开机启动vsftpd ftp服务
[root@localhost ~]# chkconfig vsftpd on四、部署验证
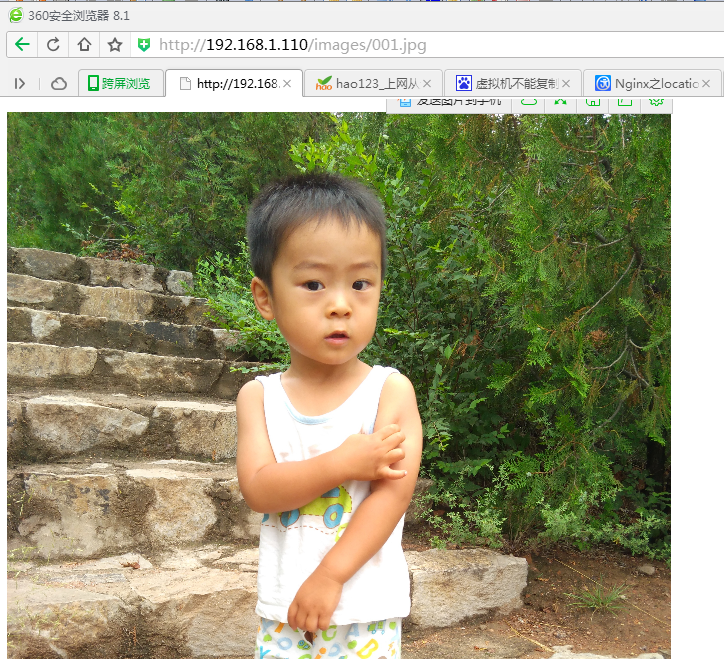
在www下新建文件夹images,下面放一张图片001.jpg
测试访问:http://192.168.1.110/images/001.jpg
五、Java实现FTP上传
上传文件测试代码:
package com.taotao.service.impl;import java.io.File;import java.io.FileInputStream;import java.io.IOException;import java.net.SocketException;import org.apache.commons.net.ftp.FTP;import org.apache.commons.net.ftp.FTPClient;import org.junit.Test;import com.taotao.util.FtpUtil;public class FTPTest {@Testpublic void testFtpClient() throws SocketException, IOException {FTPClient ftpClient = new FTPClient();try {// 连接FTP服务器ftpClient.connect("192.168.1.110", 21);// 登录FTP服务器ftpClient.login("ftpuser", "123");// 将文件转换为IOFileInputStream fileInputStream = new FileInputStream(new File("C:\\Users\\a\\Pictures\\16-040836_50.jpg"));// 指定上传远程目录ftpClient.changeWorkingDirectory("/home/ftpuser/www/images");// 绝对路径// ftpClient.changeWorkingDirectory("www/images");//相对路径// 设置上传文件类型ftpClient.setFileType(FTP.BINARY_FILE_TYPE);// 上传文件并指定远程文件名// ftpClient.storeFile("中文名.jpg", fileInputStream);//中文会出现乱码ftpClient.storeFile("a.jpg", fileInputStream);} catch (Exception e) {e.printStackTrace();} finally {// 退出登录ftpClient.logout();// 断开连接ftpClient.disconnect();}}@Testpublic void testFTPUtil() {try {FileInputStream fileInputStream = new FileInputStream(new File("C:\\Users\\a\\Pictures\\16-040836_50.jpg"));String filename=new String("中文名2.jpg".getBytes("utf-8"),"iso-8859-1");//解决中文文件名乱码FtpUtil.uploadFile("192.168.1.110", 21, "ftpuser", "123", "/home/ftpuser/www/images", "/2016/09/26",filename ,fileInputStream);} catch (Exception e) {e.printStackTrace();}}}其中FtpUtil类:
package com.taotao.util;import java.io.File;import java.io.FileInputStream;import java.io.FileNotFoundException;import java.io.FileOutputStream;import java.io.IOException;import java.io.InputStream;import java.io.OutputStream;import org.apache.commons.net.ftp.FTP;import org.apache.commons.net.ftp.FTPClient;import org.apache.commons.net.ftp.FTPFile;import org.apache.commons.net.ftp.FTPReply;/** * ftp上传下载工具类 * <p>Title: FtpUtil</p> * <p>Description: </p> * <p>Company: www.itcast.com</p> * @author入云龙 * @date2015年7月29日下午8:11:51 * @version 1.0 */public class FtpUtil {/** * Description: 向FTP服务器上传文件 * @param host FTP服务器hostname * @param port FTP服务器端口 * @param username FTP登录账号 * @param password FTP登录密码 * @param basePath FTP服务器基础目录,需要绝对路径 比如:/home/ftpuser/www/images * @param filePath FTP服务器文件存放路径。例如分日期存放:/2015/01/01。文件的路径为basePath+filePath * @param filename 上传到FTP服务器上的文件名 * @param input 输入流 * @return 成功返回true,否则返回false */ public static boolean uploadFile(String host, int port, String username, String password, String basePath,String filePath, String filename, InputStream input) {boolean result = false;FTPClient ftp = new FTPClient();try {int reply;ftp.connect(host, port);// 连接FTP服务器// 如果采用默认端口,可以使用ftp.connect(host)的方式直接连接FTP服务器ftp.login(username, password);// 登录reply = ftp.getReplyCode();if (!FTPReply.isPositiveCompletion(reply)) {ftp.disconnect();return result;}//切换到上传目录if (!ftp.changeWorkingDirectory(basePath+filePath)) {//如果目录不存在创建目录String[] dirs = filePath.split("/");String tempPath = basePath;for (String dir : dirs) {if (null == dir || "".equals(dir)) continue;tempPath += "/" + dir;if (!ftp.changeWorkingDirectory(tempPath)) {if (!ftp.makeDirectory(tempPath)) {return result;} else {ftp.changeWorkingDirectory(tempPath);}}}}//设置上传文件的类型为二进制类型ftp.setFileType(FTP.BINARY_FILE_TYPE);//上传文件if (!ftp.storeFile(filename, input)) {return result;}input.close();ftp.logout();result = true;} catch (IOException e) {e.printStackTrace();} finally {if (ftp.isConnected()) {try {ftp.disconnect();} catch (IOException ioe) {}}}return result;}/** * Description: 从FTP服务器下载文件 * @param host FTP服务器hostname * @param port FTP服务器端口 * @param username FTP登录账号 * @param password FTP登录密码 * @param remotePath FTP服务器上的相对路径 * @param fileName 要下载的文件名 * @param localPath 下载后保存到本地的路径 * @return */ public static boolean downloadFile(String host, int port, String username, String password, String remotePath,String fileName, String localPath) {boolean result = false;FTPClient ftp = new FTPClient();try {int reply;ftp.connect(host, port);// 如果采用默认端口,可以使用ftp.connect(host)的方式直接连接FTP服务器ftp.login(username, password);// 登录reply = ftp.getReplyCode();if (!FTPReply.isPositiveCompletion(reply)) {ftp.disconnect();return result;}ftp.changeWorkingDirectory(remotePath);// 转移到FTP服务器目录FTPFile[] fs = ftp.listFiles();for (FTPFile ff : fs) {if (ff.getName().equals(fileName)) {File localFile = new File(localPath + "/" + ff.getName());OutputStream is = new FileOutputStream(localFile);ftp.retrieveFile(ff.getName(), is);is.close();}}ftp.logout();result = true;} catch (IOException e) {e.printStackTrace();} finally {if (ftp.isConnected()) {try {ftp.disconnect();} catch (IOException ioe) {}}}return result;}public static void main(String[] args) {try { FileInputStream in=new FileInputStream(new File("D:\\temp\\image\\gaigeming.jpg")); boolean flag = uploadFile("192.168.25.133", 21, "ftpuser", "ftpuser", "/home/ftpuser/www/images","/2015/01/21", "gaigeming.jpg", in); System.out.println(flag); } catch (FileNotFoundException e) { e.printStackTrace(); } }}
- nginx+ftp搭建图片服务器
- nginx+ftp搭建图片服务器
- ftp+nginx 图片服务器的搭建
- nginx和ftp搭建图片服务器
- nginx和ftp搭建图片服务器
- nginx+ftp搭建图片服务器(Windows Server服务器环境下)
- FTP+Nginx图片服务器
- nginx和ftp图片服务器的搭建记录
- nginx和ftp图片服务器的搭建记录
- 搭建ftp图片服务器,通过Nginx来显示
- Linux中用Nginx和FTP搭建图片服务器
- nginx与ftp的vsftpd搭建图片服务器
- 搭建图片服务器《三》:linux上nginx+ftp搭建图片服务器
- Nginx搭建图片服务器
- nginx搭建图片服务器
- nginx图片服务器搭建
- 搭建Nginx图片服务器
- 搭建Nginx图片服务器
- 照明小夜灯
- Nginx配置文件详解
- 基于react+redux仿饿了么
- Android.mk 文件语法详解
- 李飞飞访谈:AI以人为本——之笔者见
- nginx+ftp搭建图片服务器
- android studio自定义生成jar包基础篇
- robot 批处理文件
- Vue-全局添加组件
- bzoj 2375: 疯狂的涂色
- java/Kotlin/android 判断是否是url 的正则
- leetcode算法刷题
- C# 中的线程安全集合类
- mysql学习笔记