Spring Bean
来源:互联网 发布:java server error 编辑:程序博客网 时间:2024/06/06 02:17
Bean 在 Spring 中,由 Spring IoC 容器管理的,构成程序骨架的这些对象叫做 Bean。 Bean 对象是指经过IoC容器实例化,组装和管理的对象。此外,Bean 就是应用程序中诸多对象之一。Bean 和 Bean 的依赖被容器所使用的配置元数据所反射。
1 Bean overview
Spring IoC 容器管理一个或者多个 Bean。 Bean 主要通过 xml 和 java 的形式配置元数据创建。实际开发中,我们会两种方式结合使用。
Bean 提供给我们的配置主要有以下几个方面。
- 限定包类名称:典型的实际实现是定义 Bean 的类。
- Bean 行为配置元素,定义了容器中的 Bean 应该如何行为(范围、生命周期回调,等等)。
- Bean 需要引用其他 Bean 来完成工作,这些引用也称为合作者或依赖关系。
- 其他配置设置来设置新创建的对象,例如,连接使用 Bean 的数量管理连接池,或者池的大小限制。
这些配置主要通过以下属性控制。
<bean> 的子元素,可以使用此元素传入构造参数进行实例化。该元素的index是从0开始的,type 指定构造参数的类型。 properties <bean> 的子元素,通过它可直接对 Bean 中属性赋值。 autowiring mode 自动装配的方式,可以通过类型、名称或构造方法等装配 lazy-initialization mode 是否延迟初始化 initialization method 初始化的方法 destruction method 销毁Bean的回调如果在 Bean 中为指定 id 和 name,则 spring 会将 class 值当作 id 使用。
1.1 Naming beans
每个 Bean 都有一个或多个标识符。这些标识符在容器托管 Bean 必须是唯一的。Bean 通常只有一个标识符,但如果它需要不止一个,多个名称时用逗号(,),分号(;),或白色空格进行分隔。我们还可以考虑额外的别名命名。别名的方式如下。
<alias name="fromName" alias="toName"/>通过这样的方式, fromName 和 toName 则指向同一个 Bean 对象。
spring 也提供了java注解(@Bean)的方式命名。
1.2 Instantiating beans
Spring 为 Bean 的初始化提供了三种方式,分别是构造函数、静态工厂和实例工厂方式。
1.2.1 构造函数实例化
当我们在 xml 中如下所示的配置时,
<bean id="exampleBean" class="examples.ExampleBean"/><bean name="anotherExample" class="examples.ExampleBeanTwo"/>Spring 默认会调用无参数的构造方式初始化 Bean,这种方式简洁优雅,我们无需要添加任何代码。
1.2.2 静态工厂方式实例化
当采用静态工厂方法创建 Bean 时,除了需要指定 class 属性外,还需要通过 factory-method 属性来指定创建 Bean 实例的工厂方法。
<bean id="clientService" class="examples.ClientService" factory-method="createInstance"/>下面直接使用 ClientService 的 createInstance 方法初始化Bean。
public class ClientService { private static ClientService clientService = new ClientService(); private ClientService() {} public static ClientService createInstance() { return clientService; }}1.2.3 工厂方式实例化
与通过静态工厂方式实例化类似,通过调用工厂实例的非静态方法进行实例化。 使用这种方式时,class属性置为空,而 factory-bean 属性必须指定为当前(或其祖先)容器中包含工厂方法的 Bean 的名称,而该工厂 Bean 的工厂方法本身必须通过 factory-method 属性来设定。
这里演示一个工厂创建多个 Bean 的方式。
<bean id="serviceLocator" class="examples.DefaultServiceLocator"> <!-- 其他需要注入的依赖项 --></bean><bean id="clientService" factory-bean="serviceLocator" factory-method="createClientServiceInstance"/><bean id="accountService" factory-bean="serviceLocator" factory-method="createAccountServiceInstance"/>使用 DefaultServiceLocator 创建了 clientService 和 accountService 两个Bean。
public class DefaultServiceLocator { private static ClientService clientService = new ClientServiceImpl(); private static AccountService accountService = new AccountServiceImpl(); private DefaultServiceLocator() {} public ClientService createClientServiceInstance() { return clientService; } public AccountService createAccountServiceInstance() { return accountService; }}2 Dependencies
一般情况下企业应用不会只有一个对象(Spring Bean)。多个 Bean 协同工作时会产生了依赖关系。
<bean id="exampleBean" class="examples.ExampleBean"> <!-- setter injection using the nested ref element --> <property name="beanOne"> <ref bean="anotherExampleBean"/> </property> <!-- setter injection using the neater ref attribute --> <property name="beanTwo" ref="yetAnotherBean"/> <property name="integerProperty" value="1"/></bean><bean id="anotherExampleBean" class="examples.AnotherBean"/><bean id="yetAnotherBean" class="examples.YetAnotherBean"/>上面是一个很常见的依赖注入关系,exampleBean 依赖了anotherExampleBean 和 yetAnotherBean 完成了相关工作,一个大型项目成百上千的对象,如果都是这样写的话,xml是非常臃肿且不利于维护的。
spring 通过 java 和注解的方式为我们提供了优雅的解决方案,实际开发中我们多数情况是使用注解,少数的特殊配置会使用xml配置,如数据库的连接配置。
在 xml 中定制相互之间的依赖关系是一件很麻烦的事,这里我们主要使用注解完成相关依赖关系。
spring 中定义了一系列的注解,常用的注解如下:
- @Component:表示一个组件 Bean,存在于项目中的任何层;
- @Repository:表示 dao 层的Bean;
- @Service:表示业务层的 Bean;
- @Controller:表示 控制层的 Bean,如 spring mvc 的控制器;
- @Autowired: 用于对 Bean 属性变量、属性的setter方法及构造方法进行标注,配合对应的处理器完成 Bean 的自动配置工作;
- @Resource: 指定装配方式,其中 name 代表按照名称装配,type 代表按照类型装配;
- @Qualifier: 与 @Autowired 配合使用,会将默认的按 Bean 类型装配修改为按Bean的实例名称装配,实例名称由 @Qualifier 定义;
- @Value:通过 @Value 加载的属性,可以通过资源文件读取相关信息,如
@Value("${customer.type}"),主要用于定义配置参数。
下面介绍一个特殊的业务场景,一个接口有多个实现。这样的业务场景下,我们可以按照名称装配。
@Service("com.bean.BeanServiceImpl2")public class BeanServiceImpl2 implements BeanService {}@Resource(name = "com.bean.BeanServiceImpl2")private BeanService service2;这里建议名称加上包名,保证Bean在项目中唯一。如果类移动后,我们修改了 Bean 名称,又不想引起外部的更改,也很简单。取一个别名即可。
@Service("BeanServiceImpl2")public class BeanServiceImpl2 implements BeanService {}<alias name="BeanServiceImpl2" alias="com.bean.BeanServiceImpl2"/>等到外部修改后,再将别名移除即可。
3 Bean scopes
在开发 Bean 的过程中,我们不仅可以自定义创建的方式,相互之间的依赖关系。我们还可以定制 Bean 的作用域,这使得我们可以更进一步掌控项目。
spring 为 Bean 定制了 6 种作用域。
合理的利用作用域有助于项目的多线程安全。如 a 依赖 b,则a的作用域应小于b的作用域,这就相当于多线程通过作用域加锁。
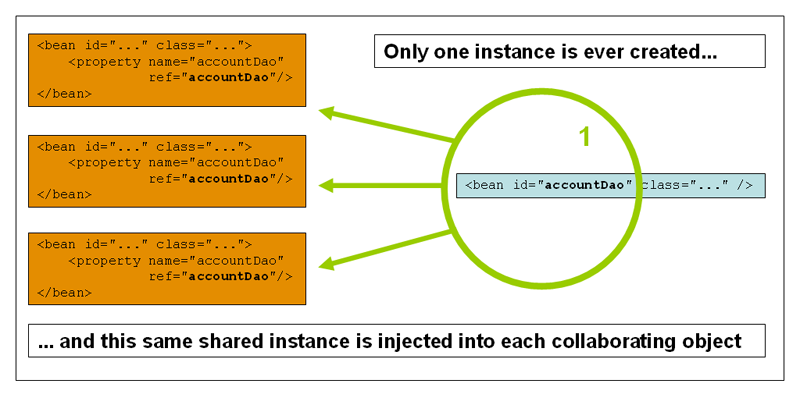
3.1 The singleton scope
单例 Bean 全局只有一个共享的实例,所有将单例Bean作为依赖的情况下,容器返回将是同一个实例。singleton 是 spring 容器默认的作用域。
3.2 The prototype scope
非单例的,原型的 Bean 指的就是每次请求 Bean 实例的时候,返回的都是新实例的 Bean 对象。对需要保持会话状态的 Bean 应该使用 prototype 作用域。
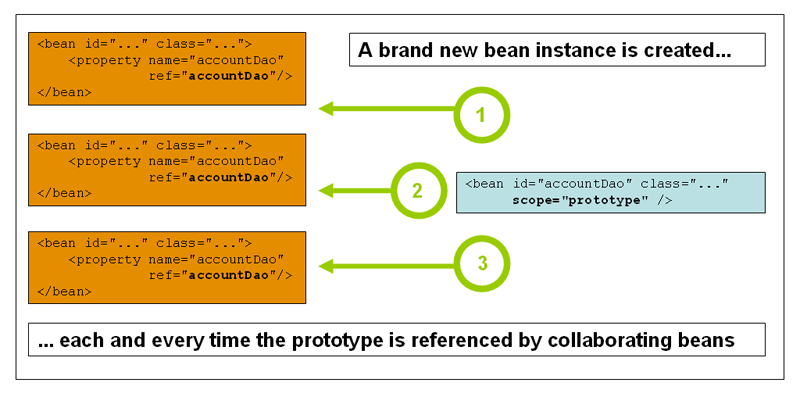
下面的例子展示了XML中如何定义一个原型的 Bean:
<bean id="accountService" class="com.foo.DefaultAccountService" scope="prototype"/>3.3 Request, session, application, and WebSocket scopes
request, session, application, 和 websocket 这四个作用域都是只有在基于 web 的 Spring ApplicationContext 实现的(比如XmlWebApplicationContext)中才能使用。 如果仅仅在常规的Spring IoC 容器中(ClassPathXmlApplicationContext)使用这些作用域,那么将会抛出一个IllegalStateException 来说明使用了未知的作用域。
如果使用了 Spring Web MVC 框架的话,每一个请求会通过 Spring 的 DispatcherServlet 或者DispatcherPortlet 来处理的,也就不需要其他特殊的初始化配置。DispatcherServlet 和DispatcherPortlet 已经包含了相关的状态。
4 Customizing the nature of a bean
4.1 Lifecycle callbacks
Spring 允许我们通过三种方式监听 Bean 的创建与销毁。
- 接口:通过实现 Spring 的 InitializeingBean 和 DisposableBean 接口,就可以让容器来管理 Bean 的生命周期。容器会在调用afterPropertiesSet()之后和destroy()之前会允许Bean在初始化和销毁 Bean 的时候执行一些操作;
- 注解:使用 JSR-250 的 @PostConstruct 和 @PreDestroy,使用这些注解意味着Bean不会再耦合在Spring特定的接口上
- xml 定制:Spring 支持 xml 定制回调,使用 init-method 和 destroy-method 指定方法即可,这种方式可以定制整个项目中统一的回调方法。
4.2 ApplicationContextAware and BeanNameAware
当 ApplicationContext 在创建实现了 org.springframework.context.ApplicationContextAware 接口的对象时,该对象的实例会包含一个到 ApplicationContext 的引用。
public interface ApplicationContextAware { void setApplicationContext(ApplicationContext applicationContext) throws BeansException;}这样我们就可以通过 applicationContext 获取其他 Bean 并完成依赖注入。
通过 BeanNameAware 可以获取设置的 Bean 名称。
4.3 Other Aware interfaces
除了上面描述的两种Aware接口,Spring还提供了一系列的Aware接口来让Bean告诉容器,这些Bean需要一些具体的基础设施信息。最重要的一些Aware接口都在下面表中进行了描述:
上面这些接口的使用是违反IoC原则的,除非必要,最好不要使用。
4.4 Bean Lifecycle
Spring 容器可以管理 singleton 作用域的 Bean 的生命周期,在此作用域下,Spring 能够精确地知道该 Bean 何时被创建,何时初始化完成以及何时销毁。对于 prototype 作用域的 Bean, Spring 只负责创建,当容器创建了 Bean 实例后,Bean 的实例就交给客户端代码来管理, Spring 容器将不再跟踪其生命周期。如 request、session、application 和 websocket 则由 Spring ApplicationContext 上下文管理,这里不再详细说明。
在 Spring 中,Bean 生命周期是一个很复杂的过程,其核心的生命周期流程如下。
- 根据配置情况调用 Bean 构造方法或工厂方法实例化 Bean。
- 利用依赖注入完成 Bean 中所有属性值的配置注入。
- BeanNameAware 接口回调 setBeanName() 方法传入 Bean 的 name 值。
- BeanFactoryAware 接口回调 setBeanFactory() 方法传入当前工厂实例的引用。
- ApplicationContextAware 接口回调 setApplicationContext() 传入当前 ApplicationContext 实例的引用。
- 如果有 BeanPostProcessor 和 Bean 相互关联,则调用 postProcessBeforeInitialization() 对 Bean 进行预初始化,Spring 的 AOP 则是在用它实现的。
- @PostConstruct 回调初始化方法。
- InitializingBean 接口回调 afterPropertiesSet() 初始化方法。
- xml 配置文件 init-method 定制初始化方法调用。
- 如果有 BeanPostProcessor 和 Bean 相互关联,则调用 postProcessAfterInitialization() 后初始化方法。
- 根据 Bean 的作用范围,如果是 singleton,则将改 Bean 放入 IoC 的缓存池中,将触发 Spring 对该 Bean 的生命周期管理;如果是其他作用范围,则将该 Bean 交给调用者,调用者管理该 Bean 的生命周期, Spring 不载管理该 Bean。
- 销毁阶段:@PreDestroy 回调销毁方法。
- DisposableBean 接口回调 destory() 销毁方法。
- xml 配置文件 destory-method 定制销毁方法调用。
4.5 Test
根据 Bean 生命周期,我们用借助 juint 完成相关验证。
StudentBean 代码如下所示。
package com.lifecycle;import org.springframework.beans.BeansException;import org.springframework.beans.factory.*;import org.springframework.beans.factory.config.BeanPostProcessor;import org.springframework.context.ApplicationContext;import org.springframework.context.ApplicationContextAware;import javax.annotation.PostConstruct;import javax.annotation.PreDestroy;/** * StudentBean.java * <p> * Created by 阳君 on 2017/10/13. * Copyright © 2017年 bean. All rights reserved. */public class StudentBean implements BeanNameAware, BeanFactoryAware, ApplicationContextAware, InitializingBean, DisposableBean { private String name; private String beanName;//实现了BeanNameAware接口,Spring可以将BeanName注入该属性中 public StudentBean() { System.out.println("【Bean构造方法】无参构造方法"); } @Override public String toString() { return "StudentBean{name='" + name + ", beanName='" + beanName + '}'; } public String getName() { return name; } public void setName(String name) { System.out.println("【set注入】注入属性"); this.name = name; } // ------------------------------ BeanNameAware接口 public void setBeanName(String name) { this.beanName = name; System.out.println("【BeanNameAware】setBeanName:" + name); } // ------------------------------ BeanFactoryAware接口 public void setBeanFactory(BeanFactory beanFactory) throws BeansException { System.out.println("【BeanFactoryAware】setBeanFactory 方法得到 beanFactory 引用"); } // ------------------------------ ApplicationContextAware 接口 public void setApplicationContext(ApplicationContext applicationContext) { System.out.println("【ApplicationContextAware】setApplicationContext 方法得到 applicationContext 引用"); } // ----------------------------------------------------------------- 初始化 // ------------------------------ 注解初始化方法 @PostConstruct public void jsrInit() { System.out.println("【@PostConstruct】调用 @PostConstruct 初始化方法"); } // ------------------------------ InitializingBean接口 public void afterPropertiesSet() throws Exception { System.out.println("【InitializingBean】afterPropertiesSet 初始化"); } // ------------------------------ xml定制初始化方法 public void xmlInit() { System.out.println("【init-method】调用init-method属性配置的初始化方法"); } // ----------------------------------------------------------------- 销毁 // ------------------------------ 注解销毁方法 @PreDestroy public void jsrDestroy() { System.out.println("【@PreDestroy】调用 @PreDestroy 销毁方法"); } // ------------------------------ DisposableBean接口 public void destroy() throws Exception { System.out.println("【DisposableBean】destroy"); } // ------------------------------ xml定制销毁方法 public void xmlDestroy() { System.out.println("【destroy-method】调用destroy-method属性配置的销毁方法"); }}BeanPostProcessor 接口实现。
package com.lifecycle;import org.springframework.beans.BeansException;import org.springframework.beans.factory.FactoryBean;import org.springframework.beans.factory.InitializingBean;import org.springframework.beans.factory.config.BeanPostProcessor;import org.springframework.lang.Nullable;/** * BeanPostProcessorImpl.java * <p> * Created by 阳君 on 2017/10/13. * Copyright © 2017年 bean. All rights reserved. */public class BeanPostProcessorImpl implements BeanPostProcessor { // ------------------------------ BeanPostProcessor 接口 public Object postProcessBeforeInitialization(Object bean, String beanName) throws BeansException { System.out.println("【BeanPostProcessor】postProcessBeforeInitialization 前置初始化 " + beanName); return bean; } public Object postProcessAfterInitialization(Object bean, String beanName) throws BeansException { System.out.println("【BeanPostProcessor】postProcessAfterInitialization 后置初始化 " + beanName); return bean; }}lifecycle.xml 配置如下:
<?xml version="1.0" encoding="UTF-8"?><beans xmlns:xsi="http://www.w3.org/2001/XMLSchema-instance" xmlns:context="http://www.springframework.org/schema/context" xmlns="http://www.springframework.org/schema/beans" xsi:schemaLocation="http://www.springframework.org/schema/beans http://www.springframework.org/schema/beans/spring-beans.xsd http://www.springframework.org/schema/context http://www.springframework.org/schema/context/spring-context.xsd"> <context:component-scan base-package="com.lifecycle"/> <bean id="beanPostProcessor" class="com.lifecycle.BeanPostProcessorImpl"/> <bean id="studentBean" class="com.lifecycle.StudentBean" init-method="xmlInit" destroy-method="xmlDestroy" scope="singleton"> <property name="name" value="阳君"></property> </bean></beans>junit 测试代码如下
@Testpublic void test() { System.out.println("--------------【初始化容器】---------------"); ApplicationContext act = new ClassPathXmlApplicationContext("lifecycle.xml"); System.out.println("-------------------【容器初始化成功】------------------"); StudentBean bc; bc = act.getBean(StudentBean.class); System.out.println(bc); System.out.println("--------------------【销毁容器】----------------------"); ((ClassPathXmlApplicationContext)act).registerShutdownHook();}运行项目,我们看到如下的输出结果。
--------------【初始化容器】---------------十月 13, 2017 7:33:04 下午 org.springframework.context.support.AbstractApplicationContext prepareRefresh信息: Refreshing org.springframework.context.support.ClassPathXmlApplicationContext@f5f2bb7: startup date [Fri Oct 13 19:33:04 CST 2017]; root of context hierarchy十月 13, 2017 7:33:05 下午 org.springframework.beans.factory.xml.XmlBeanDefinitionReader loadBeanDefinitions信息: Loading XML bean definitions from class path resource [lifecycle.xml]【BeanPostProcessor】postProcessBeforeInitialization 前置初始化 org.springframework.context.event.internalEventListenerProcessor【BeanPostProcessor】postProcessAfterInitialization 后置初始化 org.springframework.context.event.internalEventListenerProcessor【BeanPostProcessor】postProcessBeforeInitialization 前置初始化 org.springframework.context.event.internalEventListenerFactory【BeanPostProcessor】postProcessAfterInitialization 后置初始化 org.springframework.context.event.internalEventListenerFactory【Bean构造方法】无参构造方法【set注入】注入属性【BeanNameAware】setBeanName:studentBean【BeanFactoryAware】setBeanFactory 方法得到 beanFactory 引用【ApplicationContextAware】setApplicationContext 方法得到 applicationContext 引用【BeanPostProcessor】postProcessBeforeInitialization 前置初始化 studentBean【@PostConstruct】调用 @PostConstruct 初始化方法【InitializingBean】afterPropertiesSet 初始化【init-method】调用init-method属性配置的初始化方法【BeanPostProcessor】postProcessAfterInitialization 后置初始化 studentBean-------------------【容器初始化成功】------------------StudentBean{name='阳君, beanName='studentBean}--------------------【销毁容器】----------------------【@PreDestroy】调用 @PreDestroy 销毁方法【DisposableBean】destroy【destroy-method】调用destroy-method属性配置的销毁方法
Appendix
Sample Code
Java
Related Documentation
spring-framework-reference
Spring Framework 4.x Reference Documentation 中文翻译
Revision History
Copyright
CSDN:http://blog.csdn.net/y550918116j
GitHub:https://github.com/937447974
- java bean,spring bean
- Spring Bean
- spring bean
- spring bean
- Spring bean
- spring & bean
- Spring Bean
- spring bean
- Spring Bean
- Spring bean
- Spring bean
- Spring Bean
- Spring Bean
- Spring bean
- Spring Bean
- spring bean
- spring bean
- Spring Bean
- 检测iOS的APP性能的一些方法
- 前端写代码的思路
- Python内置函数---all
- 面向对象的进一步拓展
- Error:Execution failed for task ':app:processDebugGoogleServices'. > Please fix the version conflict
- Spring Bean
- Python中的装饰器
- 虚拟机ubuntu安装gitlab
- 马化腾:谈谈我创办腾讯这些年
- 逻辑回归原理
- Degree of an Array问题及解法
- 从android-apt切换到annotationProcessor
- HTML表单
- 菜鸟先飞之JAVA_多线程