springboot学习笔记(九) spring cache
来源:互联网 发布:linux系统shell 编辑:程序博客网 时间:2024/06/01 09:06
springboot学习笔记(九)
开启缓存spring cache
导入 pom 依赖
<parent> <groupId>org.springframework.boot</groupId> <artifactId>spring-boot-starter-parent</artifactId> <version>1.5.7.RELEASE</version></parent><dependencies> <dependency> <groupId>org.springframework.boot</groupId> <artifactId>spring-boot-starter</artifactId> </dependency> <dependency> <groupId>org.springframework.boot</groupId> <artifactId>spring-boot-starter-test</artifactId> </dependency> <dependency> <groupId>org.springframework.boot</groupId> <artifactId>spring-boot-starter-cache</artifactId> </dependency></dependencies>构建一个程序入口
@SpringBootApplicationpublic class CacheApp { public static void main(String[] args) { SpringApplication.run(CacheApp.class, args); }}application.yml 文件如下
server: port: 8089构建一个数据访问层
@Repositorypublic class UserDaoImpl implements UserDao{ @Override public User getById(Integer id) { System.out.println("get user " + id + " in repo"); dosomething(); return new User(id); } private void dosomething(){ try { Thread.sleep(2000); } catch (InterruptedException e) { e.printStackTrace(); } }}编写测试类
@Componentpublic class AppRunner implements CommandLineRunner { private static final Logger logger = LoggerFactory.getLogger(AppRunner.class); private final UserDao userDaoImpl; public AppRunner(UserDao userDaoImpl) { this.userDaoImpl = userDaoImpl; } @Override public void run(String... args) throws Exception { logger.info("Fetching users..."); logger.info("" + userDaoImpl.getById(1)); logger.info("" + userDaoImpl.getById(2)); logger.info("" + userDaoImpl.getById(1)); logger.info("" + userDaoImpl.getById(2)); logger.info("" + userDaoImpl.getById(1)); logger.info("" + userDaoImpl.getById(1)); System.out.println(); }}启动程序,控制台打印如下:
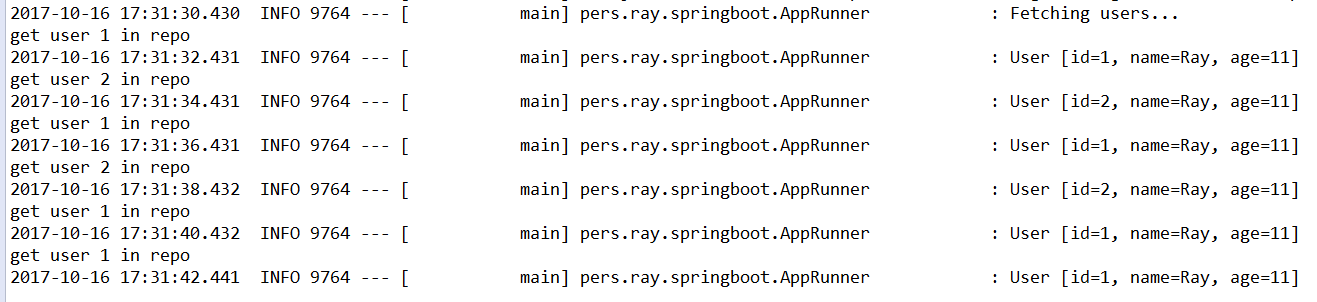
可以看见每一次都执行了数据访问层的方法,此时并没有开启缓存技术
开启缓存技术
在程序的入口中加入@ EnableCaching开启缓存技术:
@SpringBootApplication@EnableCachingpublic class CacheApp { public static void main(String[] args) { SpringApplication.run(CacheApp.class, args); }}在需要缓存的地方加入@Cacheable注解,比如在 getById() 方法上加入@Cacheable(“users”),这个方法就开启了缓存策略,当缓存有这个数据的时候,会直接返回数据,不会等待去查询数据库。
@Repositorypublic class UserDaoImpl implements UserDao{ @Override @Cacheable("users") public User getById(Integer id) { System.out.println("get user " + id + " in repo"); dosomething(); return new User(id); } private void dosomething(){ try { Thread.sleep(2000); } catch (InterruptedException e) { e.printStackTrace(); } }}此时启动程序,控制台打印如下:

只有前面两个数据被打印了,说明此时缓存起作用了个人学习springboot博客地址:http://blog.csdn.net/forezp/article/details/70341818http://blog.didispace.com/Spring-Boot%E5%9F%BA%E7%A1%80%E6%95%99%E7%A8%8B/
阅读全文
0 0
- springboot学习笔记(九) spring cache
- Spring学习笔记-Spring Cache
- Spring学习笔记(九)
- 1、Spring Boot学习笔记:初识springboot
- springboot学习笔记--搭建Spring Boot工程
- SpringBoot学习笔记(6) SpringBoot数据缓存Cache [Guava和Redis实现]
- SpringBoot学习笔记(6) SpringBoot数据缓存Cache [Guava和Redis实现]
- Java Web学习笔记(九)spring
- Neo4j学习笔记九【Spring Data Neo4j】
- Spring Boot 学习笔记(九) 数据缓存
- Springboot中Spring-cache与redis整合
- springboot番外之spring cache
- 11.springboot整合默认spring cache
- SpringBoot 学习记录(九): Email
- SpringBoot非官方教程 | 第十三篇:springboot集成spring cache
- SpringBoot非官方教程 | 第十三篇:springboot集成spring cache
- SpringBoot非官方教程 | 第十三篇:springboot集成spring cache
- SpringBoot非官方教程 | 第十三篇:springboot集成spring cache
- 老生常谈PHP位运算的用途
- React native 自定义弹窗(android使用原生ios弹窗)
- 大型站点SEO优化的核心重点
- 将注记feature添加到map中的方法。
- linux下nginx安装
- springboot学习笔记(九) spring cache
- [bzoj1497]NOI2006最大获利(最大权封闭子图)
- 吐血推荐珍藏的 Chrome 插件二
- 人类能否驾驭浩瀚宇宙?
- 在网页中调用摄像头实现拍照上传
- 玩转算法面试-数据规模,时间复杂度,均摊复杂度
- JDK自带工具keytool生成ssl证书
- 【Nim游戏】POJ2975[Nim]题解
- RabbitMQ与AMQP协议详解