JPA实体关系
来源:互联网 发布:网站中文域名注册 编辑:程序博客网 时间:2024/06/02 02:32
本章将指导完成学习实体间的关系。一般的关系数据库中的表之间的更有效。这里的实体类都被视为关系表(JPA的概念),因此是实体类之间的关系如下:
- @ManyToOne 关系
- @OneToMany 关系
- @OneToOne 关系
- @ManyToMany 关系
@ManyToOne 关系
多对一实体之间存在的关系,其中一个实体(列或组列)的引用与另一个实体(列或组列)包含唯一值。在关系数据库中,这些关系是通过使用表之间的外键/主键应用。
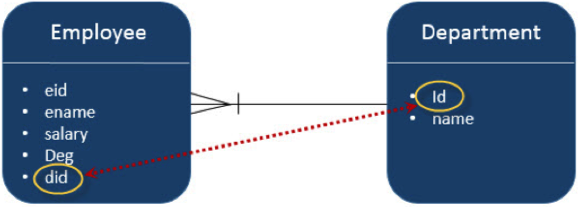
让我们考虑Employee和Department 实体之间的关系的一个例子。在单向方式,即从员工到部门,多到一的关系是可行的。这意味着员工每个记录包含一个部门ID,它应该是在部门表的主键。在这里,在Employee表,Department 的ID是外键。
下图显示了两个表之间的多对一关系。
在Eclipse中创建一个IDE JPA项目命名为JPA_Eclipselink_MTO。这个项目的所有模块下面讨论。
创建实体
遵循用于创建实体上面给出的图,在src下创建“com.tutorialspoin.eclipselink.entity'包。创建一个名为Department.java的类。类系实体如下:
package com.yiibai.eclipselink.entity;import javax.persistence.Entity;import javax.persistence.GeneratedValue;import javax.persistence.GenerationType;import javax.persistence.Id;@Entitypublic class Department { @Id @GeneratedValue( strategy=GenerationType.AUTO ) private int id; private String name; public int getId() { return id; } public void setId(int id) { this.id = id; } public String getName( ) { return name; } public void setName( String deptName ) { this.name = deptName; }}
建立在这种关系中的第二个实体 - 名为Employee.java在“com.yiibai.eclipselink.entity'包下的Employee实体类。 Employee实体类如下所示:
package com.yiibai.eclipselink.entity;import javax.persistence.Entity;import javax.persistence.GeneratedValue;import javax.persistence.GenerationType;import javax.persistence.Id;import javax.persistence.ManyToOne;@Entitypublic class Employee { @Id @GeneratedValue( strategy= GenerationType.AUTO ) private int eid; private String ename; private double salary; private String deg; @ManyToOne private Department department; public Employee(int eid, String ename, double salary, String deg) { super( ); this.eid = eid; this.ename = ename; this.salary = salary; this.deg = deg; } public Employee( ) { super(); } public int getEid( ) { return eid; } public void setEid(int eid) { this.eid = eid; } public String getEname( ) { return ename; } public void setEname(String ename) { this.ename = ename; } public double getSalary( ) { return salary; } public void setSalary(double salary) { this.salary = salary; } public String getDeg( ) { return deg; } public void setDeg(String deg) { this.deg = deg; } public Department getDepartment() { return department; } public void setDepartment(Department department) { this.department = department; }}
Persistence.xml
persistence.xml文件需要配置数据库和实体类的注册。
Persitence.xml由Eclipse IDE在创建时由JPA项目创建。详细配置信息是用户的规范。 persistence.xml 文件如下所示:
<?xml version="1.0" encoding="UTF-8"?><persistence version="2.0" xmlns="http://java.sun.com/xml/ns/persistence" xmlns:xsi="http://www.w3.org/2001/XMLSchema-instance" xsi:schemaLocation="http://java.sun.com/xml/ns/persistence http://java.sun.com/xml/ns/persistence/persistence_2_0.xsd"> <persistence-unit name="Eclipselink_JPA" transaction-type="RESOURCE_LOCAL"> <class>com.yiibai.eclipselink.entity.Employee</class> <class>com.yiibai.eclipselink.entity.Department</class> <properties> <property name="javax.persistence.jdbc.url" value="jdbc:mysql://localhost:3306/jpadb"/> <property name="javax.persistence.jdbc.user" value="root"/> <property name="javax.persistence.jdbc.password" value="root"/> <property name="javax.persistence.jdbc.driver" value="com.mysql.jdbc.Driver"/> <property name="eclipselink.logging.level" value="FINE"/> <property name="eclipselink.ddl-generation" value="create-tables"/> </properties> </persistence-unit></persistence>
服务类
该模块包含服务类,它实现了使用属性初始化关系的一部分。在src下创建一个名为“com.yiibai.eclipselink.service'包。创建一个名为ManyToOne.java的DAO类。在DAO类如下所示:
package com.yiibaieclipselink.service;import javax.persistence.EntityManager;import javax.persistence.EntityManagerFactory;import javax.persistence.Persistence;import com.yiibai.eclipselink.entity.Department;import com.yiibai.eclipselink.entity.Employee;public class ManyToOne { public static void main( String[ ] args ) { EntityManagerFactory emfactory = Persistence. createEntityManagerFactory( "Eclipselink_JPA" ); EntityManager entitymanager = emfactory. createEntityManager( ); entitymanager.getTransaction( ).begin( ); //Create Department Entity Department department = new Department(); department.setName("Development"); //Store Department entitymanager.persist(department); //Create Employee1 Entity Employee employee1 = new Employee(); employee1.setEname("Satish"); employee1.setSalary(45000.0); employee1.setDeg("Technical Writer"); employee1.setDepartment(department); //Create Employee2 Entity Employee employee2 = new Employee(); employee2.setEname("Krishna"); employee2.setSalary(45000.0); employee2.setDeg("Technical Writer"); employee2.setDepartment(department); //Create Employee3 Entity Employee employee3 = new Employee(); employee3.setEname("Masthanvali"); employee3.setSalary(50000.0); employee3.setDeg("Technical Writer"); employee3.setDepartment(department); //Store Employees entitymanager.persist(employee1); entitymanager.persist(employee2); entitymanager.persist(employee3); entitymanager.getTransaction().commit(); entitymanager.close(); emfactory.close(); }}
编译并执行上述程序后,Eclipse IDE控制台面板上会显示的通知。对于输出,检查MySQL工作台。在此示例中,将创建两个表。
通过在MySQL管理界面中执行下面的查询,Department表的结果显示如下:
Select * from department
通过在MySQL界面执行下面的查询,Employee表显示如下的结果。
Select * from employee
在上表中Deparment_Id是Department表的外键(参考字段)。
@OneToMany 关系
在这种关系中,一个实体中的每一行被引用到其它实体的许多子记录。最重要的是,子记录不能有多个父。在表A和表B之间的1对多的关系,在表A中的每一行都可以在表B中被链接到一个或多个行
让我们考虑上面的例子。假设Employee 和Department在上述例子中的表连接在一个相反的单向方式,那么关系成为一个一对多的关系。在Eclipse中创建一个IDE JPA项目命名JPA_Eclipselink_OTM。这个项目的所有模块下面讨论。
创建实体
遵循用于创建实体上面给出的图,在src下创建“com.tutorialspoin.eclipselink.entity'包。创建一个名为Department.java的类。类系实体如下:
package com.yiibai.eclipselink.entity;import java.util.List;import javax.persistence.Entity;import javax.persistence.GeneratedValue;import javax.persistence.GenerationType;import javax.persistence.Id;import javax.persistence.OneToMany;@Entitypublic class Department { @Id @GeneratedValue( strategy=GenerationType.AUTO ) private int id; private String name; @OneToMany( targetEntity=Employee.class ) private List employeelist; public int getId() { return id; } public void setId(int id) { this.id = id; } public String getName( ) { return name; } public void setName( String deptName ) { this.name = deptName; } public List getEmployeelist() { return employeelist; } public void setEmployeelist(List employeelist) { this.employeelist = employeelist; }}
创建第二个实体类关系-Employee实体类,命名为Employee.java在“com.yiibai.eclipselink.entity'包下。 Employee实体类如下所示:
package com.yiibai.eclipselink.entity;import javax.persistence.Entity;import javax.persistence.GeneratedValue;import javax.persistence.GenerationType;import javax.persistence.Id;@Entitypublic class Employee { @Id @GeneratedValue( strategy= GenerationType.AUTO ) private int eid; private String ename; private double salary; private String deg; public Employee(int eid, String ename, double salary, String deg) { super( ); this.eid = eid; this.ename = ename; this.salary = salary; this.deg = deg; } public Employee( ) { super(); } public int getEid( ) { return eid; } public void setEid(int eid) { this.eid = eid; } public String getEname( ) { return ename; } public void setEname(String ename) { this.ename = ename; } public double getSalary( ) { return salary; } public void setSalary(double salary) { this.salary = salary; } public String getDeg( ) { return deg; } public void setDeg(String deg) { this.deg = deg; }}
Persistence.xml
persistence.xml文件如下:
<?xml version="1.0" encoding="UTF-8"?><persistence version="2.0" xmlns="http://java.sun.com/xml/ns/persistence" xmlns:xsi="http://www.w3.org/2001/XMLSchema-instance" xsi:schemaLocation="http://java.sun.com/xml/ns/persistence http://java.sun.com/xml/ns/persistence/persistence_2_0.xsd"> <persistence-unit name="Eclipselink_JPA" transaction-type="RESOURCE_LOCAL"> <class>com.yiibai.eclipselink.entity.Employee</class> <class>com.yiibai.eclipselink.entity.Department</class> <properties> <property name="javax.persistence.jdbc.url" value="jdbc:mysql://localhost:3306/jpadb"/> <property name="javax.persistence.jdbc.user" value="root"/> <property name="javax.persistence.jdbc.password" value="root"/> <property name="javax.persistence.jdbc.driver" value="com.mysql.jdbc.Driver"/> <property name="eclipselink.logging.level" value="FINE"/> <property name="eclipselink.ddl-generation" value="create-tables"/> </properties> </persistence-unit></persistence>
服务类
该模块包含服务类,它实现了使用属性初始化关系的一部分。在src下创建一个名为“com.yiibai.eclipselink.service'包。并在包下创建一个名为OneToMany.java的DAO类。在DAO类如下所示:
package com.yiibaieclipselink.service;import java.util.List;import java.util.ArrayList;import javax.persistence.EntityManager;import javax.persistence.EntityManagerFactory;import javax.persistence.Persistence;import com.yiibai.eclipselink.entity.Department;import com.yiibai.eclipselink.entity.Employee;public class OneToMany { public static void main(String[] args) { EntityManagerFactory emfactory = Persistence. createEntityManagerFactory( "Eclipselink_JPA" ); EntityManager entitymanager = emfactory. createEntityManager( ); entitymanager.getTransaction( ).begin( ); //Create Employee1 Entity Employee employee1 = new Employee(); employee1.setEname("Satish"); employee1.setSalary(45000.0); employee1.setDeg("Technical Writer"); //Create Employee2 Entity Employee employee2 = new Employee(); employee2.setEname("Krishna"); employee2.setSalary(45000.0); employee2.setDeg("Technical Writer"); //Create Employee3 Entity Employee employee3 = new Employee(); employee3.setEname("Masthanvali"); employee3.setSalary(50000.0); employee3.setDeg("Technical Writer"); //Store Employee entitymanager.persist(employee1); entitymanager.persist(employee2); entitymanager.persist(employee3); //Create Employeelist List<Employee> emplist = new ArrayList(); emplist.add(employee1); emplist.add(employee2); emplist.add(employee3); //Create Department Entity Department department= new Department(); department.setName("Development"); department.setEmployeelist(emplist); //Store Department entitymanager.persist(department); entitymanager.getTransaction().commit(); entitymanager.close(); emfactory.close(); }}
编译和执行上述程序后,在Eclipse IDE的控制台面板中得到通知。对于输出检查MySQL工作台如下。
在这个项目中创建三个表。通过在MySQL界面查询,department_employee表的结果显示如下:
Select * from department_Id;
在上表中,deparment_id和employee_id 是部门和员工表的外键(参考字段)。
通过在MySQL界面下面查询,department表的结果将显示如下表格格式。
Select * from department;
通过在MySQL界面下面查询,employee表的结果显示如下:
Select * from employee;
@OneToOne 关系
在一对一关系,一个项可以链接到只能另一个项。这意味着一个实体中的每一行被称为一个且仅一个行对另一个实体。
让我们考虑上面的例子。Employee和Department在反向单向的方式,关系是一对一的关系。这意味着每个员工只能属于一个部门。
在Eclipse中创建一个IDE JPA项目命名JPA_Eclipselink_OTO。这个项目的所有模块下面讨论。
创建实体
遵循用于创建实体上面给出的图。在src下创建一个名为“com.tutorialspoin.eclipselink.entity'的包。在这个包下创建类名为:Department.java。类系实体被示为如下:
package com.yiibai.eclipselink.entity;import javax.persistence.Entity;import javax.persistence.GeneratedValue;import javax.persistence.GenerationType;import javax.persistence.Id;@Entitypublic class Department { @Id @GeneratedValue( strategy=GenerationType.AUTO ) private int id; private String name; public int getId() { return id; } public void setId(int id) { this.id = id; } public String getName( ) { return name; } public void setName( String deptName ) { this.name = deptName; }}
创建第二个实体类关系-Employee实体类,命名为Employee.java在“com.yiibai.eclipselink.entity'包下。 Employee实体类如下所示:
package com.yiibai.eclipselink.entity;import javax.persistence.Entity;import javax.persistence.GeneratedValue;import javax.persistence.GenerationType;import javax.persistence.Id;import javax.persistence.OneToOne;@Entitypublic class Employee { @Id @GeneratedValue( strategy= GenerationType.AUTO ) private int eid; private String ename; private double salary; private String deg; @OneToOne private Department department; public Employee(int eid, String ename, double salary, String deg) { super( ); this.eid = eid; this.ename = ename; this.salary = salary; this.deg = deg; } public Employee( ) { super(); } public int getEid( ) { return eid; } public void setEid(int eid) { this.eid = eid; } public String getEname( ) { return ename; } public void setEname(String ename) { this.ename = ename; } public double getSalary( ) { return salary; } public void setSalary(double salary) { this.salary = salary; } public String getDeg( ) { return deg; } public void setDeg(String deg) { this.deg = deg; } public Department getDepartment() { return department; } public void setDepartment(Department department) { this.department = department; }}
Persistence.xml
persistence.xml文件,如下所示:
<?xml version="1.0" encoding="UTF-8"?><persistence version="2.0" xmlns="http://java.sun.com/xml/ns/persistence" xmlns:xsi="http://www.w3.org/2001/XMLSchema-instance" xsi:schemaLocation="http://java.sun.com/xml/ns/persistence http://java.sun.com/xml/ns/persistence/persistence_2_0.xsd"> <persistence-unit name="Eclipselink_JPA" transaction-type="RESOURCE_LOCAL"> <class>com.yiibai.eclipselink.entity.Employee</class> <class>com.yiibai.eclipselink.entity.Department</class> <properties> <property name="javax.persistence.jdbc.url" value="jdbc:mysql://localhost:3306/jpadb"/> <property name="javax.persistence.jdbc.user" value="root"/> <property name="javax.persistence.jdbc.password" value="root"/> <property name="javax.persistence.jdbc.driver" value="com.mysql.jdbc.Driver"/> <property name="eclipselink.logging.level" value="FINE"/> <property name="eclipselink.ddl-generation" value="create-tables"/> </properties> </persistence-unit></persistence>
服务类
在src下创建一个名为“com.yiibai.eclipselink.service'的包。在这个包下创建一个名为OneToOne.java的DAO类。在DAO类如下所示:
package com.yiibaieclipselink.service;import javax.persistence.EntityManager;import javax.persistence.EntityManagerFactory;import javax.persistence.Persistence;import com.yiibai.eclipselink.entity.Department;import com.yiibai.eclipselink.entity.Employee;public class OneToOne { public static void main(String[] args) { EntityManagerFactory emfactory = Persistence. createEntityManagerFactory( "Eclipselink_JPA" ); EntityManager entitymanager = emfactory. createEntityManager( ); entitymanager.getTransaction( ).begin( ); //Create Department Entity Department department = new Department(); department.setName("Development"); //Store Department entitymanager.persist(department); //Create Employee Entity Employee employee = new Employee(); employee.setEname("Satish"); employee.setSalary(45000.0); employee.setDeg("Technical Writer"); employee.setDepartment(department); //Store Employee entitymanager.persist(employee); entitymanager.getTransaction().commit(); entitymanager.close(); emfactory.close(); }}
编译和执行上述程序后,在Eclipse IDE控制台面板的显示通知。对于输出,检查MySQL工作台如下。
在上面的例子中,将创建两个表。通过在MySQL的界面下面的查询,department表的结果显示如下:
Select * from department
通过在MySQL界面下面查询,employee表的结果显示如下:
Select * from employee
@ManyToMany 关系
多对多的关系,就是从一个实体中的一个或多个行与其他实体的多个行相关联。
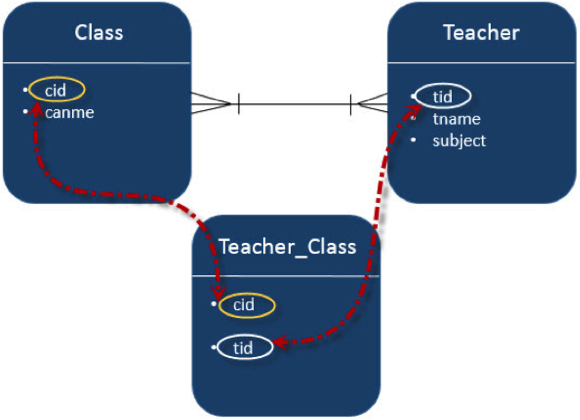
让我们考虑两个实体之间的关系的一个例子:班级和教师。以双向的方式,既班级和教师有多对一的关系。这意味着类中的每个记录由教师组(教师ID),这应该是在教师表中的主键和存储在Teacher_Class表,反之亦然简称。在这里,Teachers_Class表包含外键字段。在Eclipse中创建一个IDE JPA项目命名JPA_Eclipselink_MTM。这个项目的所有模块下面讨论。
创建实体
按照上面的图中所示的方案中创建的实体。在src下创建一个名为“com.tutorialspoin.eclipselink.entity'的包。创建一个名为Class.java的类在这个包下。类系实体显示如下:
package com.yiibai.eclipselink.entity;import java.util.Set;import javax.persistence.Entity;import javax.persistence.GeneratedValue;import javax.persistence.GenerationType;import javax.persistence.Id;import javax.persistence.ManyToMany;@Entitypublic class Clas { @Id @GeneratedValue( strategy = GenerationType.AUTO ) private int cid; private String cname; @ManyToMany(targetEntity=Teacher.class) private Set teacherSet; public Clas() { super(); } public Clas(int cid, String cname, Set teacherSet) { super(); this.cid = cid; this.cname = cname; this.teacherSet = teacherSet; } public int getCid() { return cid; } public void setCid(int cid) { this.cid = cid; } public String getCname() { return cname; } public void setCname(String cname) { this.cname = cname; } public Set getTeacherSet() { return teacherSet; } public void setTeacherSet(Set teacherSet) { this.teacherSet = teacherSet; } }
创建第二个实体这种关系的Employee实体类,命名为Teacher.java 在“com.yiibai.eclipselink.entity'包下。 Employee实体类如下所示:
package com.yiibai.eclipselink.entity;import java.util.Set;import javax.persistence.Entity;import javax.persistence.GeneratedValue;import javax.persistence.GenerationType;import javax.persistence.Id;import javax.persistence.ManyToMany;@Entitypublic class Teacher { @Id @GeneratedValue( strategy = GenerationType.AUTO ) private int tid; private String tname; private String subject; @ManyToMany(targetEntity=Clas.class) private Set clasSet; public Teacher() { super(); } public Teacher(int tid, String tname, String subject, Set clasSet) { super(); this.tid = tid; this.tname = tname; this.subject = subject; this.clasSet = clasSet; } public int getTid() { return tid; } public void setTid(int tid) { this.tid = tid; } public String getTname() { return tname; } public void setTname(String tname) { this.tname = tname; } public String getSubject() { return subject; } public void setSubject(String subject) { this.subject = subject; } public Set getClasSet() { return clasSet; } public void setClasSet(Set clasSet) { this.clasSet = clasSet; }}
Persistence.xml
Persistence.xml 文件的内容如下:
<?xml version="1.0" encoding="UTF-8"?><persistence version="2.0" xmlns="http://java.sun.com/xml/ns/persistence" xmlns:xsi="http://www.w3.org/2001/XMLSchema-instance" xsi:schemaLocation="http://java.sun.com/xml/ns/persistence http://java.sun.com/xml/ns/persistence/persistence_2_0.xsd"> <persistence-unit name="Eclipselink_JPA" transaction-type="RESOURCE_LOCAL"> <class>com.yiibai.eclipselink.entity.Employee</class> <class>com.yiibai.eclipselink.entity.Department</class> <properties> <property name="javax.persistence.jdbc.url" value="jdbc:mysql://localhost:3306/jpadb"/> <property name="javax.persistence.jdbc.user" value="root"/> <property name="javax.persistence.jdbc.password" value="root"/> <property name="javax.persistence.jdbc.driver" value="com.mysql.jdbc.Driver"/> <property name="eclipselink.logging.level" value="FINE"/> <property name="eclipselink.ddl-generation" value="create-tables"/> </properties> </persistence-unit></persistence>
服务类
在src下创建一个名为“com.yiibai.eclipselink.service'的包,在这个包下创建一个名为ManyToMany.java的DAO类。在DAO类如下所示:
package com.yiibai.eclipselink.service;import java.util.HashSet;import java.util.Set;import javax.persistence.EntityManager;import javax.persistence.EntityManagerFactory;import javax.persistence.Persistence;import com.yiibai.eclipselink.entity.Clas;import com.yiibai.eclipselink.entity.Teacher;public class ManyToMany { public static void main(String[] args) { EntityManagerFactory emfactory = Persistence. createEntityManagerFactory( "Eclipselink_JPA" ); EntityManager entitymanager = emfactory. createEntityManager( ); entitymanager.getTransaction( ).begin( ); //Create Clas Entity Clas clas1=new Clas(0,"1st",null); Clas clas2=new Clas(0,"2nd",null); Clas clas3=new Clas(0,"3rd",null); //Store Clas entitymanager.persist(clas1); entitymanager.persist(clas2); entitymanager.persist(clas3); //Create Clas Set1 Set<Clas> classSet1 = new HashSet(); classSet1.add(clas1); classSet1.add(clas2); classSet1.add(clas3); //Create Clas Set2 Set<Clas> classSet2 = new HashSet(); classSet2.add(clas3); classSet2.add(clas1); classSet2.add(clas2); //Create Clas Set3 Set<Clas> classSet3 = new HashSet(); classSet3.add(clas2); classSet3.add(clas3); classSet3.add(clas1); //Create Teacher Entity Teacher teacher1 = new Teacher(0, "Satish","Java",classSet1); Teacher teacher2 = new Teacher(0, "Krishna","Adv Java",classSet2); Teacher teacher3 = new Teacher(0, "Masthanvali","DB2",classSet3); //Store Teacher entitymanager.persist(teacher1); entitymanager.persist(teacher2); entitymanager.persist(teacher3); entitymanager.getTransaction( ).commit( ); entitymanager.close( ); emfactory.close( ); }}
在这个例子中工程,将创建三个表。通过在MySQL界面执行下面的查询,teacher_clas表将显示如下的结果:
Select * form teacher_clas
在上表中teacher_tid是从eacher表的外键,classet_cid是class表的外键。因此不同的老师被分配到不同的班级。
通过在MySQL的界面下面的查询,teacher表的结果显示如下:
Select * from teacher
通过在MySQL的界面执行下面的查询, clas表将显示如下的结果:
Select * from clas
- JPA实体映射关系
- JPA实体关系映射
- JPA实体关系
- JPA实体关系
- JPA实体关系
- JPA教程:JPA概述、JPA实体生命周期、JPA实体映射关系、JPA查询语言
- JPA实体继承关系的映射策略
- JPA实体关系映射之注释
- JPA实体关系映射之注释
- JPA树形结构实体关系映射
- JPA实体关联关系映射之概述
- JPA——实体关系映射
- Java利用JPA规范,实现实体关系解析,类似hibernate
- JPA总结——实体关系映射(一对一@OneToOne)
- JPA总结——实体关系映射(一对一@OneToOne)
- JPA对象关系映射——访问实体状态
- JPA总结——实体关系映射(一对一@OneToOne)
- 对JPA实体关系管理双向关联的一些思考
- @Component注解
- cin、cin.clear()、cin.ignore()与输入缓冲区
- python文件读写
- 动态内存分配malloc
- 反射
- JPA实体关系
- java中new一个对象jvm做了哪些事情
- 如何完全的卸载MySQL数据库?
- Flume与Kafka整合案例详解
- windows环境下安装zookeeper
- Java--线程的分类和生命周期
- for循环、php可变变量
- 文章标题
- Python的安装设置及print函数