高并发Java(5):JDK并发包1
来源:互联网 发布:林振强 知乎 编辑:程序博客网 时间:2024/05/22 00:21
原文地址:http://www.importnew.com/21288.html
在高并发Java(2):多线程基础中,我们已经初步提到了基本的线程同步操作。这次要提到的是在并发包中的同步控制工具。
1. 各种同步控制工具的使用
1.1 ReentrantLock
ReentrantLock感觉上是synchronized的增强版,synchronized的特点是使用简单,一切交给JVM去处理,但是功能上是比较薄弱的。在JDK1.5之前,ReentrantLock的性能要好于synchronized,由于对JVM进行了优化,现在的JDK版本中,两者性能是不相上下的。如果是简单的实现,不要刻意去使用ReentrantLock。
相比于synchronized,ReentrantLock在功能上更加丰富,它具有可重入、可中断、可限时、公平锁等特点。
首先我们通过一个例子来说明ReentrantLock最初步的用法:
packagetest;importjava.util.concurrent.locks.ReentrantLock;publicclass Test implementsRunnable{ publicstatic ReentrantLock lock = newReentrantLock(); publicstatic int i = 0; @Override publicvoid run() { for(intj = 0; j < 10000000; j++) { lock.lock(); try { i++; } finally { lock.unlock(); } } } publicstatic void main(String[] args) throwsInterruptedException { Test test = newTest(); Thread t1 = newThread(test); Thread t2 = newThread(test); t1.start(); t2.start(); t1.join(); t2.join(); System.out.println(i); }}有两个线程都对i进行++操作,为了保证线程安全,使用了 ReentrantLock,从用法上可以看出,与 synchronized相比,ReentrantLock就稍微复杂一点。因为必须在finally中进行解锁操作,如果不在 finally解锁,有可能代码出现异常锁没被释放,而synchronized是由JVM来释放锁。
那么ReentrantLock到底有哪些优秀的特点呢?
1.1.1 可重入
单线程可以重复进入,但要重复退出
lock.lock();lock.lock();try{ i++;} finally{ lock.unlock(); lock.unlock();}由于ReentrantLock是重入锁,所以可以反复得到相同的一把锁,它有一个与锁相关的获取计数器,如果拥有锁的某个线程再次得到锁,那么获取计数器就加1,然后锁需要被释放两次才能获得真正释放(重入锁)。这模仿了 synchronized 的语义;如果线程进入由线程已经拥有的监控器保护的 synchronized 块,就允许线程继续进行,当线程退出第二个(或者后续) synchronized 块的时候,不释放锁,只有线程退出它进入的监控器保护的第一个synchronized 块时,才释放锁。
publicclass Child extendsFather implementsRunnable{ finalstatic Child child = newChild();//为了保证锁唯一 publicstatic void main(String[] args) { for(inti = 0; i < 50; i++) { newThread(child).start(); } } publicsynchronized void doSomething() { System.out.println("1child.doSomething()"); doAnotherThing();// 调用自己类中其他的synchronized方法 } privatesynchronized void doAnotherThing() { super.doSomething();// 调用父类的synchronized方法 System.out.println("3child.doAnotherThing()"); } @Override publicvoid run() { child.doSomething(); }}classFather { publicsynchronized void doSomething() { System.out.println("2father.doSomething()"); }}我们可以看到一个线程进入不同的 synchronized方法,是不会释放之前得到的锁的。所以输出还是顺序输出。所以synchronized也是重入锁
输出:
1child.doSomething()2father.doSomething()3child.doAnotherThing()1child.doSomething()2father.doSomething()3child.doAnotherThing()1child.doSomething()2father.doSomething()3child.doAnotherThing()...1.1.2.可中断
与synchronized不同的是,ReentrantLock对中断是有响应的。中断相关知识查看高并发Java(2):多线程基础
普通的lock.lock()是不能响应中断的,lock.lockInterruptibly()能够响应中断。
我们模拟出一个死锁现场,然后用中断来处理死锁
packagetest;importjava.lang.management.ManagementFactory;importjava.lang.management.ThreadInfo;importjava.lang.management.ThreadMXBean;importjava.util.concurrent.locks.ReentrantLock;publicclass Test implementsRunnable{ publicstatic ReentrantLock lock1 = newReentrantLock(); publicstatic ReentrantLock lock2 = newReentrantLock(); intlock; publicTest(intlock) { this.lock = lock; } @Override publicvoid run() { try { if(lock == 1) { lock1.lockInterruptibly(); try { Thread.sleep(500); } catch(Exception e) { // TODO: handle exception } lock2.lockInterruptibly(); } else { lock2.lockInterruptibly(); try { Thread.sleep(500); } catch(Exception e) { // TODO: handle exception } lock1.lockInterruptibly(); } } catch(Exception e) { // TODO: handle exception } finally { if(lock1.isHeldByCurrentThread()) { lock1.unlock(); } if(lock2.isHeldByCurrentThread()) { lock2.unlock(); } System.out.println(Thread.currentThread().getId() + ":线程退出"); } } publicstatic void main(String[] args) throwsInterruptedException { Test t1 = newTest(1); Test t2 = newTest(2); Thread thread1 = newThread(t1); Thread thread2 = newThread(t2); thread1.start(); thread2.start(); Thread.sleep(1000); //DeadlockChecker.check(); } staticclass DeadlockChecker { privatefinal static ThreadMXBean mbean = ManagementFactory .getThreadMXBean(); finalstatic Runnable deadlockChecker = newRunnable() { @Override publicvoid run() { // TODO Auto-generated method stub while(true) { long[] deadlockedThreadIds = mbean.findDeadlockedThreads(); if(deadlockedThreadIds != null) { ThreadInfo[] threadInfos = mbean.getThreadInfo(deadlockedThreadIds); for(Thread t : Thread.getAllStackTraces().keySet()) { for(inti = 0; i < threadInfos.length; i++) { if(t.getId() == threadInfos[i].getThreadId()) { t.interrupt(); } } } } try { Thread.sleep(5000); } catch(Exception e) { // TODO: handle exception } } } }; publicstatic void check() { Thread t = newThread(deadlockChecker); t.setDaemon(true); t.start(); } }}上述代码有可能会发生死锁,线程1得到lock1,线程2得到lock2,然后彼此又想获得对方的锁。
我们用jstack查看运行上述代码后的情况
的确发现了一个死锁。
DeadlockChecker.check();方法用来检测死锁,然后把死锁的线程中断。中断后,线程正常退出。
1.1.3.可限时
超时不能获得锁,就返回false,不会永久等待构成死锁
使用lock.tryLock(long timeout, TimeUnit unit)来实现可限时锁,参数为时间和单位。
举个例子来说明下可限时:
packagetest;importjava.util.concurrent.TimeUnit;importjava.util.concurrent.locks.ReentrantLock;publicclass Test implementsRunnable{ publicstatic ReentrantLock lock = newReentrantLock(); @Override publicvoid run() { try { if(lock.tryLock(5, TimeUnit.SECONDS)) { Thread.sleep(6000); } else { System.out.println("get lock failed"); } } catch(Exception e) { } finally { if(lock.isHeldByCurrentThread()) { lock.unlock(); } } } publicstatic void main(String[] args) { Test t = newTest(); Thread t1 = newThread(t); Thread t2 = newThread(t); t1.start(); t2.start(); }}使用两个线程来争夺一把锁,当某个线程获得锁后,sleep6秒,每个线程都只尝试5秒去获得锁。
所以必定有一个线程无法获得锁。无法获得后就直接退出了。
输出:
get lock failed1.1.4.公平锁
使用方式:
publicReentrantLock(booleanfair) publicstatic ReentrantLock fairLock = newReentrantLock(true);一般意义上的锁是不公平的,不一定先来的线程能先得到锁,后来的线程就后得到锁。不公平的锁可能会产生饥饿现象。
公平锁的意思就是,这个锁能保证线程是先来的先得到锁。虽然公平锁不会产生饥饿现象,但是公平锁的性能会比非公平锁差很多。
1.2 Condition
Condition与ReentrantLock的关系就类似于synchronized与Object.wait()/signal()
await()方法会使当前线程等待,同时释放当前锁,当其他线程中使用signal()时或者signalAll()方法时,线 程会重新获得锁并继续执行。或者当线程被中断时,也能跳出等待。这和Object.wait()方法很相似。
awaitUninterruptibly()方法与await()方法基本相同,但是它并不会再等待过程中响应中断。 singal()方法用于唤醒一个在等待中的线程。相对的singalAll()方法会唤醒所有在等待中的线程。这和Obejct.notify()方法很类似。
这里就不再详细介绍了。举个例子来说明:
packagetest;importjava.util.concurrent.locks.Condition;importjava.util.concurrent.locks.ReentrantLock;publicclass Test implementsRunnable{ publicstatic ReentrantLock lock = newReentrantLock(); publicstatic Condition condition = lock.newCondition(); @Override publicvoid run() { try { lock.lock(); condition.await(); System.out.println("Thread is going on"); } catch(Exception e) { e.printStackTrace(); } finally { lock.unlock(); } } publicstatic void main(String[] args) throwsInterruptedException { Test t = newTest(); Thread thread = newThread(t); thread.start(); Thread.sleep(2000); lock.lock(); condition.signal(); lock.unlock(); }}上述例子很简单,让一个线程await住,让主线程去唤醒它。condition.await()/signal只能在得到锁以后使用。
1.3.Semaphore
对于锁来说,它是互斥的排他的。意思就是,只要我获得了锁,没人能再获得了。
而对于Semaphore来说,它允许多个线程同时进入临界区。可以认为它是一个共享锁,但是共享的额度是有限制的,额度用完了,其他没有拿到额度的线程还是要阻塞在临界区外。当额度为1时,就相等于lock
下面举个例子:
packagetest;importjava.util.concurrent.ExecutorService;importjava.util.concurrent.Executors;importjava.util.concurrent.Semaphore;publicclass Test implementsRunnable{ finalSemaphore semaphore = newSemaphore(5); @Override publicvoid run() { try { semaphore.acquire(); Thread.sleep(2000); System.out.println(Thread.currentThread().getId() + " done"); } catch(Exception e) { e.printStackTrace(); }finally{ semaphore.release(); } } publicstatic void main(String[] args) throwsInterruptedException { ExecutorService executorService = Executors.newFixedThreadPool(20); finalTest t = newTest(); for(inti = 0; i < 20; i++) { executorService.submit(t); } }}有一个20个线程的线程池,每个线程都去 Semaphore的许可,Semaphore的许可只有5个,运行后可以看到,5个一批,一批一批地输出。
当然一个线程也可以一次申请多个许可
publicvoid acquire(intpermits) throwsInterruptedException1.4 ReadWriteLock
ReadWriteLock是区分功能的锁。读和写是两种不同的功能,读-读不互斥,读-写互斥,写-写互斥。
这样的设计是并发量提高了,又保证了数据安全。
使用方式:
privatestatic ReentrantReadWriteLock readWriteLock=newReentrantReadWriteLock(); privatestatic Lock readLock = readWriteLock.readLock(); privatestatic Lock writeLock = readWriteLock.writeLock();详细例子可以查看 Java实现生产者消费者问题与读者写者问题,这里就不展开了。
1.5 CountDownLatch
倒数计时器
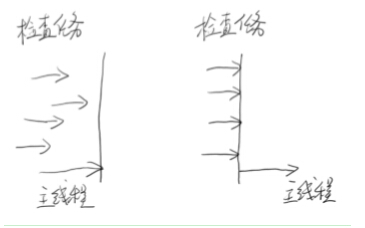
一种典型的场景就是火箭发射。在火箭发射前,为了保证万无一失,往往还要进行各项设备、仪器的检查。 只有等所有检查完毕后,引擎才能点火。这种场景就非常适合使用CountDownLatch。它可以使得点火线程
,等待所有检查线程全部完工后,再执行
使用方式:
staticfinal CountDownLatch end = newCountDownLatch(10);end.countDown();end.await();示意图:
一个简单的例子:
packagetest;importjava.util.concurrent.CountDownLatch;importjava.util.concurrent.ExecutorService;importjava.util.concurrent.Executors;publicclass Test implementsRunnable{ staticfinal CountDownLatch countDownLatch = newCountDownLatch(10); staticfinal Test t = newTest(); @Override publicvoid run() { try { Thread.sleep(2000); System.out.println("complete"); countDownLatch.countDown(); } catch(Exception e) { e.printStackTrace(); } } publicstatic void main(String[] args) throwsInterruptedException { ExecutorService executorService = Executors.newFixedThreadPool(10); for(inti = 0; i < 10; i++) { executorService.execute(t); } countDownLatch.await(); System.out.println("end"); executorService.shutdown(); }}主线程必须等待10个线程全部执行完才会输出”end”。
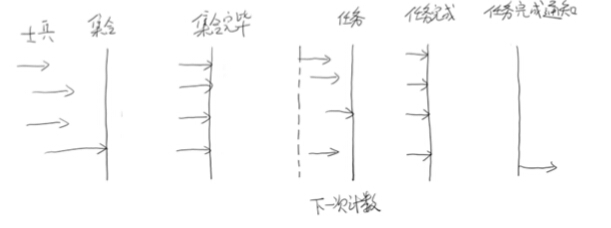
1.6 CyclicBarrier
和CountDownLatch相似,也是等待某些线程都做完以后再执行。与CountDownLatch区别在于这个计数器可以反复使用。比如,假设我们将计数器设置为10。那么凑齐第一批1 0个线程后,计数器就会归零,然后接着凑齐下一批10个线程
使用方式:
publicCyclicBarrier(intparties, Runnable barrierAction) barrierAction就是当计数器一次计数完成后,系统会执行的动作await()示意图:
下面举个例子:
packagetest;importjava.util.concurrent.CyclicBarrier;publicclass Test implementsRunnable{ privateString soldier; privatefinal CyclicBarrier cyclic; publicTest(String soldier, CyclicBarrier cyclic) { this.soldier = soldier; this.cyclic = cyclic; } @Override publicvoid run() { try { //等待所有士兵到齐 cyclic.await(); dowork(); //等待所有士兵完成工作 cyclic.await(); } catch(Exception e) { // TODO Auto-generated catch block e.printStackTrace(); } } privatevoid dowork() { // TODO Auto-generated method stub try { Thread.sleep(3000); } catch(Exception e) { // TODO: handle exception } System.out.println(soldier + ": done"); } publicstatic class BarrierRun implementsRunnable { booleanflag; intn; publicBarrierRun(booleanflag, intn) { super(); this.flag = flag; this.n = n; } @Override publicvoid run() { if(flag) { System.out.println(n + "个任务完成"); } else { System.out.println(n + "个集合完成"); flag = true; } } } publicstatic void main(String[] args) { finalint n = 10; Thread[] threads = newThread[n]; booleanflag = false; CyclicBarrier barrier = newCyclicBarrier(n, newBarrierRun(flag, n)); System.out.println("集合"); for(inti = 0; i < n; i++) { System.out.println(i + "报道"); threads[i] = newThread(newTest("士兵"+ i, barrier)); threads[i].start(); } }}打印结果:
集合0报道1报道2报道3报道4报道5报道6报道7报道8报道9报道10个集合完成士兵5: done士兵7: done士兵8: done士兵3: done士兵4: done士兵1: done士兵6: done士兵2: done士兵0: done士兵9: done10个任务完成1.7 LockSupport
提供线程阻塞原语
和suspend类似
LockSupport.park();LockSupport.unpark(t1);与suspend相比 不容易引起线程冻结
LockSupport的思想呢,和 Semaphore有点相似,内部有一个许可,park的时候拿掉这个许可,unpark的时候申请这个许可。所以如果unpark在park之前,是不会发生线程冻结的。
下面的代码是高并发Java(2):多线程基础中suspend示例代码,在使用suspend时会发生死锁。
packagetest;importjava.util.concurrent.locks.LockSupport;publicclass Test{ staticObject u = newObject(); staticTestSuspendThread t1 = newTestSuspendThread("t1"); staticTestSuspendThread t2 = newTestSuspendThread("t2"); publicstatic class TestSuspendThread extendsThread { publicTestSuspendThread(String name) { setName(name); } @Override publicvoid run() { synchronized(u) { System.out.println("in " + getName()); //Thread.currentThread().suspend(); LockSupport.park(); } } } publicstatic void main(String[] args) throwsInterruptedException { t1.start(); Thread.sleep(100); t2.start();// t1.resume();// t2.resume(); LockSupport.unpark(t1); LockSupport.unpark(t2); t1.join(); t2.join(); }}而使用 LockSupport则不会发生死锁。
另外
park()能够响应中断,但不抛出异常。中断响应的结果是,park()函数的返回,可以从Thread.interrupted()得到中断标志。
在JDK当中有大量地方使用到了park,当然LockSupport的实现也是使用unsafe.park()来实现的。
publicstatic void park() { unsafe.park(false, 0L); }1.8 ReentrantLock 的实现
下面来介绍下ReentrantLock的实现,ReentrantLock的实现主要由3部分组成:
- CAS状态
- 等待队列
- park()
ReentrantLock的父类中会有一个state变量来表示同步的状态
/** * The synchronization state. */ privatevolatile int state;通过CAS操作来设置state来获取锁,如果设置成了1,则将锁的持有者给当前线程
finalvoid lock() { if(compareAndSetState(0,1)) setExclusiveOwnerThread(Thread.currentThread()); else acquire(1); }如果拿锁不成功,则会做一个申请
publicfinal void acquire(intarg) { if(!tryAcquire(arg) && acquireQueued(addWaiter(Node.EXCLUSIVE), arg)) selfInterrupt(); }首先,再去申请下试试看tryAcquire,因为此时可能另一个线程已经释放了锁。
如果还是没有申请到锁,就addWaiter,意思是把自己加到等待队列中去
privateNode addWaiter(Node mode) { Node node = newNode(Thread.currentThread(), mode); // Try the fast path of enq; backup to full enq on failure Node pred = tail; if(pred != null) { node.prev = pred; if(compareAndSetTail(pred, node)) { pred.next = node; returnnode; } } enq(node); returnnode; }其间还会有多次尝试去申请锁,如果还是申请不到,就会被挂起
privatefinal boolean parkAndCheckInterrupt() { LockSupport.park(this); returnThread.interrupted(); }同理,如果在unlock操作中,就是释放了锁,然后unpark,这里就不具体讲了。
2. 并发容器及典型源码分析
2.1 ConcurrentHashMap
我们知道HashMap不是一个线程安全的容器,最简单的方式使HashMap变成线程安全就是使用Collections.synchronizedMap,它是对HashMap的一个包装
publicstatic Map m=Collections.synchronizedMap(newHashMap());同理对于List,Set也提供了相似方法。
但是这种方式只适合于并发量比较小的情况。
我们来看下synchronizedMap的实现
privatefinal Map<K,V> m; // Backing Map finalObject mutex; // Object on which to synchronize SynchronizedMap(Map<K,V> m) { if(m==null) thrownew NullPointerException(); this.m = m; mutex = this; } SynchronizedMap(Map<K,V> m, Object mutex) { this.m = m; this.mutex = mutex; } publicint size() { synchronized(mutex) {returnm.size();} } publicboolean isEmpty() { synchronized(mutex) {returnm.isEmpty();} } publicboolean containsKey(Object key) { synchronized(mutex) {returnm.containsKey(key);} } publicboolean containsValue(Object value) { synchronized(mutex) {returnm.containsValue(value);} } publicV get(Object key) { synchronized(mutex) {returnm.get(key);} } publicV put(K key, V value) { synchronized(mutex) {returnm.put(key, value);} } publicV remove(Object key) { synchronized(mutex) {returnm.remove(key);} } publicvoid putAll(Map<? extendsK, ? extendsV> map) { synchronized(mutex) {m.putAll(map);} } publicvoid clear() { synchronized(mutex) {m.clear();} }它会将HashMap包装在里面,然后将HashMap的每个操作都加上synchronized。
由于每个方法都是获取同一把锁(mutex),这就意味着,put和remove等操作是互斥的,大大减少了并发量。
下面来看下ConcurrentHashMap是如何实现的
publicV put(K key, V value) { Segment<K,V> s; if(value == null) thrownew NullPointerException(); inthash = hash(key); intj = (hash >>> segmentShift) & segmentMask; if((s = (Segment<K,V>)UNSAFE.getObject // nonvolatile; recheck (segments, (j << SSHIFT) + SBASE)) == null)// in ensureSegment s = ensureSegment(j); returns.put(key, hash, value, false); }在 ConcurrentHashMap内部有一个Segment段,它将大的HashMap切分成若干个段(小的HashMap),然后让数据在每一段上Hash,这样多个线程在不同段上的Hash操作一定是线程安全的,所以只需要同步同一个段上的线程就可以了,这样实现了锁的分离,大大增加了并发量。
在使用ConcurrentHashMap.size时会比较麻烦,因为它要统计每个段的数据和,在这个时候,要把每一个段都加上锁,然后再做数据统计。这个就是把锁分离后的小小弊端,但是size方法应该是不会被高频率调用的方法。
在实现上,不使用synchronized和lock.lock而是尽量使用trylock,同时在HashMap的实现上,也做了一点优化。这里就不提了。
2.2 BlockingQueue
BlockingQueue不是一个高性能的容器。但是它是一个非常好的共享数据的容器。是典型的生产者和消费者的实现。
示意图:

具体可以查看Java实现生产者消费者问题与读者写者问题
- 高并发Java(5):JDK并发包1
- 高并发Java(5):JDK并发包1
- 高并发Java五 JDK并发包1
- 【高并发Java五】JDK并发包1
- [高并发Java 五] JDK并发包1
- 高并发Java 五 JDK并发包1
- 高并发Java 五 JDK并发包1
- Java高并发程序设计 JDK并发包(上)
- 实战Java高并发程序设计(三)JDK并发包
- 高并发Java(6):JDK并发包2
- 高并发Java六 JDK并发包2
- 【高并发Java六】JDK并发包2
- [高并发Java 六] JDK并发包2
- 《Java高并发程序设计》总结--3. JDK并发包
- 高并发Java 六 JDK并发包2
- 高并发Java 六 JDK并发包2
- JDK并发包1
- java并发包:jdk并发容器
- 欢迎使用CSDN-markdown编辑器
- 4、JQuery——DOM节点删除、复制和拷贝
- git教程
- 代码封装/匿名对象/关键字(this ,static)/工具类main方法/
- ubuntu执行startx命令之后,无法登录
- 高并发Java(5):JDK并发包1
- hive安装
- (算法分析Week7)Divide Two Integers[Medium]
- mycat1.6.5分片(按小时)
- IntelliJ IDEA添加额外的jar包
- redis cluster节点的添加与删除(2)
- poj 1486 二分图的必须边
- 操作系统学习(五)
- 年底啦,java后台面试题整理