Outline effect as post process – tutorial
来源:互联网 发布:网络电视直播回看 编辑:程序博客网 时间:2024/06/06 00:33
Introduction
In this tutorial I will present a way of creating outline effect for meshes inside UE4. There are two popular methods of creating outline/stroke effect around objects in the game:
- Render mesh twice. Draw first mesh with a standard material and then draw second mesh with slightly higher scale and emissive material.
- Add outline to objects in post-process using edge detection
I’ll focus on the second method, as it requires very little effort to integrate it into existing projects. This tutorial assumes, you are familiar with basics of Unreal Engine 4 and it’s systems (material editor in particular). If you wish to fully understand how to implement edge detection algorithm as UE4 material, some basic image processing knowledge will be useful.
Basic steps
In order to implement outline effect as post process you need to follow these steps:
- Create a post process material that will add stroke effect for objects that have Custom Depth rendering enabled.
- Add your post process material into blendables list in your scenes’ post process volume.
- For each skeletal mesh or static mesh that you wish to be highlighted, enable parameter „Render Custom Depth”.
I’ll explain each of those points later on. If you are here just for the material, you can grab it in download section at bottom of the page.
Custom depth map
One of UE4’s cool features is ability to render individual meshes into separate depth texture and use it in materials. A depth texture keeps information about distance between each individual pixel in world space and a camera. A typical depth map will look like the image below.

Our custom depth map looks similar, expect there are visible only objects that have „Render Custom Depth” option selected in their properties.
This makes it super convenient to implement effects such us Outline, in screen space.
Creating a material
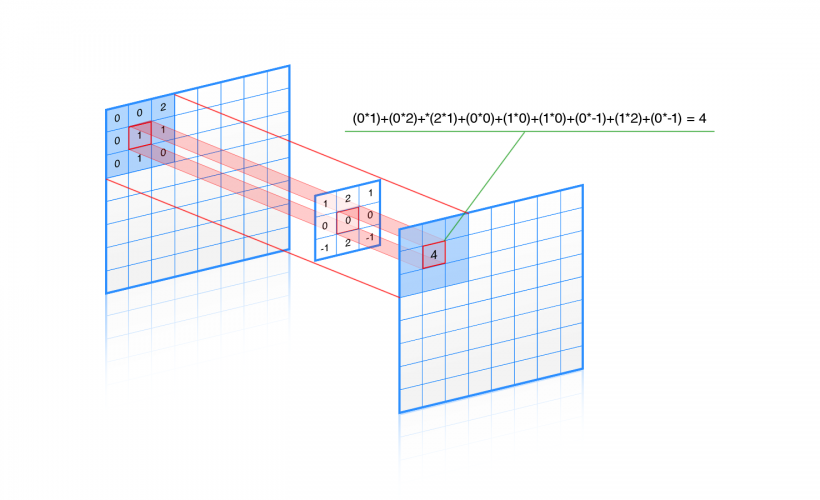
This is the hardest part. In our material we will implement sobel operator and convolve it with the custom depth map. In other words we will apply edge detection filter on our custom depth map to find out where we should draw stroke.
We will start with implementing our convolution algorithm. It’s rather sophisticated math behind this, but everything really boils down to following these steps:
- for each pixel P
- for each pixel PN adjacent to P
- Multiply PN’s value with weight found in kernel’s cell relative to pixel’s origin
- add result to output value
- return output value
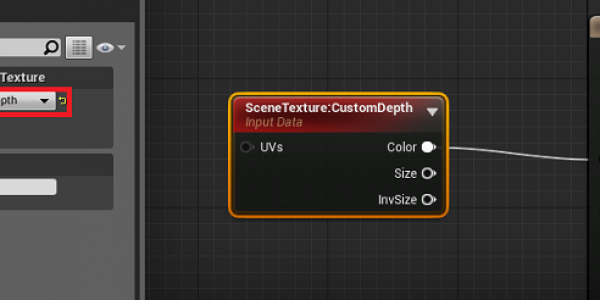
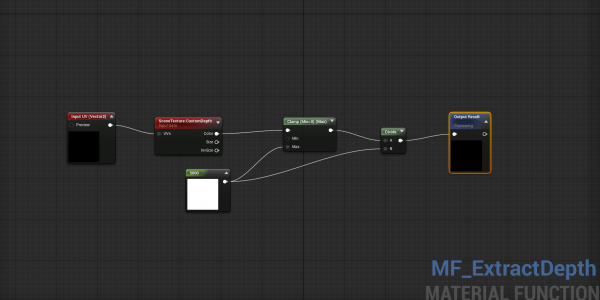
Sampling our depth map is simple: Drop Scene Texture node and connect it to the Emissive output. In node’s properties set Texture ID to CustomDepth
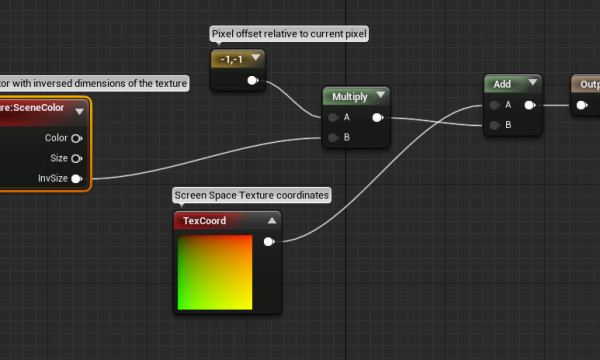
Now, we need to sample adjacent pixels. We can use the UV parameter of Scene Texture node for this. Problem is, UV parameters work in texture space, which means they take values from Top-Left corner(0,0) to Bottom-Right corner(1,1) of the texture. To do this we need to take inverse of our texture width and height, multiply by our offset and add it to UV coordinates of current pixel.
In material editor it will look like this:
Next, we need to duplicate those expressions for remaining seven adjacent pixels. The final setup for calculating pixel offsets:
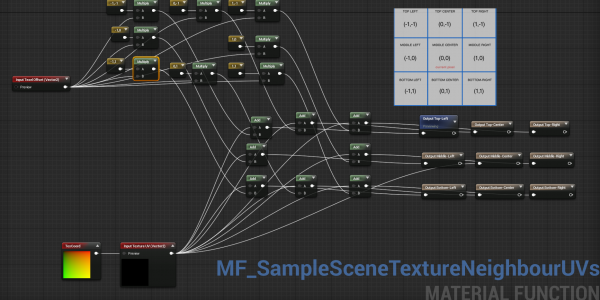
We have a set of UVs for all adjacent pixels, so we can now sample actual values from the CustomDepthMap. I’ve created a simple material function for this. It accepts UV coordinates as input and returns value of the sampled pixel.
If we use this function to sample adjacent values, we will have all the data to do the actual edge detection. Let’s create another material function that will perform the convolution:
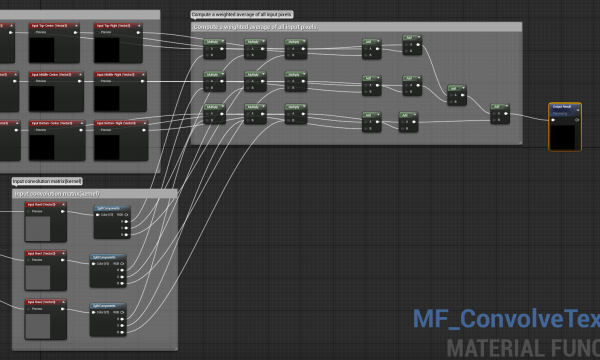
On the left side there are two sets of input parameters. First 9 input vectors are the values of pixels that we will be working on. The other three, provide values of our kernel. It’s really just a 3×3 matrix, but since there is no matrix type in UE4 material editor, I divided mine into three Vector3 parameters. Up to this point, we have all pieces of algorithm. All we have to do is put everything together inside the final material.
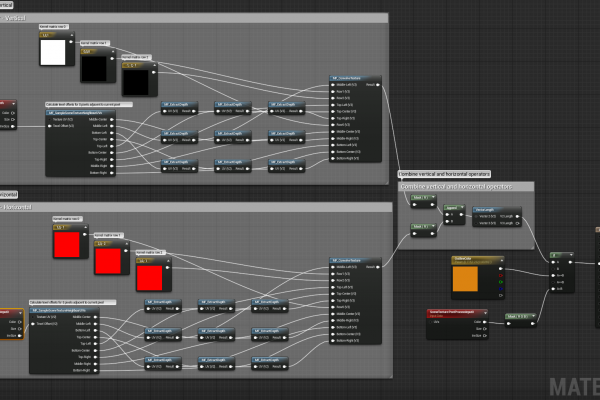
The sobel operator actually involves two convolution operations: vertical and horizontal. As you can probably notice, the only difference between those two is the input kernel.
Now we need to combine our two values:
![]()
In material editor we can just create vector from calculated values and return it’s length. The output will be black image with white outline around meshes that have custom depth rendering enabled. The last thing to do is blending our outline into final image. In this case I used „IF” expression to get solid stroke around objects, but it should be fairly easy to adjust the effect for your needs.
REMEMBER: Make sure that your material needs to be in Postprocess Domain, and not in Surface. You can change that in your material’s properties.
Scene setup
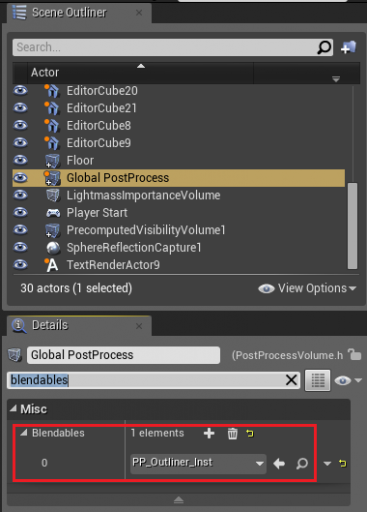
Our awesome material is finished, and now we need to plug it into our scene’s post process to see actual results. In your level select Post Process Volume and search for „Blendables”. Add new item to blendables list and pick your material from the list. If you don’t have any post process volumes in your leve, you should create one. Also double check that your volume has „Unbound” property set to true. Otherwise you will see the outline around objects only when you are inside that volume.
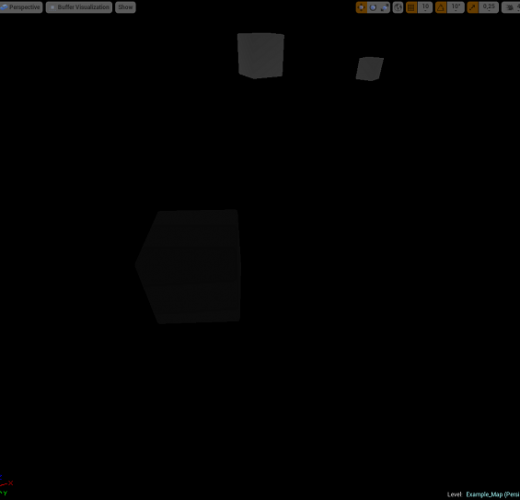
You can test results by dropping any mesh into scene and checking it’s „Render custom depth” property.
Blueprint example
In our sample project, static meshes get highlighted, when player aims at them. I’ve used FPS template for starter. In MyCharacter blueprint I’ve added a new function called Trace. It is called by timer every 0.1 seconds. It checks if player is looking at a static mesh. If yes then it sets RenderCustomDepth to true. When player stops aiming at that mesh, the RenderCustomDepth variable is set to false. You can check it out in action by downloading sample project provided below.
Conclusion
In this tutorial I’ve presented a fairly simple and easy to integrate method of rendering outline around objects. In fact this material is capable of doing much more than this particular effect. By convolving image with different kernels, we can achieve a variety of effects like blur, emboss or sharpen(seehttp://en.wikipedia.org/wiki/Kernel_(image_processing) for more information).
http://www.michalorzelek.com/blog/tutorial-creating-outline-effect-around-objects/
- Outline effect as post process – tutorial
- Tutorial – Creating outline effect around objects
- JQuery Tutorial | AJAX POST
- outline
- outline
- outline
- outline
- outline
- outline
- Post Process DX9
- Post Process后期处理
- UE4 Post Process Materials
- create process as system privilege
- Unity中的image effect和Post processing
- Tutorial 3: Shaders and Effect System(Directx手册)
- Effect
- Unity Shader之Post Effect抖动重影效果
- Java Spring Tutorial -- Bean Post Processors
- echart饼状图上显示百分比
- 697
- 指针就是地址
- 利用CSS写一个底部弧度效果
- 一种接口限速方案
- Outline effect as post process – tutorial
- 《Linux内核设计与实现》读书笔记(三)- Linux的进程
- OpenCV-Camshift算法解析
- 1024程序员节,属于我和未来的你
- 设计模式(19)--空对象模式
- 求大神指教JAVA 新手上路。。。。。
- OpenGL: 渲染管线理论
- PullToRefreshListView
- 循环神经网络