区块链入门(5)Truffle 项目实战,Solidity IDE, 智能合约部署
来源:互联网 发布:2016淘宝网店装修教程 编辑:程序博客网 时间:2024/05/22 05:17
在上一张我们学习了Truffle项目的创建,部署等相关内容,今天我们就来实战一下.今天我们要做3件事: 1) 学习搭建一个Solidity IDE(Remix). 2) 使用这个Solidity Ide编写一份智能合约. 3) 在我们前面第1,2,3章中部署的私有网络节点集群中部署这个合约,并能够在不同的节点中调用这个合约.Remix,是一个Solidity开发语言的Ide, 它是一款运行在浏览器端的solidity ide,也是官方推荐使用的ide.另外还有其它的solidiy ide,比如:Ethereum Studio, IntelliJ IDEA Plugin, Vistual studio extension...等这些ide的详细情况请参考官方文档:https://solidity.readthedocs.io/en/latest/index.html我们主要讲解Remix.
官方推荐的Solidity基于浏览器端的Ide(Remix)
运行Remix有两种方式,一种是直接用浏览器打开网址: https://remix.ethereum.org/直接打开官方部署的编辑器,进行开发.另外一种方式就是在本地部署Remix服务, 顺序运行下面的命令:
1
2
3
4
> git clone https://github.com/ethereum/remix> cdremix> npm install> npm startRemix服务就部署好了,然后在浏览器中打开:http://127.0.0.1:8080就可以直接使用本地部署Remix进行开发了.本地搭建Rmix 编辑器的好处,是可以随意修改编辑器中,源代码的字体.
1
2
3
4
5
6
7
8
9
10
11
12
13
14
15
16
17
18
19
20
21
vim ./node_modules/brace/index.js找到下面的内容:var editorCss = ".ace_editor {\ position: relative;\ overflow: hidden;\ font: 10px/normal'Ubuntu Mono', 'Monaco', 'Menlo', 'Consolas', 'source-code-pro', monospace;\ direction: ltr;\}\.ace_scroller {\ position: absolute;\ overflow: hidden;\ top: 0;\ bottom: 0;\ background-color: inherit;\ -ms-user-select: none;\ -moz-user-select: none;\ -webkit-user-select: none;\ user-select: none;\ cursor: text;\}\在font这这一行,把字体修改成自己喜欢的大小和样式.然后重新执行命令:
1
2
npm installnpm start重新打开网页,即可看到效果:
在Remix上编写第一份智能合约
打开浏览器,访问http://127.0.0.1:8080, 新建文件'SimpleStorage.sol'
1
2
3
4
5
6
7
8
9
10
11
12
13
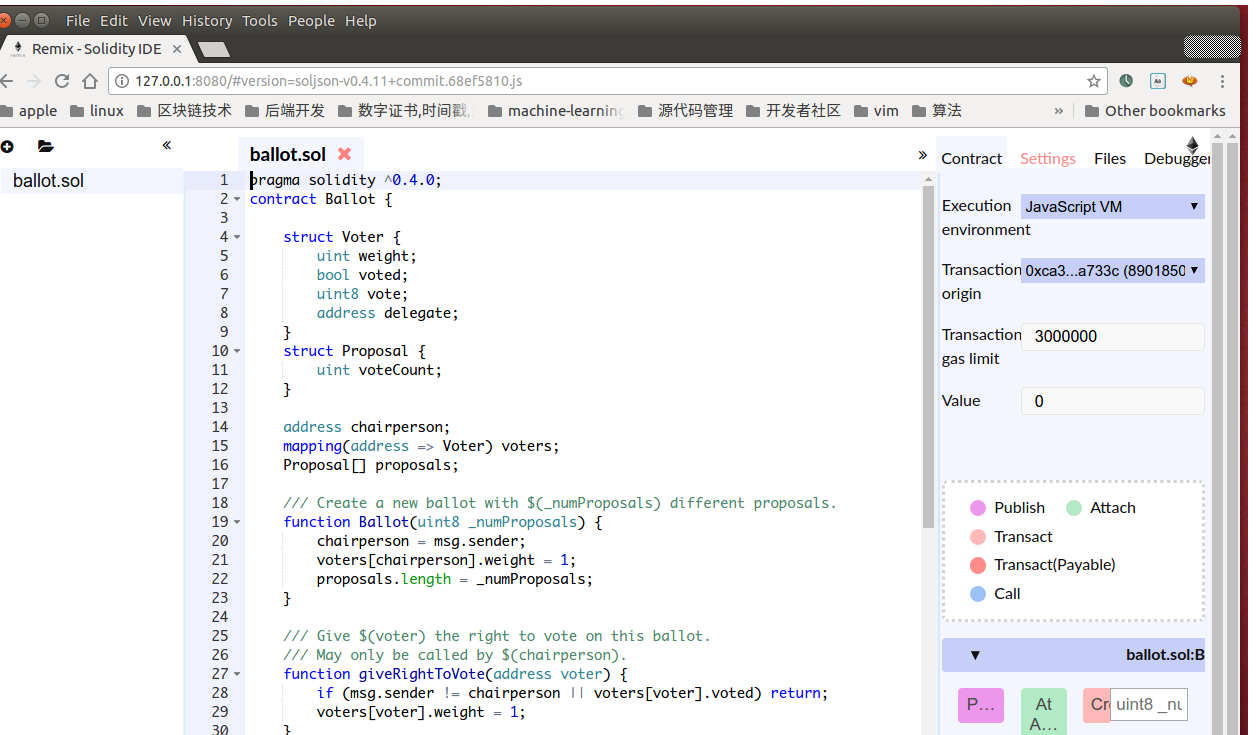
pragma solidity ^0.4.0;contract SimpleStorage { uint storeddata; functionset(uint x) { storeddata = x; } functionget() constant returns(uint retVal) { returnstoreddata; } functionmultiply(uint a) returns(uint d) { returna * 7; }}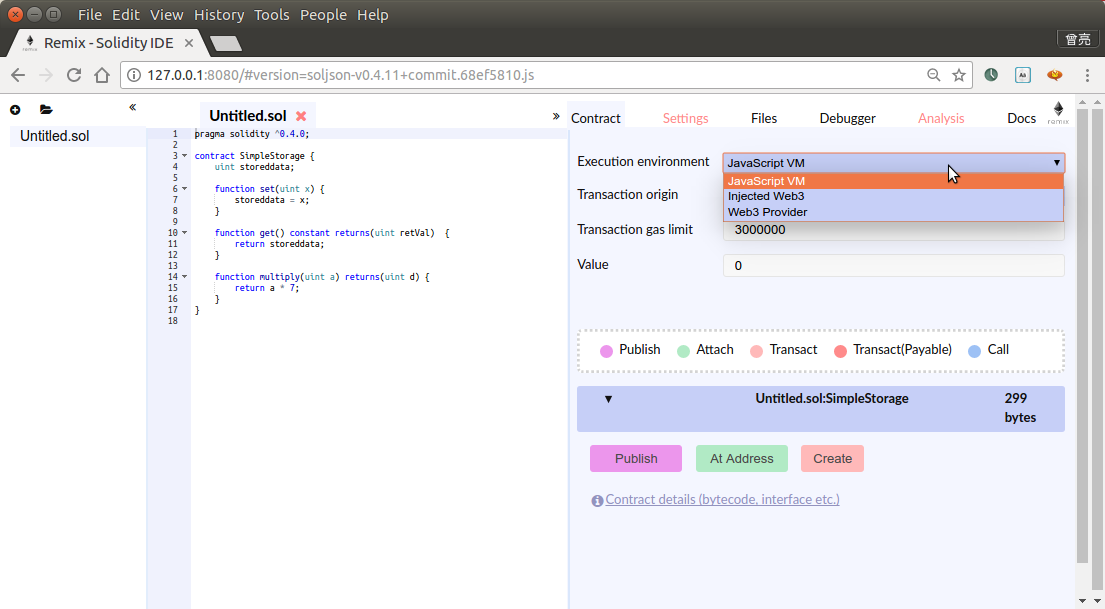
这个SimpleStorage功能很简单,把一个数乘以7并保存起来,提供获取和设置它的接口.大家最好手动输入以上内容体验一下Remix的效果.也可以故意输错,看看Remix是如何提醒错误的.
Remix调试模式
第一种是默认模式:javascript vm
第二种,是通过本地私有网络的rpc端口,链接到本地私有网络进行调试
还记得我们第2章中创建的以太坊私有网络节点集群吗? 进入之前的私有网络目录,并使用我们讲过的方法启动节点:
1
2
cd~/Documents/private-chain/geth --datadir ./data/00--networkid 314590 --ipcdisable --port 61910 --rpcport 8200 console回到Remix浏览器Ide中,选中右侧边栏的'Contact'选项卡.在'Execution environment'选项中,选择:'web3 provider', ide会弹出提示,让你输入之前我们启动的私有网络的rpc地址和端口, 输入: http://localhost:8200确定, 可以看到ide弹出提示:
1
Invalid JSON RPC response: ""我们按照官方提供的方法,增加几个选项,启动命令修改之后如下:
1
2
3
geth --datadir ./data/00--networkid 314590 --ipcdisable --port 61910 --rpc --rpcapi 'web3,eth,debug'--rpccorsdomain '*'--rpcport 8200 console####我们增加了以下几个命令选项:####--rpc --rpcapi 'web3,eth,debug'--rpccorsdomain '*'然后Remix重新链接私有网络的RPC地址, Idea没有了错误提示. 回到刚才启动的网络节点,在命令行输入命令查看账号:
1
> eth.accounts ["0x5fba50fce50baf0b8a7314200ba46336958ac97e"]观察Remix中, 有侧边栏'Contract' tab页中的'Transaction origin',这里显示的就是这个账号地址.
点击下方的'create'按钮.错误又来了: callback contain no result Error: authentication needed: password or unlock提示账号被锁定,需要'Transaction origin'中指定的账号的密码,或者解锁账户.回到geth命令行,执行下面的命令解锁账户:
1
2
> personal.unlockAccount("0x5fba50fce50baf0b8a7314200ba46336958ac97e", 'password of account')true再次点击'Create', 出现提示:

并且在geth命令行中,看到了一个提示: > INFO [06-19|00:21:11] Submitted contract creation fullhash=0x5aaf0021c94f52e37eda6c17cfbea2995c1ad1935816e7cac84c73448bd6ab2d contract=0xa7fdc326fa65a15665e3637ff33a120ff3758cdb > 就像之前我们在第三章中,从一个账户发送以太币到另一个账户,需要调用miner.start(),挖矿来确认我们的交易一样.这里我们调用一下: > miner.start(3); admin.sleepBlocks(1); miner.stop(); INFO [06-19|00:22:31] Updated mining threads threads=3 INFO [06-19|00:27:08] Successfully sealed new block number=38 hash=b7fdac…eb3c3f INFO [06-19|00:27:08] mined potential block number=38 hash=b7fdac…eb3c3f INFO [06-19|00:27:08] Commit new mining work number=39 txs=0 uncles=0 elapsed=1.836ms INFO [06-19|00:27:08] Successfully sealed new block number=39 hash=210027…1218e0 INFO [06-19|00:27:08] mined potential block number=39 hash=210027…1218e0 INFO [06-19|00:27:08] Commit new mining work number=40 txs=0 uncles=0 elapsed=183.453µs true > 这里这一串语句表示启动3个线程来挖矿,挖到第一个区块就停止.####查看未确认的交易数量#### >txpool.status回到Remix中,我们可以看到,合约已经创建成功了.
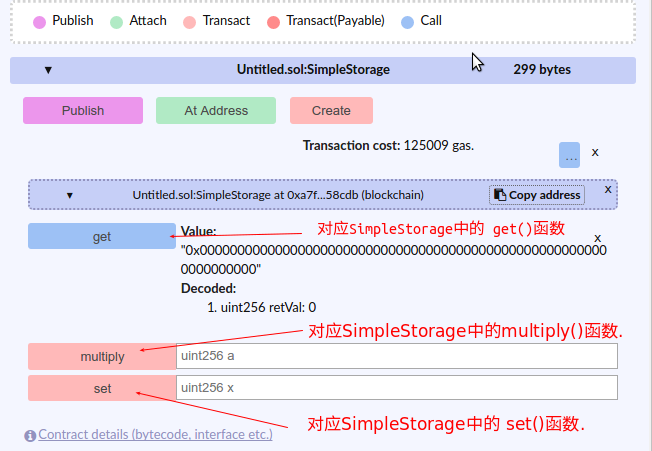
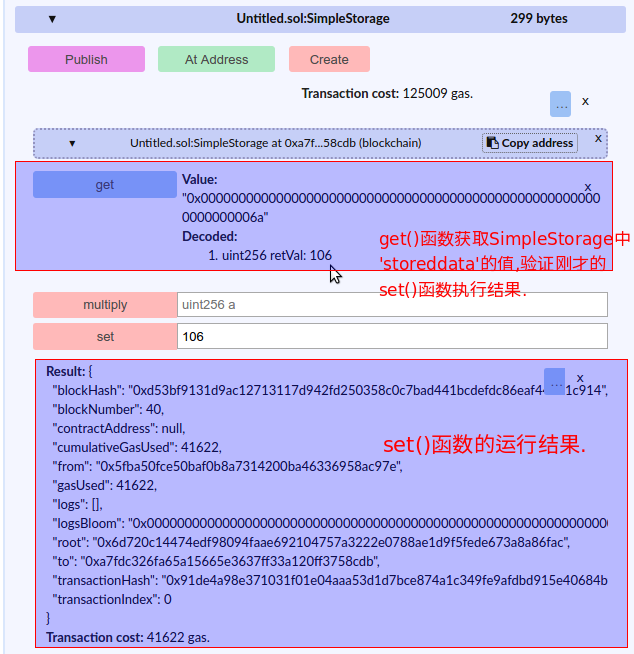
其中,有get, multiply, 和set 3个按钮分别对应了SimpleStorage合约中的3个函数,用于测试函数的功能.下面在set按钮后面的的输入框中,输入参数'106',点击'set'按钮.合约就被调用了.但是任然需要挖矿来确认.继续运行这个命令: miner.start(3); admin.sleepBlocks(1); miner.stop();等到挖矿完成,我们可以在浏览器的Remix中看到合约的set()函数的运行结果. 点击'get'按钮,获取SimpleStorage合约中'storeddata'的值,可以看到我们获取到的结果是'106',说明我们的合约没有问题.另外'multiply',大家可以自行测试.
在私有链中部署智能合约
首先创建truffle项目,依次输入以下命令: mkdir SimpleStorage cd SimpleStorage truffle init以上命令创建并初始化truffle项目,在第4章中有说明, 这里不在重复.把Remix中的SimpleStorage.sol保存到SimpleStorage/contracts目录中.增加SimpleStorage的部署在migrations中增加部署SimpleStorage的功能.在第四章中曾经详细介绍Migration以及合约的部署.这里直接提供代码. 打开migration/2_deploy_contracts.js, 修改为:
1
2
3
4
5
6
7
8
9
10
var ConvertLib = artifacts.require("./ConvertLib.sol");var MetaCoin = artifacts.require("./MetaCoin.sol");var SimpleStorage = artifacts.require("./SimpleStorage.sol")module.exports = function(deployer) { deployer.deploy(ConvertLib); deployer.link(ConvertLib, MetaCoin); deployer.deploy(MetaCoin); deployer.deploy(SimpleStorage);};编译 cd SimpleStorage truflle compile编译之后,我们开始把合约SipleStorage部署到我们的私有链中.用我们第二章中的方法启动节点: > geth --datadir ./data/00 --networkid 314590 --ipcdisable --port 61910 --rpcport 8200 console节点启动成功后,我们执行部署合约的命令. cd SimpleStorage truffle migrate我靠,什么鬼意思...他妈的执行失败,显示下面的信息. Error: Invalid JSON RPC response: "" at Object.InvalidResponse (/usr/local/node-v6.10.2-linux-x64/lib/node_modules/truffle/node_modules/web3/lib/web3/errors.js:35:16)[image023]查看大量资料后,发现在部署合约到私有链时,需要要注意以下几点: 1) geth启动节点的时候,必须带有--rpcapi选项,并且选项的值必须包含有:"web3", "net", "eth"这3个设置,另外为了保证rpc为启用,还应该带有"--rpc"等一系列相关的参数. 2) 注意SimpleStorage项目目录中:SimpleStorage/truffle.js(项目的配置文件),关于"rpcport"的配置必须要与启动节点时,设置的端口号一致.
1
2
3
4
5
6
7
8
9
module.exports = { networks: { development: { host: "localhost", port: 8545, network_id: "*"// Match any network id } }};我们需要把prot: 8545,修改为geth启动节点时设置的:8200 3) 启动节点后,节点中默认的账户是被锁定的,无法执行部署合约的操作,需要调用下面的命令解锁账户: > personal.unlockAccount(eth.accounts[0],"password", 1000*60*20) 第一个参数是账户地址. 第二个参数:账户密码. 第三个参数:账户解锁持续的时间, 以毫秒为单位,这里这样只是为了更方便的设置以分钟为单位(20分钟) 我们把账户解锁持续时间稍微设置久一点,以免在部署的过程中,账户突然被锁定,导致意外的出现.有了以上3个需要注意的地方,我们重新执行部署:调整启动命令后,用下面的命令启动: > geth --datadir ./data/00 --networkid 314590 --ipcdisable --port 61910 --rpc --rpcapi 'web3,eth,net' --rpccorsdomain '*' --rpcport 8200 console INFO [06-24|19:15:09] Starting peer-to-peer node instance=Geth/v1.6.1-stable-021c3c28/linux-amd64/go1.8.1#####....这里是很多书输出的日志信息....##### Welcome to the Geth JavaScript console! instance: Geth/v1.6.1-stable-021c3c28/linux-amd64/go1.8.1 coinbase: 0x5fba50fce50baf0b8a7314200ba46336958ac97e at block: 41 (Sat, 24 Jun 2017 00:34:18 CST) datadir: /home/zl/Documents/private-chain/data/00 modules: admin:1.0 debug:1.0 eth:1.0 miner:1.0 net:1.0 personal:1.0 rpc:1.0 txpool:1.0 web3:1.0#####....启动完成,我们执行解锁账户unlock.....##### > personal.unlockAccount(eth.accounts[0], "ko2005", 20*(60*1000)) true私有网络节点的操作完成后,回到刚才SimpleStorage所在的命令行, 执行部署命令: > truffle migrate Using network 'development'. Running migration: 1_initial_migration.js Deploying Migrations...可以看到,执行的输出结果与上一次不太一样了,好像离成功更近了.我们继续等一会儿.[过了一分钟,还是没反应,先来放一首歌....][....等啊等....[草它大爷的,等了快10分钟还是没有反应....][.....好像不按我们的套路来啊.....][........]突然想起来一件事,我们在之前的私有网络中,用户之间转账都是要通过挖矿来确认的...这尼玛..回到刚才启动的私有网络命令行,执行挖矿: > miner.start(3); admin.sleepBlocks(1); miner.stop(); INFO [06-24|19:16:43] Updated mining threads threads=3 INFO [06-24|19:16:43] Starting mining operation INFO [06-24|19:16:43] Commit new mining work number=42 txs=1 uncles=0 elapsed=3.079ms这行命令的意思: 启动挖矿程序,在挖到一个区块之后,停止挖矿.[挖矿又是一个耗时间的操作...]一会儿, 部署合约的命令行输出内容: Migrations: 0xbc14f4725810403de4b31cdaf00a84e2ea7252dc Saving successful migration to network...同时,查看私有网络的命令行,输出内容: > miner.start(3); admin.sleepBlocks(1); miner.stop(); INFO [06-24|19:16:43] Updated mining threads threads=3 INFO [06-24|19:16:43] Starting mining operation INFO [06-24|19:16:43] Commit new mining work number=42 txs=1 uncles=0 elapsed=3.079ms INFO [06-24|19:32:05] Successfully sealed new block number=42 hash=de460c…aefbfb INFO [06-24|19:32:05] mined potential block number=42 hash=de460c…aefbfb INFO [06-24|19:32:05] Commit new mining work number=43 txs=0 uncles=0 elapsed=2.730ms true > INFO [06-24|19:32:06] Submitted transaction fullhash=0xdf799ee7e5981011125dca4e5edcdbbf344dfbc81f466be7e69ba266572e2724 recipient=0xbc14f4725810403de4b31cdaf00a84e2ea7252dc看这命令行输出"Submitted transaction",意思又的让我们挖矿确认吧, ,老套路,我们懂, 再挖,命令行我就不打出来了.跟之前一样的.又等一会儿..SimpleStorage命令行输出: Saving artifacts...区块链网络命令行输出: > INFO [06-24|19:49:31] Submitted contract creation fullhash=0xb399d73bb5ed563e4acf6ad0b8ffc5e28ef114a1643df90b6218e568473c0b66 contract=0x6853da42bccdee332f180be1dd1e118e825ac57e这尼玛套路我们算是明白了,但这尼玛套路也太长了吧. 用周星驰的话来说就是:我走过最长的路,就是这尼玛以太坊的套路....反正我就这样一直走下去,最后总算是部署成功了,这就是我的执行结果:

合约部署成功后,我们尝试执行以下合约..今天就到这里吧...这一章我们了解了以下几点: 1) 基于浏览器端的solidity ide "Remix",以及如何搭建本地版本的"Remix" 2) Remix 的大概使用方法 3) 使用Remix部署智能合约到Debug网络中 4) 如何创建一个简单的truffle 项目, 进行项目创建,编写部署代码, 编译..到执行部署的详细流程. 5) 在部署智能合约到以太坊私有链时,需要注意的许多地方. 6) 我们成功部署了一个智能合约在以太坊私有链中....下一次我们讲一下如何在私有链中调用已经部署好的智能合约....工作忙的时候,更新会稍慢,大家敬请期待..
阅读全文
0 0
- 区块链入门(5)Truffle 项目实战,Solidity IDE, 智能合约部署
- truffle部署智能合约
- 【区块链】Truffle 部署 编译 测试 智能合约 的 完整实践操作
- 【区块链】Truffle合约交互
- 区块链-智能合约简单脚本编写方法(solidity)
- 区块链-智能合约简单脚本编写方法(solidity)
- 区块链智能合约部署初探
- 区块链学堂(第一课):区块链引子+智能合约+Solidity
- 区块链开发(十)区块链技术-智能合约Solidity编程语言
- Truffle 3.0部署智能合约至Ethereum节点(区别truffle部署智能合约到testrpc)
- 区块链入门(4)Truffle创建项目,编译,及项目部署
- Solidity 文档--第一章:智能合约入门
- Solidity 文档--第一章:智能合约入门
- Solidity 文档--第一章:智能合约入门
- truffle 部署合约
- 智能合约语言 Solidity 教程系列5
- 智能合约语言 Solidity 教程系列5
- 【智能合约】Solidity
- 剑指offer--两个链表的第一个公共结点
- 百度地图 经纬度批量转换
- R vs. Python,数据分析中谁与争锋?
- NOIP模拟10.24 R2
- Java中JSON字符串与java对象的互换实例详解
- 区块链入门(5)Truffle 项目实战,Solidity IDE, 智能合约部署
- 通过WebView向html页面注入js代码,实现WebView切换白昼模式/夜间模式
- 使用 CURL+正则匹配获取网页信息
- 数据库锁机制
- zookeeper kafka 集群配置(centos6.5)
- WebService与Spring整合
- 物联网平台市场竞争日益激烈
- 使用javascript实现简单的轮播图效果
- 欢迎使用CSDN-markdown编辑器