Tensorflow物体检测(Object Detection)
来源:互联网 发布:linux查看硬件命令 编辑:程序博客网 时间:2024/06/11 07:02
最近工作需要折腾 tensorflow, 学会图片分类后开始折腾物体检测。 感谢前人的工作,现在把物体检跑起来还是比较容易的,但优化就不容易了。
Tensorflow在更新1.2版本之后多了很多新功能,其中放出了很多用tf框架写的深度网络slim模型,大大降低了开发难度,无论是fine-tuning还是修改网络结构都方便了不少。这里讲的的是物体检测(object detection)API,这个库的说明文档很详细。
这个物体检测API提供了5种网络结构的预训练的weights,全部是用COCO数据集进行训练,可以在这里下载:分别是SSD+mobilenet, SSD+inception_v2, R-FCN+resnet101, faster RCNN+resnet101, faster RCNN+inception+resnet101。各个模型的精度和计算所需时间如下,具体测评细节可以看这篇文章: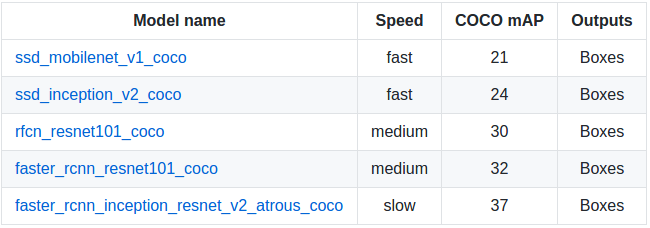
依赖包
Protobuf 2.6Pillow 1.0lxmltf Slim Jupyter notebookMatplotlib # 用这个画图会比较慢,内存占用高,可以用cv2来代替TensorflowAPI安装
$ pip install tensorflow-gpu$ sudo apt-get install protobuf-compiler python-pil python-lxml$ sudo pip install jupyter$ sudo pip install matplotlib因为使用protobuf来配置模型和训练参数,所以API正常使用必须先编译protobuf库:
$ cd tensorflow/models$ protoc object_detection/protos/*.proto --python_out=.然后将models和slim(tf高级框架)加入python环境变量:
export PYTHONPATH=$PYTHONPATH:/your/path/to/tensorflow/models:/your/path/to/tensorflow/models/slim最后测试安装:
python object_detection/builders/model_builder_test.pyfine-tuning
准备数据集
以Pascal VOC数据集的格式为例:object_detection/create_pascal_tf_record.py提供了一个模板,将voc格式的数据保存到.record格式python object_detection/create_pascal_tf_record.py \--label_map_path=object_detection/data/pascal_label_map.pbtxt \ # 训练物品的品类和id--data_dir=VOCdevkit --year=VOC2012 --set=train \--output_path=pascal_train.recordpython object_detection/create_pascal_tf_record.py \--label_map_path=object_detection/data/pascal_label_map.pbtxt \--data_dir=VOCdevkit --year=VOC2012 --set=val \--output_path=pascal_val.record其中
--data_dir为训练集的目录。结构同Pascal VOC,如下:+ VOCdevkit # +为文件夹 + JPEGImages - 001.jpg # - 为文件 + Annotations - 001.xml训练
train和eval输入输出数据储存结构为:+ input - label_map.pbtxt file # 可以在object_detection/data/*.pbtxt找到样例 - train TFRecord file - eval TFRecord file+ models + modelA - pipeline config file # 可以在object_detection/samples/configs/*.config下找到样例,定义训练参数和输入数据 + train # 保存训练产生的checkpoint文件 + eval准备好上述文件后就可以直接调用train文件进行训练
python object_detection/train.py \--logtostderr \--pipeline_config_path=/your/path/to/models/modelA/pipeline config file \ --train_dir=/your/path/to/models/modelA/train评估
在训练开始以后,就可以运行eval来评估模型的效果。不过实际情况是eval模型也需要加载ckpt文件,因此也需要占用不小的显存,而一般训练的时候都会调整batch尽量利用显卡性能,所以想要实时运行train和eval的话需要调整好两者所需的内存。python object_detection/eval.py \--logtostderr \--pipeline_config_path=/your/path/to/models/modelA/pipeline config file \--checkpoint_dir=/your/path/to/models/modelA/train \--eval_dir=/your/path/to/models/modelA/eval监控
通过tensorboard命令可以在浏览器很轻松的监控训练进程,在浏览器输入localhost:6006(默认)即可tensorboard --logdir=/your/path/to/models/modelA # 需要包含eval和train目录(.ckpt, .index, .meta, checkpoint, graph.pbtxt文件)
freeze model
在训练完成后需要将训练产生的最后一组.meta, .index, .ckpt, checkpoint文件。其中meta保存了graph和metadata,ckpt保存了网络的weights。而在生产环境中进行预测的时候是只需要模型和权重,不需要metadata,所以需要将其提出进行freeze操作,将所需的部分放到一个文件,方便之后的调用,也减少模型加载所需的内存。(在下载的预训练模型解压后可以找到4个文件,其中名为frozen_inference_graph.pb的文件就是freeze后产生的模型文件,比weights文件大,但是比weights和meta文件加起来要小不少。)
本来,tensorflow/python/tools/freeze_graph.py提供了freeze model的api,但是需要提供输出的final node names(一般是softmax之类的最后一层的激活函数命名),而object detection api提供提供了预训练好的网络,final node name并不好找,所以object_detection目录下还提供了export_inference_graph.py。
python export_inference_graph.py \ --input_type image_tensor \ --pipeline_config_path /your/path/to/models/modelA/pipeline config file \ --checkpoint_path /your/path/to/models/modelA/train/model.ckpt-* \ --inference_graph_path /your/path/to/models/modelA/train/frozen_inference_graph.pb # 输出的文件名模型调用
目录下提供了一个样例。这里只是稍作调整用cv2来显示图像。
也可以直接使用官方提供的https://github.com/tensorflow/models/blob/master/research/object_detection/object_detection_tutorial.ipynb ,使用jupyter notebook测试。
import numpy as npimport os, sysimport tensorflow as tfimport cv2MODEL_ROOT = "/home/arkenstone/tensorflow/workspace/models"sys.path.append(MODEL_ROOT) # 应用和训练的目录在不同的地方from object_detection.utils import label_map_utilfrom object_detection.utils import visualization_utils as vis_utilMODEL_PATH = "/home/arkenstone/tensorflow/workspace/models/objectdetection/models/faster_rcnn_inception_resnet_v2_atrous_coco_11_06_2017"PATH_TO_CKPT = MODEL_PATH + '/frozen_inference_graph.pb' # frozen model pathPATH_TO_LABELS = os.path.join(MODEL_ROOT, 'object_detection/data', 'mscoco_label_map.pbtxt')NUM_CLASSES = 90label_map = label_map_util.load_labelmap(PATH_TO_LABELS)categories = label_map_util.convert_label_map_to_categories(label_map, max_num_classes=NUM_CLASSES, use_display_name=True)category_index = label_map_util.create_category_index(categories) # 格式为{1:{'id': 1, 'name': 'person'}, 2: {'id': 2, 'name': 'bicycle'}, ...}# 模型加载:test.pydetection_graph = tf.Graph()with detection_graph.as_default(): od_graph_def = tf.GraphDef() with tf.gfile.GFile(PATH_TO_CKPT, 'rb') as fid: serialized_graph = fid.read() od_graph_def.ParseFromString(serialized_graph) tf.import_graph_def(od_graph_def, name='')gpu_memory_fraction = 0.4gpu_options = tf.GPUOptions(per_process_gpu_memory_fraction=gpu_memory_fraction)config = tf.ConfigProto(gpu_options=gpu_options, log_device_placement=False, allow_soft_placement=True)config.gpu_options.allow_growth = Falsedef detect(image_path): with detection_graph.as_default(): # 需要手动close sess with tf.Session(graph=detection_graph, config=config) as sess: image = cv2.imread(image_path) image_np = cv2.cvtColor(image, cv2.COLOR_BGR2RGB) image_np_expanded = np.expand_dims(image_np, axis=0) image_tensor = detection_graph.get_tensor_by_name('image_tensor:0') boxes = detection_graph.get_tensor_by_name('detection_boxes:0') scores = detection_graph.get_tensor_by_name('detection_scores:0') classes = detection_graph.get_tensor_by_name('detection_classes:0') num_detections = detection_graph.get_tensor_by_name('num_detections:0') (boxes, scores, classes, num_detections) = sess.run( [boxes, scores, classes, num_detections], feed_dict={image_tensor: image_np_expanded}) vis_util.visualize_boxes_and_labels_on_image_array( image_np, np.squeeze(boxes), np.squeeze(classes).astype(np.int32), np.squeeze(scores), category_index, use_normalized_coordinates=True, line_thickness=4) new_img = cv2.cvtColor(image_np, cv2.COLOR_RGB2BGR) cv2.imshow("test", new_img) cv2.waitKey(0)if __name__ == '__main__': detect(/your/test/image)参考
https://github.com/tensorflow/models/tree/master/research/object_detection
https://blog.metaflow.fr/tensorflow-how-to-freeze-a-model-and-serve-it-with-a-python-api-d4f3596b3adc
https://www.tensorflow.org/extend/tool_developers/
- Tensorflow物体检测(Object Detection)
- 使用TensorFlow Object Detection API进行图像物体检测
- object detection(物体检测)系列论文梳理
- 谷歌开源TensorFlow Object Detection API物体识别系统
- 使用tensorflow object detection API 进行物体识别
- 目标检测(Object Detection)
- 计算机视觉实时目标检测 TensorFlow Object Detection API
- tensorflow object detection demo
- TensorFlow Object Detection API
- Tensorflow Object Detection API
- TensorFlow Object Detection API
- Class-Specific Hough Forests for Object Detection随机森林(霍夫森林)来做物体(分类)检测
- 目标检测(Object Detection)资料汇总
- 目标 检测领域(Object Detection Benchmark)
- 对象检测(object detection)
- 对于谷歌开源的TensorFlow Object Detection API视频物体识别系统实现教程
- 梯度方向直方图和物体检测Histogram of Oriented Gradients and Object Detection
- 【论文笔记】物体检测系列 R-FCN: Object Detection via Region-based Fully Convolutional Networks
- 现在才入局智能投顾,有道智投不怕死?
- 李在石已成历史,AlphaGo对弈金立品牌文化大使柯洁日期确定
- 腾讯AI Lab主任张潼:解密实验室的研究和应用方向 | CITE 2017
- 智能手机的下一个“大气候”在哪里?
- 系统服务控制
- Tensorflow物体检测(Object Detection)
- 原易到创始人周航出任顺为资本投资合伙人
- 因3D摄像头技术问题 5.8英寸iPhone 8将延迟数周发货
- AndroidStudio 升级3.0.0(10月27日)
- 07打开r40m平台Android6.0下验证SPI0(分色排版)
- GMIC全球顾问委员会成立 张亚勤博士任首届主席
- 英特尔:GPU已out,Nvidia的人工智能之路会越来越难
- ssh服务
- Bagging