Jetty使用教程(一)开始使用Jetty
来源:互联网 发布:2017淘宝开店成功经验 编辑:程序博客网 时间:2024/05/16 11:48
1.1 什么是Jetty
- 第一部分部分重点介绍如何使用Jetty,它提供如下信息,如什么是Jetty,从哪可以下载它,怎么在像Maven一样的仓库中找到它。这一部分同样会提供启动Jetty和如何配置Jetty的快速入门。
- 第二部分从更细致的方面介绍Jetty的配置,介绍怎么用Jetty来部署一个web应用程序,怎么配置容器和连接,以及如何实现SSL和其它安全措施。
- Jetty的管理员应该关注第三部分。从启动Jetty容器开始到session管理,日志记录,HTTP/2支持和Jetty优化,这一章节将帮助Jetty管理员获得更多关于Jetty服务以外的知识,这一章节同样包含容器最常用的特性配置如JNDI和JMX。
- 针对使用Jetty的高级用户,第四部分着重于Jetty的开发,本章节的重点是如何将Jetty嵌入一个已经存在的应用程序中。这部分包含几个简单的例子和操作Jetty框架的指南。这一部分同样包含如何使用Jetty的maven插件以及Jetty调试。
- 最后一个部分是引用部分,也包含Jetty的架构信息,Jetty的XML语法介绍,以及常见问题的解析,这章也介绍如何参与Jetty社区,如何贡献代码,以及如何寻求帮助。
1.2 如何选择Jetty的版本
9.3
2015
Eclipse
1.8
HTTP/1.1 (RFC 7230), HTTP/2 (RFC 7540),
WebSocket (RFC 6455, JSR 356), FastCGI
3.1
2.3
稳定版本9.2
2014
Eclipse
1.7
HTTP/1.1 RFC2616, javax.websocket, SPDY v3
3.1
2.3
稳定版本
8
2009-
Eclipse/Codehaus
1.6
HTTP/1.1 RFC2616, WebSocket RFC 6455, SPDY v3
3.0
2.2
珍贵版本
7
2008-
Eclipse/Codehaus
1.5
HTTP/1.1 RFC2616, WebSocket RFC 6455, SPDY v3
2.5
2.1
珍贵版本
6
2006-2010
Codehaus
1.4-1.5
HTTP/1.1 RFC2616
2.5
2.0
已经作废
5
2003-2009
Sourceforge
1.2-1.5
HTTP/1.1 RFC2616
2.4
2.0
已经作废
4
2001-2006
Sourceforge
1.2, J2ME
HTTP/1.1 RFC2616
2.3
1.2
远古时期
3
1999-2002
Sourceforge
1.2
HTTP/1.1 RFC2068
2.2
1.1
石器时代
2
1998-2000
Mortbay
1.1
HTTP/1.0 RFC1945
2.1
1.0
传说级别
1
1995-1998
Mortbay
1.0
HTTP/1.0 RFC1945
-
-
神话级别
1.3 Jetty 和Java EE Web规范
1.3.1 Java EE 7 Web规范
JSR 340
Servlet Specification API 3.1
Yes
JSR 344
Java Server Faces 2.2 (JSF)
No
Yes, Mojarra or MyFaces
JSR 245 / JSR 341
Java Server Pages 2.3/Java Expression Language 3.0 (JSP/EL)
Yes
Yes
JSR 52
Java Standard Tag Library 1.2 (JSTL)
Yes
Yes
JSR 45
Debugging Support for Other Languages 1.0
Yes (via JSP)
Yes (via JSP)
JSR 346
Contexts and Dependency Injection for the
JavaEE Platform 1.1 (Web Beans)
No
Yes, Weld
JSR 330
Dependency Injection for Java 1.0
No
Yes as part of a CDI implementation, Weld
JSR 316
Managed Beans 1.0
No
Yes, as part of another technology
JSR 345
Enterprise JavaBeans 3.2 Lite
No
JSR 338
Java Persistance 2.1 (JPA)
No
Yes, eg Hibernate
JSR 250
Common Annotations for the Java Platform 1.2
Yes
Partially (for non-core Servlet Spec annotations)
JSR 907
Java Transaction API 1.2 (JTA)
Yes
Yes
JSR 349
Bean Validation 1.1
No
Yes as part of another technology eg JSF, or
a stand-alone implementation such as Hiberate Validator
JSR 339
Java API for RESTful Web Services 2.0 (JAX-RS)
No
JSR 356
Java API for Websocket 1.0
Yes
No
JSR 353
Java API for JSON Processing 1.0 (JSON-P)
No
Yes, eg JSON-P reference implementation
JSR 318
Interceptors 1.2
No
Yes as part of a CDI implementation
1.3.2 Jetty EE 6 Web Profile
表格 1.3. Java EE 6 Web Profile
JSR 315
Servlet Specification API 3.0
Yes
JSR 314
JavaServer Faces 2.0 (JSF)
No
Yes, for example, Mojarra or MyFaces
JSR 245
JavaServer Pages 2.2/Java Expression
Language 2.2 (JSP/EL)
Yes
Yes
JSR 52
Java Standard Tag Library 1.2 (JSTL)
Yes
Yes
JSR 45
Debugging Support for Other Languages 1.0
Yes (via JSP)
Yes (via JSP)
JSR 299
Contexts and Dependency Injection for
the Java EE Platform 1.0 (Web Beans)
No
Yes, Weld or OpenWebBeans
JSR 330
Dependency Injection for Java 1.0
No
Yes as part of a CDI implementation, Weld
JSR 316
Managed Beans 1.0
No
Yes, as part of another technology.
JSR 318
Enterprise JavaBeans 3.1
No
Yes, OpenEJB
JSR 317
Java Persistance 2.0 (JPA)
No
Yes, Hibernate
JSR 250
Common Annotations for the Java Platform
Yes
Partially (for non-core Servlet Spec annotations)
JSR 907
Java Transaction API (JTA)
Yes
Implementations are pluggable, such as Atomikos, JOTM,
Jencks (Geronimo Transaction Manager)
JSR 303
Bean Validation 1.0
No
Yes as part of another technology (JSF), or a stand-alone
implementation such as Hiberate Validator
1.4 在Maven中获取Jetty
1.4.1 Maven坐标
<dependency> <groupId>org.eclipse.jetty</groupId> <artifactId>jetty-project</artifactId> <version>${project.version}</version></dependency>1.4.2 在Maven中心的更新日志

<dependency> <groupId>org.eclipse.jetty</groupId> <artifactId>jetty-project</artifactId> <version>${project.version}</version> <classifier>version</classifier> <type>txt</type></dependency>二、Jetty的使用
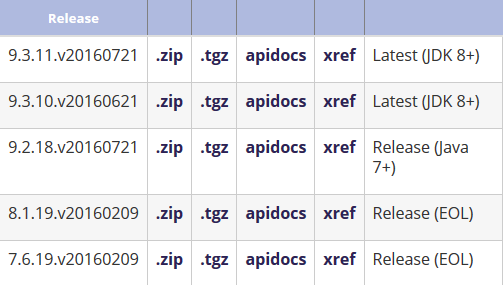
2.1 下载Jetty
2.1.1 下载Jetty项目

2.1.2 Jetty工程简介
表格 2.1. Contents
license-eplv10-aslv20.html
Jetty的许可文件
README.txt
有用的开始信息
VERSION.txt
版本信息
bin/
存放在Unix系统下运行的shell脚本
demo-base/
一个可运行包含示例web应用的Jetty服务器基目录
etc/
Jetty的配置文件
lib/
Jetty运行所必须的jar文件
logs/
日志
modules/
各个模块
notice.html
许可信息等
resources/
包含新增到classpath配置文件夹,如log4j.properties
start.ini
存放启动信息
start.jar
运行Jetty的jar
webapps/
一个用来存放运行在默认配置下的Jetty Web应用目录
2.2 运行Jetty
cd $JETTY_HOMEjava -jar start.jar若执行成功会输出以下信息
2015-06-04 10:50:44.806:INFO::main: Logging initialized @334ms2015-06-04 10:50:44.858:WARN:oejs.HomeBaseWarning:main: This instance of Jetty is not running from a separate {jetty.base} directory, this is not recommended. See documentation at http://www.eclipse.org/jetty/documentation/current/startup.html2015-06-04 10:50:44.995:INFO:oejs.Server:main: jetty-9.3.0.v201506012015-06-04 10:50:45.012:INFO:oejdp.ScanningAppProvider:main: Deployment monitor [file:///opt/jetty-distribution-9.3.0.v20150601/webapps/] at interval 12015-06-04 10:50:45.030:INFO:oejs.ServerConnector:main: Started ServerConnector@19dfb72a{HTTP/1.1,[http/1.1]}{0.0.0.0:8080}2015-06-04 10:50:45.030:INFO:oejs.Server:main: Started @558ms
你可以通过浏览器访问http://localhost:8080.。然而在


2.2.1 基础应用例子
> cd $JETTY_HOME/demo-base/> java -jar $JETTY_HOME/start.jar
成功运行将有如下信息输出:
2015-06-04 10:55:24.161:INFO::main: Logging initialized @308ms2015-06-04 10:55:24.431:WARN::main: demo test-realm is deployed. DO NOT USE IN PRODUCTION!2015-06-04 10:55:24.434:INFO:oejs.Server:main: jetty-9.3.0.v201506012015-06-04 10:55:24.457:INFO:oejdp.ScanningAppProvider:main: Deployment monitor [file:///opt/jetty-distribution-9.3.0.v20150601/demo-base/webapps/] at interval 12015-06-04 10:55:24.826:INFO:oejsh.ContextHandler:main: Started o.e.j.w.WebAppContext@c038203{/,file:///opt/jetty-distribution-9.3.0.v20150601/demo-base/webapps/ROOT/,AVAILABLE}{/ROOT}2015-06-04 10:55:24.929:WARN::main: test-jaas webapp is deployed. DO NOT USE IN PRODUCTION!2015-06-04 10:55:24.978:INFO:oejsh.ContextHandler:main: Started o.e.j.w.WebAppContext@46238e3f{/test-jaas,file:///tmp/jetty-0.0.0.0-8080-test-jaas.war-_test-jaas-any-9105214562680121772.dir/webapp/,AVAILABLE}{/test-jaas.war}2015-06-04 10:55:25.162:WARN::main: async-rest webapp is deployed. DO NOT USE IN PRODUCTION!2015-06-04 10:55:25.208:INFO:oejsh.ContextHandler:main: Started o.e.j.w.WebAppContext@6b67034{/async-rest,[file:///tmp/jetty-0.0.0.0-8080-async-rest.war-_async-rest-any-1023939491558622183.dir/webapp/, jar:file:///tmp/jetty-0.0.0.0-8080-async-rest.war-_async-rest-any-1023939491558622183.dir/webapp/WEB-INF/lib/example-async-rest-jar-9.3.0.v20150601.jar!/META-INF/resources],AVAILABLE}{/async-rest.war}2015-06-04 10:55:25.311:WARN::main: test-jndi webapp is deployed. DO NOT USE IN PRODUCTION!2015-06-04 10:55:25.386:INFO:oejsh.ContextHandler:main: Started o.e.j.w.WebAppContext@8b96fde{/test-jndi,file:///tmp/jetty-0.0.0.0-8080-test-jndi.war-_test-jndi-any-1692053319754270133.dir/webapp/,AVAILABLE}{/test-jndi.war}2015-06-04 10:55:25.508:WARN::main: test-spec webapp is deployed. DO NOT USE IN PRODUCTION!2015-06-04 10:55:25.594:INFO:oejsh.ContextHandler:main: Started o.e.j.w.WebAppContext@69930714{/test-spec,[file:///tmp/jetty-0.0.0.0-8080-test-spec.war-_test-spec-any-5518740932795802823.dir/webapp/, jar:file:///tmp/jetty-0.0.0.0-8080-test-spec.war-_test-spec-any-5518740932795802823.dir/webapp/WEB-INF/lib/test-web-fragment-9.3.0.v20150601.jar!/META-INF/resources],AVAILABLE}{/test-spec.war}2015-06-04 10:55:25.781:INFO:oejsh.ContextHandler:main: Started o.e.j.w.WebAppContext@3eb7fc54{/proxy,file:///tmp/jetty-0.0.0.0-8080-xref-proxy.war-_xref-proxy-any-3068657547009829038.dir/webapp/,AVAILABLE}{/xref-proxy.war}2015-06-04 10:55:25.786:INFO:oejsh.ContextHandler:main: Started o.e.j.s.h.MovedContextHandler@59662a0b{/oldContextPath,null,AVAILABLE}2015-06-04 10:55:25.951:WARN::main: test webapp is deployed. DO NOT USE IN PRODUCTION!2015-06-04 10:55:26.248:INFO:oejsh.ContextHandler:main: Started o.e.j.w.WebAppContext@4f83df68{/test,file:///tmp/jetty-0.0.0.0-8080-test.war-_test-any-5238659347611323540.dir/webapp/,AVAILABLE}{/test.war}2015-06-04 10:55:26.255:INFO:oejs.ServerConnector:main: Started ServerConnector@5a9c4ad9{HTTP/1.1,[http/1.1]}{0.0.0.0:8080}2015-06-04 10:55:26.259:INFO:oejus.SslContextFactory:main: x509={jetty.eclipse.org=jetty} wild={} alias=null for SslContextFactory@23941fb4(file:///opt/jetty-distribution-9.3.0.v20150601/demo-base/etc/keystore,file:///opt/jetty-distribution-9.3.0.v20150601/demo-base/etc/keystore)2015-06-04 10:55:26.269:INFO:oejs.ServerConnector:main: Started ServerConnector@5d908d47{SSL,[ssl, http/1.1]}{0.0.0.0:8443}2015-06-04 10:55:26.270:INFO:oejs.Server:main: Started @2417ms
现在可以通过浏览器访问 http://localhost:8080, 此时可以看到一个Jetty的欢迎页面,页面上包含几个简单的例子,欢迎页面如下
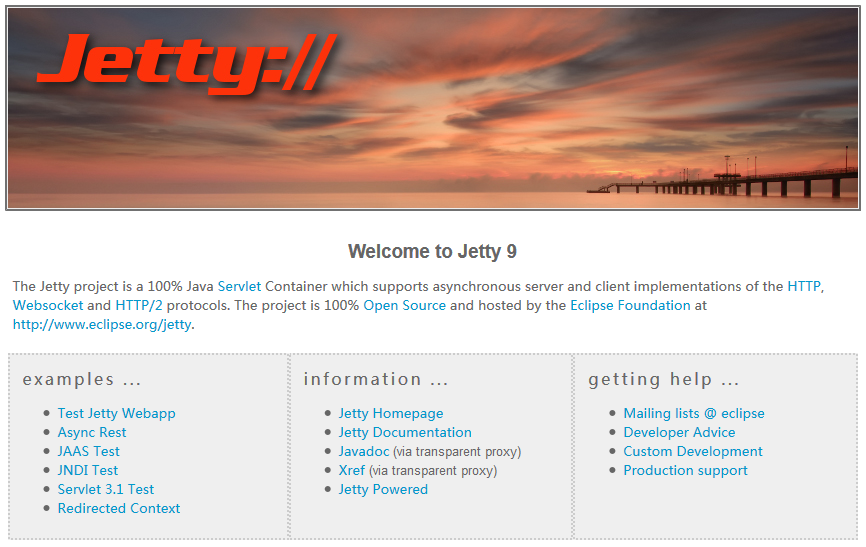

警告
示例的web应用程序不一定是绝对安全的,所以不应该部署在生产环境上。
你可以通过以下命令查看示例应用的配置信息
> cd $JETTY_HOME/demo-base/> java -jar $JETTY_HOME/start.jar --list-modules...> java -jar %JETTY_HOME/start.jar --list-config...
–list-modules:此命令将返回当前服务所有可用的模块,同时也会显示本地的模块,信息包括模块实现的顺序,依赖模块以及相应的jar信息
2.2.2 创建一个新的Jetty基目录
> JETTY_BASE=/tmp/mybase> mkdir $JETTY_BASE> cd $JETTY_BASE> java -jar $JETTY_HOME/start.jarWARNING: Nothing to start, exiting ...Usage: java -jar start.jar [options] [properties] [configs]java -jar start.jar --help # for more information> java -jar $JETTY_HOME/start.jar --add-to-startd=http,deployINFO: server initialised (transitively) in ${jetty.base}/start.d/server.iniINFO: http initialised in ${jetty.base}/start.d/http.iniINFO: security initialised (transitively) in ${jetty.base}/start.d/security.iniINFO: servlet initialised (transitively) in ${jetty.base}/start.d/servlet.iniINFO: webapp initialised (transitively) in ${jetty.base}/start.d/webapp.iniINFO: deploy initialised in ${jetty.base}/start.d/deploy.iniMKDIR: ${jetty.base}/webappsINFO: Base directory was modified> cp $JETTY_HOME/demo-base/webapps/async-rest.war webapps/ROOT.war> java -jar $JETTY_HOME/start.jar2015-06-04 11:10:16.286:INFO::main: Logging initialized @274ms2015-06-04 11:10:16.440:INFO:oejs.Server:main: jetty-9.3.0.v201506012015-06-04 11:10:16.460:INFO:oejdp.ScanningAppProvider:main: Deployment monitor [file:///tmp/mybase/webapps/] at interval 12015-06-04 11:10:16.581:WARN::main: async-rest webapp is deployed. DO NOT USE IN PRODUCTION!2015-06-04 11:10:16.589:INFO:oejw.StandardDescriptorProcessor:main: NO JSP Support for /, did not find org.eclipse.jetty.jsp.JettyJspServlet2015-06-04 11:10:16.628:INFO:oejsh.ContextHandler:main: Started o.e.j.w.WebAppContext@1a407d53{/,[file:///tmp/jetty-0.0.0.0-8080-ROOT.war-_-any-4510228025526425427.dir/webapp/, jar:file:///tmp/jetty-0.0.0.0-8080-ROOT.war-_-any-4510228025526425427.dir/webapp/WEB-INF/lib/example-async-rest-jar-9.3.0.v20150601.jar!/META-INF/resources],AVAILABLE}{/ROOT.war}2015-06-04 11:10:16.645:INFO:oejs.ServerConnector:main: Started ServerConnector@3abbfa04{HTTP/1.1,[http/1.1]}{0.0.0.0:8080}2015-06-04 11:10:16.646:INFO:oejs.Server:main: Started @634ms
以上命令是Linux下的命令,简单解释:创建一个JETTY_BASE环境变量,并创建指定的文件夹,在此文件夹下运行start.jar时提示没有可以启动的东西,系统退出,此时输入java -jar


2.2.3 改变Jetty的端口
> cd $JETTY_BASE> java -jar $JETTY_HOME/start.jar jetty.http.port=8081...
另外,可以将要设置的端口属性添加到start.ini或者start.d/http.ini文件中。默认情况,在start.d/http.ini文件中定义的jetty.http.port属性可以被修改成另一个值。
提示
配置属性信息通过如下方式获得
- 首先去start.d/http.ini文件中找jetty.http.port=8080配置信息,若找到配置端口即为指定端口
- 根据模块modules/http.mod文件找到指定配置默认为etc/jetty-http.xml,在此配置文件中有jetty.http.port配置信息,若找到即为此端口配置
- 若上面两个都没有,则随机一个没有使用的端口
2.2.4 为HTTPS & HTTP2增加SSL
> java -jar $JETTY_HOME/start.jar --add-to-startd=https,http2[...]> java -jar $JETTY_HOME/start.jar[...]2015-06-04 13:52:01.933:INFO:oejs.ServerConnector:main: Started ServerConnector@6f1fba17{SSL,[ssl, alpn, h2, http/1.1]}{0.0.0.0:8443}[...]
–add-to-startd:此命令在ini文件中设置有效的配置信息,使HTTPS和HTTP2支持SSL连接


2.2.5 修改Jetty的HTTPS端口
> cd $JETTY_BASE> java -jar $JETTY_HOME/start.jar jetty.ssl.port=8444除了在命令行增加参数的方法外,还可以在start.ini和start.d/*.ini文件中进行配置,所以如果用户使用–add-to-startd命令来使HTTPS生效,同样也可以在start.d/https.ini文件中进行修改。
2.2.6 更多的start.jar操作选项
> java -jar $JETTY_HOME/start.jar --help
2.3 部署Web应用
- 例如一个包含 WEB-INF/ 子文件夹的example/文件夹做为一个标准的web应用进行部署,否则就按静态资源部署,context路径为/example(访问路径: http://localhost:8080/example/);若文件夹名字为ROOT,则访问路径为/;若文件夹名字末尾为.d则此文件夹被忽略(除非被特殊的配置文件引用)
- 若一个文件example.war被部署在webapps下,则context路径为example/,如果名字为ROOT则访问路径为/,如果example.war文件和example/文件夹同时存在,只有war文件会被部署(这个文件会被当做一个没有被解压的目录来使用)
- 一个像example.xml的配置文件,若文件中是标准的配置信息,也会被部署,文件中必须包含context path,如果context path和example.xml同时存在,只有example.xml会被部署。
2.3.1 Jetty示例Web Application
三、Jetty配置信息介绍
3.1如何配置jetty
3.1.1 Jetty POJO 配置
- 编写Java代码来直接实例化并配置Jetty对象,这称为嵌入式Jetty。
- 使用Jetty的xml配置文件,这是一个控制反转框架模式,从xml文件中实例化Jetty对象。 etc/jetty.xml配置文件是Jetty的主要配置文件,但是也有很多etc/jetty-__feature__.xml类型的文件被Jetty使用
- 使用第三方IOC框架,如Spring来实例化Jetty对象做为一个Spring Beans
3.1.2 Jetty启动配置文件
- 激活的模块 –module=name
- 通过name=value的来为Jetty的IOC配置属性
- XML files in Jetty IoC (or Spring) XML format
- 一个标准的Java属性文件包含额外的启动属性
- 其他start.jar选项(see java -jar start.jar –help)
- 一些JVM参数组合通过–exec,例如-Xbootclasspath.
提示
在Jetty9,只有Jetty基路径下的配置文件被编辑,属性才会被修改
- 模块依赖如何排序以及激活
- 被模块需要并且要就在到classpath的jar包
- 被模块需要并且内容会被执行的xml文件
- 被激活模块需要的文件
- 一个示例的ini文件,当被-add-to-start=name选项激活时使用
Note
常见典型的模块配置信息通长很少被改动,*.mod文件通常位于
JETTYHOME/modules/文件夹下,但是额外增加的或者编辑过的通常放在 JETTY_BASE/module下,如果一个模块需要被修改,最好的做法是在修改前从JETTYHOME/modules/拷贝∗.mod到 JETTY_BASE/modules/
XML files:
xml文件一般用与IoC以及spring使用,用在命令行或者模块定义中。xml文件里面的配置将被注入到描述服务的一个对象里。通常改变属性的方法是改变对应的ini文件。xml文件通常放在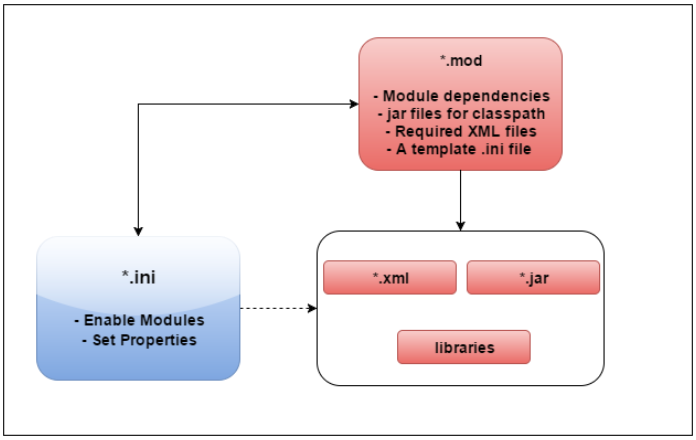

3.1.3 其它配置文件
- 设置一个web项目的默认的根路径
- 通过WEB-INF/web.xml进行特殊的配置
- Interpret descriptor fragments included in the META-INF directory of Jar files within WEB-INF/lib.
Note
通常web应用的web.xml文件应该在WEB-INF/web.xml位置被发现,Jetty还支持多个web.xml,可以在 WEB-INF/web.xml文件加载前或者加载后加载(使用方法见test.xml)
- 可以为Jetty IoC增加参数
- 配置默认日志信息(StdErrLog),其他日志框架也可以通过配置被使用(例如,log4j)
- 数据库的登录配置信息等
3.1.4 Jetty IoC XML使用
//// ========================================================================// Copyright (c) 1995-2016 Mort Bay Consulting Pty. Ltd.// ------------------------------------------------------------------------// All rights reserved. This program and the accompanying materials// are made available under the terms of the Eclipse Public License v1.0// and Apache License v2.0 which accompanies this distribution.//// The Eclipse Public License is available at// http://www.eclipse.org/legal/epl-v10.html//// The Apache License v2.0 is available at// http://www.opensource.org/licenses/apache2.0.php//// You may elect to redistribute this code under either of these licenses.// ========================================================================//package org.eclipse.jetty.embedded;import org.eclipse.jetty.server.Connector;import org.eclipse.jetty.server.Handler;import org.eclipse.jetty.server.Server;import org.eclipse.jetty.server.ServerConnector;import org.eclipse.jetty.server.handler.DefaultHandler;import org.eclipse.jetty.server.handler.HandlerCollection;import org.eclipse.jetty.servlet.ServletContextHandler;public class ExampleServer{ public static void main( String[] args ) throws Exception { Server server = new Server(); ServerConnector connector = new ServerConnector(server); connector.setPort(8080); server.setConnectors(new Connector[] { connector }); ServletContextHandler context = new ServletContextHandler(); context.setContextPath("/"); context.addServlet(HelloServlet.class, "/hello"); context.addServlet(AsyncEchoServlet.class, "/echo/*"); HandlerCollection handlers = new HandlerCollection(); handlers.setHandlers(new Handler[] { context, new DefaultHandler() }); server.setHandler(handlers); server.start(); server.join(); }}
- 注意Jetty的最低使用的jdk版本,最新版本使用jdk1.8
- HelloServlet是一个继承了HttpServlet的servlet
- 运行成功后程序会被挂起,等待用户连接,在浏览器中输入http://localhost:8080/hello即可访问
<?xml version="1.0"?><!DOCTYPE Configure PUBLIC "-//Jetty//Configure//EN" "http://www.eclipse.org/jetty/configure_9_3.dtd"><Configure id="ExampleServer" class="org.eclipse.jetty.server.Server"> <Set name="connectors"> <Array type="org.eclipse.jetty.server.Connector"> <Item> <New class="org.eclipse.jetty.server.ServerConnector"> <Arg><Ref refid="ExampleServer"/></Arg> <Set name="port">8080</Set> </New> </Item> </Array> </Set> <New id="context" class="org.eclipse.jetty.servlet.ServletContextHandler"> <Set name="contextPath">/hello</Set> <Call name="addServlet"> <Arg>org.eclipse.jetty.embedded.HelloServlet</Arg> <Arg>/</Arg> </Call> </New> <Set name="handler"> <New class="org.eclipse.jetty.server.handler.HandlerCollection"> <Set name="handlers"> <Array type="org.eclipse.jetty.server.Handler"> <Item> <Ref refid="context" /> </Item> <Item> <New class="org.eclipse.jetty.server.handler.DefaultHandler" /> </Item> </Array> </Set> </New> </Set></Configure>
3.2 可以在Jetty中配置什么
3.2.1 配置服务
3.2.2配置连接
Note
虚拟主机不能配置连接,用户应该通过虚拟主机的context来实现它们的相应。
Note
Jetty9同时支持连接协议(HTTP,HTTPS,AJP,SPDY)和自然连接(NIO或者BIO),Jetty9以后只有一个主要的连接器ServerConnector
3.2.3配置上下文环境
Note
servlet规范定一个web应用。在Jetty规范中一个标准的web项目必须有一个标准的WEB-INF/web.xml文件,用来配置classpath,资源,session处理,登录,以及servlet,jsp,以及静态资源。标准的web应用需要很少的额外的配置文件。
3.2.3.1 通过API配置上下文
//// ========================================================================// Copyright (c) 1995-2016 Mort Bay Consulting Pty. Ltd.// ------------------------------------------------------------------------// All rights reserved. This program and the accompanying materials// are made available under the terms of the Eclipse Public License v1.0// and Apache License v2.0 which accompanies this distribution.//// The Eclipse Public License is available at// http://www.eclipse.org/legal/epl-v10.html//// The Apache License v2.0 is available at// http://www.opensource.org/licenses/apache2.0.php//// You may elect to redistribute this code under either of these licenses.// ========================================================================//package org.eclipse.jetty.embedded;import org.eclipse.jetty.server.Server;import org.eclipse.jetty.server.handler.ContextHandler;public class OneContext{ public static void main( String[] args ) throws Exception { Server server = new Server( 8080 ); // Add a single handler on context "/hello" ContextHandler context = new ContextHandler(); context.setContextPath( "/hello" ); context.setHandler( new HelloHandler() ); // Can be accessed using http://localhost:8080/hello server.setHandler( context ); // Start the server server.start(); server.join(); }}
3.2.3.2 通过Ioc XML配置上下文
<?xml version="1.0" encoding="UTF-8"?><!DOCTYPE Configure PUBLIC "-//Mort Bay Consulting//DTD Configure//EN" "http://www.eclipse.org/jetty/configure_9_0.dtd"><!-- Configure a custom context for serving javadoc as static resources--><Configure class="org.eclipse.jetty.server.handler.ContextHandler"> <Set name="contextPath">/javadoc</Set> <Set name="resourceBase"><SystemProperty name="jetty.home" default="."/>/javadoc/</Set> <Set name="handler"> <New class="org.eclipse.jetty.server.handler.ResourceHandler"> <Set name="welcomeFiles"> <Array type="String"> <Item>index.html</Item> </Array> </Set> <Set name="cacheControl">max-age=3600,public</Set> </New> </Set></Configure>
3.2.4 配置web应用
- 初始化classpath,在WEB-INF/lib和WEB-INF/classes下。
- 根据标准的WEB-INF/web.xml进行解析初始化参数,过滤器,监听器,欢迎页面等信息。
- WEB-INF/jetty-web.xml文件可能包含Jetty IoC的配置。
3.2.4.1 配置contextpath
<?xml version="1.0" encoding="UTF-8"?><!DOCTYPE Configure PUBLIC "-//Mort Bay Consulting//DTD Configure//EN" "http://www.eclipse.org/jetty/configure_9_0.dtd"><Configure class="org.eclipse.jetty.webapp.WebAppContext"> <Set name="contextPath">/contextpath</Set></Configure>
还有一种做法是,不用增加配置文件,在war文件同目录,建一个同名的xml文件,内容如下:
<?xml version="1.0" encoding="UTF-8"?><!DOCTYPE Configure PUBLIC "-//Mort Bay Consulting//DTD Configure//EN" "http://www.eclipse.org/jetty/configure_9_0.dtd"><Configure class="org.eclipse.jetty.webapp.WebAppContext"> <Set name="war"><SystemProperty name="jetty.home" default="."/>/webapps/test.war</Set> <Set name="contextPath">/test</Set></Configure>
配置例子可以参照$JETTY_HOME/webapps/test.xml
3.2.4.2 Web应用部署
- 一个标准的war文件(必须以war结尾)
- 一个标准的web应用(必须有{dir}/WEB-INF/web.xml 文件)
- 一个包含静态资源的文件夹
- 一个Jetty描述XML,引用一个web应用
- 隐藏文件将被忽略(以.开头的文件)
- 以.d开头的文件夹将被忽略
- 如果一个文件夹和war名字一样,则只有war会部署
- 如果一个文件夹和同名xml配置,则xml配置的会被部署
- 如果一个war文件和xml文件同名,则xml配置的会被部署
3.2.4.3 设置身份验证区域
...<login-config> <auth-method>BASIC</auth-method> <realm-name>Test Realm</realm-name></login-config>...
这个例子使用名为Test Realm.的验证,但是没有说明其是怎么实现的,在Jetty中有几种实现方式,其中一种是HashLoginService可以读取登录用户,并在配置文件中查找,为了配置HashLoginService用来匹配Test Realm,可以配置$JETTY_BASE/etc/test-realm.xml文件,并且该文件必须在start.ini或者start.d/server.ini中设置。
<?xml version="1.0"?><!DOCTYPE Configure PUBLIC "-" "http://www.eclipse.org/jetty/configure_9_3.dtd"><Configure id="Server" class="org.eclipse.jetty.server.Server"> <!-- =========================================================== --> <!-- Configure Authentication Login Service --> <!-- Realms may be configured for the entire server here, or --> <!-- they can be configured for a specific web app in a context --> <!-- configuration (see $(jetty.home)/webapps/test.xml for an --> <!-- example). --> <!-- =========================================================== --> <Call name="addBean"> <Arg> <New class="org.eclipse.jetty.security.HashLoginService"> <Set name="name">Test Realm</Set> <Set name="config"><Property name="jetty.demo.realm" default="etc/realm.properties"/></Set> <Set name="refreshInterval">0</Set> </New> </Arg> </Call> <Get class="org.eclipse.jetty.util.log.Log" name="rootLogger"> <Call name="warn"><Arg>demo test-realm is deployed. DO NOT USE IN PRODUCTION!</Arg></Call> </Get></Configure>
通过创建和配置LoginService到web应用中,当部署应用时,会通过名字去寻找匹配的登录Service。
- Jetty使用教程(一)开始使用Jetty
- Jetty使用教程(一)——开始使用Jetty
- Jetty学习【一】 Jetty的嵌入式使用
- jetty使用
- jetty使用
- jetty的安装使用图文教程
- jetty的安装使用图文教程
- jetty使用教程(嵌入eclipse开发)
- jetty使用教程(嵌入eclipse开发)
- eclipse在线安装Jetty使用教程
- Jetty容器之浅显使用一
- jetty快速入门与嵌入使用 jetty
- jetty快速入门与嵌入使用 jetty
- jetty快速入门与嵌入使用 jetty
- jetty快速入门与嵌入使用 jetty
- 嵌入式jetty的使用
- jetty---ResourceHandler 使用
- jetty--使用servlet
- Exception in thread "main" java.lang.NoClassDefFoundError: org/springframework/core/ResolvableTypePr
- 从架构理解价值-我的软件世界观
- JAVA scanner类中next()方法与nextline()方法的区别
- truncate 、delete与drop区别
- linux之awk
- Jetty使用教程(一)开始使用Jetty
- Linux解压缩
- 清理svn、git,添加Xcode自带版本管理
- spring 总结
- destoon中的图片上传和删除
- Kotlin 第六站
- 使用spring @Scheduled注解执行定时任务
- Facebook介绍ICCV2017收录论文,其中五分之一都有何恺明的名字(附下载链接)
- 结构体【C语言程序设计】