weblogic10+ejb3
来源:互联网 发布:软件开发个人工作总结 编辑:程序博客网 时间:2024/05/21 15:50
在本文主要介绍如何来开发一个Stateless Session Bean,并在未安装WebLogic10的机器上访问Session Bean。开发EJB3 Stateless Session Bean要比开发EJB2 Stateless Session Bean容易得多,只需要几个注释就可以搞定。读者可按如下的步骤来开发和调用EJB3Stateless Session Bean:
第1步:编写远程接口
每一个Session Bean需要一个远程接口,该接口的代码如下:
import javax.ejb.Remote;
// 此处必须使用@Remote注释指定该接口为远程接口
@Remote
public interface CompanyRemote
{
public String getName();
public Employee[] getEmployees();
}
在CompanyRemote接口中定义了两个方法,分别返回一个字符串和一个Employee类型的数组。
第2步:编写Employee类
public class Employee implements java.io.Serializable
{
private String name;
private String job;
private int age;
public String getName()
{
return name;
}
public void setName(String name)
{
this.name = name;
}
public String getJob()
{
return job;
}
public void setJob(String job)
{
this.job = job;
}
public int getAge()
{
return age;
}
public void setAge(int age)
{
this.age = age;
}
}
<!--/* Font Definitions */@font-face{font-family:宋体;panose-1:2 1 6 0 3 1 1 1 1 1;}@font-face{font-family:""@宋体";panose-1:2 1 6 0 3 1 1 1 1 1;}/* Style Definitions */p.MsoNormal, li.MsoNormal, div.MsoNormal{mso-style-parent:"";margin:0cm;margin-bottom:.0001pt;text-align:justify;text-justify:inter-ideograph;font-size:10.5pt;font-family:"Times New Roman";}/* Page Definitions */@page{}@page Section1{size:612.0pt 792.0pt;margin:72.0pt 90.0pt 72.0pt 90.0pt;}div.Section1{page:Section1;}-->
第3步:编写StatelessSession Bean
import java.util.List;
import java.util.ArrayList;
import javax.ejb.Remote;
import javax.ejb.Stateless;
@Stateless(mappedName = "Company")
public class Company implements CompanyRemote
{
public Employee[] getEmployees()
{
Employee[] employees = new Employee[2];
employees[0] = new Employee();
employees[0].setName("superman");
employees[0].setJob("CEO");
employees[0].setAge(1234);
employees[1] = new Employee();
employees[1].setName("擎天柱");
employees[1].setJob("CTO");
employees[1].setAge(4321);
return employees;
}
public String getName()
{
return "地球软件有限公司";
}
}
<!--/* Font Definitions */@font-face{font-family:宋体;panose-1:2 1 6 0 3 1 1 1 1 1;}@font-face{font-family:""@宋体";panose-1:2 1 6 0 3 1 1 1 1 1;}/* Style Definitions */p.MsoNormal, li.MsoNormal, div.MsoNormal{mso-style-parent:"";margin:0cm;margin-bottom:.0001pt;text-align:justify;text-justify:inter-ideograph;font-size:10.5pt;font-family:"Times New Roman";}/* Page Definitions */@page{}@page Section1{size:612.0pt 792.0pt;margin:72.0pt 90.0pt 72.0pt 90.0pt;}div.Section1{page:Section1;}-->
这个Session Bean使用了@Stateless注释指定了该Session Bean是无状态的,并使用了mappedName属性指定该Session Bean的JNDI名的前一部分,如果mappedName属性的值是Company,则该Session Bean的JNDI名是Company#com.earth.CompanyRemote。
第4步:编译.java文件,并生成.jar文件
将上面三个.java文件放到同一个目录下,并使用如下的命令生成相应的.class文件:
<!--/* Font Definitions */@font-face{font-family:宋体;panose-1:2 1 6 0 3 1 1 1 1 1;}@font-face{font-family:""@宋体";panose-1:2 1 6 0 3 1 1 1 1 1;}/* Style Definitions */p.MsoNormal, li.MsoNormal, div.MsoNormal{mso-style-parent:"";margin:0cm;margin-bottom:.0001pt;text-align:justify;text-justify:inter-ideograph;font-size:10.5pt;font-family:"Times New Roman";}/* Page Definitions */@page{}@page Section1{size:612.0pt 792.0pt;margin:72.0pt 90.0pt 72.0pt 90.0pt;}div.Section1{page:Section1;}-->
注意:在编译.java文件时要将在classpath环境变量或javac的-classpath参数中指定weblogic.jar文件,假设WebLogic10安装在了C盘的bea目录,则weblogic.jar文件位于C:"bea"wlserver_10.3"server"lib目录中,本例使用了weblogic10.3。
在生成.class文件后,使用如下的命令生成company.jar文件:
<!--/* Font Definitions */@font-face{font-family:宋体;panose-1:2 1 6 0 3 1 1 1 1 1;}@font-face{font-family:""@宋体";panose-1:2 1 6 0 3 1 1 1 1 1;}/* Style Definitions */p.MsoNormal, li.MsoNormal, div.MsoNormal{mso-style-parent:"";margin:0cm;margin-bottom:.0001pt;text-align:justify;text-justify:inter-ideograph;font-size:10.5pt;font-family:"Times New Roman";}/* Page Definitions */@page{}@page Section1{size:612.0pt 792.0pt;margin:72.0pt 90.0pt 72.0pt 90.0pt;}div.Section1{page:Section1;}-->
第5步:发布EJB
发布EJB的方法很多,然而最简单的是直接将company.jar文件复制到如下的目录:
C:/bea/user_projects/domains/base_domain_new/autodeploy
其中base_domain_new是域名,读者也可将company.jar文件复制到其他域的autodeploy目录中。
启动Weblogic,该EJB自动发布。读者可以使用如下的URL来查看在当前Weblogic服务器中注册的JNDI:
http://localhost:7001/console/consolejndi.portal?_nfpb=true&_pageLabel=JNDIHomePage&server=AdminServer
其中AdminServer为Weblogic的服务名,可能在读者的机器上是其他的服务名,请使用如下的URL进行Weblogic Console进行查看:
http://localhost:7001/console
<!--/* Font Definitions */@font-face{font-family:宋体;panose-1:2 1 6 0 3 1 1 1 1 1;}@font-face{font-family:""@宋体";panose-1:2 1 6 0 3 1 1 1 1 1;}/* Style Definitions */p.MsoNormal, li.MsoNormal, div.MsoNormal{mso-style-parent:"";margin:0cm;margin-bottom:.0001pt;text-align:justify;text-justify:inter-ideograph;font-size:10.5pt;font-family:"Times New Roman";}/* Page Definitions */@page{}@page Section1{size:612.0pt 792.0pt;margin:72.0pt 90.0pt 72.0pt 90.0pt;}div.Section1{page:Section1;}-->
安装EJB后,本机注册的JNDI如下图所示。
第6步:编写客户端程序
调用EJB的客户端代码如下:
import javax.naming.Context;
import javax.naming.InitialContext;
import com.earth.*;
public class TestCompany
{
public static void main(String[] args) throws Exception
{
Properties props = new Properties();
props.setProperty(Context.INITIAL_CONTEXT_FACTORY,
"weblogic.jndi.WLInitialContextFactory");
props.setProperty(Context.PROVIDER_URL, "t3://192.168.17.127:7001");
InitialContext ctx = new InitialContext(props);
CompanyRemote companyRemote = (CompanyRemote) ctx
.lookup("Company#com.earth.CompanyRemote");
System.out.println(companyRemote.getName());
Employee[] employees = companyRemote.getEmployees();
for (Employee employee : employees)
{
System.out.println("name:" + employee.getName());
System.out.println("job:" + employee.getJob());
System.out.println("age:" + employee.getAge());
System.out.println("-------------------------");
}
}
}
<!--/* Font Definitions */@font-face{font-family:宋体;panose-1:2 1 6 0 3 1 1 1 1 1;}@font-face{font-family:""@宋体";panose-1:2 1 6 0 3 1 1 1 1 1;}/* Style Definitions */p.MsoNormal, li.MsoNormal, div.MsoNormal{mso-style-parent:"";margin:0cm;margin-bottom:.0001pt;text-align:justify;text-justify:inter-ideograph;font-size:10.5pt;font-family:"Times New Roman";}/* Page Definitions */@page{}@page Section1{size:612.0pt 792.0pt;margin:72.0pt 90.0pt 72.0pt 90.0pt;}div.Section1{page:Section1;}--> 使用如下的命令编译TestCompany.java:
<!--/* Font Definitions */@font-face{font-family:宋体;panose-1:2 1 6 0 3 1 1 1 1 1;}@font-face{font-family:""@宋体";panose-1:2 1 6 0 3 1 1 1 1 1;}/* Style Definitions */p.MsoNormal, li.MsoNormal, div.MsoNormal{mso-style-parent:"";margin:0cm;margin-bottom:.0001pt;text-align:justify;text-justify:inter-ideograph;font-size:10.5pt;font-family:"Times New Roman";}/* Page Definitions */@page{}@page Section1{size:612.0pt 792.0pt;margin:72.0pt 90.0pt 72.0pt 90.0pt;}div.Section1{page:Section1;}-->
注意:TestCompany.java与company.jar文件需要在同一目录下。
由于调用客户端的代码并不一定在安装WebLogic的机器上运行,因此,在将TestCompany.class和company.jar(发布到客户端的这个jar文件只需要Employee.class和CompanyRemote.class文件即可,Company.class可以从该jar文件中删除)发布到客户端时还需要带一些WebLogic自身的jar文件。虽然Weblogic中有一个wlclient.jar文件,但光有这个文件还不够,不了方便提取客户端需要的jar文件,Weblogic提供了一个jar包,通过该包,可以将客户端需要的所有.class文件打成一个jar包。
这个jar文件是C:/bea/modules/com.bea.core.jarbuilder_1.2.0.0.jar,可通过如下的命令行来生成客户端需要的jar包:
<!--/* Font Definitions */@font-face{font-family:宋体;panose-1:2 1 6 0 3 1 1 1 1 1;}@font-face{font-family:""@宋体";panose-1:2 1 6 0 3 1 1 1 1 1;}/* Style Definitions */p.MsoNormal, li.MsoNormal, div.MsoNormal{mso-style-parent:"";margin:0cm;margin-bottom:.0001pt;text-align:justify;text-justify:inter-ideograph;font-size:10.5pt;font-family:"Times New Roman";}/* Page Definitions */@page{}@page Section1{size:612.0pt 792.0pt;margin:72.0pt 90.0pt 72.0pt 90.0pt;}div.Section1{page:Section1;}--> 注意:上面的命令必须在C:/bea/wlserver_10.3/server/lib目录中执行。
在执行上面的命令后,将在E:/bea/wlserver_10.3/server/lib目录生成一个wlfullclient.jar文件,将该文件与TestCompany.class、company.jar一同复制到客户端的机器上即可。并通过如下的命令来执行TestCompany.class:
<!--/* Font Definitions */@font-face{font-family:宋体;panose-1:2 1 6 0 3 1 1 1 1 1;}@font-face{font-family:""@宋体";panose-1:2 1 6 0 3 1 1 1 1 1;}/* Style Definitions */p.MsoNormal, li.MsoNormal, div.MsoNormal{mso-style-parent:"";margin:0cm;margin-bottom:.0001pt;text-align:justify;text-justify:inter-ideograph;font-size:10.5pt;font-family:"Times New Roman";}/* Page Definitions */@page{}@page Section1{size:612.0pt 792.0pt;margin:72.0pt 90.0pt 72.0pt 90.0pt;}div.Section1{page:Section1;}--> 执行上面的命令后的输出结果如下面两个图所示: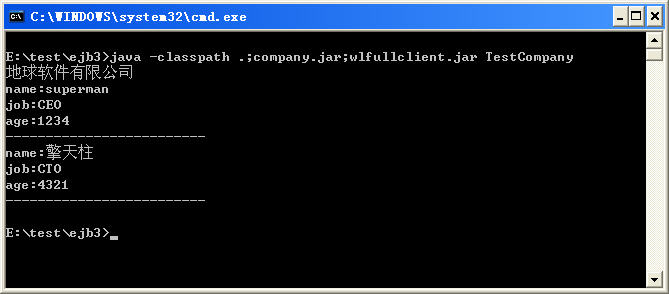
Windows下的执行结果
Linux下的执行结果
- weblogic10+ejb3
- weblogic10+eclipse 开发ejb3
- EJB3.1+MyEclipse10+WebLogic10示例
- Ejb3.0 Local Working In Weblogic10.3
- 如何设置基于weblogic10的EJB3.0的JNDI
- EJB3+JSF 打成EAR包发布到Weblogic10.3
- Weblogic10+EJB3.0下的MDB遇到问题及解决
- Weblogic10 + EJB3入门教程(1):编写第一个无状态会话Bean(Stateless Session Bean)
- 将JBoss下开发的EJB3.0数据库应用迁移到WebLogic10.3的注意事项
- EJB3
- EJB3
- EJB3
- 安装weblogic10
- weblogic10 下载
- WebLogic10 安装
- weblogic10安装
- 破解weblogic10.0
- weblogic10配置JMS
- ADempiere服务器的启动
- Php中判断一个字符串为空
- ejb本地调用总结(websphere)
- 数字音频技术与杜比AC-3数字音频编码
- 解析#pragma指令
- weblogic10+ejb3
- Linux启动级别
- PKU 1887 Testing the CATCHER
- 基于MATLAB的分数阶负反馈控制系统的设计界面
- 唐骏的八大“职业经理潜规则”辨析
- 颜色代码表
- char,varchar,text,nchar,nvarchar,ntext的区别
- 牛人飞信协议分析
- MSVCRTD.lib(crtexe.obj) : error LNK2019: 无法解析的外部符号 _main && 无法解析__imp__PlaySoundW