Butter Knife使用详解
来源:互联网 发布:赵丽颖林更新网络剧 编辑:程序博客网 时间:2024/05/18 01:33
Butter Knife
Github地址: https://github.com/JakeWharton/butterknife

官方说明给出的解释是 Bind Android views and callbacks to fields and methods.
Field and method binding for Android views which uses annotation processing to generate boilerplate code for you.
- Eliminate
findViewByIdcalls by using@BindViewon fields. - Group multiple views in a list or array. Operate on all of them at once with actions, setters, or properties.
- Eliminate anonymous inner-classes for listeners by annotating methods with
@OnClickand others. - Eliminate resource lookups by using resource annotations on fields.
意思就是:将Android视图和回调绑定到字段和方法。使用注释处理为您生成样板代码的Android视图的字段和方法绑定。通过在字段上使用@BindView消除findViewById调用。在列表或数组中分组多个视图。 使用操作,设置器或属性一次操作所有这些。通过使用@OnClick和其他方法注释方法,消除匿名内部类的侦听器。通过在字段上使用资源注释来消除资源查找。
官方文档给出了Butter Knife在Gradle里面如何配置

下面我们就来配置Buffer Knife到工程里面
新建Android Studio工程(作者的Android Studio版本是2.3)
项目主体结构如下:

首先,配置build.gradle(Project:XXX)
新建工程的build.gradle(Project:XXX)初始样子如下:
然后我们按照官方文档进行配置
在repositories {}里面添加
mavenCentral()
在dependencies {}里面添加
classpath 'com.jakewharton:butterknife-gradle-plugin:8.5.1'
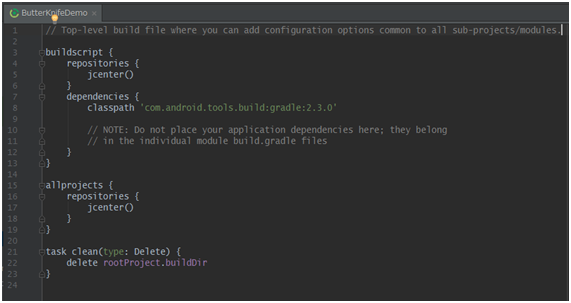
build.gradle(Project:XXX)完整代码即:

// Top-level build file where you can add configuration options common to all sub-projects/modules.buildscript { repositories { jcenter() mavenCentral() } dependencies { classpath 'com.android.tools.build:gradle:2.3.0' classpath 'com.jakewharton:butterknife-gradle-plugin:8.5.1' // NOTE: Do not place your application dependencies here; they belong // in the individual module build.gradle files }}allprojects { repositories { jcenter() }}task clean(type: Delete) { delete rootProject.buildDir}其次,修改build.gradle(Module:XXX)
新建工程的build.gradle(Module:XXX)初始样子如下:
然后我们按照官方文档进行配置
在开头添加
apply plugin: 'com.jakewharton.butterknife'
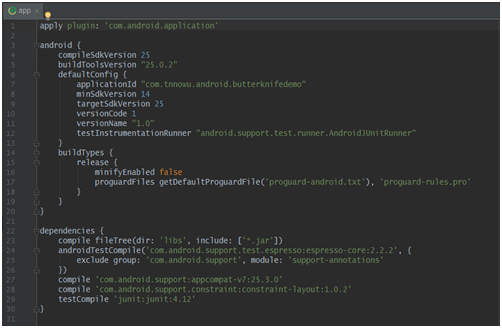
在dependencies {} 里面添加 compile 'com.jakewharton:butterknife:8.5.1'annotationProcessor 'com.jakewharton:butterknife-compiler:8.5.1'build.gradle(Module:XXX)完整代码即:
apply plugin: 'com.android.application'apply plugin: 'com.jakewharton.butterknife'android { compileSdkVersion 25 buildToolsVersion "25.0.2" defaultConfig { applicationId "com.tnnowu.android.butterknifedemo" minSdkVersion 14 targetSdkVersion 25 versionCode 1 versionName "1.0" testInstrumentationRunner "android.support.test.runner.AndroidJUnitRunner" } buildTypes { release { minifyEnabled false proguardFiles getDefaultProguardFile('proguard-android.txt'), 'proguard-rules.pro' } }}dependencies { compile fileTree(dir: 'libs', include: ['*.jar']) androidTestCompile('com.android.support.test.espresso:espresso-core:2.2.2', { exclude group: 'com.android.support', module: 'support-annotations' }) compile 'com.android.support:appcompat-v7:25.3.0' compile 'com.android.support.constraint:constraint-layout:1.0.2' testCompile 'junit:junit:4.12' compile 'com.jakewharton:butterknife:8.5.1' annotationProcessor 'com.jakewharton:butterknife-compiler:8.5.1'}至此,我们的Butter Knife就已经正确的配置到我们的工程里面了。
彩蛋:做过安卓项目的同学都知道,比如工程里面的get、set 方法,都是通过Generate快速编译的。(说到这里如果你没看懂的话,说明你的Android开发经验太少了,请自行百度查找)

又有同学问了,我在Github上面看到大神们用Butter Knife去编写代码,初始化的时候总是蒙圈。其实 Butter Knife的初衷就是简化代码,让程序员更有效率的开发。
这时候可以利用Android Studio里面的 Plugins来辅助我们开发。
File -> Settings -> Plguins
然后在右面的搜索框里面输入 ButterKnife,然后点击下面的 Search in repositories

就会出现下图的场景:
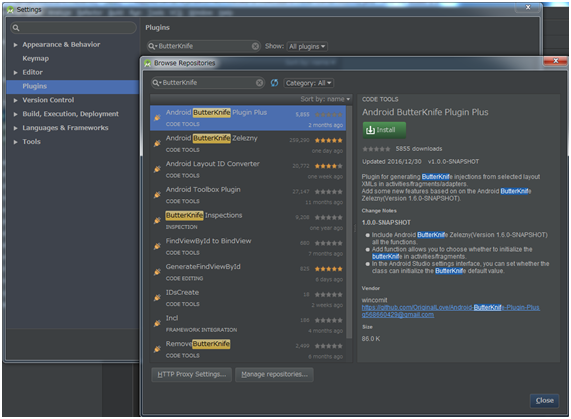
选择第一个 Android ButterKnife PPlugin Plus 然后点击 Install,重启Android Studio
重启之后,Butter Knife就可以很好的为我们效劳了。
那么Butter Knife如何使用呢?
首先,打开布局文件
Android Studio更新到2.3以后的布局文件初始是这样的

为了做演示,我们稍微修改一下,添加几个控件。
一个EditText,两个Button
<?xml version="1.0" encoding="utf-8"?><LinearLayout xmlns:android="http://schemas.android.com/apk/res/android" xmlns:tools="http://schemas.android.com/tools" android:layout_width="match_parent" android:layout_height="match_parent" android:orientation="vertical" tools:context="com.tnnowu.android.butterknifedemo.MainActivity"> <EditText android:id="@+id/edit_text" android:layout_width="match_parent" android:layout_height="50dp" /> <Button android:id="@+id/btn1" android:layout_width="match_parent" android:layout_height="50dp" /> <Button android:id="@+id/btn2" android:layout_width="match_parent" android:layout_height="50dp" /></LinearLayout>然后,我到Class类里面去用 Butter Knife绑定控件,代替 findViewById初始Class类文件如下:

在布局文件上面右键,选择Generate

然后选择 Generate Butterknife Injections

这里我们可以看到布局文件中的控件都出现在上面,可以额外选择点击事件OnClick
Confirm之后的场景如下:
package com.tnnowu.android.butterknifedemo;import android.os.Bundle;import android.support.v7.app.AppCompatActivity;import android.view.View;import android.widget.Button;import android.widget.EditText;import butterknife.BindView;import butterknife.ButterKnife;import butterknife.OnClick;public class MainActivity extends AppCompatActivity implements View.OnClickListener { @BindView(R.id.edit_text) EditText editText; @BindView(R.id.btn1) Button btn1; @BindView(R.id.btn2) Button btn2; @Override protected void onCreate(Bundle savedInstanceState) { super.onCreate(savedInstanceState); setContentView(R.layout.activity_main); ButterKnife.bind(this); } @OnClick({R.id.btn1, R.id.btn2}) public void onClick(View view) { switch (view.getId()) { case R.id.btn1: break; case R.id.btn2: break; } }}可以清晰的看到 Butter Knife 已经开始为我们效劳了。
(注意:ButterKnife.bind(this) 是一定要写在onCreate里面)
学会使用 BUffer Knife,可以让程序自动化帮忙减轻工作量!
原文来自:http://www.cnblogs.com/cnwutianhao/p/6610529.html
- Butter Knife使用详解
- butter knife详解和使用
- Butter Knife 配置及使用入门详解
- Butter Knife 配置及使用入门详解
- Butter Knife详解
- Butter Knife使用教程
- Butter Knife使用笔记
- 使用Butter Knife
- Butter Knife的使用
- Butter Knife 的使用
- Butter Knife的使用
- Butter Knife的使用
- Butter-Knife使用
- Butter Knife 详细使用
- Android Butter Knife使用
- Butter Knife使用
- Butter Knife简单使用教程
- butter knife框架的使用
- android fresco 详解大全
- 银联的跨行清算体系架构分析
- raise NoReverseMatch("%s is not a registered namespace" % key)
- 【数据分析】脑图讲述数据分析方法论
- 相机标定
- Butter Knife使用详解
- HTML5表单
- CRC校验原理与计算
- 企业内容管理-互联网应用
- openstack安装与配置
- 谈谈 HTTPS
- 实现盒子的垂直水平居中
- 在datagridview控件中添加“合计”和“平均值” 摘抄自书
- 起点