JUnit4框架代码解析
来源:互联网 发布:windows nt系统 编辑:程序博客网 时间:2024/06/05 14:14
JUnit4 已经在业界运用很长时间了。相对于 JUnit3 ,版本 4 做了很大量的改进。主要是针对使用 annotation使得用户有更多客户化的定制,为了提供更多更灵活的测试手段。早在版本3的时候JUnit就完美地符合了一个单元测试框架的3个要求:
- 每个单元测试必须独立于其他的单元测试
- 每个单元测试中产生的错误必须被记录下来
- 用户能够轻松指定要执行的单元测试
在版本4中间这些优良特性被保留,而且加入了更多的测试灵活性。
JUnit 的代码不算巨大,但其以高密度的设计模式和灵活性使大家对 JUnit 框架评价很高。作为 JUnit3 的后续版本它仍旧延续了高密度的设计模式的风格,而且代码更为精巧。利用 Eclipse 的插件CodePro Analytix来测量 JUnit4 的结果是:抽象类和接口的比例超过 22% ,平均每个方法的大小约为 5 行。
已经有很多文章描述如何使用 JUnit4 的新特性。此文不打算介绍这些新特性,只是分析和介绍 JUnit4 的设计框架,其版本为 4.8.2 。希望读者对JUnit至少有初步的理解,这样才能比较容易理解这篇文章。
JUnit4的输入输出:
作为一个程序,首先要知道它的输入和输出是什么。
1. 输入:JUnit4的输入是待测的类。这里需要说明的是这里的输入是类的Class对象,而非一个java对象。因为程序的入口是JUnitCore.runClasses(Class<?>…),也就是说参数是个Class对象,而非这个待测的类的实例。
2. 输出:测试的结果,包括成功和失败的case的原因,以及测试花费的时间等。
JUni4的总体结构:
总的来说可以分为2大步骤:
1. 首先对输入的Class利用org.junit.runners.model.RunnerBuilder进行分类解析,把它组织成JUnit4内部对象org.junit.runner.Runner。
2. 然后调Runner.run(RunNotifier)来执行testcase,测试过程中的事件由RunNotifier来处理。
组织Runner:
JUnit4使用了Builder模式来生成Runner。在这个过程里面,RunnerBuilder的子类扮演具体Builder角色。一种RunnerBuilder负责一种Runner的生成,而每个Runner代表一个待测类。
这个需要指出的是JUnit4利用AllDefaultPossibilitiesBuilder类作为Director的角色,它本身就是一个RunnerBuilder,它通过对不同的class的特征来分配对应的RunnerBuilder。
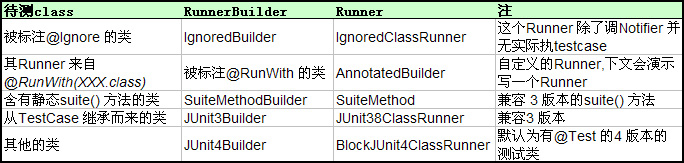
下面是不同特征的待测class和对应的RunnerBuilder,以及其生成的Runner的表:
JUnit4的输入输出:
作为一个程序,首先要知道它的输入和输出是什么。
1. 输入:JUnit4的输入是待测的类。这里需要说明的是这里的输入是类的Class对象,而非一个java对象。因为程序的入口是JUnitCore.runClasses(Class<?>…),也就是说参数是个Class对象,而非这个待测的类的实例。
2. 输出:测试的结果,包括成功和失败的case的原因,以及测试花费的时间等。
JUni4的总体结构:
总的来说可以分为2大步骤:
1. 首先对输入的Class利用org.junit.runners.model.RunnerBuilder进行分类解析,把它组织成JUnit4内部对象org.junit.runner.Runner。
2. 然后调Runner.run(RunNotifier)来执行testcase,测试过程中的事件由RunNotifier来处理。
组织Runner:
JUnit4使用了Builder模式来生成Runner。在这个过程里面,RunnerBuilder的子类扮演具体Builder角色。一种RunnerBuilder负责一种Runner的生成,而每个Runner代表一个待测类。
这个需要指出的是JUnit4利用AllDefaultPossibilitiesBuilder类作为Director的角色,它本身就是一个RunnerBuilder,它通过对不同的class的特征来分配对应的RunnerBuilder。
下面是不同特征的待测class和对应的RunnerBuilder,以及其生成的Runner的表:
Runner的继承结构:
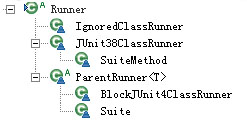
最后所有生成的Runner都被封装到org.junit.runners.Suite,Suite还是使用了Composite模式,它本身就是一个Runner,并且内部包含了Runner 集合。也就是说Suite里面可以嵌套Suite和其他的Runner。
需要特别说明的是AnnotatedBuilder,它是处理带有@RunWith的待测类,为其生成Runner。这提供了客户订制Runner的强大功能。有时你需要做一些特别的功能你就可以继承Runner,然后在待测类上标注@RunWith(MyRunner.class)。这个时候 AnnotatedBuilder会通过反射生成MyRunner的实例。你在定义自己的Runner的时候就可以对测试的行为“为所欲为”,这个真的很酷。
JUnit4还带了Categories,Enclosed和Parameterized这些Runner,它们都实现了很强大的功能。
说了这么多不如举个例子来说明,对于程序员来说有什么比用代码说明更清楚的:)
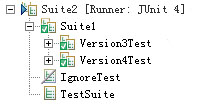
假设我们的待测类有JUnit3的类Version3Test, JUnit4的类Version4Test,Ignore的类IgnoreTest,以及含有静态suite()方法的类SuiteTest。我们把Version3Test和Version3Test放到Suite1。 然后为了展示递归结构把Suite1再放入Suite2,顺便把IgnoreTest和SuiteTest也放入Suite2。
代码如下:
- public class Version3Test extends TestCase{
- public void testIn3X(){}
- }
- public class Version4Test {
- @Test public void testIn4X(){}
- }
- @RunWith(Suite.class)
- @Suite.SuiteClasses({
- Version3Test.class, Version4Test.class
- })
- public class Suite1 {}
- @Ignore
- public class IgnoreTest {
- public void testInIgnore(){}
- }
- public class SuiteTest {
- public static Test suite(){ return new TestSuite(); }
- }
- @RunWith(Suite.class)
- @Suite.SuiteClasses({//Put all together
- Suite1.class, IgnoreTest.class, SuiteTest.class
- }) public class Suite2 {}
如果是在Eclipse下面运行Suite2,你就可以看到这样的结构:
各种Runner的说明:
- JUnit38ClassRunner:它的run方法其实就是把3版本的运行机制搬到4版本。你可以在代码里面看到Test.run(TestResult)这样的代码。
- SuiteMethod:它继承于JUnit38ClassRunner。这也是个巧妙的设计:SuiteMethod会在构造方法里面利用反射执行静态suite()方法。suite()方法的返回值就是Test对象,这样就把问题变为版本3的测试问题。
- IgnoredClassRunner:这几乎不用说了。既然希望忽略的测试,那么这个Runner的run就是没有执行测试内容。
- Suite:它是Composite结构的根,它包含了所有子Runner的集合。
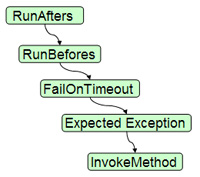
- BlockJUnit4ClassRunner:这是全新的设计。对于提供了丰富订制化的测试来说,原先junit.framework.TestCase.runBare()方法里面的Template模式已经完全不够用了。因此在BlockJUnit4ClassRunner里面引入了Statement类的概念,实际上这是个Decorator模式。Statement里面只有一个方法evaluate()。一个方法evaluate()代表一个操作:譬如@Before是一个Statement,@BeforeClass也是一个Statement,@Test里面定义的expected和timeout都是Statement。当然被测试的方法本身也是一个Statement。一个典型的带有@Before,@After以及@Test(expected=Exception.class, timeout=X)的 测试方法最终组成的Statement装饰链表结构就是:RunAfters -> RunBefores -> FailOnTimeout -> ExpectedException -> InvokeMethod。
自己写一个Runner:
接下来做点好玩的东西:自己写一个Runner。在正常情况下,testcase的测试方法的执行顺序就是定义测试方法的顺序。现在我们自己写一个按照测试方法名字升序执行的Runner。在BlockJUnit4ClassRunner 里面它其实会支持dummy的sort功能,如果我们重新实现这个sort就可以很便捷地自定义排序行为。虽然这有悖单元测试互相独立的原则,for fun:)
- /**
- * The Runner provides sort functionality by lexicographic test method name.
- *
- * @author 卢声远<michaellufhl@yahoo.com.cn>
- */
- public class SortRunner extends BlockJUnit4ClassRunner {
- /**
- * Create a Sorter.
- * @param klass
- * @throws InitializationError
- */
- public SortRunner(Class<?> klass) throws InitializationError {
- super(klass);
- Sorter sorter = new Sorter(new Comparator<Description>() {
- public int compare(Description o1, Description o2) {
- return o1.getMethodName().compareTo(o2.getMethodName());
- }});
- sort(sorter);
- }
- }
- @RunWith(SortRunner.class)
- public class Version4Test {
- @Test public void c(){}
- @Test public void a(){}
- @Test public void b(){}
- }
当执行结束后,你会发现执行顺序是a->b->c,而不是默认的c->b->a。
关于@Rule:
为了增强订制行为的高灵活度,JUnit4提供了@Rule机制。Rule变量必须实现org.junit.rules.MethodRule接口,用户可以通过自定义@Rule来做些类似Interceptor的操作。而且JUnit4同时支持多个MethodRule。MethodRule接口只有一个方法Statement apply(Statement base, FrameworkMethod method, Object target)。参数base就是已经生成的Statement,通过apply方法用户可以修饰已有的Statement base。@Rule机制是如此强大以至于JUnit4已经打算在后续版本把ExpectingException,timeout,Before和After的特性用Rule机制来实现。
下面继续做点有趣的事情:定义一个可以订制执行次数的Rule:
- @Retention(RetentionPolicy.RUNTIME)
- @interface RunCount {
- int count() default 1;
- }
- /**
- * Define a repeatable Rule.
- * The repeat times is defined in annotation RunCount(count=X).
- *
- * @author 卢声远<michaellufhl@yahoo.com.cn>
- */
- class RepeatRule implements MethodRule {
- public final Statement apply(final Statement base,
- final FrameworkMethod method, Object target) {
- return new Statement() {
- @Override
- public void evaluate() throws Throwable {
- int count =1;//Default
- RunCount rCount= method.getAnnotation(RunCount.class) ;
- if (rCount != null)
- count=rCount.count();
- while(count–>0){
- base.evaluate();
- }
- }
- };
- }
- }
- public class RepeatTest {
- @Rule
- public RepeatRule rule = new RepeatRule();
- @Test
- @RunCount(count=2)//Run twice
- public void testIt(){}
- }
你可以看到testIt()执行了2次,而且参数Statement base其实已经是包含了@Before和@After等修饰的Statement。
最后:
JUnit4的结构相比3版本变化是巨大的。代码非常精致,但同时代码也相当复杂,充满callback机制和大量的内部类。还有些比较cool的特性的代码在包org.junit.experimental下面。譬如里面有各种各样特性的Runner,有兴趣大家可以看一下。源代码可以到:https://github.com/downloads/KentBeck/junit/junit-4.8.2.jar下载。
参考资料:
- JUnit A Cook’s Tour
- JUnit 4 in 60 Seconds
- JUnit in Action: Vincent Massol, Ted Husted
作者:卢声远<michaellufhl@yahoo.com.cn>
阅读全文
0 0
- JUnit4框架代码解析
- JUnit4框架代码解析
- jQuery框架代码解析
- junit4测试框架
- Junit4 框架学习
- JUnit4测试框架
- Junit4框架简介
- java 单元测试框架-JUnit4
- Java单元测试框架-JUnit4
- JUnit4 单元测试框架
- Java JUnit4测试框架
- JUnit4单元测试框架使用
- java测试框架-junit4
- Junit4精简解析
- JUnit4测试代码示例
- Karto_slam框架与代码解析
- framebuffer驱动框架代码解析
- Spring测试框架JUnit4.4
- 大学毕业后参加工作的这段日子过得简单的像泡面一样
- Fiddler抓取手机上的网络数据包
- DOM(文档对象模型)学习笔记(二)
- ssdh
- ubuntu 下 MySQL 基本操作
- JUnit4框架代码解析
- 【Lucene】Lucene和Oracle数据库的对比
- 高级软件工程(C编码实践篇)学习心得
- 软件工程学习总结
- HashMap 里数组下标如何确定?
- M3U文件制作与视频播放器播放M3U
- 操作系统知识点整理
- Linux中部分工具学习
- Leetcode | Partition to K Equal Sum Subsets